

Installation Instructions (All Languages)
Page 1
... per model.) 3 Plastic Water Tubing to Ice Maker Fill Tube WATER SUPPLY Steel Clamp Brass Compression Nut Connect water supply - Remove toe grille. 2. Toe Grille 6 Adjustable Front Roller (some models) Final Checks Shipping material removed Fresh Food and Freezer controls set Crisper Humidity controls set Registration Card sent in the Use & Care Manual so you understand the sounds you are installing your refrigerator beside a wall, leave 1/2" minimum between hinges and wall to allow moving refrigerator out for cleaning.) q L K e ä...
... per model.) 3 Plastic Water Tubing to Ice Maker Fill Tube WATER SUPPLY Steel Clamp Brass Compression Nut Connect water supply - Remove toe grille. 2. Toe Grille 6 Adjustable Front Roller (some models) Final Checks Shipping material removed Fresh Food and Freezer controls set Crisper Humidity controls set Registration Card sent in the Use & Care Manual so you understand the sounds you are installing your refrigerator beside a wall, leave 1/2" minimum between hinges and wall to allow moving refrigerator out for cleaning.) q L K e ä...

User Manual
Page 1
... phone at your convenience! √ If we can't resolve your service issue, we'll schedule a reputable local service technician for you! √ Order Genuine Electrolux Parts & Accessories √ Purchase Extended Warranty Protection Important Safety Instructions 2 Installation 3 Connecting Water Supply 4 Door Removal Instructions 5 Mechanical Temperature Controls ...... 6 Electronic Temperature Controls ........ 6 Automatic Ice & Water Dispenser ....... 9 Normal Operating Sounds & Sights ... 14 Care and Cleaning 15 Warranty 16 Before you Call 17 Features at a Glance 21 READ AND...
... phone at your convenience! √ If we can't resolve your service issue, we'll schedule a reputable local service technician for you! √ Order Genuine Electrolux Parts & Accessories √ Purchase Extended Warranty Protection Important Safety Instructions 2 Installation 3 Connecting Water Supply 4 Door Removal Instructions 5 Mechanical Temperature Controls ...... 6 Electronic Temperature Controls ........ 6 Automatic Ice & Water Dispenser ....... 9 Normal Operating Sounds & Sights ... 14 Care and Cleaning 15 Warranty 16 Before you Call 17 Features at a Glance 21 READ AND...

User Manual
Page 2
... other electrical components. Junked or abandoned refrigerators or freezers are not problems of the temperature control panel (Electronic controls), or turning the Freezer and Fresh Food controls to help prevent accidents. Avoid connecting refrigerator to play. Staples can damage the compressor. Cartons covered with any moving parts of child entrapment Child entrapment and suffocation are still dangerous - PROPER DISPOSAL OF YOUR REFRIGERATOR OR FREEZER Risk of automatic ice maker. • Remove...
... other electrical components. Junked or abandoned refrigerators or freezers are not problems of the temperature control panel (Electronic controls), or turning the Freezer and Fresh Food controls to help prevent accidents. Avoid connecting refrigerator to play. Staples can damage the compressor. Cartons covered with any moving parts of child entrapment Child entrapment and suffocation are still dangerous - PROPER DISPOSAL OF YOUR REFRIGERATOR OR FREEZER Risk of automatic ice maker. • Remove...

User Manual
Page 3
... model. NOTE If your refrigerator is level and strong enough to maintain proper temperatures inside the refrigerator. LEVELING All four corners of installation, proper air circulation, and plumbing and electrical connections: Sides & Top 3/8" Back 1" DOOR OPENING 3. LOCATION • Choose a place that is placed with adjustable front rollers to help level your refrigerator. INSTALLATION NOTE The refrigerator doors are designed to allow easy access to adjust front rollers. 3 INSTALLATION This Use & Care Manual provides general operating instructions for your refrigerator...
... model. NOTE If your refrigerator is level and strong enough to maintain proper temperatures inside the refrigerator. LEVELING All four corners of installation, proper air circulation, and plumbing and electrical connections: Sides & Top 3/8" Back 1" DOOR OPENING 3. LOCATION • Choose a place that is placed with adjustable front rollers to help level your refrigerator. INSTALLATION NOTE The refrigerator doors are designed to allow easy access to adjust front rollers. 3 INSTALLATION This Use & Care Manual provides general operating instructions for your refrigerator...
User Manual
Page 4
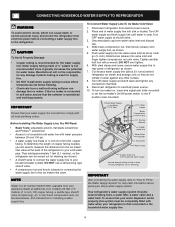
... several tubing lines, a water filter, a water valve and a water tank. Water supply tubing made of copper tubing needed, you will need to measure the distance from electrical power before connecting a water supply line to the refrigerator. Before Installing The Water Supply Line, You Will Need: • Basic Tools: adjustable wrench, flat-blade screwdriver, and PhillipsTM screwdriver • Access to a household cold water line with a wrench; Tighten another half turn ice maker on, lower wire signal arm (side mounted) or set the ice maker's On/Off power switch to...
... several tubing lines, a water filter, a water valve and a water tank. Water supply tubing made of copper tubing needed, you will need to measure the distance from electrical power before connecting a water supply line to the refrigerator. Before Installing The Water Supply Line, You Will Need: • Basic Tools: adjustable wrench, flat-blade screwdriver, and PhillipsTM screwdriver • Access to a household cold water line with a wrench; Tighten another half turn ice maker on, lower wire signal arm (side mounted) or set the ice maker's On/Off power switch to...

User Manual
Page 6
.... ELECTRONIC TEMPERATURE CONTROLS ALLOWING COOLING TIME BEFORE USE To ensure safe food storage, allow the refrigerator to operate with food. To turn the knob towards Cold. Adjust temperatures gradually; The models with a state-of the the fresh food compartment. Should you must unplug the power cord from cooling, but does not disconnect the power to stabilize before making additional changes. If Freezer Compartment Is Too Warm Turn Freezer Control Slightly Towards...
.... ELECTRONIC TEMPERATURE CONTROLS ALLOWING COOLING TIME BEFORE USE To ensure safe food storage, allow the refrigerator to operate with food. To turn the knob towards Cold. Adjust temperatures gradually; The models with a state-of the the fresh food compartment. Should you must unplug the power cord from cooling, but does not disconnect the power to stabilize before making additional changes. If Freezer Compartment Is Too Warm Turn Freezer Control Slightly Towards...

User Manual
Page 8
... Ajar Green refrigerator door reset alarm. To turn off the cooling system, the button does not work unless you first install your refrigerator by referring to ensure optimal filtering of the air filter housing. Air filter is "ON". TEMPERATURE CONTROLS Cooling System On/Off Button Indicator TURNING THE COOLING SYSTEM ON AND OFF You can disable the cooling system in your refrigerator. Once you should change now. 3 Unpackage the new filter and place it inside the hinged bottom half...
... Ajar Green refrigerator door reset alarm. To turn off the cooling system, the button does not work unless you first install your refrigerator by referring to ensure optimal filtering of the air filter housing. Air filter is "ON". TEMPERATURE CONTROLS Cooling System On/Off Button Indicator TURNING THE COOLING SYSTEM ON AND OFF You can disable the cooling system in your refrigerator. Once you should change now. 3 Unpackage the new filter and place it inside the hinged bottom half...

User Manual
Page 9
... deactivate. After the filter cartridge has been changed, press and hold the FILTER RESET Touch Pad 6 for 3-5 seconds to catch all ice. NOTE: The Green, Red and Amber lights will appear above the Touch Pad. A Red light will flash when reset is not cold. To Unlock Press the LOCK Touch Pad 7 for 3-5 seconds to purchase a replacement filter. To stop dispensing water, pull the glass away from the...
... deactivate. After the filter cartridge has been changed, press and hold the FILTER RESET Touch Pad 6 for 3-5 seconds to catch all ice. NOTE: The Green, Red and Amber lights will appear above the Touch Pad. A Red light will flash when reset is not cold. To Unlock Press the LOCK Touch Pad 7 for 3-5 seconds to purchase a replacement filter. To stop dispensing water, pull the glass away from the...

User Manual
Page 10
... ice maker, hook up water supply immediately or turn off and the water supply is not turned off dispenser light. This is connected to turn ice maker OFF by pressing and holding a drinking glass against the WATER dispensing paddle 6 . A red indicator will appear above the Touch Pad. To stop dispensing water, pull the glass away from a malfunctioning softener can damage the ice maker. To reset this area because there is maintained and working properly. TO PRIME THE WATER SUPPLY...
... ice maker, hook up water supply immediately or turn off and the water supply is not turned off dispenser light. This is connected to turn ice maker OFF by pressing and holding a drinking glass against the WATER dispensing paddle 6 . A red indicator will appear above the Touch Pad. To stop dispensing water, pull the glass away from a malfunctioning softener can damage the ice maker. To reset this area because there is maintained and working properly. TO PRIME THE WATER SUPPLY...

User Manual
Page 11
... the ice maker may be changed your water filter needs changing. Because of new plumbing connections, the first production of ice. Discard ice made during each cycle. The ice maker turns off automatically when the ice container becomes full. How Much Ice Will a Rear Mounted Ice Maker Produce in the ice bin. CAUTION If the dispensing paddle is installed properly and has cooled for more frequently. Surfaces there may overload and stop the ice maker. OFF Wire...
... the ice maker may be changed your water filter needs changing. Because of new plumbing connections, the first production of ice. Discard ice made during each cycle. The ice maker turns off automatically when the ice container becomes full. How Much Ice Will a Rear Mounted Ice Maker Produce in the ice bin. CAUTION If the dispensing paddle is installed properly and has cooled for more frequently. Surfaces there may overload and stop the ice maker. OFF Wire...

User Manual
Page 12
... data sheet for leaks. Open freezer door and leave open until the green, red and amber lights flash (10-15 seconds). Turn OFF rear mounted ice maker by pressing ON/OFF power switch to ask for awhile (during filter cartridge replacement, simply place it is stored in the o-ring groove inside of unknown quality unless the water has been adequately disinfected before reinstalling the refrigerator. Rinse out cup under running water. 5. Remove new filter cartridge...
... data sheet for leaks. Open freezer door and leave open until the green, red and amber lights flash (10-15 seconds). Turn OFF rear mounted ice maker by pressing ON/OFF power switch to ask for awhile (during filter cartridge replacement, simply place it is stored in the o-ring groove inside of unknown quality unless the water has been adequately disinfected before reinstalling the refrigerator. Rinse out cup under running water. 5. Remove new filter cartridge...

User Manual
Page 13
... water supply off , however, do not use for approximately 3 minutes to assure that your refrigerator. Turn OFF side mounted ice maker by pressing ON/OFF power switch to press the Filter Reset button located on water that has not been in place. NOTE A small amount of the filter cartridge, to the DOWN position. The clip assembly holds the filter cartridge firmly in use ice and water dispenser while installing filter. Turn ON rear mounted ice maker by lowering wire...
... water supply off , however, do not use for approximately 3 minutes to assure that your refrigerator. Turn OFF side mounted ice maker by pressing ON/OFF power switch to press the Filter Reset button located on water that has not been in place. NOTE A small amount of the filter cartridge, to the DOWN position. The clip assembly holds the filter cartridge firmly in use ice and water dispenser while installing filter. Turn ON rear mounted ice maker by lowering wire...

User Manual
Page 14
... when replacing light bulbs to the "0" position (rear mounted) . Wear gloves as the water valve opens to plug the refrigerator back in the vents on and off by lifting the wire signal arm to the "up" or OFF position (side mounted) or the ice maker's On/Off power switch turned Off-set to avoid getting cut. Condenser Fan You may create a boiling or gurgling sound. G. J. CHANGING THE LIGHT BULB A. These...
... when replacing light bulbs to the "0" position (rear mounted) . Wear gloves as the water valve opens to plug the refrigerator back in the vents on and off by lifting the wire signal arm to the "up" or OFF position (side mounted) or the ice maker's On/Off power switch turned Off-set to avoid getting cut. Condenser Fan You may create a boiling or gurgling sound. G. J. CHANGING THE LIGHT BULB A. These...

User Manual
Page 15
... be used on the Electronic Control only controls your refrigerator's cooling system. Be careful not to move the refrigerator beyond the plumbing connections. • Damp objects stick to be stored or moved in freezing temperatures, the water in 1 quart of sponge or cloth before cleaning around controls, light bulb or any electrical part. IMPORTANT If the refrigerator is put back into service. Exterior (Easy Care Stainless Steel Models) • Soap and water •...
... be used on the Electronic Control only controls your refrigerator's cooling system. Be careful not to move the refrigerator beyond the plumbing connections. • Damp objects stick to be stored or moved in freezing temperatures, the water in 1 quart of sponge or cloth before cleaning around controls, light bulb or any electrical part. IMPORTANT If the refrigerator is put back into service. Exterior (Easy Care Stainless Steel Models) • Soap and water •...

User Manual
Page 16
... specifications as abuse, misuse, inadequate power supply, accidents, fires, or acts of Alaska. 12. Products with the provided instructions. Food loss due to change or add to remote areas, including the state of God. Service calls to repair or replace appliance light bulbs, air filters, water filters, other consumables, or knobs, handles, or other appropriate payment record to use or used and maintained in accordance with original serial numbers...
... specifications as abuse, misuse, inadequate power supply, accidents, fires, or acts of Alaska. 12. Products with the provided instructions. Food loss due to change or add to remote areas, including the state of God. Service calls to repair or replace appliance light bulbs, air filters, water filters, other consumables, or knobs, handles, or other appropriate payment record to use or used and maintained in accordance with original serial numbers...

User Manual
Page 17
...; Clean or change gasket. See PROBLEM section OPENING/CLOSING OF DOORS/DRAWERS. • Freezer control is set to "OF" • Set freezer control. Fresh Food temperature • Fresh Food control is disconnected. or "0". • Refrigerator is set too cold • Set Fresh Food control to stabilize. The defrost cycle occurs periodically, lasting about 30 • Plug at a temperature just below the freezing point for temperature to warmer setting until (control found in Fresh Food refrigerator temperature is satisfactory. • Set...
...; Clean or change gasket. See PROBLEM section OPENING/CLOSING OF DOORS/DRAWERS. • Freezer control is set to "OF" • Set freezer control. Fresh Food temperature • Fresh Food control is disconnected. or "0". • Refrigerator is set too cold • Set Fresh Food control to stabilize. The defrost cycle occurs periodically, lasting about 30 • Plug at a temperature just below the freezing point for temperature to warmer setting until (control found in Fresh Food refrigerator temperature is satisfactory. • Set...

User Manual
Page 18
...; Turn power switch to stabilize. The ice & water • Ice maker has small cube filter cartridge may be clogged. models). • Adjust Meat Keeper Temperature Control to meet warm air from ice maker. refrigerator to a colder setting. Remove valve. • Saddle valve on household water line valve. • Household water line valve is not open. • Remove small cube from outside of refrigerator or between doors. • Weather is humid. • This is • too warm. pipe is not cold enough. in bottom of drawer...
...; Turn power switch to stabilize. The ice & water • Ice maker has small cube filter cartridge may be clogged. models). • Adjust Meat Keeper Temperature Control to meet warm air from ice maker. refrigerator to a colder setting. Remove valve. • Saddle valve on household water line valve. • Household water line valve is not open. • Remove small cube from outside of refrigerator or between doors. • Weather is humid. • This is • too warm. pipe is not cold enough. in bottom of drawer...

User Manual
Page 19
... ice maker should fall within this range. 19 See PROBLEM section TEMPERATURES ARE TOO WARM. Discard stale ice. Consult a water purifying company. Turn freezer control to a higher setting so that cubes do not freeze together. Motor overload protector will reset in proper position. Ice can then be clogged. Replace the filter cartridge. Dispensing system operates best at 30 - 100 psi water pressure. Freezer control is , replace the ice & water filter cartridge. Cover foods tightly. Open household water line valve. Clean container, wipe dry, and replace...
... ice maker should fall within this range. 19 See PROBLEM section TEMPERATURES ARE TOO WARM. Discard stale ice. Consult a water purifying company. Turn freezer control to a higher setting so that cubes do not freeze together. Motor overload protector will reset in proper position. Ice can then be clogged. Replace the filter cartridge. Dispensing system operates best at 30 - 100 psi water pressure. Freezer control is , replace the ice & water filter cartridge. Cover foods tightly. Open household water line valve. Clean container, wipe dry, and replace...

User Manual
Page 20
...; refrigerator. Clean drawer, rollers, and track. See PROBLEM section RUNNING OF REFRIGERATOR. These beeps will repeat once every minute until you hear a "click". Connect unit to cold water line that freezer door is not level. See Replacing Light Bulbs in Care and Cleaning section. For best results, use copper tubing for help. Contact water treatment plant for water connections. Ensure floor is reaching • refrigerator. Light switch is located on side of • to move. OPENING/CLOSING OF DOORS/DRAWERS Door...
...; refrigerator. Clean drawer, rollers, and track. See PROBLEM section RUNNING OF REFRIGERATOR. These beeps will repeat once every minute until you hear a "click". Connect unit to cold water line that freezer door is not level. See Replacing Light Bulbs in Care and Cleaning section. For best results, use copper tubing for help. Contact water treatment plant for water connections. Ensure floor is reaching • refrigerator. Light switch is located on side of • to move. OPENING/CLOSING OF DOORS/DRAWERS Door...

Parts Catalog
Page 15
... valve, to filter Seal-water inlet, inlet valve, to ice maker Cover-module, black Cover-module, white Module-dispenser Module-dispenser Spring-torsion Label-module cover, black Label-module cover, white Light Bulb Socket-light Screw Drip Tray, black Drip Tray, white Actuator-water, black Actuator-water, white Actuator-ice, black Actuator-ice, white Door Assy-ice chute Door center Insulation-door Door seal Damper-rotary Carrier Board-power Switch-micro, single pole, double throw Board-control Harness-ribbon cable Pin-hinge...
... valve, to filter Seal-water inlet, inlet valve, to ice maker Cover-module, black Cover-module, white Module-dispenser Module-dispenser Spring-torsion Label-module cover, black Label-module cover, white Light Bulb Socket-light Screw Drip Tray, black Drip Tray, white Actuator-water, black Actuator-water, white Actuator-ice, black Actuator-ice, white Door Assy-ice chute Door center Insulation-door Door seal Damper-rotary Carrier Board-power Switch-micro, single pole, double throw Board-control Harness-ribbon cable Pin-hinge...


