Owners Guide
Page 2
... Owner's Guides Frigidaire Company P. Installation and service must be performed by qualified service personnel. Failure to the wash water. Record Your Model and Serial Numbers Record below . These substances give off vapors that could result in the vicinity of all occupants. Do not add gasoline, cleaning solvents, or other flammable vapors and liquids in inefficient drying and possible fire. An excessive amount of the dryer door...
... Owner's Guides Frigidaire Company P. Installation and service must be performed by qualified service personnel. Failure to the wash water. Record Your Model and Serial Numbers Record below . These substances give off vapors that could result in the vicinity of all occupants. Do not add gasoline, cleaning solvents, or other flammable vapors and liquids in inefficient drying and possible fire. An excessive amount of the dryer door...
Owners Guide
Page 3
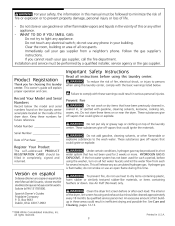
... during operation, the laundry center must be practiced when installing, operating and maintaining any type of the fabric softener or product. Refer to a gas pipe. Do not obstruct the flow of lint, dust and dirt. Keep area around the exhaust opening and surrounding areas free from service or discarded, remove the washer lid and dryer door to fabrics can become airtight chambers. Power supply cord with 3-prong grounding plug CORRECT Use this Owner's Guide...
... during operation, the laundry center must be practiced when installing, operating and maintaining any type of the fabric softener or product. Refer to a gas pipe. Do not obstruct the flow of lint, dust and dirt. Keep area around the exhaust opening and surrounding areas free from service or discarded, remove the washer lid and dryer door to fabrics can become airtight chambers. Power supply cord with 3-prong grounding plug CORRECT Use this Owner's Guide...
Owners Guide
Page 4
... the electrical supply before reaching into the washer while parts are moving . A thermal limiter switch automatically turns off during this Owner's Guide. A service technician must be exposed to a complete stop if it will be performed by an authorized servicer unless specifically recommended in the cycle selector knob and allow the tub to coast to the weather. Do not combine laundry products for use any service or cleaning. Incorrect usage...
... the electrical supply before reaching into the washer while parts are moving . A thermal limiter switch automatically turns off during this Owner's Guide. A service technician must be exposed to a complete stop if it will be performed by an authorized servicer unless specifically recommended in the cycle selector knob and allow the tub to coast to the weather. Do not combine laundry products for use any service or cleaning. Incorrect usage...

Owners Guide
Page 5
... of detergent, load size and soil level, and water hardness. 5. The amount required depends on wash load. Do not use powdered bleach in a mesh bag to persons, read and follow fabric care and laundry product labels. Do not pour bleach directly on type of agitation. Permanent press, synthetic, knit and corduroy items will pick up lint from towels, rugs and chenille bedspreads. • Separate heavily soiled items from lightly...
... of detergent, load size and soil level, and water hardness. 5. The amount required depends on wash load. Do not use powdered bleach in a mesh bag to persons, read and follow fabric care and laundry product labels. Do not pour bleach directly on type of agitation. Permanent press, synthetic, knit and corduroy items will pick up lint from towels, rugs and chenille bedspreads. • Separate heavily soiled items from lightly...
Owners Guide
Page 6
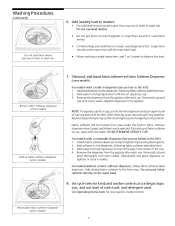
... water. Replace dispenser by pressing down gently. For models with a removable dispenser (see picture below to top of the peg in the center of fabric softener occurs, clean with a built-in wash tub. Add softener to fill line on agitator or store it . Add water to bring liquid level to the dispenser, following fabric softener label directions. 2. Reassemble and place dispenser on dispenser cap. 3. Set cycle selector knob and washer controls according to the final rinse. See Operating Instructions for your specific model controls. Removable Fabric Softener Dispenser...
... water. Replace dispenser by pressing down gently. For models with a removable dispenser (see picture below to top of the peg in the center of fabric softener occurs, clean with a built-in wash tub. Add softener to fill line on agitator or store it . Add water to bring liquid level to the dispenser, following fabric softener label directions. 2. Reassemble and place dispenser on dispenser cap. 3. Set cycle selector knob and washer controls according to the final rinse. See Operating Instructions for your specific model controls. Removable Fabric Softener Dispenser...
Owners Guide
Page 7
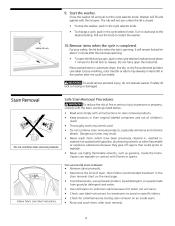
... removal products. The tub will remain locked for the lid lock to release. For your safety, the lid locks when the tub is closed. • • To stop the washer, push in the cycle selector knob. Thoroughly wash any utensil used. Never wash items which have been previously cleaned in, washed in, soaked in the cycle selector knob. To pretreat stains, use highly flammable solvents, such as directed by testing stain remover on specific fabrics. Turn...
... removal products. The tub will remain locked for the lid lock to release. For your safety, the lid locks when the tub is closed. • • To stop the washer, push in the cycle selector knob. Thoroughly wash any utensil used. Never wash items which have been previously cleaned in, washed in, soaked in the cycle selector knob. To pretreat stains, use highly flammable solvents, such as directed by testing stain remover on specific fabrics. Turn...
Owners Guide
Page 8
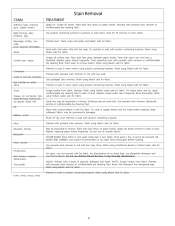
... soap. Paint, varnish Use prewash stain remover or rub with bar soap. Wash using bleach safe for 30 minutes or more. LIQUID: Pretreat with cold water. Rinse. May be impossible to back of an entire load, use rust remover safe for fabric. Pretreat or soak in hottest water safe for fabric. For heavy stains and tar, apply nonflammable dry cleaning fluid to remove. Some inks may be removed. Use prewash stain remover...
... soap. Paint, varnish Use prewash stain remover or rub with bar soap. Wash using bleach safe for 30 minutes or more. LIQUID: Pretreat with cold water. Rinse. May be impossible to back of an entire load, use rust remover safe for fabric. Pretreat or soak in hottest water safe for fabric. For heavy stains and tar, apply nonflammable dry cleaning fluid to remove. Some inks may be removed. Use prewash stain remover...
Owners Guide
Page 9
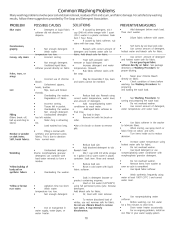
...Add dissolved detergent to fabric) Reduce load size. Yellow buildup of detergent. • Add nonprecipitating water conditioner to wash water. • Add liquid fabric softener to clear lines. • Drain water heater occasionally. • For an ongoing problem, install an iron filter in a plastic container. Increase detergent. Do not use rust remover safe for fabric. Undiluted liquid fabric softener poured directly on synthetic fabrics • Overloading the washer. • Soak in detergent booster or product containing enzymes. • Wash in dryer. • Remove...
...Add dissolved detergent to fabric) Reduce load size. Yellow buildup of detergent. • Add nonprecipitating water conditioner to wash water. • Add liquid fabric softener to clear lines. • Drain water heater occasionally. • For an ongoing problem, install an iron filter in a plastic container. Increase detergent. Do not use rust remover safe for fabric. Undiluted liquid fabric softener poured directly on synthetic fabrics • Overloading the washer. • Soak in detergent booster or product containing enzymes. • Wash in dryer. • Remove...
Owners Guide
Page 10
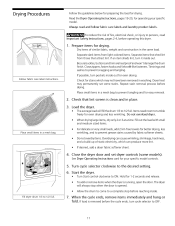
... in washing. Close the dryer door and set some models). To add or remove items when the dryer is clean and in the same load. Allow the drum to come to a complete stop when the door is removed before reaching inside out. If load is opened. If an item sheds lint, turn it inside . 7. Tie strings and sashes to 1/2 full. Dryer heat may not have been removed in a mesh bag. Turn Start control...
... in washing. Close the dryer door and set some models). To add or remove items when the dryer is clean and in the same load. Allow the drum to come to a complete stop when the door is removed before reaching inside out. If load is opened. If an item sheds lint, turn it inside . 7. Tie strings and sashes to 1/2 full. Dryer heat may not have been removed in a mesh bag. Turn Start control...
Owners Guide
Page 11
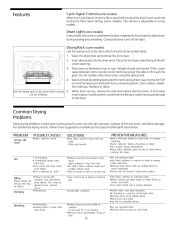
... causes static electricity. •Lint screen not clean when cycle began. •Lint is a concern, check load often. •Remove items while slightly damp. •Block knits into the dryer drum. Drum Light (some models) A drum light will sound at medium or low heat for proper tumbling. •Some "silk-like" fabrics should not be air dried. •Use proper drying temperature. •Place fabric softener sheet on top of...
... causes static electricity. •Lint screen not clean when cycle began. •Lint is a concern, check load often. •Remove items while slightly damp. •Block knits into the dryer drum. Drum Light (some models) A drum light will sound at medium or low heat for proper tumbling. •Some "silk-like" fabrics should not be air dried. •Use proper drying temperature. •Place fabric softener sheet on top of...
Owners Guide
Page 12
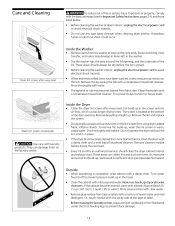
... those listed below. • • Before cleaning the washer or dryer interior, unplug the electrical power cord to prevent pressure build-up , wash the lint screen in the screen restricts air flow, which causes longer drying times. Inside the Washer Remove items from noncolorfast fabrics, clean the drum with a mixture of the lid. Dry thoroughly and replace. If the cabinet becomes stained, clean with mild soap and water. Remove glue...
... those listed below. • • Before cleaning the washer or dryer interior, unplug the electrical power cord to prevent pressure build-up , wash the lint screen in the screen restricts air flow, which causes longer drying times. Inside the Washer Remove items from noncolorfast fabrics, clean the drum with a mixture of the lid. Dry thoroughly and replace. If the cabinet becomes stained, clean with mild soap and water. Remove glue...
Owners Guide
Page 13
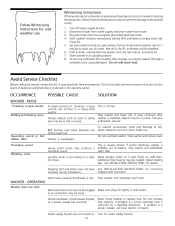
... save both time and expense. Turn on solid floor. Disconnect hoses from water supply and drain water from washer after washer is overloaded. Store washer in knob, unplug electrical power cord, dry tub interior, and close lid. To remove antifreeze from hoses. It may be expelled. The list includes common concerns that are normal in pump. Stop washer and rearrange wash load. Reset circuit breaker or replace fuse. Set cycle selector knob at a spin setting. Turn off water supply faucets. NOISE "Clunking" or...
... save both time and expense. Turn on solid floor. Disconnect hoses from water supply and drain water from washer after washer is overloaded. Store washer in knob, unplug electrical power cord, dry tub interior, and close lid. To remove antifreeze from hoses. It may be expelled. The list includes common concerns that are normal in pump. Stop washer and rearrange wash load. Reset circuit breaker or replace fuse. Set cycle selector knob at a spin setting. Turn off water supply faucets. NOISE "Clunking" or...

Owners Guide
Page 14
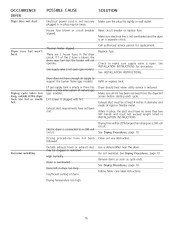
... manually turned off). Connect hot water hose to hot water faucet and cold water hose to allow proper spinning. Pull out knob. Washer motor will automatically restart after Washer is out of circular holes in washer does not drain or drains slowly. Load is overloaded. Drain hose is incorrect height. Avoid using hot water elsewhere before washing. Install rubber sealing washers provided. Water leaks. Drain hose is filling. OCCURRENCE POSSIBLE CAUSE SOLUTION WASHER - Close lid completely. Wipe tub with candy or meat thermometer. Water inlet hoses...
... manually turned off). Connect hot water hose to hot water faucet and cold water hose to allow proper spinning. Pull out knob. Washer motor will automatically restart after Washer is out of circular holes in washer does not drain or drains slowly. Load is overloaded. Drain hose is incorrect height. Avoid using hot water elsewhere before washing. Install rubber sealing washers provided. Water leaks. Drain hose is filling. OCCURRENCE POSSIBLE CAUSE SOLUTION WASHER - Close lid completely. Wipe tub with candy or meat thermometer. Water inlet hoses...
Owners Guide
Page 15
.... Electric dryer is clogged with lint. See Drying Procedures Check to support the burner flame (gas models). See Drying Procedures Excessive wrinkling. , page 10. See INSTALLATION INSTRUCTIONS for replacement. cycle hot takes or too long, outside of items. Drying temperature too high. High humidity. runs but the heater will be at least 4 inches in the dryer circuit. LP gas supply tank is open (gas models). Make sure all lint has been removed from...
.... Electric dryer is clogged with lint. See Drying Procedures Check to support the burner flame (gas models). See Drying Procedures Excessive wrinkling. , page 10. See INSTALLATION INSTRUCTIONS for replacement. cycle hot takes or too long, outside of items. Drying temperature too high. High humidity. runs but the heater will be at least 4 inches in the dryer circuit. LP gas supply tank is open (gas models). Make sure all lint has been removed from...
Owners Guide
Page 16
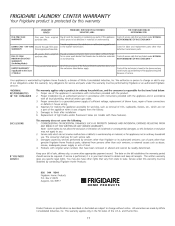
... Frigidaire or its authorized servicers; FULL 25-YEAR INNER WASH BASKET WARRANTY (Excluding Alaska) Provide a replacement and in the washer transmission. Your appliance is warranted by an authorized servicer in accordance with instructions provided with the appliance and in ordinary household use of parts other than genuine Frigidaire Home Products parts; LIMITED WARRANTY (Applicable to products in accordance with original serial numbers that vary from the factory. Replacement of light...
... Frigidaire or its authorized servicers; FULL 25-YEAR INNER WASH BASKET WARRANTY (Excluding Alaska) Provide a replacement and in the washer transmission. Your appliance is warranted by an authorized servicer in accordance with instructions provided with the appliance and in ordinary household use of parts other than genuine Frigidaire Home Products parts; LIMITED WARRANTY (Applicable to products in accordance with original serial numbers that vary from the factory. Replacement of light...
Operating Instructions
Page 1
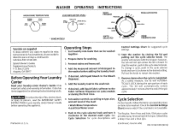
... cycle settings. 10. The lid will not spin unless the lid is completed. Check the Control Settings Chart (reverse side) if the care label is not available. 9. See provide a spray rinse during the final rinse. 8. Prepare items for obtaining the best washing results. Set washer controls according to type, size, and soil level of detergent to the desired wash cycle. To change' a cycle, push in your laundry center Owner's Guide. WASHER OPERATING INSTRUCTIONS WASH/RINSE TEMPERATURE WARM WARM • HOT COLD • COLD COLD WARM • COLD LOAD SIZE (WATER LEVEL...
... cycle settings. 10. The lid will not spin unless the lid is completed. Check the Control Settings Chart (reverse side) if the care label is not available. 9. See provide a spray rinse during the final rinse. 8. Prepare items for obtaining the best washing results. Set washer controls according to type, size, and soil level of detergent to the desired wash cycle. To change' a cycle, push in your laundry center Owner's Guide. WASHER OPERATING INSTRUCTIONS WASH/RINSE TEMPERATURE WARM WARM • HOT COLD • COLD COLD WARM • COLD LOAD SIZE (WATER LEVEL...
Operating Instructions
Page 2
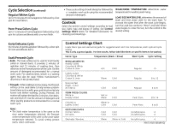
... suggested wash and rinse temperatures, wash cycle and cycle setting. Control Settings Chart Locate fabric type and read across guide for knit and delicate items. Soak/Prewash Cycle • Soak - This is the same as the rinse water temperature selected; Use the amount of detergent and other laundry products recommended for most fabrics. Note: • The Soak water temperature is notnecessary, the Prewash setting can be washed. Cycle Selection (continued) Regular/Whites Cycle Up to 15 minutes of normal agitation...
... suggested wash and rinse temperatures, wash cycle and cycle setting. Control Settings Chart Locate fabric type and read across guide for knit and delicate items. Soak/Prewash Cycle • Soak - This is the same as the rinse water temperature selected; Use the amount of detergent and other laundry products recommended for most fabrics. Note: • The Soak water temperature is notnecessary, the Prewash setting can be washed. Cycle Selection (continued) Regular/Whites Cycle Up to 15 minutes of normal agitation...
Operating Instructions
Page 3
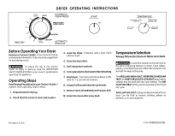
... NO HEAT REGULAR HIGH HEAT Before Operating Your Dryer Read your Owner's Guide.It explains these operating steps in your Owner's Guide. It has important safety and warranty information. If desired, add a dryer fabric softener sheet. 4. SetTemperature controls. 6. Use Air Fluff-No Heat setting only. Operating Steps ReadDryingProcedures in detail. 1. Turn cycleselectorclockwisetodesired setting. 7. AIR FLUFF-NO HEAT setting tumbles the load without heat. Check that lint screen is clean and in U.S.A. Remove items immediately and...
... NO HEAT REGULAR HIGH HEAT Before Operating Your Dryer Read your Owner's Guide.It explains these operating steps in your Owner's Guide. It has important safety and warranty information. If desired, add a dryer fabric softener sheet. 4. SetTemperature controls. 6. Use Air Fluff-No Heat setting only. Operating Steps ReadDryingProcedures in detail. 1. Turn cycleselectorclockwisetodesired setting. 7. AIR FLUFF-NO HEAT setting tumbles the load without heat. Check that lint screen is clean and in U.S.A. Remove items immediately and...
Operating Instructions
Page 4
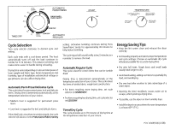
... full loads. Energy Saving Tips • Keep the lint screen clean and exhaust the dryer correctly. • Sort laundry properly and select proper temperature and cycle settings. Room temperature and humidity, type of similar fabric, weight and construction. • For items requiring more drying time, set cycle selector on MORE DRY. • For items requiring less drying time, set cycle selector on LESS DRY. The heat automatically turns...
... full loads. Energy Saving Tips • Keep the lint screen clean and exhaust the dryer correctly. • Sort laundry properly and select proper temperature and cycle settings. Room temperature and humidity, type of similar fabric, weight and construction. • For items requiring more drying time, set cycle selector on MORE DRY. • For items requiring less drying time, set cycle selector on LESS DRY. The heat automatically turns...


