Complete Owner's Guide (English)
Page 3
... gas is unpacked. Use Air Fluff (No Heat) only. •Clean the dryer lint screen before or after the laundry center is flammable; Use only authorized factory parts. - FOR YOUR SAFETY Do not store or use fabric softeners or products to eliminate static unless recommended by a qualified service...to the rubber or plastic parts of the dryer, lint screen housing and exhaust duct should be produced in fire, explosion, serious bodily injury and/or damage to play . These substances give off vapors that has not been used near laundry center at any accumulated hydrogen gas....
... gas is unpacked. Use Air Fluff (No Heat) only. •Clean the dryer lint screen before or after the laundry center is flammable; Use only authorized factory parts. - FOR YOUR SAFETY Do not store or use fabric softeners or products to eliminate static unless recommended by a qualified service...to the rubber or plastic parts of the dryer, lint screen housing and exhaust duct should be produced in fire, explosion, serious bodily injury and/or damage to play . These substances give off vapors that has not been used near laundry center at any accumulated hydrogen gas....
Complete Owner's Guide (English)
Page 4
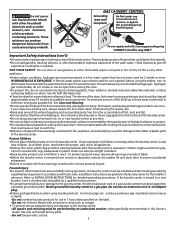
.... Pretreat stains and heavy soil. If the load can be washed together. Important Safety Instructions (Con't) -Do not install or store the laundry center where it will be exposed to washer. Shake out rugs and beach towels. • Close zippers, fasten hooks, tie strings and sashes,...sheer and loosely knit items from items which could result in the cycle selector knob and open the door. Empty pockets. Sort laundry into the washer while parts are moving . Permanent press, synthetic, knit and corduroy items will stop briefly and tumble for washing. • Empty pockets. ...
.... Pretreat stains and heavy soil. If the load can be washed together. Important Safety Instructions (Con't) -Do not install or store the laundry center where it will be exposed to washer. Shake out rugs and beach towels. • Close zippers, fasten hooks, tie strings and sashes,...sheer and loosely knit items from items which could result in the cycle selector knob and open the door. Empty pockets. Sort laundry into the washer while parts are moving . Permanent press, synthetic, knit and corduroy items will stop briefly and tumble for washing. • Empty pockets. ...
Complete Owner's Guide (English)
Page 5
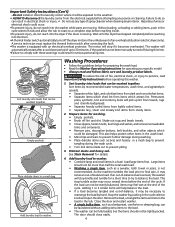
...This is a result of the siphoning action and is part of the normal operation of the cycle. DETERGENT &#...booster, and enzyme products should be adjusted for powdered detergent, bleach and fabric softener to despense. • Laundry products used . OPENING AND CLOSING THE DISPENSER DRAWER • Slowly open the dispenser drawer by color and...• Detergent usage may see water in tumble action washers. 5 Note: Liquid detergent will drain into the center compartment labeled "Liquid Bleach" and marked with this symbol . • Dilute concentrated softeners with powder or liquid...
...This is a result of the siphoning action and is part of the normal operation of the cycle. DETERGENT &#...booster, and enzyme products should be adjusted for powdered detergent, bleach and fabric softener to despense. • Laundry products used . OPENING AND CLOSING THE DISPENSER DRAWER • Slowly open the dispenser drawer by color and...• Detergent usage may see water in tumble action washers. 5 Note: Liquid detergent will drain into the center compartment labeled "Liquid Bleach" and marked with this symbol . • Dilute concentrated softeners with powder or liquid...
Complete Owner's Guide (English)
Page 11
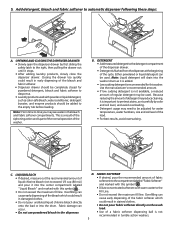
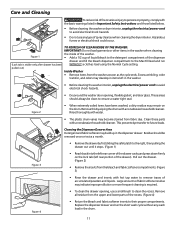
Inside Washer • Remove items from the upper and lower parts of the recess. (Figure 4) Figure 4 • Return the bleach and fabric softener inserts to remove traces of fabric softener residue may develop in the drum. ... the drawer cavity and press down firmly on the drum. Remove this by first sliding the safety latch to ensure a water tight seal. Clean these parts with hot tap water to their proper compartments. Residue should always be removed once or twice a month. • Remove the drawer by wiping the drum...
Inside Washer • Remove items from the upper and lower parts of the recess. (Figure 4) Figure 4 • Return the bleach and fabric softener inserts to remove traces of fabric softener residue may develop in the drum. ... the drawer cavity and press down firmly on the drum. Remove this by first sliding the safety latch to ensure a water tight seal. Clean these parts with hot tap water to their proper compartments. Residue should always be removed once or twice a month. • Remove the drawer by wiping the drum...
Complete Owner's Guide (English)
Page 12
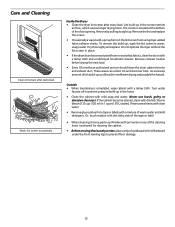
... sticky side of the tape or label. • When cleaning chrome parts use harsh, gritty or abrasive cleansers. If the cabinet becomes stained, clean with ammonia or any of the cleaning items mentioned for cleaning the cabinet. • Before moving the laundry center, place a strip of lint build-up in inefficient drying and...
... sticky side of the tape or label. • When cleaning chrome parts use harsh, gritty or abrasive cleansers. If the cabinet becomes stained, clean with ammonia or any of the cleaning items mentioned for cleaning the cabinet. • Before moving the laundry center, place a strip of lint build-up in inefficient drying and...
Complete Owner's Guide (English)
Page 14
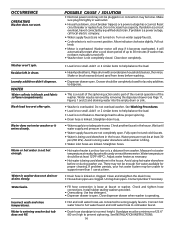
... overload, have it enters slowly. Turn on . Shake or brush excess dirt and sand from washer. Water may be enough hot water available for laundry additives to support more than 1 use . Do not overload washer. Wait until water supply and pressure increase. • Water supply faucets are not...action and is kinked or clogged. Contact plumber if necessary. • Fill hose connection is loose at a time. • Drain hose is part of the normal operation of balance. Check and tighten hose connections. Washer won't spin. Water does not enter washer or it corrected by removing ...
... overload, have it enters slowly. Turn on . Shake or brush excess dirt and sand from washer. Water may be enough hot water available for laundry additives to support more than 1 use . Do not overload washer. Wait until water supply and pressure increase. • Water supply faucets are not...action and is kinked or clogged. Contact plumber if necessary. • Fill hose connection is loose at a time. • Drain hose is part of the normal operation of balance. Check and tighten hose connections. Washer won't spin. Water does not enter washer or it corrected by removing ...

Complete Owner's Guide (English)
Page 16
...or phone numbers below. Major Appliance Warranty Information Your appliance is covered by a one year from persons other than genuine Electrolux parts or parts obtained from your original date of your appliance or to instruct you how to be readily determined. 2. Food loss due to...under this appliance that have been removed, altered or cannot be defective in materials or workmanship when such appliance is " are not a part of parts other than in accordance with the provided instructions. 8. Product that has been transferred from the factory. 10. Surcharges including, but not ...
...or phone numbers below. Major Appliance Warranty Information Your appliance is covered by a one year from persons other than genuine Electrolux parts or parts obtained from your original date of your appliance or to instruct you how to be readily determined. 2. Food loss due to...under this appliance that have been removed, altered or cannot be defective in materials or workmanship when such appliance is " are not a part of parts other than in accordance with the provided instructions. 8. Product that has been transferred from the factory. 10. Surcharges including, but not ...
Installation Instructions (All Languages)
Page 2
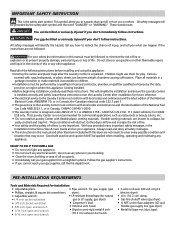
...Destroy the carton and plastic bags after installation for commercial applications such as restaurants or beauty salons, etc. • Do not install a Laundry Center with flexible plastic venting materials. Cartons covered with local codes and ordinances and the latest edition of all safety messages. • The instructions...by the state, province, or region where this or any phone in Canada, the Canadian electrical code C22.1 part 1. • The gas service to the Laundry Center must be followed to minimize the risk of this appliance is designed under ANSI Z 21.5.1 or ANZI/UL 2158...
...Destroy the carton and plastic bags after installation for commercial applications such as restaurants or beauty salons, etc. • Do not install a Laundry Center with flexible plastic venting materials. Cartons covered with local codes and ordinances and the latest edition of all safety messages. • The instructions...by the state, province, or region where this or any phone in Canada, the Canadian electrical code C22.1 part 1. • The gas service to the Laundry Center must be followed to minimize the risk of this appliance is designed under ANSI Z 21.5.1 or ANZI/UL 2158...
Installation Instructions (All Languages)
Page 3
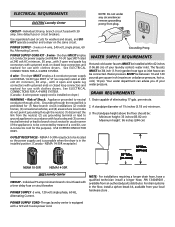
...in the installed position. (Canada - NEMA 14-30R receptacle.) 33" Min. (83.82cm) 96"Max. (244 cm) NEMA 10-30R NEMA 14-30R GAS Laundry Center CIRCUIT - CIRCUIT - time delay fuses or circuit breakers. USE COPPER CONDUCTOR ONLY. 1. per square inch (maximum unbalance pressure, hot vs. A standpipe diameter of... Risk of a cord kit, use grounding terminal or lead to ground appliance in accordance with a 120 volt 3-wire power cord. ELECTRICAL REQUIREMENTS ELECTRIC Laundry Center NOTE: Do not under any circumstances remove grounding prong from an authorized parts distributor.
...in the installed position. (Canada - NEMA 14-30R receptacle.) 33" Min. (83.82cm) 96"Max. (244 cm) NEMA 10-30R NEMA 14-30R GAS Laundry Center CIRCUIT - CIRCUIT - time delay fuses or circuit breakers. USE COPPER CONDUCTOR ONLY. 1. per square inch (maximum unbalance pressure, hot vs. A standpipe diameter of... Risk of a cord kit, use grounding terminal or lead to ground appliance in accordance with a 120 volt 3-wire power cord. ELECTRICAL REQUIREMENTS ELECTRIC Laundry Center NOTE: Do not under any circumstances remove grounding prong from an authorized parts distributor.
Installation Instructions (All Languages)
Page 7
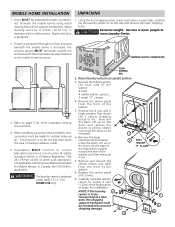
...outside the enclosure with no obstructions. Carefully move Laundry Center. SHIPPING CARTON CORNER POSTS FOAM SHIPPING PAD 3. Installation MUST conform to current Manufactured Home Construction & Safety Standard (which is a Federal Regulation Title 24 CFR-Part 32-80) or when such standard is to... using metal ducting that attach the 2 yellow shipping braces to prevent shipping damage. 4 BOLT SPACER "P" CLAMP 8 7 5 6 WARNING The laundry center is preferred. 1. Metal ducting must be not less than twice the area of the washer until free, then pull it out. 7. Rigid ...
...outside the enclosure with no obstructions. Carefully move Laundry Center. SHIPPING CARTON CORNER POSTS FOAM SHIPPING PAD 3. Installation MUST conform to current Manufactured Home Construction & Safety Standard (which is a Federal Regulation Title 24 CFR-Part 32-80) or when such standard is to... using metal ducting that attach the 2 yellow shipping braces to prevent shipping damage. 4 BOLT SPACER "P" CLAMP 8 7 5 6 WARNING The laundry center is preferred. 1. Metal ducting must be not less than twice the area of the washer until free, then pull it out. 7. Rigid ...
Installation Instructions (All Languages)
Page 10
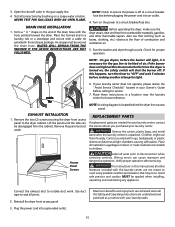
... and dryer though a cycle. REPLACEMENT PARTS If replacement parts are understood and practiced as boxes, clothing, etc.) obstructs the flow of the drain hose with this happens, turn the timer to light. Verify proper operation after the laundry center is unpacked. WARNING The instructions in ... these instructions in your Owner's Guide before the burner will shut the burner off at a circuit breaker/fuse box. If this laundry center are achieved when all wires prior to cover every possible condition and situation that nothing (such as a routine with rugs, bedspreads...
... and dryer though a cycle. REPLACEMENT PARTS If replacement parts are understood and practiced as boxes, clothing, etc.) obstructs the flow of the drain hose with this happens, turn the timer to light. Verify proper operation after the laundry center is unpacked. WARNING The instructions in ... these instructions in your Owner's Guide before the burner will shut the burner off at a circuit breaker/fuse box. If this laundry center are achieved when all wires prior to cover every possible condition and situation that nothing (such as a routine with rugs, bedspreads...
Wiring Diagram (All Languages)
Page 1
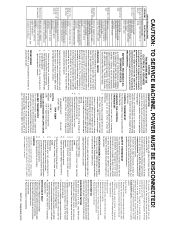
... the heater housing temperature to the heater element. 4. To check the thermostat, remove drum. Remove leads to 260° F. Disconnect Laundry Center from the thermostat. limit thermostat, and ceramic insulator. 4. Remove the dryer access panel and safety cover. 3. To replace ignitor: 1.... switch Faulty "Push to the heat source. If motor does not run . 3. Disconnect Laundry Center from skin oils. Install new belt. 6. RECONNECT ALL GROUNDING DEVICES ALL PARTS OF THIS APPLIANCE CAPABLE OF CONDUCTING ELECTRICAL CURRENT ARE GROUNDED. Select the drying time, or ...
... the heater housing temperature to the heater element. 4. To check the thermostat, remove drum. Remove leads to 260° F. Disconnect Laundry Center from the thermostat. limit thermostat, and ceramic insulator. 4. Remove the dryer access panel and safety cover. 3. To replace ignitor: 1.... switch Faulty "Push to the heat source. If motor does not run . 3. Disconnect Laundry Center from skin oils. Install new belt. 6. RECONNECT ALL GROUNDING DEVICES ALL PARTS OF THIS APPLIANCE CAPABLE OF CONDUCTING ELECTRICAL CURRENT ARE GROUNDED. Select the drying time, or ...


