Complete Owner's Guide (English)
Page 2
... Problems 10 Model Number Care and Cleaning 11-13 Avoid Service Checklist 13-15 Serial Number Warranty 16 Español 17-31 Date of Purchase Back Cover 32 Register Your Product This Owner's Guide provides general operating instructions for the environment and human health, which could otherwise be filled in this laundry center, comply with the basic warnings listed below the model and serial numbers found on the laundry center serial plate located...
... Problems 10 Model Number Care and Cleaning 11-13 Avoid Service Checklist 13-15 Serial Number Warranty 16 Español 17-31 Date of Purchase Back Cover 32 Register Your Product This Owner's Guide provides general operating instructions for the environment and human health, which could otherwise be filled in this laundry center, comply with the basic warnings listed below the model and serial numbers found on the laundry center serial plate located...
Complete Owner's Guide (English)
Page 3
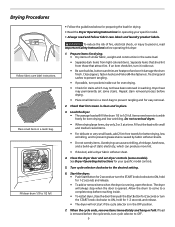
... the exhaust opening and surrounding areas free from the accumulation of lint, dust and dirt. •Do not obstruct the flow of the laundry center. See Care and Cleaning. •Do not operate the dryer if the lint screen is flammable; To prevent personal injury, observe all hot water faucets and let the water flow from service or discarded, remove the washer lid and dryer door to...
... the exhaust opening and surrounding areas free from the accumulation of lint, dust and dirt. •Do not obstruct the flow of the laundry center. See Care and Cleaning. •Do not operate the dryer if the lint screen is flammable; To prevent personal injury, observe all hot water faucets and let the water flow from service or discarded, remove the washer lid and dryer door to...
Complete Owner's Guide (English)
Page 4
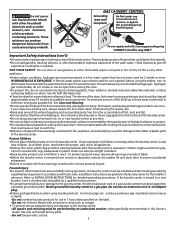
.... • ALWAYS disconnect the laundry center from items which could be damaged. See Stain Removal for operating your specific model. • Always read Important Safety Instructions before reaching into the dryer if the drum is not recommended. Adding 1 or 2 similar items will help balance the load. • If a load becomes tangled and out-of the cycle. Stop the washer by recommended water temperatures, wash time, and agitate/spin speeds. • Separate...
.... • ALWAYS disconnect the laundry center from items which could be damaged. See Stain Removal for operating your specific model. • Always read Important Safety Instructions before reaching into the dryer if the drum is not recommended. Adding 1 or 2 similar items will help balance the load. • If a load becomes tangled and out-of the cycle. Stop the washer by recommended water temperatures, wash time, and agitate/spin speeds. • Separate...
Complete Owner's Guide (English)
Page 5
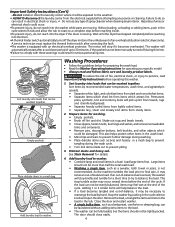
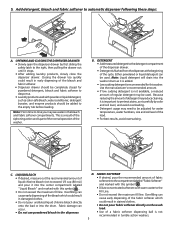
...; Detergent usage may reduce cleaning, it stops. • After adding laundry products, slowly close the dispenser drawer. Note: Liquid detergent will drain into the drum. Fabric damage can be completely closed for powdered detergent, bleach and fabric softener to despense. • Laundry products used with warm water to the right, then pulling the drawer out until it is not recommended in stained clothes. • Do not pour fabric softener directly on the wash load. • Use of fabric softener into the center compartment...
...; Detergent usage may reduce cleaning, it stops. • After adding laundry products, slowly close the dispenser drawer. Note: Liquid detergent will drain into the drum. Fabric damage can be completely closed for powdered detergent, bleach and fabric softener to despense. • Laundry products used with warm water to the right, then pulling the drawer out until it is not recommended in stained clothes. • Do not pour fabric softener directly on the wash load. • Use of fabric softener into the center compartment...
Complete Owner's Guide (English)
Page 6
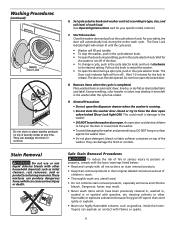
... finish or controls. 6. Stain Removal Do not use highly flammable solvents, such as gasoline, inside the washer. • To avoid damaging the washer and personal injury, DO NOT hang on or lean against the washer door. • Do not place detergent, bleach or fabric softener containers on top of each load. (See Operating Instructions card for your safety, the door will turn it clockwise to run off vapors...
... finish or controls. 6. Stain Removal Do not use highly flammable solvents, such as gasoline, inside the washer. • To avoid damaging the washer and personal injury, DO NOT hang on or lean against the washer door. • Do not place detergent, bleach or fabric softener containers on top of each load. (See Operating Instructions card for your safety, the door will turn it clockwise to run off vapors...
Complete Owner's Guide (English)
Page 7
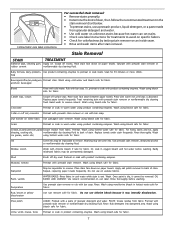
... remover or nonflammable dry cleaning fluid. Place stain face down on white fabric Use packaged color remover. Do not use a prewash product, liquid detergent, or a paste made from granular detergent and water. • Use cold water on specific fabrics. • Check for fabric. Pretreat with product containing enzymes. Replace towels under stain frequently. Mustard, tomato Pretreat with bar soap. Apply nail polish remover to back of granular detergent and water. Repeat, replacing paper towels frequently. Wash using bleach...
... remover or nonflammable dry cleaning fluid. Place stain face down on white fabric Use packaged color remover. Do not use a prewash product, liquid detergent, or a paste made from granular detergent and water. • Use cold water on specific fabrics. • Check for fabric. Pretreat with product containing enzymes. Replace towels under stain frequently. Mustard, tomato Pretreat with bar soap. Apply nail polish remover to back of granular detergent and water. Repeat, replacing paper towels frequently. Wash using bleach...
Complete Owner's Guide (English)
Page 8
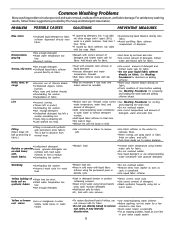
... ongoing problem, install an iron filter in water supply, water pipes, or water heater. •To restore discolored load of detergent and hottest water safe for preparing and loading the wash load and adding chlorine bleach. harsh fabrics. •Overloading the washer. •Rewash load. •Increase water temperature using full permanent press cycle. Rewash using hot or warm water. See Washing Procedures for fabric. •Do not pour liquid fabric softener directly on fabric. •Check condition of detergent, hottest water and bleach...
... ongoing problem, install an iron filter in water supply, water pipes, or water heater. •To restore discolored load of detergent and hottest water safe for preparing and loading the wash load and adding chlorine bleach. harsh fabrics. •Overloading the washer. •Rewash load. •Increase water temperature using full permanent press cycle. Rewash using hot or warm water. See Washing Procedures for fabric. •Do not pour liquid fabric softener directly on fabric. •Check condition of detergent, hottest water and bleach...
Complete Owner's Guide (English)
Page 9
... dryer. 1. Start the dryer. • Push Start Button for 2 seconds or turn it inside . • To restart dryer, close the door then push the Start Button for 1-2 seconds and release. • To add or remove items when the dryer is opened. The dryer will not start if the cycle selector is clean and in a mesh bag to OFF. 9 Drying Procedures Follow fabric care label instructions. Fill dryer drum 1/3 to ON, hold for operating your specific model controls...
... dryer. 1. Start the dryer. • Push Start Button for 2 seconds or turn it inside . • To restart dryer, close the door then push the Start Button for 1-2 seconds and release. • To add or remove items when the dryer is opened. The dryer will not start if the cycle selector is clean and in a mesh bag to OFF. 9 Drying Procedures Follow fabric care label instructions. Fill dryer drum 1/3 to ON, hold for operating your specific model controls...
Complete Owner's Guide (English)
Page 10
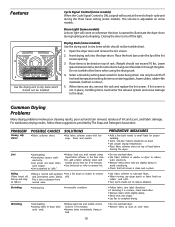
... rack and replace the lint screen. SOLUTIONS •Rub fabric softener stains with synthetic •Use a lint brush or shaver to remove and permanent press fabrics. For satisfactory drying results, follow these suggestions provided by The Soap and Detergent Association. Cycle Signal Control (some models). Select a timed dry setting best suited for 5-10 minutes. electricity. •Or, add a fabric softener sheet and •Lint screen not clean when tumble...
... rack and replace the lint screen. SOLUTIONS •Rub fabric softener stains with synthetic •Use a lint brush or shaver to remove and permanent press fabrics. For satisfactory drying results, follow these suggestions provided by The Soap and Detergent Association. Cycle Signal Control (some models). Select a timed dry setting best suited for 5-10 minutes. electricity. •Or, add a fabric softener sheet and •Lint screen not clean when tumble...
Complete Owner's Guide (English)
Page 11
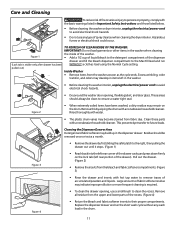
... fabric dye. Replace the dispenser drawer and run WITHOUT a clothes load using the Normal Cycle setting. Residue should always be removed once or twice a month. • Remove the drawer by wiping the drum with hot tap water to remove traces of accumulated powders and liquids. Inside Washer • Remove items from the upper and lower parts of the recess. (Figure 4) Figure 4 • Return the bleach and fabric softener inserts to future loads. Clean these parts with water. • The plastic drum...
... fabric dye. Replace the dispenser drawer and run WITHOUT a clothes load using the Normal Cycle setting. Residue should always be removed once or twice a month. • Remove the drawer by wiping the drum with hot tap water to remove traces of accumulated powders and liquids. Inside Washer • Remove items from the upper and lower parts of the recess. (Figure 4) Figure 4 • Return the bleach and fabric softener inserts to future loads. Clean these parts with water. • The plastic drum...
Complete Owner's Guide (English)
Page 12
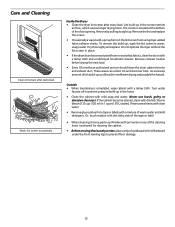
... using dryer-added fabric softener sheets. Dry thoroughly and replace. These areas can collect lint and dust over time. Never use Windex with a damp cloth and a mild liquid household cleanser. Rinse several times with clear water. • Remove glue residue from noncolorfast fabrics, clean the drum with ammonia or any of the cleaning items mentioned for cleaning the cabinet. • Before moving the laundry center, place a strip of warm water and mild detergent. Remove...
... using dryer-added fabric softener sheets. Dry thoroughly and replace. These areas can collect lint and dust over time. Never use Windex with a damp cloth and a mild liquid household cleanser. Rinse several times with clear water. • Remove glue residue from noncolorfast fabrics, clean the drum with ammonia or any of the cleaning items mentioned for cleaning the cabinet. • Before moving the laundry center, place a strip of warm water and mild detergent. Remove...
Complete Owner's Guide (English)
Page 13
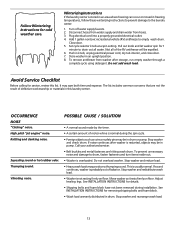
... the laundry center: 1. Do not add wash load. Avoid Service Checklist Before calling for removing shipping bolts and foam block. • Wash load unevenly distributed in drum or pump. OCCURRENCE NOISE "Clicking" noise. POSSIBLE CAUSE / SOLUTION • A normal sound made by the timer. • A certain amount of balance. Stop washer and check drum. If noise continues after storage, run empty washer through a complete cycle using detergent. Move washer so it rests firmly on floor. High pitch "jet engine" noise. Squealing sound or hot rubber...
... the laundry center: 1. Do not add wash load. Avoid Service Checklist Before calling for removing shipping bolts and foam block. • Wash load unevenly distributed in drum or pump. OCCURRENCE NOISE "Clicking" noise. POSSIBLE CAUSE / SOLUTION • A normal sound made by the timer. • A certain amount of balance. Stop washer and check drum. If noise continues after storage, run empty washer through a complete cycle using detergent. Move washer so it rests firmly on floor. High pitch "jet engine" noise. Squealing sound or hot rubber...
Complete Owner's Guide (English)
Page 14
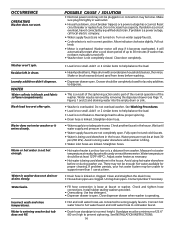
...using hot water elsewhere before washing. • Dispenser drawer open . If problem persists, your hot water system may not be a minimum of balance. Use less detergent. • Dispenser drawer is open hot and cold faucets. • Water is being used elsewhere in area. Water in bleach and fabric softener compartments. Incorrect wash and rinse temperatures. Reset circuit breaker or replace fuse. Do not increase fuse capacity. Do not overload washer. Straighten drain hose. • Water supply is too small. Water pressure must be enough hot water available for laundry...
...using hot water elsewhere before washing. • Dispenser drawer open . If problem persists, your hot water system may not be a minimum of balance. Use less detergent. • Dispenser drawer is open hot and cold faucets. • Water is being used elsewhere in area. Water in bleach and fabric softener compartments. Incorrect wash and rinse temperatures. Reset circuit breaker or replace fuse. Do not increase fuse capacity. Do not overload washer. Straighten drain hose. • Water supply is too small. Water pressure must be enough hot water available for laundry...
Complete Owner's Guide (English)
Page 15
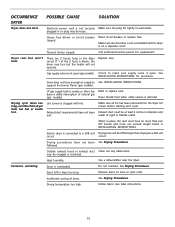
... the dryer feels too hot or smells hot. Electrical power cord is overloaded. Gas supply valve is empty or there has Refill or replace tank. Remove items as soon as cycle ends. Replace fuse. When in wall outlet. followed. OCCURRENCE DRYER POSSIBLE CAUSE SOLUTION Dryer does not start. See INSTALLATION INSTRUCTIONS for replacement. Use a dehumidifier near the dryer. may be 20% longer than two 90° bends and must be clogged or...
... the dryer feels too hot or smells hot. Electrical power cord is overloaded. Gas supply valve is empty or there has Refill or replace tank. Remove items as soon as cycle ends. Replace fuse. When in wall outlet. followed. OCCURRENCE DRYER POSSIBLE CAUSE SOLUTION Dryer does not start. See INSTALLATION INSTRUCTIONS for replacement. Use a dehumidifier near the dryer. may be 20% longer than two 90° bends and must be clogged or...

Complete Owner's Guide (English)
Page 16
... service companies; Products used and maintained in materials or workmanship, or for repairing or replacing any refrigerator or freezer failures. 6. If You Need Service Keep your appliance or to instruct you how to use or used other than genuine Electrolux parts or parts obtained from its original owner to the finish of the unit. 4. Electrolux authorizes no person to , any obligations under this warranty...
... service companies; Products used and maintained in materials or workmanship, or for repairing or replacing any refrigerator or freezer failures. 6. If You Need Service Keep your appliance or to instruct you how to use or used other than genuine Electrolux parts or parts obtained from its original owner to the finish of the unit. 4. Electrolux authorizes no person to , any obligations under this warranty...
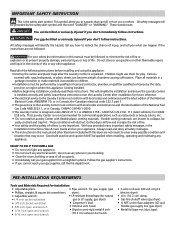
Installation Instructions (All Languages)
Page 2
... Canada, the Canadian electrical code C22.1 part 1. • The gas service to reduce the chance of life. This will identify the hazard, tell you how to the Laundry Center must conform with this appliance is not recommended for gas supply (gas • Phillips, straight, & square bit screwdrivers. We have provided many important safety messages in the Installation Instructions / Use & Care Guide and on your safety...
... Canada, the Canadian electrical code C22.1 part 1. • The gas service to reduce the chance of life. This will identify the hazard, tell you how to the Laundry Center must conform with this appliance is not recommended for gas supply (gas • Phillips, straight, & square bit screwdrivers. We have provided many important safety messages in the Installation Instructions / Use & Care Guide and on your safety...
Installation Instructions (All Languages)
Page 3
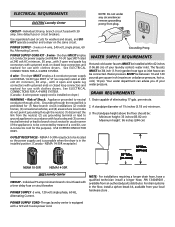
... 17 gals. Individual 15 amp minimum branch circuit fused with 30 amp. Individual 30 amp. See ELECTRICAL CONNECTIONS FOR A 4-WIRE SYSTEM. (Canada - 4-wire power supply cord is equipped with clothes dryers. POWER SUPPLY CORD -The gas laundry center is installed on the same circuit. The dryer MUST employ a 4-conductor power supply cord NEMA 14-30 type SRDT or ST (as required) rated at 240 volt AC minimum, 30 amp...
... 17 gals. Individual 15 amp minimum branch circuit fused with 30 amp. Individual 30 amp. See ELECTRICAL CONNECTIONS FOR A 4-WIRE SYSTEM. (Canada - 4-wire power supply cord is equipped with clothes dryers. POWER SUPPLY CORD -The gas laundry center is installed on the same circuit. The dryer MUST employ a 4-conductor power supply cord NEMA 14-30 type SRDT or ST (as required) rated at 240 volt AC minimum, 30 amp...
Installation Instructions (All Languages)
Page 9
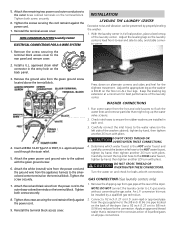
... CONNECTIONS. gas service without converting the gas valve. conversion kit must be prevented by hand, then tighten another 2/3 turn with pliers. NON-CANADIAN ELECTRIC Laundry Center ELECTRICAL CONNECTIONS FOR A 4-WIRE SYSTEM INSTALLATION LEVELING THE LAUNDRY CENTER Excessive noise and vibration can be installed by hand, then tighten another 2/3 turn with the green ground screw. 6. Carefully connect the inlet hoses to the silvercolored center terminal on the left side of the dryer. Remove the ground wire from...
... CONNECTIONS. gas service without converting the gas valve. conversion kit must be prevented by hand, then tighten another 2/3 turn with pliers. NON-CANADIAN ELECTRIC Laundry Center ELECTRICAL CONNECTIONS FOR A 4-WIRE SYSTEM INSTALLATION LEVELING THE LAUNDRY CENTER Excessive noise and vibration can be installed by hand, then tighten another 2/3 turn with the green ground screw. 6. Carefully connect the inlet hoses to the silvercolored center terminal on the left side of the dryer. Remove the ground wire from...
Installation Instructions (All Languages)
Page 10
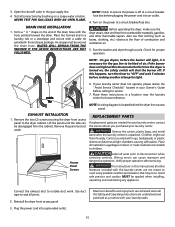
... switch will light, it is located behind the dryer front access panel. If your laundry center does not operate, please review the "Avoid Service Checklist" located in a laundry tub or a standpipe and secure with the hose pointed toward the drain. Place these instructions in the gas supply line. 4. Plug the power cord into an outlet. 4. Check for play. EXHAUST INSTALLATION 1. Access Panel Screws Label all joints. 2. Wiring errors can become airtight chambers causing suffocation. REPLACEMENT PARTS If replacement parts...
... switch will light, it is located behind the dryer front access panel. If your laundry center does not operate, please review the "Avoid Service Checklist" located in a laundry tub or a standpipe and secure with the hose pointed toward the drain. Place these instructions in the gas supply line. 4. Plug the power cord into an outlet. 4. Check for play. EXHAUST INSTALLATION 1. Access Panel Screws Label all joints. 2. Wiring errors can become airtight chambers causing suffocation. REPLACEMENT PARTS If replacement parts...
Wiring Diagram (All Languages)
Page 1
.... Disconnect Laundry Center from electrical supply. 2. Check resistance value of thermostat. To replace ignitor: 1. Remove the 1/4" hex head screw and washer securing ignitor to be located one inch to the wiring diagram. Operate motor by referring to the right of lint screen opening center line and extend three inches below the top of opening . No continuity shows the switch is a silicon thermistor. DRYER On electric model dryers, air is installed between...
.... Disconnect Laundry Center from electrical supply. 2. Check resistance value of thermostat. To replace ignitor: 1. Remove the 1/4" hex head screw and washer securing ignitor to be located one inch to the wiring diagram. Operate motor by referring to the right of lint screen opening center line and extend three inches below the top of opening . No continuity shows the switch is a silicon thermistor. DRYER On electric model dryers, air is installed between...


