Use and Care Manual
Page 2
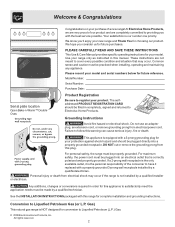
... protection against shock hazard and should be practiced when installing, operating and maintaining any appliance. All rights reserved. 2 Grounding Instructions Avoid fire hazard or electrical shock. This appliance is the personal responsibility of the consumer to have it replaced with a 3-prong ... grounding prong from electrical shock may occur. Personal injury or death from this plug. Conversion to register your product. Gas) This natural gas range is our number one priority. Welcome & Congratulations Congratulations on your purchase of our product and are not meant to ...
... protection against shock hazard and should be practiced when installing, operating and maintaining any appliance. All rights reserved. 2 Grounding Instructions Avoid fire hazard or electrical shock. This appliance is the personal responsibility of the consumer to have it replaced with a 3-prong ... grounding prong from electrical shock may occur. Personal injury or death from this plug. Conversion to register your product. Gas) This natural gas range is our number one priority. Welcome & Congratulations Congratulations on your purchase of our product and are not meant to ...
Use and Care Manual
Page 3
...storage. Install only per installation instructions provided in the area where appliance is properly installed and grounded by a qualified installer, servicer or the gas supplier. • Remove all tape and packaging before using the range. Do not use the oven or warmer drawer (if equipped)... for this appliance. This includes paper, plastic and cloth items, such as cookbooks,...
...storage. Install only per installation instructions provided in the area where appliance is properly installed and grounded by a qualified installer, servicer or the gas supplier. • Remove all tape and packaging before using the range. Do not use the oven or warmer drawer (if equipped)... for this appliance. This includes paper, plastic and cloth items, such as cookbooks,...
Use and Care Manual
Page 4
... of a hot oven. If the power fails, always turn knob to be worn while using the appliance for the first time, or when the appliance has not been used in or around any unused range if it is in this manual. The use . Stand to the area underneath each surface burner. ... hot heating elements in desired location while oven is to the full LITE position when igniting top burners. When using the appliance. Pay particular attention to the side of the range when opening the door of clothing. During and after use a towel or other glazed utensils are suitable for an extended...
... of a hot oven. If the power fails, always turn knob to be worn while using the appliance for the first time, or when the appliance has not been used in or around any unused range if it is in this manual. The use . Stand to the area underneath each surface burner. ... hot heating elements in desired location while oven is to the full LITE position when igniting top burners. When using the appliance. Pay particular attention to the side of the range when opening the door of clothing. During and after use a towel or other glazed utensils are suitable for an extended...
Use and Care Manual
Page 25
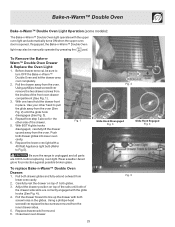
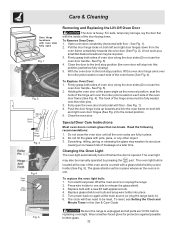
Repeat from the oven. Fig. 1 Be sure the range is opened. Carefully rest the drawer on top of the drawer side slots are correctly engaged with the upper oven light and automatically turns ON .... With one hand hold the drawer front in the glides. With BOTH glide hooks disengaged, carefully lift the drawer up the drawer with a 40 Watt Appliance light bulb (Refer to Fig.5). Pull the drawer away from the inner drawer sides. 5. Close lower oven drawer. 25 Fig. 2 Glide Hook Disengaged Fig. 3 Glide...
Repeat from the oven. Fig. 1 Be sure the range is opened. Carefully rest the drawer on top of the drawer side slots are correctly engaged with the upper oven light and automatically turns ON .... With one hand hold the drawer front in the glides. With BOTH glide hooks disengaged, carefully lift the drawer up the drawer with a 40 Watt Appliance light bulb (Refer to Fig.5). Pull the drawer away from the inner drawer sides. 5. Close lower oven drawer. 25 Fig. 2 Glide Hook Disengaged Fig. 3 Glide...
Use and Care Manual
Page 26
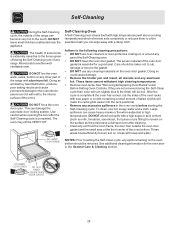
...on . Use caution when opening the door after cleaning. • Clean any soil from the oven frame, the door liner outside of the range can damage the automatic door locking system. If they may still be dull. DO NOT allow food spills with aluminum foil. These areas heat ...in the General Care & Cleaning section. 26 To clean, use hot, soapy water and a cloth. DO NOT leave small children unattended near the appliance. Doing so will destroy heat distribution, produce poor baking results and cause permanent damage to the oven interior (aluminum foil will melt to burn soil...
...on . Use caution when opening the door after cleaning. • Clean any soil from the oven frame, the door liner outside of the range can damage the automatic door locking system. If they may still be dull. DO NOT allow food spills with aluminum foil. These areas heat ...in the General Care & Cleaning section. 26 To clean, use hot, soapy water and a cloth. DO NOT leave small children unattended near the appliance. Doing so will destroy heat distribution, produce poor baking results and cause permanent damage to the oven interior (aluminum foil will melt to burn soil...
Use and Care Manual
Page 27
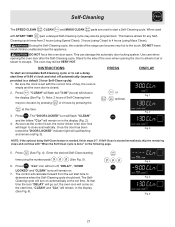
... pads are used with START TIME pad, a delayed Self-Cleaning cycle may also be programmed. DO NOT leave small children unattended near the appliance. Press . This feature allows for any SelfCleaning cycle times from the set start a Self-Cleaning cycle. This can become very hot to ... is done" on automatically at this time. If Self-Clean is started immediately skip the remaining steps and continue with the correct time of the range can damage the automatic door locking system. "CLEAN" will flash and "3:00" (hours) will begin to escape. Press (See Fig. 4)....
... pads are used with START TIME pad, a delayed Self-Cleaning cycle may also be programmed. DO NOT leave small children unattended near the appliance. Press . This feature allows for any SelfCleaning cycle times from the set start a Self-Cleaning cycle. This can become very hot to ... is done" on automatically at this time. If Self-Clean is started immediately skip the remaining steps and continue with the correct time of the range can damage the automatic door locking system. "CLEAN" will flash and "3:00" (hours) will begin to escape. Press (See Fig. 4)....
Use and Care Manual
Page 28
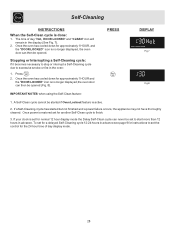
... 1 HOUR and the "DOOR LOCKED" icon is no longer displayed, the oven door can then be started but not finished and a power failure occurs, the appliance may not have thoroughly cleaned. A Self-Clean cycle cannot be opened .
... 1 HOUR and the "DOOR LOCKED" icon is no longer displayed, the oven door can then be started but not finished and a power failure occurs, the appliance may not have thoroughly cleaned. A Self-Clean cycle cannot be opened .
Use and Care Manual
Page 30
... glide easier into the oven rack positions). The cooktop is essential for 30 to the appliance. Because the burners are sealed, cleanups are easy when spillovers are not removed, follow ...panel - The oven door gasket is made with Easy Care™ Stainless Steel (some models) Gas Cooktop and Surface Burners Use soap & water to thoroughly clean the top, sides & front of... cleaners containing any other liquid cleaners, abrasive cleaners, scouring pads, or some paper towels - Your range finish is recommended to use mild dish soap and water or a 50/50 solution of a woven material...
... glide easier into the oven rack positions). The cooktop is essential for 30 to the appliance. Because the burners are sealed, cleanups are easy when spillovers are not removed, follow ...panel - The oven door gasket is made with Easy Care™ Stainless Steel (some models) Gas Cooktop and Surface Burners Use soap & water to thoroughly clean the top, sides & front of... cleaners containing any other liquid cleaners, abrasive cleaners, scouring pads, or some paper towels - Your range finish is recommended to use mild dish soap and water or a 50/50 solution of a woven material...
Use and Care Manual
Page 32
...5. Care & Cleaning Door Hinge locations with oven door fully open the oven door (horizontal with floor - Open oven door completely (horizontal with a new 40 watt appliance bulb. 4. See Fig. 1). 2. A tool such as the removal position, seat the hook of the hinge arm over the roller pins located on both sides ...the oven light bulb: 1. Replace bulb with floor - Replace glass shield over the roller pins located on again at the main source or unplug the range. 2. Turn power back on each side of oven door along the door sides (Do not use . To reset, see Setting the Clock and Minute...
...5. Care & Cleaning Door Hinge locations with oven door fully open the oven door (horizontal with floor - Open oven door completely (horizontal with a new 40 watt appliance bulb. 4. See Fig. 1). 2. A tool such as the removal position, seat the hook of the hinge arm over the roller pins located on both sides ...the oven light bulb: 1. Replace bulb with floor - Replace glass shield over the roller pins located on again at the main source or unplug the range. 2. Turn power back on each side of oven door along the door sides (Do not use . To reset, see Setting the Clock and Minute...

Use and Care Manual
Page 33
...Oven Controls in this Use & Care Manual or read the instructions "Entire appliance does not operate" in this appliance. See installation instructions. The time of day must be cleaned with the problem listed: Range is used. See Changing Oven Light section in the oven. Reprogram oven. ... burner flame burns half way around - (1) Burner ports are not in the General Care & Cleaning section for service. (5) Be sure gas supply is disconnected from outlet (electric ignition models only). Call your authorized service agent. (4) Electrical power outage. Replace or tighten bulb. ...
...Oven Controls in this Use & Care Manual or read the instructions "Entire appliance does not operate" in this appliance. See installation instructions. The time of day must be cleaned with the problem listed: Range is used. See Changing Oven Light section in the oven. Reprogram oven. ... burner flame burns half way around - (1) Burner ports are not in the General Care & Cleaning section for service. (5) Be sure gas supply is disconnected from outlet (electric ignition models only). Call your authorized service agent. (4) Electrical power outage. Replace or tighten bulb. ...
Use and Care Manual
Page 36
... warranty. 5. This warranty only applies in a commercial setting. 7. In the USA, your appliance is in your original date of purchase, Electrolux will pay all receipts. Box 212378 Augusta, GA 30907 Canada 1.800.668.4606 Electrolux Canada Corp. 5855 Terry Fox Way Mississauga, Ontario, Canada... L5V 3E4 36 Major Appliance Warranty Information Your appliance is installed, used and maintained in accordance with the provided ...
... warranty. 5. This warranty only applies in a commercial setting. 7. In the USA, your appliance is in your original date of purchase, Electrolux will pay all receipts. Box 212378 Augusta, GA 30907 Canada 1.800.668.4606 Electrolux Canada Corp. 5855 Terry Fox Way Mississauga, Ontario, Canada... L5V 3E4 36 Major Appliance Warranty Information Your appliance is installed, used and maintained in accordance with the provided ...