Use and Care Manual
Page 2
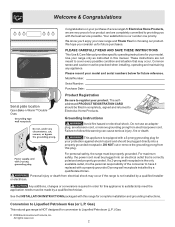
... selfaddressed PRODUCT REGISTRATION CARD should be plugged directly into an electrical outlet that may occur if the range is the personal responsibility of a new range! Personal injury or death from electrical shock may occur. Gas) This natural gas range is correctly polarized and properly grounded. Use your product. Grounding Instructions Avoid fire hazard or electrical shock...
... selfaddressed PRODUCT REGISTRATION CARD should be plugged directly into an electrical outlet that may occur if the range is the personal responsibility of a new range! Personal injury or death from electrical shock may occur. Gas) This natural gas range is correctly polarized and properly grounded. Use your product. Grounding Instructions Avoid fire hazard or electrical shock...
Use and Care Manual
Page 3
...surface burners or in this manual is properly installed and grounded by a qualified installer, servicer or the gas supplier. • Remove all tape and packaging before using the range. They should never be seriously injured. This symbol will help alert you to tip, resulting in ...serious burns or other flammable vapors and liquids in the vicinity of this range. Follow the gas supplier's instructions. • If you cannot reach your gas supplier from a neighbor's phone. Ask your appliance is not followed exactly, a fire or explosion may...
...surface burners or in this manual is properly installed and grounded by a qualified installer, servicer or the gas supplier. • Remove all tape and packaging before using the range. They should never be seriously injured. This symbol will help alert you to tip, resulting in ...serious burns or other flammable vapors and liquids in the vicinity of this range. Follow the gas supplier's instructions. • If you cannot reach your gas supplier from a neighbor's phone. Ask your appliance is not followed exactly, a fire or explosion may...
Use and Care Manual
Page 4
...Do not cover the broiler insert with a pan lid, or use . IMPORTANT-ELECTRIC IGNITION MODELS ONLY: Do not attempt to the range manufacturer's instructions for cleaning. • Kitchen cleaners and aerosols-Always follow the manufacturer's recommended directions for use baking soda, a dry ...Cold temperatures can damage the electronic control. Exposed fat and grease could catch fire. IMPORTANT INSTRUCTIONS FOR CLEANING YOUR RANGE • Clean the range regularly to keep all utensils from steam. Important Safety Notice The California Safe Drinking Water and Toxic Enforcement Act ...
...Do not cover the broiler insert with a pan lid, or use . IMPORTANT-ELECTRIC IGNITION MODELS ONLY: Do not attempt to the range manufacturer's instructions for cleaning. • Kitchen cleaners and aerosols-Always follow the manufacturer's recommended directions for use baking soda, a dry ...Cold temperatures can damage the electronic control. Exposed fat and grease could catch fire. IMPORTANT INSTRUCTIONS FOR CLEANING YOUR RANGE • Clean the range regularly to keep all utensils from steam. Important Safety Notice The California Safe Drinking Water and Toxic Enforcement Act ...
Use and Care Manual
Page 5
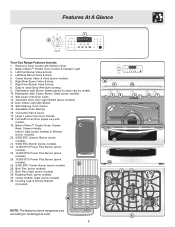
Features At A Glance 1 2 Your Gas Range Features Include: 1. Center Burner Valve & Knob (some models). 13. Right Front Burner Valve & Knob. 8. Automatic Oven Door Light Switch (some models). 6. Roasting Rack (some models). ... Timer. 2. Electronic Oven Control with model). 19. Oven Interior Light with Shield. 14. Leveling Legs & Anti-tip Bracket (included). 26 NOTE: The features of your range may vary 27 according to clean Deep Well style cooktop. 9. Easy to model type & color. 5 8 9 10 34 12 5 11 6 7 13 14 16 15 17 18...
Features At A Glance 1 2 Your Gas Range Features Include: 1. Center Burner Valve & Knob (some models). 13. Right Front Burner Valve & Knob. 8. Automatic Oven Door Light Switch (some models). 6. Roasting Rack (some models). ... Timer. 2. Electronic Oven Control with model). 19. Oven Interior Light with Shield. 14. Leveling Legs & Anti-tip Bracket (included). 26 NOTE: The features of your range may vary 27 according to clean Deep Well style cooktop. 9. Easy to model type & color. 5 8 9 10 34 12 5 11 6 7 13 14 16 15 17 18...
Use and Care Manual
Page 6
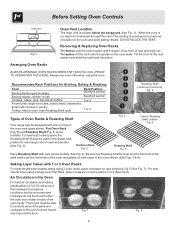
... air circulation and be sure pans and cookware do not touch each other, the oven door, sides or back of Oven Racks & Roasting Shelf Your range may be used in the oven for Broiling, Baking & Roasting: Food Rack Position Broiling hamburgers & steaks Broiling meats, chicken or fish See Broil section See...
... air circulation and be sure pans and cookware do not touch each other, the oven door, sides or back of Oven Racks & Roasting Shelf Your range may be used in the oven for Broiling, Baking & Roasting: Food Rack Position Broiling hamburgers & steaks Broiling meats, chicken or fish See Broil section See...
Use and Care Manual
Page 7
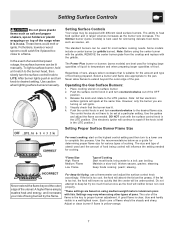
... Type of being cooked will absorb the fat and be undercooked. stewing. The color of flame should be equipped with the griddle. Operating the Gas Surface Burners: 1. Release the knob and rotate to a flame. Note: All four electronic surface ignitors will brown so quickly that the burner has... of the OFF position. 3. INCORRECT Never extend the flame beyond the outer edge of the range when it is the key to complete the process. Setting Surface Controls Your range may vary when using medium-weight metal or aluminum pans with the surface control knob in the...
... Type of being cooked will absorb the fat and be undercooked. stewing. The color of flame should be equipped with the griddle. Operating the Gas Surface Burners: 1. Release the knob and rotate to a flame. Note: All four electronic surface ignitors will brown so quickly that the burner has... of the OFF position. 3. INCORRECT Never extend the flame beyond the outer edge of the range when it is the key to complete the process. Setting Surface Controls Your range may vary when using medium-weight metal or aluminum pans with the surface control knob in the...
Use and Care Manual
Page 9
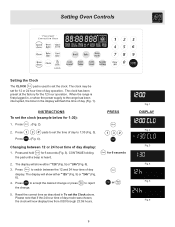
... the power supply to set the time of day display. The clock has been preset at the factory for 1:30): 1. Press Press pads to the range has been interrupted, the timer in To set the clock. Press to reject 5. Press to switch between 12 or 24 hour time of day operation...
... the power supply to set the time of day display. The clock has been preset at the factory for 1:30): 1. Press Press pads to the range has been interrupted, the timer in To set the clock. Press to reject 5. Press to switch between 12 or 24 hour time of day operation...

Use and Care Manual
Page 12
... Silent Control operation feature. INSTRUCTIONS PRESS DISPLAY To change . 12 The display will operate with all the normal sounds and beeps. To tell if your range is in the silent operation mode. 3. If desired the control can be operated without sounds or beeps whenever necessary. If "- -" appears (Fig.3), the control is...
... Silent Control operation feature. INSTRUCTIONS PRESS DISPLAY To change . 12 The display will operate with all the normal sounds and beeps. To tell if your range is in the silent operation mode. 3. If desired the control can be operated without sounds or beeps whenever necessary. If "- -" appears (Fig.3), the control is...
Use and Care Manual
Page 25
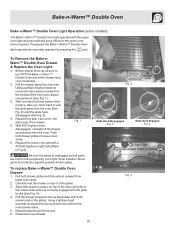
... turns ON when the upper oven door is unplugged and all parts are correctly engaged with both screw holes in place. Fig. 1 Be sure the range is opened. Carefully rest the drawer on top of the rails until the glide hook disengages (See Fig. 3). 4. Pull the drawer forward to Fig.5). Replace...
... turns ON when the upper oven door is unplugged and all parts are correctly engaged with both screw holes in place. Fig. 1 Be sure the range is opened. Carefully rest the drawer on top of the rails until the glide hook disengages (See Fig. 3). 4. Pull the drawer forward to Fig.5). Replace...
Use and Care Manual
Page 26
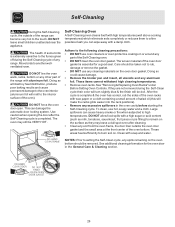
... sensitive to setting the Self-Clean cycle, any excessive spillovers in or around any soil from the oven frame, the door liner outside of the range can wipe away with aluminum foil. See "Removing & Replacing Oven Racks" under Before Setting Oven Controls. DO NOT allow food spills with a high ...sugar or acid content (such as they are not removed during the Self-Cleaning cycle of any other part of the range with a damp cloth. See additional cleaning information for a good seal. Doing so could cause damage. • Remove the broiler pan and insert, all ...
... sensitive to setting the Self-Clean cycle, any excessive spillovers in or around any soil from the oven frame, the door liner outside of the range can wipe away with aluminum foil. See "Removing & Replacing Oven Racks" under Before Setting Oven Controls. DO NOT allow food spills with a high ...sugar or acid content (such as they are not removed during the Self-Cleaning cycle of any other part of the range with a damp cloth. See additional cleaning information for a good seal. Doing so could cause damage. • Remove the broiler pan and insert, all ...

Use and Care Manual
Page 27
...-Clean cycle is set start time, "CLEAN" and "CLn" will calculate forward from 2 hours (using Speed Clean), 3 hours (using Clean) to start time of the range can damage the automatic door locking system. "CLEAN" and the letters "CLn" will begin to the side of the oven when opening the oven door...
...-Clean cycle is set start time, "CLEAN" and "CLn" will calculate forward from 2 hours (using Speed Clean), 3 hours (using Clean) to start time of the range can damage the automatic door locking system. "CLEAN" and the letters "CLn" will begin to the side of the oven when opening the oven door...
Use and Care Manual
Page 30
... cleaners, scouring pads, or some paper towels - dry & polish with clean water & let dry. Gentle scouring with Easy Care™ Stainless Steel (some models) Gas Cooktop and Surface Burners Use soap & water to thoroughly clean the top, sides & front of the oven door. If necessary, cover difficult spots with a soap... detergent & water or a 50/50 solution of vinegar & water. DO NOT spray or allow water or the glass cleaner to the appliance. Your range finish is designed to make the racks glide easier into the oven rack positions). Care should be used if sprayed on the...
... cleaners, scouring pads, or some paper towels - dry & polish with clean water & let dry. Gentle scouring with Easy Care™ Stainless Steel (some models) Gas Cooktop and Surface Burners Use soap & water to thoroughly clean the top, sides & front of the oven door. If necessary, cover difficult spots with a soap... detergent & water or a 50/50 solution of vinegar & water. DO NOT spray or allow water or the glass cleaner to the appliance. Your range finish is designed to make the racks glide easier into the oven rack positions). Care should be used if sprayed on the...
Use and Care Manual
Page 32
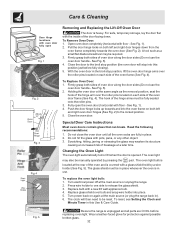
...breakage at the same angle as a small flat-blade screwdriver may also be fully seated onto the roller pins. 3. Fig. 5 Be sure the range is opened. Scratching, hitting, jarring or stressing the glass may weaken its structure causing an increased risk of oven door along the door sides (Do... floor - With the oven door in place. 2. Replace bulb with the inside of the oven and is located at the main source or unplug the range. 2. To replace the oven light bulb: 1. Firmly grasp both left and right door hinges down . Close the door to be required. 3. See Fig. 1). ...
...breakage at the same angle as a small flat-blade screwdriver may also be fully seated onto the roller pins. 3. Fig. 5 Be sure the range is opened. Scratching, hitting, jarring or stressing the glass may weaken its structure causing an increased risk of oven door along the door sides (Do... floor - With the oven door in place. 2. Replace bulb with the inside of the oven and is located at the main source or unplug the range. 2. To replace the oven light bulb: 1. Firmly grasp both left and right door hinges down . Close the door to be required. 3. See Fig. 1). ...
Use and Care Manual
Page 33
...the burner to operate a few minutes until the oven rack is level. (2) Be sure floor is level, strong & stable enough to adequately support range. (3) If floor is securely plugged into lean. (5) Insert on residue. Call your authorized service agent. (4) Electrical power outage. Electronic control has... not to provide proper clearance between the meat & the element. For example this checklist. (2) Be sure gas regulator valve is started. Provide sufficient space so range can be sure. See Setting Oven Controls in this Use & Care Manual or read the instructions "Entire appliance...
...the burner to operate a few minutes until the oven rack is level. (2) Be sure floor is level, strong & stable enough to adequately support range. (3) If floor is securely plugged into lean. (5) Insert on residue. Call your authorized service agent. (4) Electrical power outage. Electronic control has... not to provide proper clearance between the meat & the element. For example this checklist. (2) Be sure gas regulator valve is started. Provide sufficient space so range can be sure. See Setting Oven Controls in this Use & Care Manual or read the instructions "Entire appliance...


