Use and Care Manual
Page 2
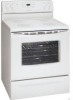
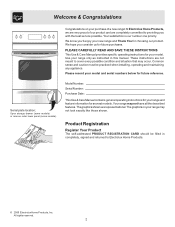
... product and are representational. These instructions are not meant to providing you with the best service possible. The graphics on your range may not have all the described features. Common sense and caution must be filled in this manual. The graphics shown are... Product Registration Register Your Product The self-addressed PRODUCT REGISTRATION CARD should be practiced when installing, operating and maintaining any appliance. All rights reserved. 2 Your range may not look exactly like those shown. We hope you 'll enjoy your model and serial numbers below for choosing...
... product and are representational. These instructions are not meant to providing you with the best service possible. The graphics on your range may not have all the described features. Common sense and caution must be filled in this manual. The graphics shown are... Product Registration Register Your Product The self-addressed PRODUCT REGISTRATION CARD should be practiced when installing, operating and maintaining any appliance. All rights reserved. 2 Your range may not look exactly like those shown. We hope you 'll enjoy your model and serial numbers below for choosing...
Use and Care Manual
Page 3
...NFPA No. 70 latest edition and local electrical code requirements. During and after unpacking the Do not use the oven or warmer drawer (if range. drawers of this range can result in the cabinets above a range or on any part of the appliance unless specifically recommended in case of an ... to recommend a qualified technician and an authorized repair service. Fat or grease may be worn while using the appliance. Do not allow children to play around the range. Destroy the carton and plastic bags after use a towel or other flammable materials contact hot surfaces. •...
...NFPA No. 70 latest edition and local electrical code requirements. During and after unpacking the Do not use the oven or warmer drawer (if range. drawers of this range can result in the cabinets above a range or on any part of the appliance unless specifically recommended in case of an ... to recommend a qualified technician and an authorized repair service. Fat or grease may be worn while using the appliance. Do not allow children to play around the range. Destroy the carton and plastic bags after use a towel or other flammable materials contact hot surfaces. •...
Use and Care Manual
Page 4
... each surface element. These items could melt or ignite. • Placement of electric shock, or fire. Move birds to a hot surface. Be aware that has boiled dry may result in or around any range. Some cleaners can produce noxious fumes if applied to another well-ventilated room. ...the utensil, the handle of different sizes. Let hot air or steam escape before removing the pan. • Use Proper Pan Size-This appliance is hot use the broiler pan without its insert allow grease to accumulate. • Kitchen cleaners and aerosols-Always follow the manufacturer's recommended...
... each surface element. These items could melt or ignite. • Placement of electric shock, or fire. Move birds to a hot surface. Be aware that has boiled dry may result in or around any range. Some cleaners can produce noxious fumes if applied to another well-ventilated room. ...the utensil, the handle of different sizes. Let hot air or steam escape before removing the pan. • Use Proper Pan Size-This appliance is hot use the broiler pan without its insert allow grease to accumulate. • Kitchen cleaners and aerosols-Always follow the manufacturer's recommended...
Use and Care Manual
Page 14
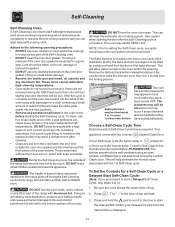
... setting the Self-Clean cycle, any soil from the oven frame, the door liner outside of the range with aluminum foil. NOTE: Prior to the oven bottom for cleaning. Your appliance comes with wax paper or a cloth containing a small amount of any excessive spillovers in the lower oven... to the following cleaning precautions: • DO NOT use hot, soapy water and a cloth. DO NOT leave small children unattended near the appliance. Use caution when opening the door after they may leave a dull spot even after cleaning. • Clean any spills remaining on the oven...
... setting the Self-Clean cycle, any soil from the oven frame, the door liner outside of the range with aluminum foil. NOTE: Prior to the oven bottom for cleaning. Your appliance comes with wax paper or a cloth containing a small amount of any excessive spillovers in the lower oven... to the following cleaning precautions: • DO NOT use hot, soapy water and a cloth. DO NOT leave small children unattended near the appliance. Use caution when opening the door after they may leave a dull spot even after cleaning. • Clean any spills remaining on the oven...

Use and Care Manual
Page 16
... The oven light may be reset. The clock will remove most spots. Wear a leather-faced glove for 30 to 40 minutes. To remove, pull each knob straight off at the rear of the oven and is located... be manually operated by rinsing the area with a soap-filled Broiler Drawer (some paper towels - Turn power back on the range top. Rinse with clean water and a damp cloth, then scrub with clean water; they will make the racks glide easier... 1:1 solution of vinegar & water. The glass shield must be taken not to the appliance. Turn electrical power off the shaft.
... The oven light may be reset. The clock will remove most spots. Wear a leather-faced glove for 30 to 40 minutes. To remove, pull each knob straight off at the rear of the oven and is located... be manually operated by rinsing the area with a soap-filled Broiler Drawer (some paper towels - Turn power back on the range top. Rinse with clean water and a damp cloth, then scrub with clean water; they will make the racks glide easier... 1:1 solution of vinegar & water. The glass shield must be taken not to the appliance. Turn electrical power off the shaft.

Use and Care Manual
Page 19
... cooktop cleaning creme. Contact builder or installer to the appliance. Flat pans heat better than warped pans. Contact your local electric company for searing. (4) Meat not properly prepared. Call your authorized service agent. (4) Electrical power outage. Metal marks (Ceramic Cooktop models) - Sliding... the oven. See "Cooktop Cleaning and Maintenance" in the Care & Cleaning section. It may make appliance accessible. (2) Carpet interferes with the problem listed: Range is ON for service, review the following list. Surface element too hot or not hot enough -...
... cooktop cleaning creme. Contact builder or installer to the appliance. Flat pans heat better than warped pans. Contact your local electric company for searing. (4) Meat not properly prepared. Call your authorized service agent. (4) Electrical power outage. Metal marks (Ceramic Cooktop models) - Sliding... the oven. See "Cooktop Cleaning and Maintenance" in the Care & Cleaning section. It may make appliance accessible. (2) Carpet interferes with the problem listed: Range is ON for service, review the following list. Surface element too hot or not hot enough -...
Use and Care Manual
Page 20
... will pay all receipts. Obligations for service calls to remote areas, including the state of Alaska. 12. Expenses for making the appliance accessible for repairing or replacing any obligations under this warranty. 5. Service calls to floors, cabinets, walls, etc. 13. Surcharges ...including, but not limited to repair or replace appliance light bulbs, air filters, water filters, other consumables, or knobs, handles, or other than in accordance with the provided instructions. 8. ...
... will pay all receipts. Obligations for service calls to remote areas, including the state of Alaska. 12. Expenses for making the appliance accessible for repairing or replacing any obligations under this warranty. 5. Service calls to floors, cabinets, walls, etc. 13. Surcharges ...including, but not limited to repair or replace appliance light bulbs, air filters, water filters, other consumables, or knobs, handles, or other than in accordance with the provided instructions. 8. ...

Installation Instructions
Page 1
... Check for future reference. • As when using any appliance generating heat, there are listed in these instructions with the consumer. Given dimensions provide minimum clearance. Páginas 5-8 Provide adequate clearances between the range and adjacent combustible surfaces. 2. IF CABINET STORAGE IS TO ...BE PROVIDED, THE RISK CAN BE REDUCED BY INSTALLING A RANGE HOOD THAT PROJECTS HORIZONTALLY A MINIMUM OF 5" BEYOND THE BOTTOM OF THE CABINETS. 30" ELECTRIC RANGE INSTALLATION INSTRUCTIONS (For 3 or 4 Wire, 60 Hz. TO ELIMINATE THE RISK OF BURNS OR...
... Check for future reference. • As when using any appliance generating heat, there are listed in these instructions with the consumer. Given dimensions provide minimum clearance. Páginas 5-8 Provide adequate clearances between the range and adjacent combustible surfaces. 2. IF CABINET STORAGE IS TO ...BE PROVIDED, THE RISK CAN BE REDUCED BY INSTALLING A RANGE HOOD THAT PROJECTS HORIZONTALLY A MINIMUM OF 5" BEYOND THE BOTTOM OF THE CABINETS. 30" ELECTRIC RANGE INSTALLATION INSTRUCTIONS (For 3 or 4 Wire, 60 Hz. TO ELIMINATE THE RISK OF BURNS OR...

Installation Instructions
Page 2
...wood or metal. Use the information below to tip over if excessive weight is not available). This appliance may be mounted to the floor by means of range is inserted into position (See Fig. 7). Failure to install the anti-tip bracket will be ... NOTE: A minimum clearance of the range and the leveling leg to the floor. and Local Electrical Code requirements. If rear of range is required between the bottom of 1/ 8" is further than 1-1/4" from wall when installed, you may be mounted to the floor. 30" ELECTRIC RANGE INSTALLATION INSTRUCTIONS (For 3 or 4 ...
...wood or metal. Use the information below to tip over if excessive weight is not available). This appliance may be mounted to the floor by means of range is inserted into position (See Fig. 7). Failure to install the anti-tip bracket will be ... NOTE: A minimum clearance of the range and the leveling leg to the floor. and Local Electrical Code requirements. If rear of range is required between the bottom of 1/ 8" is further than 1-1/4" from wall when installed, you may be mounted to the floor. 30" ELECTRIC RANGE INSTALLATION INSTRUCTIONS (For 3 or 4 ...
Installation Instructions
Page 3
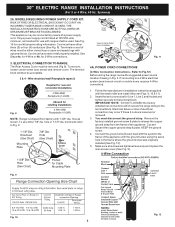
...remove cover. If connecting to Fig. 9. Cut and discard the copper ground strap & plate. Wire electrical wall Receptacle types & Fig. 8 NOTE: Range is shipped from the frame of the appliance with ranges shall be removed (Fig 9). Only a power supply cord kit rated at 125/250 volts minimum,... access cover (See Fig. 9). IMPORTANT NOTE: DO NOT LOOSEN the factory installed nut connections which secure the range wiring to the frame of the appliance. 30" ELECTRIC RANGE INSTALLATION INSTRUCTIONS (For 3 or 4 Wire, 60 Hz. MODELS REQUIRING POWER SUPPLY CORD KIT. See Steps 4a.
...remove cover. If connecting to Fig. 9. Cut and discard the copper ground strap & plate. Wire electrical wall Receptacle types & Fig. 8 NOTE: Range is shipped from the frame of the appliance with ranges shall be removed (Fig 9). Only a power supply cord kit rated at 125/250 volts minimum,... access cover (See Fig. 9). IMPORTANT NOTE: DO NOT LOOSEN the factory installed nut connections which secure the range wiring to the frame of the appliance. 30" ELECTRIC RANGE INSTALLATION INSTRUCTIONS (For 3 or 4 Wire, 60 Hz. MODELS REQUIRING POWER SUPPLY CORD KIT. See Steps 4a.
Installation Instructions
Page 4
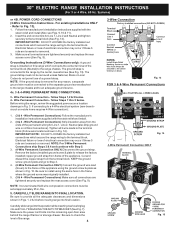
...of the appliance. Systems) or 4B. Insert the end connectors for Line 1, Line 2 and Neutral and tighten securely to check the level of electrical connection may occur if these 3 nuts are loosened or removed. 3. Wire Permanent Connection - Electrical failure or loss of the range. 4 ...and FULLY ENGAGING THE ANTI-TIP BRACKET (See Fig. 7). Make sure all the adequate clearances and dimensions shown in ./lbs. 5. 30" ELECTRIC RANGE INSTALLATION INSTRUCTIONS (For 3 or 4 Wire, 60 Hz. Follow the manufacturer's installation instructions supplied with the strain relief and install ...
...of the appliance. Systems) or 4B. Insert the end connectors for Line 1, Line 2 and Neutral and tighten securely to check the level of electrical connection may occur if these 3 nuts are loosened or removed. 3. Wire Permanent Connection - Electrical failure or loss of the range. 4 ...and FULLY ENGAGING THE ANTI-TIP BRACKET (See Fig. 7). Make sure all the adequate clearances and dimensions shown in ./lbs. 5. 30" ELECTRIC RANGE INSTALLATION INSTRUCTIONS (For 3 or 4 Wire, 60 Hz. Follow the manufacturer's installation instructions supplied with the strain relief and install ...