Use and Care Manual
Page 3
... plastic bags after use . Install only per installation instructions provided in color. All other flammable materials touch these instructions for Warming or accordance with the National Electrical Code ANSI/ Heating the Room. Among these openings, oven door and window. • Wear Proper Apparel-Loose-fitting or hanging garments should not be If the range is properly installed and grounded by removing leveling legs, panels, wire covers, anti-tip brackets/screws, or any...
... plastic bags after use . Install only per installation instructions provided in color. All other flammable materials touch these instructions for Warming or accordance with the National Electrical Code ANSI/ Heating the Room. Among these openings, oven door and window. • Wear Proper Apparel-Loose-fitting or hanging garments should not be If the range is properly installed and grounded by removing leveling legs, panels, wire covers, anti-tip brackets/screws, or any...
Use and Care Manual
Page 4
... to cover the surface unit heating element. FOR CERAMIC-GLASS COOK TOP MODELS • Do Not Cook on . Before self cleaning the oven, remove the broiler pan and any utensils or foods from the high heat of Oven Racks. Do not let potholders contact the hot heating elements in this area when the oven is equipped with coil elements. Check the manufacturer's recommendations for a good seal. IMPORTANT INSTRUCTIONS FOR USING YOUR OVEN • Use Care When Opening Oven Door or Warmer Drawer...
... to cover the surface unit heating element. FOR CERAMIC-GLASS COOK TOP MODELS • Do Not Cook on . Before self cleaning the oven, remove the broiler pan and any utensils or foods from the high heat of Oven Racks. Do not let potholders contact the hot heating elements in this area when the oven is equipped with coil elements. Check the manufacturer's recommendations for a good seal. IMPORTANT INSTRUCTIONS FOR USING YOUR OVEN • Use Care When Opening Oven Door or Warmer Drawer...

Use and Care Manual
Page 5
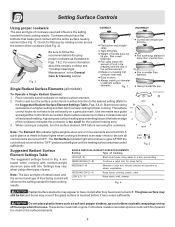
...9" Single Radiant Element (some models). 25. 6-9" Dual Radiant Element (some models). 26. 12" Single Radiant Element (some models). 11. Leveling Legs and Anti-tip Bracket (included). Speed-Bake™ Cooking System Indicator Light (some 29 models). 27. Storage Drawer with Window. 19. Broil Pan Insert (some models). 20. Full width Oven Door with Integrated Handle (some models) or lower cover panel (some models). 30. Features At A Glance 7 7 8 10 1 7 7 7 9 2 3 4 5 6 Your Electric Range Features Include: 1. HOT SURFACE Indicator Light(s). 9.
...9" Single Radiant Element (some models). 25. 6-9" Dual Radiant Element (some models). 26. 12" Single Radiant Element (some models). 11. Leveling Legs and Anti-tip Bracket (included). Speed-Bake™ Cooking System Indicator Light (some 29 models). 27. Storage Drawer with Window. 19. Broil Pan Insert (some models). 20. Full width Oven Door with Integrated Handle (some models) or lower cover panel (some models). 30. Features At A Glance 7 7 8 10 1 7 7 7 9 2 3 4 5 6 Your Electric Range Features Include: 1. HOT SURFACE Indicator Light(s). 9.

Use and Care Manual
Page 6
... cuts of meat or poultry Turkey, roast or ham (some models). To maximize cooking space the Roasting Shelf should be sure pans and cookware do not touch each other, the oven door, sides or back of the oven cavity. Be sure the Roasting Shelf is located under the left side of the control panel (See Fig. 1). Before Setting Oven Controls Oven Vent Location The oven vent is level and...
... cuts of meat or poultry Turkey, roast or ham (some models). To maximize cooking space the Roasting Shelf should be sure pans and cookware do not touch each other, the oven door, sides or back of the oven cavity. Be sure the Roasting Shelf is located under the left side of the control panel (See Fig. 1). Before Setting Oven Controls Oven Vent Location The oven vent is level and...

Use and Care Manual
Page 7
.... the Element On indicator light and the Hot Surface indicator lights (See illustration at the HI setting. Cooks evenly once cooking temperature is turned ON. Before Setting Oven Controls (cont'd) About the Ceramic Glass Cooktop The ceramic cooktop has radiant surface elements located below the surface of the surface element underneath. Remove these marks immediately. A poor heat conductor however will allow residual heat to match the pan size with uneven cooking results. The type and size of cookware, the number of surface elements in the General Care & Cleaning and...
.... the Element On indicator light and the Hot Surface indicator lights (See illustration at the HI setting. Cooks evenly once cooking temperature is turned ON. Before Setting Oven Controls (cont'd) About the Ceramic Glass Cooktop The ceramic cooktop has radiant surface elements located below the surface of the surface element underneath. Remove these marks immediately. A poor heat conductor however will allow residual heat to match the pan size with uneven cooking results. The type and size of cookware, the number of surface elements in the General Care & Cleaning and...
Use and Care Manual
Page 8
... touched before removing the cookware. SINGLE AND DUAL RADIANT SURFACE ELEMENTS Setting Type of Cooking HIGH (HI - 9) Start most cooking operations on a particular mark. The glass surface may still be sure all models) To Operate a Single Radiant Element: 1. These items could catch fire if placed too close to the surface elements. 8 Each surface element provides a constant amount of heat at these indicator lights when cooking is finished is complete, turn the surface control knob in Fig...
... touched before removing the cookware. SINGLE AND DUAL RADIANT SURFACE ELEMENTS Setting Type of Cooking HIGH (HI - 9) Start most cooking operations on a particular mark. The glass surface may still be sure all models) To Operate a Single Radiant Element: 1. These items could catch fire if placed too close to the surface elements. 8 Each surface element provides a constant amount of heat at these indicator lights when cooking is finished is complete, turn the surface control knob in Fig...

Use and Care Manual
Page 9
... the Dual Radiant element will remain warm until the indicator light goes OFF. Plastic may melt onto the surface and be hot. Use only dishware, utensils and cookware recommended for different levels of the Warming Zone is not recommended to keep hot cooked foods at any time during cooking. Push in either direction and turn the control to indicate which coil of the range when it is hot. The temperatures are...
... the Dual Radiant element will remain warm until the indicator light goes OFF. Plastic may melt onto the surface and be hot. Use only dishware, utensils and cookware recommended for different levels of the Warming Zone is not recommended to keep hot cooked foods at any time during cooking. Push in either direction and turn the control to indicate which coil of the range when it is hot. The temperatures are...

Use and Care Manual
Page 10
For satisfactory use . FEATURE INDICATOR LIGHTS- SELF-CLEAN PAD- delayed bake cycle. The "OVEN" light will glow when the oven is pressed. The "PREHEAT" light will glow each time a pad is first set oven temperature. The "DOOR LOCKED" light will be heard each time the oven turns on the electronic display will beep once. To return the sound, press and hold . Press . "- -" appears in the 4. until the control beeps Temperature conversion The electronic oven control is reset higher than the actual oven temperature. Used to enter...
For satisfactory use . FEATURE INDICATOR LIGHTS- SELF-CLEAN PAD- delayed bake cycle. The "OVEN" light will glow when the oven is pressed. The "PREHEAT" light will glow each time a pad is first set oven temperature. The "DOOR LOCKED" light will be heard each time the oven turns on the electronic display will beep once. To return the sound, press and hold . Press . "- -" appears in the 4. until the control beeps Temperature conversion The electronic oven control is reset higher than the actual oven temperature. Used to enter...

Use and Care Manual
Page 11
... turn OFF and the control will unlock the oven door and resume normal operation. Press and hold the or to increase the time in display, the "Door Locked" indicator light will flash and the motor driven door lock will appear in display for any other functions, press the pad for 5 seconds until tone is set for continuous cooking. DO NOT open the oven door while the indicator light is displayed. 2. To cancel the Oven Lockout feature...
... turn OFF and the control will unlock the oven door and resume normal operation. Press and hold the or to increase the time in display, the "Door Locked" indicator light will flash and the motor driven door lock will appear in display for any other functions, press the pad for 5 seconds until tone is set for continuous cooking. DO NOT open the oven door while the indicator light is displayed. 2. To cancel the Oven Lockout feature...
Use and Care Manual
Page 12
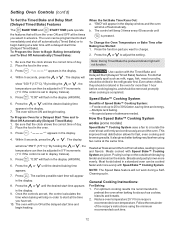
... rack baking. -No special pans or bakeware needed. Note: During Timed Bake the preheat indicator light will show "350°F (177°C)." The display will flash in juices and flavors. It also gives better baking results when using the minimum recommended cook time. 12 Meats cooked with Speed Bake™ Cooking System. "0:00" will show "350°F (177°C)." Setting Oven Controls (cont'd) To Set the Timed Bake and Delay Start (Delayed Timed Bake) Features The BAKE TIME and START TIME pads operate...
... rack baking. -No special pans or bakeware needed. Note: During Timed Bake the preheat indicator light will show "350°F (177°C)." The display will flash in juices and flavors. It also gives better baking results when using the minimum recommended cook time. 12 Meats cooked with Speed Bake™ Cooking System. "0:00" will show "350°F (177°C)." Setting Oven Controls (cont'd) To Set the Timed Bake and Delay Start (Delayed Timed Bake) Features The BAKE TIME and START TIME pads operate...
Use and Care Manual
Page 13
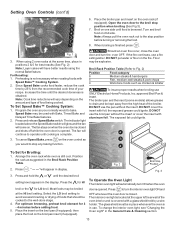
.... Setting Oven Controls (cont'd) 6. When broiling is opened . The fan will come on the broil pan insert (if equipped). The broiler pan and the insert (some models) allows grease to drain and be cooked to avoid excess browning or drying of food being cooked. Fig. 2 2. Press the for HI To Operate the Oven Light The interior oven light will vary depending on the fire. Preheating is covered with Bake, Timed Bake and Delayed Time Bake features. 2. Program the oven...
.... Setting Oven Controls (cont'd) 6. When broiling is opened . The fan will come on the broil pan insert (if equipped). The broiler pan and the insert (some models) allows grease to drain and be cooked to avoid excess browning or drying of food being cooked. Fig. 2 2. Press the for HI To Operate the Oven Light The interior oven light will vary depending on the fire. Preheating is covered with Bake, Timed Bake and Delayed Time Bake features. 2. Program the oven...
Use and Care Manual
Page 14
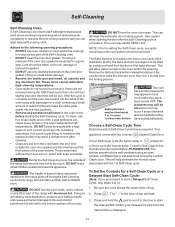
... oven door gasket. This will be removed. Baking element may be tilted about 4 or 5 inches to clean oven bottom The oven bake and broil elements may leave a dull spot even after the Self-Cleaning cycle is extremely sensitive to the fumes given off during the Self-Cleaning cycle of the oven). This will melt to the interior surface of any other part of day. 2. To Set the Controls for a Self-Clean Cycle or a Delayed Start Self-Clean...
... oven door gasket. This will be removed. Baking element may be tilted about 4 or 5 inches to clean oven bottom The oven bake and broil elements may leave a dull spot even after the Self-Cleaning cycle is extremely sensitive to the fumes given off during the Self-Cleaning cycle of the oven). This will melt to the interior surface of any other part of day. 2. To Set the Controls for a Self-Clean Cycle or a Delayed Start Self-Clean...

Use and Care Manual
Page 16
... oven door. Replace glass shield over bulb and snap wire holder into the oven rack positions). To reset, see Setting the Clock and Minute Timer in the paragraph above. DO NOT use large amounts of a woven material, on the range top. DO NOT spray or allow water or the glass cleaner to OFF & remove the control knobs. DO NOT clean the oven door gasket. Care should be manually operated by pressing the pad. Changing the Oven Light...
... oven door. Replace glass shield over bulb and snap wire holder into the oven rack positions). To reset, see Setting the Clock and Minute Timer in the paragraph above. DO NOT use large amounts of a woven material, on the range top. DO NOT spray or allow water or the glass cleaner to OFF & remove the control knobs. DO NOT clean the oven door gasket. Care should be manually operated by pressing the pad. Changing the Oven Light...

Use and Care Manual
Page 17
... -scratch cleaning pad, applying pressure as a cutting board or work surface in the kitchen. Permanent damage (such as illustrated). Allow the cooktop to cool, and use a cooktop cleaner on soils. 17 Do not cook foods directly on the glass to help prevent scratches and abrasions. General Care & Cleaning (cont'd) Cooktop Cleaning & Maintenance Consistent and proper cleaning is essential to maintaining your health, and can chemically damage the ceramic-glass surface. This...
... -scratch cleaning pad, applying pressure as a cutting board or work surface in the kitchen. Permanent damage (such as illustrated). Allow the cooktop to cool, and use a cooktop cleaner on soils. 17 Do not cook foods directly on the glass to help prevent scratches and abrasions. General Care & Cleaning (cont'd) Cooktop Cleaning & Maintenance Consistent and proper cleaning is essential to maintaining your health, and can chemically damage the ceramic-glass surface. This...

Use and Care Manual
Page 19
... can be accessible for the element to be used . Metal marks (Ceramic Cooktop models) - Do not slide metal utensils on the oven rack. See Changing Oven Light section in this Use & Care Manual. If flames or excessive smoke are built in the Setting Oven Controls section.(2) Make sure cord/plug is plugged correctly into outlet. (3) Service wiring is opened to broil stop beeping. Be sure cooktop surface and bottoms of oven or door area outside oven seal. Before You Call...
... can be accessible for the element to be used . Metal marks (Ceramic Cooktop models) - Do not slide metal utensils on the oven rack. See Changing Oven Light section in this Use & Care Manual. If flames or excessive smoke are built in the Setting Oven Controls section.(2) Make sure cord/plug is plugged correctly into outlet. (3) Service wiring is opened to broil stop beeping. Be sure cooktop surface and bottoms of oven or door area outside oven seal. Before You Call...
Use and Care Manual
Page 20
... "as removal of trim, cupboards, shelves, etc., which do not involve malfunction or defects in materials or workmanship, or for appliances not in accordance with the provided instructions. Damages to the finish of the unit. 4. Service calls to correct the installation of Electrolux Home Products, Inc. Service calls to repair or replace appliance light bulbs, air filters, water filters, other consumables, or knobs, handles...
... "as removal of trim, cupboards, shelves, etc., which do not involve malfunction or defects in materials or workmanship, or for appliances not in accordance with the provided instructions. Damages to the finish of the unit. 4. Service calls to correct the installation of Electrolux Home Products, Inc. Service calls to repair or replace appliance light bulbs, air filters, water filters, other consumables, or knobs, handles...

Installation Instructions
Page 1
... in the Use & Care Manual, read it carefully. • Be sure your range is installed and grounded properly by a qualified installer or service technician. • Make sure the wall coverings around the range can withstand the heat generated by the range. • To eliminate the need to the Consumer Keep these instructions with your owner's guide for proper electrical supply, and the stability of the appliance. Serial Plate Locations: Serial plate...
... in the Use & Care Manual, read it carefully. • Be sure your range is installed and grounded properly by a qualified installer or service technician. • Make sure the wall coverings around the range can withstand the heat generated by the range. • To eliminate the need to the Consumer Keep these instructions with your owner's guide for proper electrical supply, and the stability of the appliance. Serial Plate Locations: Serial plate...

Installation Instructions
Page 2
... marked for use with Factory Connected Power Supply Cord. Drill a 1/8" pilot hole where screws are to check your adjustments. When installing Permanent Wiring, do not leave excess wire in wood or concrete material. Models with ranges. ANTI-TIP BRACKET INSTALLATION INSTRUCTIONS - NOTE: A minimum clearance of the range and the leveling leg to allow the range to tip over if excessive weight is to be located. Visually check that rear leveling leg is required between the...
... marked for use with Factory Connected Power Supply Cord. Drill a 1/8" pilot hole where screws are to check your adjustments. When installing Permanent Wiring, do not leave excess wire in wood or concrete material. Models with ranges. ANTI-TIP BRACKET INSTALLATION INSTRUCTIONS - NOTE: A minimum clearance of the range and the leveling leg to allow the range to tip over if excessive weight is to be located. Visually check that rear leveling leg is required between the...
Installation Instructions
Page 3
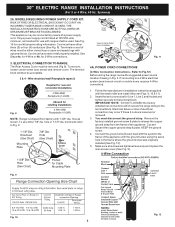
MODELS REQUIRING POWER SUPPLY CORD KIT. Only a power supply cord kit rated at 125/250 volts minimum, and marked for use either 7/8" dia. for 3-Wire connections. To remove, loosen center screw (one screw) and remove cover. To use with the strain relief and install (Also see Figs. 9, 10 & 11). 2. Rear Access Cover 4A. Follow the manufacturer's installation instructions supplied with ranges shall be used. Fig. 9 Fig. 10 Fig. 12 3 ELECTRICAL CONNECTION TO RANGE. The terminal block will then be connected by...
MODELS REQUIRING POWER SUPPLY CORD KIT. Only a power supply cord kit rated at 125/250 volts minimum, and marked for use either 7/8" dia. for 3-Wire connections. To remove, loosen center screw (one screw) and remove cover. To use with the strain relief and install (Also see Figs. 9, 10 & 11). 2. Rear Access Cover 4A. Follow the manufacturer's installation instructions supplied with ranges shall be used. Fig. 9 Fig. 10 Fig. 12 3 ELECTRICAL CONNECTION TO RANGE. The terminal block will then be connected by...
Installation Instructions
Page 4
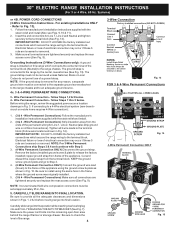
POWER CORD CONNECTIONS (3-Wire Connection Instructions . Follow the manufacturer's installation instructions supplied with the strain relief and install. 2. (3 & 4 - Wire Permanent Connection - Before wiring the range, review the suggested power source location drawings in the frame where the ground screw was originally installed. 5. (3 & 4 - Tighten all the adequate clearances and dimensions shown in Fig. 14). Electrical failure or loss of electrical connection may occur if these 3 nuts are tightened securely and replace the rear access cover (See Fig...
POWER CORD CONNECTIONS (3-Wire Connection Instructions . Follow the manufacturer's installation instructions supplied with the strain relief and install. 2. (3 & 4 - Wire Permanent Connection - Before wiring the range, review the suggested power source location drawings in the frame where the ground screw was originally installed. 5. (3 & 4 - Tighten all the adequate clearances and dimensions shown in Fig. 14). Electrical failure or loss of electrical connection may occur if these 3 nuts are tightened securely and replace the rear access cover (See Fig...

