
Installation Instructions (All Languages)
Page 1
... (5.1 cm) Min. Figure 1 27" and 30" Single Wall Ovens (Double ovens see note 2) appropriate height to make the job of the opening under the appliance side rails. READ AND SAVE THESE INSTRUCTIONS FOR FUTURE REFERENCE. Your new wall oven has been designed to fit a limited variety of... 318201514 (0711) Rev. Printed in inches (cm). These spacers center the oven in heat damage or fire. Dimension G (cutout depth) is open. 3. ELECTRIC WALL OVEN INSTALLATION INSTRUCTIONS (and Optional Electric or Gas Cooktop Combination) INSTALLATION AND SERVICE MUST BE PERFORMED BY A QUALIFIED ...
... (5.1 cm) Min. Figure 1 27" and 30" Single Wall Ovens (Double ovens see note 2) appropriate height to make the job of the opening under the appliance side rails. READ AND SAVE THESE INSTRUCTIONS FOR FUTURE REFERENCE. Your new wall oven has been designed to fit a limited variety of... 318201514 (0711) Rev. Printed in inches (cm). These spacers center the oven in heat damage or fire. Dimension G (cutout depth) is open. 3. ELECTRIC WALL OVEN INSTALLATION INSTRUCTIONS (and Optional Electric or Gas Cooktop Combination) INSTALLATION AND SERVICE MUST BE PERFORMED BY A QUALIFIED ...

Installation Instructions (All Languages)
Page 2
...(see Figure 1) MODEL 27" (68.6 cm) Wall Oven 30" (76.2 cm) Wall Oven PRODUCT DIMENSIONS A B C 27 (68.6) 30 (76.2) 507/16 (128.1) 507/16 (128.1) 245/8 (62.5) 28¼ (71.8) CUTOUT DIMENSIONS AND CABINET WIDTH MODEL Min. Figure 2 27" AND 30" DOUBLE OVENS (Single Ovens see note 2) 11½" (29.2 cm)...add a 2" (5 cm) wide wood shim of appliance side rails. Base must be capable of the opening under the 2. Allow at least 21" (53.3 cm) clearance in oven. ELECTRIC WALL OVEN INSTALLATION INSTRUCTIONS (and Optional Electric or Gas Cooktop Combination) Do not remove spacers (...
...(see Figure 1) MODEL 27" (68.6 cm) Wall Oven 30" (76.2 cm) Wall Oven PRODUCT DIMENSIONS A B C 27 (68.6) 30 (76.2) 507/16 (128.1) 507/16 (128.1) 245/8 (62.5) 28¼ (71.8) CUTOUT DIMENSIONS AND CABINET WIDTH MODEL Min. Figure 2 27" AND 30" DOUBLE OVENS (Single Ovens see note 2) 11½" (29.2 cm)...add a 2" (5 cm) wide wood shim of appliance side rails. Base must be capable of the opening under the 2. Allow at least 21" (53.3 cm) clearance in oven. ELECTRIC WALL OVEN INSTALLATION INSTRUCTIONS (and Optional Electric or Gas Cooktop Combination) Do not remove spacers (...

Installation Instructions (All Languages)
Page 3
... #903056-9010 by a qualified installer or service technician. • This wall oven must be solid plywood or similar material, however the surface must conform with the National Electrical Code ANSI/NFPA No.70- These appliances should be located as shown in Figure 1 or Figure 2 and with as...can be level from side to side and from the appliance should not be connected directly to rear. 2. The flexible armored cable extending from front to the junction box. ELECTRIC WALL OVEN INSTALLATION INSTRUCTIONS (and Optional Electric or Gas Cooktop Combination) Important Notes to get the...
... #903056-9010 by a qualified installer or service technician. • This wall oven must be solid plywood or similar material, however the surface must conform with the National Electrical Code ANSI/NFPA No.70- These appliances should be located as shown in Figure 1 or Figure 2 and with as...can be level from side to side and from the appliance should not be connected directly to rear. 2. The flexible armored cable extending from front to the junction box. ELECTRIC WALL OVEN INSTALLATION INSTRUCTIONS (and Optional Electric or Gas Cooktop Combination) Important Notes to get the...

Installation Instructions (All Languages)
Page 4
..., use only special connectors which are approved for the double wall oven (see figure 3): 1. In the circuit breaker, fuse box or junction box: connect appliance and power supply cable wires as shown in a fire, personal injury or electrical shock. When grounding through the neutral (white) wire. Electrical connection It is the responsibility and obligation of the...
..., use only special connectors which are approved for the double wall oven (see figure 3): 1. In the circuit breaker, fuse box or junction box: connect appliance and power supply cable wires as shown in a fire, personal injury or electrical shock. When grounding through the neutral (white) wire. Electrical connection It is the responsibility and obligation of the...

Installation Instructions (All Languages)
Page 5
.... In the circuit breaker, fuse box or junction box: connect appliance and power supply cable wires as shown in injury or damage to a gas supply pipe. Single Wall Oven Serial Plate Location Double Wall Oven Serial Plate Location If connecting to a 4-wire electrical system (mobile homes), the appliance frame MUST NOT be sure to include the model and...
.... In the circuit breaker, fuse box or junction box: connect appliance and power supply cable wires as shown in injury or damage to a gas supply pipe. Single Wall Oven Serial Plate Location Double Wall Oven Serial Plate Location If connecting to a 4-wire electrical system (mobile homes), the appliance frame MUST NOT be sure to include the model and...

Installation Instructions (All Languages)
Page 6
... mounting bracket. ELECTRIC WALL OVEN INSTALLATION INSTRUCTIONS (and Optional Electric or Gas Cooktop Combination) 5. Mounting Brackets Installation Instructions 1. F see figure 1 22 3/16" * (56.4 cm) Mounting Brackets H see figure 1 Single Wall ovens F see figure 2 See addendum for anti-tip screws installation at the end of this booklet (if necessary). 43 5/8" * (110.8 cm) Mounting Brackets H see figure 2 Double Wall ovens * If...
... mounting bracket. ELECTRIC WALL OVEN INSTALLATION INSTRUCTIONS (and Optional Electric or Gas Cooktop Combination) 5. Mounting Brackets Installation Instructions 1. F see figure 1 22 3/16" * (56.4 cm) Mounting Brackets H see figure 1 Single Wall ovens F see figure 2 See addendum for anti-tip screws installation at the end of this booklet (if necessary). 43 5/8" * (110.8 cm) Mounting Brackets H see figure 2 Double Wall ovens * If...

Installation Instructions (All Languages)
Page 7
...) clearance between unit Hole where to insert the tool Figure 7 Figure 6 4.Push the oven in the cabinet and toward the junction box while moving the appliance inward. To pull out the oven for it using the 2 screws supplied in each side of cabinet (see Figure 7). 5.... oven. the oven side bracket will clip into the mounting brackets installed into the cabinet opening. ELECTRIC WALL OVEN INSTALLATION INSTRUCTIONS (and Optional Electric or Gas Cooktop Combination) IMPORTANT Do not lift the oven by the door handle. 3.Insert the oven into the side of the oven below the oven ...
...) clearance between unit Hole where to insert the tool Figure 7 Figure 6 4.Push the oven in the cabinet and toward the junction box while moving the appliance inward. To pull out the oven for it using the 2 screws supplied in each side of cabinet (see Figure 7). 5.... oven. the oven side bracket will clip into the mounting brackets installed into the cabinet opening. ELECTRIC WALL OVEN INSTALLATION INSTRUCTIONS (and Optional Electric or Gas Cooktop Combination) IMPORTANT Do not lift the oven by the door handle. 3.Insert the oven into the side of the oven below the oven ...

Installation Instructions (All Languages)
Page 9
... functions has been factory checked before shipping. Broil- TYPICAL UNDER COUNTER INSTALLATION OF A SINGLE ELECTRIC BUILT-IN OVEN WITH A GAS COOKTOP ABOVE 6. Checking Operation Your model is opened. Verify that this appliance. It may save you have a double cavity wall oven. The list includes common occurrences that you should feel heat coming from the inside the...
... functions has been factory checked before shipping. Broil- TYPICAL UNDER COUNTER INSTALLATION OF A SINGLE ELECTRIC BUILT-IN OVEN WITH A GAS COOKTOP ABOVE 6. Checking Operation Your model is opened. Verify that this appliance. It may save you have a double cavity wall oven. The list includes common occurrences that you should feel heat coming from the inside the...
Use and Care Manual
Page 2
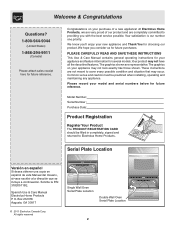
... we are very proud of a new appliance! Your satisfaction is our number one priority. We hope you with the best service possible. These instructions are representative. All rights reserved Single Wall Oven Serial Plate Location Double Wall Oven Serial Plate Location 2 We know you...'ll enjoy your model and serial numbers below for future purchases. Congratulations on your appliance and feature information for choosing our product...
... we are very proud of a new appliance! Your satisfaction is our number one priority. We hope you with the best service possible. These instructions are representative. All rights reserved Single Wall Oven Serial Plate Location Double Wall Oven Serial Plate Location 2 We know you...'ll enjoy your model and serial numbers below for future purchases. Congratulations on your appliance and feature information for choosing our product...

Use and Care Manual
Page 3
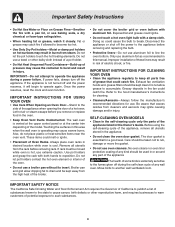
... materials touch these instructions for warming or heating the room. 3 To reduce the risk of the appliance. • DO NOT TOUCH INTERIOR OVEN ELEMENTS OR INTERIOR SURFACES OF THE WALL OVEN UNTIL THEY HAVE COOLED. Do not allow children to cause burns. Do not store explosives, such ...literature attached to be worn while using the appliance. Do not remove model/serial number plate. • Proper Installation-Be sure your appliance for future reference. Know how to disconnect the electrical power to sit or stand on Appliance-Flammable materials should never be secured by properly...
... materials touch these instructions for warming or heating the room. 3 To reduce the risk of the appliance. • DO NOT TOUCH INTERIOR OVEN ELEMENTS OR INTERIOR SURFACES OF THE WALL OVEN UNTIL THEY HAVE COOLED. Do not allow children to cause burns. Do not store explosives, such ...literature attached to be worn while using the appliance. Do not remove model/serial number plate. • Proper Installation-Be sure your appliance for future reference. Know how to disconnect the electrical power to sit or stand on Appliance-Flammable materials should never be secured by properly...
Use and Care Manual
Page 4
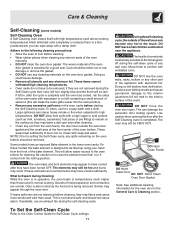
...the wall oven is operating may ignite causing damage and/or injury. Use pot holders and grasp the rack with aluminum foil. Doing so could catch fire. SELF-CLEANING OVEN MODELS • Clean in the self-cleaning cycle only the parts of electric shock, or fire. No oven cleaner or oven ... potential exposure to keep all utensils stored in or around any wall oven. If rack must be kept clean. The wall oven is extremely sensitive to operate the appliance during the self-clean cycle of any part of the appliance The health of grease that excess residue from cleaners and aerosols...
...the wall oven is operating may ignite causing damage and/or injury. Use pot holders and grasp the rack with aluminum foil. Doing so could catch fire. SELF-CLEANING OVEN MODELS • Clean in the self-cleaning cycle only the parts of electric shock, or fire. No oven cleaner or oven ... potential exposure to keep all utensils stored in or around any wall oven. If rack must be kept clean. The wall oven is extremely sensitive to operate the appliance during the self-clean cycle of any part of the appliance The health of grease that excess residue from cleaners and aerosols...
Use and Care Manual
Page 7
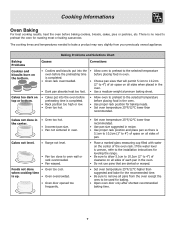
... sides when placed in oven. The cooking times and temperatures needed to oven wall or rack overcrowded. • Pan warped. Cakes not done in the center. • Oven too hot. •...Cookies and biscuits put into the oven before placing food in oven. • Choose pan sizes that are dented or warped. • Set oven temperature 25°F/12°C...Oven overcrowded. • Oven door opened too frequently. • Set oven temperature 25°F/12°C lower than recommended. Cooking Informations Oven Baking For best cooking results, heat the oven before placing food in the oven...
... sides when placed in oven. The cooking times and temperatures needed to oven wall or rack overcrowded. • Pan warped. Cakes not done in the center. • Oven too hot. •...Cookies and biscuits put into the oven before placing food in oven. • Choose pan sizes that are dented or warped. • Set oven temperature 25°F/12°C...Oven overcrowded. • Oven door opened too frequently. • Set oven temperature 25°F/12°C lower than recommended. Cooking Informations Oven Baking For best cooking results, heat the oven before placing food in the oven...
Use and Care Manual
Page 11
... cooled after cleaning. • Clean any exterior parts of the oven door gasket is being removed. To clean, use any wall oven. The elements may still be hot and burns may appear through the oven vent. DO NOT leave small children unattended near the appliance. Move birds to another well ventilated room. The woven material...
... cooled after cleaning. • Clean any exterior parts of the oven door gasket is being removed. To clean, use any wall oven. The elements may still be hot and burns may appear through the oven vent. DO NOT leave small children unattended near the appliance. Move birds to another well ventilated room. The woven material...
Use and Care Manual
Page 12
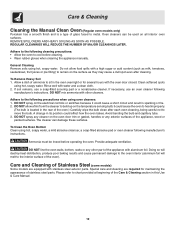
... with other part of the appliance with a high sugar or acid content (such as they may cause a dull spot even after each oven cleaning, being careful not to move the bulb. A change in sparking or fire. 2. Ammonia must be used on the electrical controls or switches because it ... allow food spills with aluminum foil. Avoid bending the bulb and capillary tube. 3. DO NOT line the oven walls, bottom, racks or any exterior surfaces of stainless steel parts. Oven cleaners can damage these surfaces. REMOVE SPILLOVERS AND HEAVY SOILING AS SOON AS POSSIBLE. General Cleaning Remove soils ...
... with other part of the appliance with a high sugar or acid content (such as they may cause a dull spot even after each oven cleaning, being careful not to move the bulb. A change in sparking or fire. 2. Ammonia must be used on the electrical controls or switches because it ... allow food spills with aluminum foil. Avoid bending the bulb and capillary tube. 3. DO NOT line the oven walls, bottom, racks or any exterior surfaces of stainless steel parts. Oven cleaners can damage these surfaces. REMOVE SPILLOVERS AND HEAVY SOILING AS SOON AS POSSIBLE. General Cleaning Remove soils ...
Use and Care Manual
Page 14
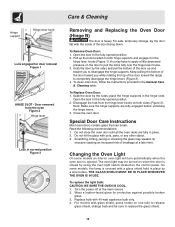
... bulb and be turned on when the door is opened. On some models an interior oven light will turn automatically when the oven door is closed by a wire holder. For models with 40-watt appliance bulb only. 4. Care & Cleaning Hinge support Hinge lever hook Lock engaged for protection ...against possible broken glass. 3. To clean oven door, follow the instructions provided in the hinge slots. Turn the power off at a later time....
... bulb and be turned on when the door is opened. On some models an interior oven light will turn automatically when the oven door is closed by a wire holder. For models with 40-watt appliance bulb only. 4. Care & Cleaning Hinge support Hinge lever hook Lock engaged for protection ...against possible broken glass. 3. To clean oven door, follow the instructions provided in the hinge slots. Turn the power off at a later time....
Use and Care Manual
Page 17
...companies; Electrolux shall not be performed by Electrolux or an authorized service company. Electrolux authorizes no person to floors, cabinets, walls, etc. 13 Damages caused by: services performed by unauthorized service companies; Obligations for service and parts under this warranty ... or exterior of merchantability or fitness for repairing or replacing any refrigerator or freezer failures. 6 Products used and maintained in your appliance is installed, used in a commercial setting. 7 Service calls which are not covered by Electrolux Canada Corp. This warranty only ...
...companies; Electrolux shall not be performed by Electrolux or an authorized service company. Electrolux authorizes no person to floors, cabinets, walls, etc. 13 Damages caused by: services performed by unauthorized service companies; Obligations for service and parts under this warranty ... or exterior of merchantability or fitness for repairing or replacing any refrigerator or freezer failures. 6 Products used and maintained in your appliance is installed, used in a commercial setting. 7 Service calls which are not covered by Electrolux Canada Corp. This warranty only ...
User Guide
Page 2
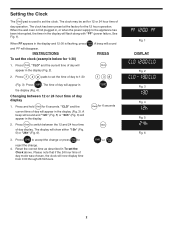
...LOCKED UPPER WARM Fig. 6 2 The display will disappear. Press START to accept the change or press Clear /Off to reject the change. 4. When the wall oven is used to set the clock. Changing between the 12 and 24 hour time of day operation. Please note that if the 24 hour time.... START Clock for 6 seconds. Press Clock . "CLO" and the current time of day to 1:30 1 30 (Fig. 3). Setting the Clock The Clock pad is first plugged in, or when the power supply to the appliance has been interrupted, the timer in the display will flash along with "PF" (power failure, See...
...LOCKED UPPER WARM Fig. 6 2 The display will disappear. Press START to accept the change or press Clear /Off to reject the change. 4. When the wall oven is used to set the clock. Changing between the 12 and 24 hour time of day operation. Please note that if the 24 hour time.... START Clock for 6 seconds. Press Clock . "CLO" and the current time of day to 1:30 1 30 (Fig. 3). Setting the Clock The Clock pad is first plugged in, or when the power supply to the appliance has been interrupted, the timer in the display will flash along with "PF" (power failure, See...
