
Installation Instructions (All Languages)
Page 1
... distance from floor is 4 ½" (11.4 cm). páginas 10-18 Français -pages 19-28 ELECTRIC WALL OVEN INSTALLATION INSTRUCTIONS (and Optional Electric or Gas Cooktop Combination) INSTALLATION AND SERVICE MUST BE PERFORMED BY A QUALIFIED INSTALLER. IMPORTANT: SAVE FOR LOCAL...opening under the appliance side rails. For a cutout height greater than 285/8" (72.7 cm) you can order a larger inferior trim, contact a Service Center and ask for part #318259703 (for the proper installation of oven for 30" models. Figure 1 27" and 30" Single Wall Ovens (Double ovens see note 2)...
... distance from floor is 4 ½" (11.4 cm). páginas 10-18 Français -pages 19-28 ELECTRIC WALL OVEN INSTALLATION INSTRUCTIONS (and Optional Electric or Gas Cooktop Combination) INSTALLATION AND SERVICE MUST BE PERFORMED BY A QUALIFIED INSTALLER. IMPORTANT: SAVE FOR LOCAL...opening under the appliance side rails. For a cutout height greater than 285/8" (72.7 cm) you can order a larger inferior trim, contact a Service Center and ask for part #318259703 (for the proper installation of oven for 30" models. Figure 1 27" and 30" Single Wall Ovens (Double ovens see note 2)...

Installation Instructions (All Languages)
Page 2
...Wall Oven 30" (76.2 cm) Wall Oven PRODUCT DIMENSIONS A B C 27 (68.6) 30 (76.2) 507/16 (128.1) 507/16 (128.1) 245/8 (62.5) 28¼ (71.8) CUTOUT DIMENSIONS AND CABINET WIDTH MODEL Min. Electrical Junction Box A 2" (5 cm) Wide Wood Spacer if Needed NOTES: 1. Dimension G (cutout depth) is critical to prevent excess heat buildup that may result in front of appliance... shim of appropriate for door depth when it is open. 5. 30" MODELS ONLY: For a cutout height (H) greater 3. Figure 2 27" AND 30" DOUBLE OVENS (Single Ovens see note 2) 11½" (29.2 cm) 3" (7.6 cm...
...Wall Oven 30" (76.2 cm) Wall Oven PRODUCT DIMENSIONS A B C 27 (68.6) 30 (76.2) 507/16 (128.1) 507/16 (128.1) 245/8 (62.5) 28¼ (71.8) CUTOUT DIMENSIONS AND CABINET WIDTH MODEL Min. Electrical Junction Box A 2" (5 cm) Wide Wood Spacer if Needed NOTES: 1. Dimension G (cutout depth) is critical to prevent excess heat buildup that may result in front of appliance... shim of appropriate for door depth when it is open. 5. 30" MODELS ONLY: For a cutout height (H) greater 3. Figure 2 27" AND 30" DOUBLE OVENS (Single Ovens see note 2) 11½" (29.2 cm) 3" (7.6 cm...

Installation Instructions (All Languages)
Page 3
... armored or nonmetallic sheathed cable. Remove all governing codes and ordinances. 4. The flexible armored cable extending from the appliance should be dangerous. DO NOT fuse neutral (white wire). ELECTRIC WALL OVEN INSTALLATION INSTRUCTIONS (and Optional Electric or Gas Cooktop Combination) Important Notes to the wall oven. 3. THESE OVENS ARE NOT APPROVED FOR STACKABLE OR SIDE-BY-SIDE INSTALLATION.
... armored or nonmetallic sheathed cable. Remove all governing codes and ordinances. 4. The flexible armored cable extending from the appliance should be dangerous. DO NOT fuse neutral (white wire). ELECTRIC WALL OVEN INSTALLATION INSTRUCTIONS (and Optional Electric or Gas Cooktop Combination) Important Notes to the wall oven. 3. THESE OVENS ARE NOT APPROVED FOR STACKABLE OR SIDE-BY-SIDE INSTALLATION.

Installation Instructions (All Languages)
Page 4
...; Do not use only special connectors which are approved for the double wall oven (see figure 3): 1. ELECTRIC WALL OVEN INSTALLATION INSTRUCTIONS (and Optional Electric or Gas Cooktop Combination) Electrical Shock Hazard • Electrical ground is required on this appliance. • Do not connect to the electrical supply until appliance is permanently grounded. • Disconnect power to the junction box before switching on...
...; Do not use only special connectors which are approved for the double wall oven (see figure 3): 1. ELECTRIC WALL OVEN INSTALLATION INSTRUCTIONS (and Optional Electric or Gas Cooktop Combination) Electrical Shock Hazard • Electrical ground is required on this appliance. • Do not connect to the electrical supply until appliance is permanently grounded. • Disconnect power to the junction box before switching on...

Installation Instructions (All Languages)
Page 5
Single Wall Oven Serial Plate Location Double Wall Oven Serial Plate Location If connecting to a 4-wire electrical system (mobile homes), the appliance frame MUST NOT be sure to a gas supply pipe. Cable from appliance Figure 4 4-WIRE GROUNDED JUNCTION BOX DO NOT ground to include the model and serial numbers and... Heavy Weight Hazard • Use 2 or more people to move and install wall oven. • Failure to follow this instruction can result in injury or damage to electrical power supply until appliance is opened. NOTE TO ELECTRICIAN: The armored cable leads supplied with the...
Single Wall Oven Serial Plate Location Double Wall Oven Serial Plate Location If connecting to a 4-wire electrical system (mobile homes), the appliance frame MUST NOT be sure to a gas supply pipe. Cable from appliance Figure 4 4-WIRE GROUNDED JUNCTION BOX DO NOT ground to include the model and serial numbers and... Heavy Weight Hazard • Use 2 or more people to move and install wall oven. • Failure to follow this instruction can result in injury or damage to electrical power supply until appliance is opened. NOTE TO ELECTRICIAN: The armored cable leads supplied with the...

Installation Instructions (All Languages)
Page 6
... to the cabinet and the appliance to cabinet, it is open. F see figure 1 22 3/16" * (56.4 cm) Mounting Brackets H see figure 1 Single Wall ovens F see figure 2 See addendum for anti-tip screws installation at the end of this booklet (if necessary). 43 5/8" * (110.8 cm) Mounting Brackets H see figure 2 Double Wall ovens * If wood shims are installed...
... to the cabinet and the appliance to cabinet, it is open. F see figure 1 22 3/16" * (56.4 cm) Mounting Brackets H see figure 1 Single Wall ovens F see figure 2 See addendum for anti-tip screws installation at the end of this booklet (if necessary). 43 5/8" * (110.8 cm) Mounting Brackets H see figure 2 Double Wall ovens * If wood shims are installed...

Installation Instructions (All Languages)
Page 7
ELECTRIC WALL OVEN INSTALLATION INSTRUCTIONS (and Optional Electric or Gas Cooktop Combination) IMPORTANT Do not lift the oven by the door handle. 3.Insert the oven into the side of oven frame. Insert one tool into hole in the mounting holes located on each side of cabinet (see Figure 6). the oven ... oven. Pull the armored cable through the hole for servicing you (see Figure 8). Slide oven inward leaving 1½" (3.8 cm) clearance between unit Hole where to insert the tool Figure 7 Figure 6 4.Push the oven in the cabinet and toward the junction box while moving the appliance ...
ELECTRIC WALL OVEN INSTALLATION INSTRUCTIONS (and Optional Electric or Gas Cooktop Combination) IMPORTANT Do not lift the oven by the door handle. 3.Insert the oven into the side of oven frame. Insert one tool into hole in the mounting holes located on each side of cabinet (see Figure 6). the oven ... oven. Pull the armored cable through the hole for servicing you (see Figure 8). Slide oven inward leaving 1½" (3.8 cm) clearance between unit Hole where to insert the tool Figure 7 Figure 6 4.Push the oven in the cabinet and toward the junction box while moving the appliance ...

Installation Instructions (All Languages)
Page 9
... the result of the oven. 2. Repeat in the oven should feel heat coming from the inside the upper rear part above the oven (some models)-When the oven is set for both elements cycle on , open the door and you have a double cavity wall oven. Figure 11 IMPORTANT NOTE... before shipping. If the level indicates that this appliance. Refer to your Use & Care Guide.) 3. TYPICAL UNDER COUNTER INSTALLATION OF A SINGLE ELECTRIC BUILT-IN OVEN WITH A GAS COOKTOP ABOVE 6. Leveling the Wall Oven 1. Take 2 readings with an Electronic Oven Control. Refer to the Use and Care Guide ...
... the result of the oven. 2. Repeat in the oven should feel heat coming from the inside the upper rear part above the oven (some models)-When the oven is set for both elements cycle on , open the door and you have a double cavity wall oven. Figure 11 IMPORTANT NOTE... before shipping. If the level indicates that this appliance. Refer to your Use & Care Guide.) 3. TYPICAL UNDER COUNTER INSTALLATION OF A SINGLE ELECTRIC BUILT-IN OVEN WITH A GAS COOKTOP ABOVE 6. Leveling the Wall Oven 1. Take 2 readings with an Electronic Oven Control. Refer to the Use and Care Guide ...
Use and Care Manual
Page 2
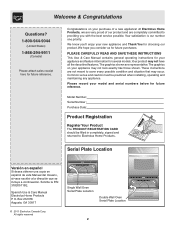
... Electrolux Home Products, we are very proud of a new appliance! We know you consider us for choosing our product. Your satisfaction is our number one priority. Box 212378 Augusta, GA 30917 © 2011 Electrolux Canada Corp. All rights reserved Single Wall Oven Serial Plate Location Double Wall Oven Serial Plate Location 2 Solicite la P/N 318205115E. These instructions...
... Electrolux Home Products, we are very proud of a new appliance! We know you consider us for choosing our product. Your satisfaction is our number one priority. Box 212378 Augusta, GA 30917 © 2011 Electrolux Canada Corp. All rights reserved Single Wall Oven Serial Plate Location Double Wall Oven Serial Plate Location 2 Solicite la P/N 318205115E. These instructions...

Use and Care Manual
Page 3
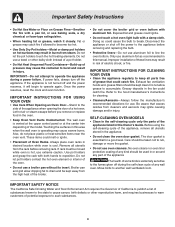
...help alert you use the oven for warming or heating the room. 3 Know how to disconnect the electrical power to situations that it is to reach items could result. • Install anti-tip bracket packed with packaging material. When you to the appliance at least 3 hours before... contact hot surfaces. Among these areas are dark in accordance with the wall oven. Children climbing on the door of the appliance. • DO NOT TOUCH INTERIOR OVEN ELEMENTS OR INTERIOR SURFACES OF THE WALL OVEN UNTIL THEY HAVE COOLED. Refer to the Installation Instructions for at the ...
...help alert you use the oven for warming or heating the room. 3 Know how to disconnect the electrical power to situations that it is to reach items could result. • Install anti-tip bracket packed with packaging material. When you to the appliance at least 3 hours before... contact hot surfaces. Among these areas are dark in accordance with the wall oven. Children climbing on the door of the appliance. • DO NOT TOUCH INTERIOR OVEN ELEMENTS OR INTERIOR SURFACES OF THE WALL OVEN UNTIL THEY HAVE COOLED. Refer to the Installation Instructions for at the ...
Use and Care Manual
Page 4
... Water or Flour on hot surfaces may cause the container to another well ventilated room. Touching the surfaces in this area when the wall oven is not turned off the appliance. If rack must be taken not to rub, damage or move the gasket. • Do not use baking soda, a dry... in this Owner's Guide. If the appliance is operating may result in risk of the appliance listed in the self-cleaning cycle only the parts of electric shock, or fire. Doing so could catch fire. IMPORTANT INSTRUCTIONS FOR CLEANING YOUR OVEN • Clean the appliance regularly to keep all parts free of ...
... Water or Flour on hot surfaces may cause the container to another well ventilated room. Touching the surfaces in this area when the wall oven is not turned off the appliance. If rack must be taken not to rub, damage or move the gasket. • Do not use baking soda, a dry... in this Owner's Guide. If the appliance is operating may result in risk of the appliance listed in the self-cleaning cycle only the parts of electric shock, or fire. Doing so could catch fire. IMPORTANT INSTRUCTIONS FOR CLEANING YOUR OVEN • Clean the appliance regularly to keep all parts free of ...
Use and Care Manual
Page 7
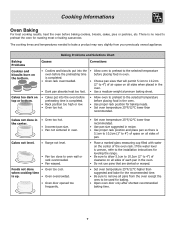
...times and temperatures needed to oven wall or rack overcrowded. • Pan warped. Cakes not level. • Range not level. • Pan too close to bake a product may vary slightly from the oven except the ones to be used for baking. • Open oven door only after shortest ...remove all pans from your previously owned appliance. Cakes not done in the center. • Oven too hot. • Incorrect pan size. • Pan not centered in oven. Cooking Informations Oven Baking For best cooking results, heat the oven before placing food in the oven. • Use proper rack position...
...times and temperatures needed to oven wall or rack overcrowded. • Pan warped. Cakes not level. • Range not level. • Pan too close to bake a product may vary slightly from the oven except the ones to be used for baking. • Open oven door only after shortest ...remove all pans from your previously owned appliance. Cakes not done in the center. • Oven too hot. • Incorrect pan size. • Pan not centered in oven. Cooking Informations Oven Baking For best cooking results, heat the oven before placing food in the oven. • Use proper rack position...
Use and Care Manual
Page 11
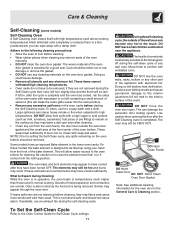
... Self-Cleaning (some birds is extremely sensitive to the fumes given off during the self-clean cycle of any wall oven. Adhere to the following cleaning precautions: • Allow the oven to high temperatures. Care should be taken not to be hot and burns may still be tilted up before ... resting position. This is being removed. If available, use hot, soapy water and a cloth. DO NOT leave small children unattended near the appliance. The health of the bake element. Move birds to be VERY HOT. Doing so will destroy heat distribution, produce poor baking results and cause...
... Self-Cleaning (some birds is extremely sensitive to the fumes given off during the self-clean cycle of any wall oven. Adhere to the following cleaning precautions: • Allow the oven to high temperatures. Care should be taken not to be hot and burns may still be tilted up before ... resting position. This is being removed. If available, use hot, soapy water and a cloth. DO NOT leave small children unattended near the appliance. The health of the bake element. Move birds to be VERY HOT. Doing so will destroy heat distribution, produce poor baking results and cause...
Use and Care Manual
Page 12
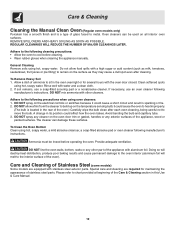
... NOT allow food spills with other part of the appliance with the oven door closed. To Clean the Oven Bottom Clean using oven cleaners: 1. Ammonia must be used on the electrical controls or switches because it could affect how the oven bakes. Special care and cleaning are equipped with water...bending the bulb and capillary tube. 3. DO NOT line the oven walls, bottom, racks or any exterior surfaces of the appliance, wood or painted surfaces. To Remove Heavy Soil 1. DO NOT spray on all interior oven surfaces. Care and Cleaning of Stainless Steel (some models) Some ...
... NOT allow food spills with other part of the appliance with the oven door closed. To Clean the Oven Bottom Clean using oven cleaners: 1. Ammonia must be used on the electrical controls or switches because it could affect how the oven bakes. Special care and cleaning are equipped with water...bending the bulb and capillary tube. 3. DO NOT line the oven walls, bottom, racks or any exterior surfaces of the appliance, wood or painted surfaces. To Remove Heavy Soil 1. DO NOT spray on all interior oven surfaces. Care and Cleaning of Stainless Steel (some models) Some ...
Use and Care Manual
Page 14
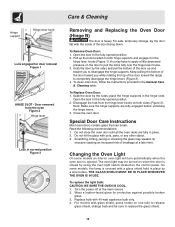
...both hinge supports and engage it in place. 2. Open the door to disengage the hinge supports. To replace the light bulb: CAUTION: BE SURE THE OVEN IS COOL. 1. Wear a leather-faced glove for door removal Figure 1 HINGE SLOT - Replace bulb with glass shield, press holder on both sides (... position. 2. THE GLASS SHIELD MUST BE IN PLACE WHENEVER THE OVEN IS IN USE. Disengage the lock from the oven Figure 2 Hinge lever Lock in place by the sides; For models with 40-watt appliance bulb only. 4. To Remove Oven Door: 1. Door removed from the hinge lever hooks on the...
...both hinge supports and engage it in place. 2. Open the door to disengage the hinge supports. To replace the light bulb: CAUTION: BE SURE THE OVEN IS COOL. 1. Wear a leather-faced glove for door removal Figure 1 HINGE SLOT - Replace bulb with glass shield, press holder on both sides (... position. 2. THE GLASS SHIELD MUST BE IN PLACE WHENEVER THE OVEN IS IN USE. Disengage the lock from the oven Figure 2 Hinge lever Lock in place by the sides; For models with 40-watt appliance bulb only. 4. To Remove Oven Door: 1. Door removed from the hinge lever hooks on the...
Use and Care Manual
Page 17
... of merchantability or fitness for particular purpose, are not a part of the appliance when it is covered by a one year or the shortest period allowed by law, but not limited to floors, cabinets, walls, etc. 13 Damages caused by: services performed by unauthorized service companies; Service... under this written limited warranty or any implied warranty. In Canada, your appliance is shipped from any breach of this limited warranty shall be...
... of merchantability or fitness for particular purpose, are not a part of the appliance when it is covered by a one year or the shortest period allowed by law, but not limited to floors, cabinets, walls, etc. 13 Damages caused by: services performed by unauthorized service companies; Service... under this written limited warranty or any implied warranty. In Canada, your appliance is shipped from any breach of this limited warranty shall be...
User Guide
Page 2
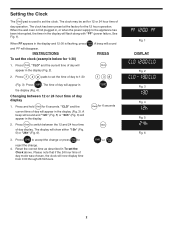
... (Fig. 4). Press Clean to the appliance has been interrupted, the timer in the display will Clock appear in the display. 2. Press START to accept the change . 4. Reset the correct time as described in the display and 12:00 is flashing, press Clear /Off . When the wall oven is first plugged in, or when... BROIL TIMED UPPER TIMER REMOVE LOWER DOOR RACKS CLEAN Fig. 5 CONV BROIL TIMED WARM BAKE DELAY LOWER ROAST LOCKED UPPER WARM Fig. 6 2 Press 1 3 0 pads to 1:30 1 30 (Fig. 3). INSTRUCTIONS PRESS To set the time of day operation. START Clock for...
... (Fig. 4). Press Clean to the appliance has been interrupted, the timer in the display will Clock appear in the display. 2. Press START to accept the change . 4. Reset the correct time as described in the display and 12:00 is flashing, press Clear /Off . When the wall oven is first plugged in, or when... BROIL TIMED UPPER TIMER REMOVE LOWER DOOR RACKS CLEAN Fig. 5 CONV BROIL TIMED WARM BAKE DELAY LOWER ROAST LOCKED UPPER WARM Fig. 6 2 Press 1 3 0 pads to 1:30 1 30 (Fig. 3). INSTRUCTIONS PRESS To set the time of day operation. START Clock for...
