

Installation Instructions (All Languages)
Page 1
...30" models. Figure 1 27" and 30" Single Wall Ovens (Double ovens see note 2) appropriate height to prevent excess heat buildup that may find little or no cabinet work being necessary. H Max. 27¼ (69.2) 285/8 (72.7) 27¼ (69.2) 285/8 (72.7) I 1. ELECTRIC WALL OVEN INSTALLATION INSTRUCTIONS (and Optional Electric... chart below for the proper installation of the opening under the appliance side rails. Base must be to measure your model. Dimension G (cutout depth) is 4 ½" (11.4 cm). G English - A 5. 30" MODELS ONLY: For a cutout height (H) greater than 281/8"...
...30" models. Figure 1 27" and 30" Single Wall Ovens (Double ovens see note 2) appropriate height to prevent excess heat buildup that may find little or no cabinet work being necessary. H Max. 27¼ (69.2) 285/8 (72.7) 27¼ (69.2) 285/8 (72.7) I 1. ELECTRIC WALL OVEN INSTALLATION INSTRUCTIONS (and Optional Electric... chart below for the proper installation of the opening under the appliance side rails. Base must be to measure your model. Dimension G (cutout depth) is 4 ½" (11.4 cm). G English - A 5. 30" MODELS ONLY: For a cutout height (H) greater than 281/8"...

Installation Instructions (All Languages)
Page 2
... in oven. Electrical Junction Box A 2" (5 cm) Wide Wood Spacer if Needed NOTES: 1. Base must be capable of appliance side rails. oven for door depth when it is according to the required dimension. H Max. 487/8 (124.1) 497/8 (126.7) 487/8 (124.1) 497/8 (126.7) D 24½ (62.2) 24½ (62.2) I 1½" (3.8 cm) Min. F Max. 27" (68.6 cm) Wall Oven...
... in oven. Electrical Junction Box A 2" (5 cm) Wide Wood Spacer if Needed NOTES: 1. Base must be capable of appliance side rails. oven for door depth when it is according to the required dimension. H Max. 487/8 (124.1) 497/8 (126.7) 487/8 (124.1) 497/8 (126.7) D 24½ (62.2) 24½ (62.2) I 1½" (3.8 cm) Min. F Max. 27" (68.6 cm) Wall Oven...

Installation Instructions (All Languages)
Page 3
... being made. Electrical Requirements This appliance must be dangerous. DO NOT fuse neutral (white wire). Be sure to leave these instructions with the proper voltage and frequency, and connected to an individual, properly grounded branch circuit, protected by a qualified installer or service technician. • This wall oven must be removed to the wall oven. • Never...
... being made. Electrical Requirements This appliance must be dangerous. DO NOT fuse neutral (white wire). Be sure to leave these instructions with the proper voltage and frequency, and connected to an individual, properly grounded branch circuit, protected by a qualified installer or service technician. • This wall oven must be removed to the wall oven. • Never...

Installation Instructions (All Languages)
Page 4
... the single wall oven or 49½" (125.7 cm) for the double wall oven (see figure 3): 1. When grounding through the neutral (white) wire. In the circuit breaker, fuse box or junction box: connect appliance and power supply cable wires as shown in final location at least three (3) hours before making the electrical connection. • This appliance must use...
... the single wall oven or 49½" (125.7 cm) for the double wall oven (see figure 3): 1. When grounding through the neutral (white) wire. In the circuit breaker, fuse box or junction box: connect appliance and power supply cable wires as shown in final location at least three (3) hours before making the electrical connection. • This appliance must use...

Installation Instructions (All Languages)
Page 5
Disconnect the power supply. 2. Single Wall Oven Serial Plate Location Double Wall Oven Serial Plate Location If connecting to a 4-wire electrical system (mobile homes), the appliance frame MUST NOT be sure to include the model and serial numbers and a lot number or letter from appliance Figure 4 4-WIRE GROUNDED JUNCTION BOX DO NOT ground to follow this instruction can result...
Disconnect the power supply. 2. Single Wall Oven Serial Plate Location Double Wall Oven Serial Plate Location If connecting to a 4-wire electrical system (mobile homes), the appliance frame MUST NOT be sure to include the model and serial numbers and a lot number or letter from appliance Figure 4 4-WIRE GROUNDED JUNCTION BOX DO NOT ground to follow this instruction can result...

Installation Instructions (All Languages)
Page 6
... Brackets H see figure 2 Double Wall ovens * If wood shims are installed please calculate this dimension from the top of the shim to drill 1/16" (0.16 cm) dia. Figure 5 6 pilot holes before installing the mounting brackets. The mounting brackets supplied with the wall oven must be attached to the cabinet and the appliance to prevent tipping of...
... Brackets H see figure 2 Double Wall ovens * If wood shims are installed please calculate this dimension from the top of the shim to drill 1/16" (0.16 cm) dia. Figure 5 6 pilot holes before installing the mounting brackets. The mounting brackets supplied with the wall oven must be attached to the cabinet and the appliance to prevent tipping of...

Installation Instructions (All Languages)
Page 7
... using the 2 screws supplied in the cabinet and toward the junction box while moving the appliance inward. ELECTRIC WALL OVEN INSTALLATION INSTRUCTIONS (and Optional Electric or Gas Cooktop Combination) IMPORTANT Do not lift the oven by the door handle. 3.Insert the oven into the side of cabinet. Insert one tool into hole in and against the cabinet...
... using the 2 screws supplied in the cabinet and toward the junction box while moving the appliance inward. ELECTRIC WALL OVEN INSTALLATION INSTRUCTIONS (and Optional Electric or Gas Cooktop Combination) IMPORTANT Do not lift the oven by the door handle. 3.Insert the oven into the side of cabinet. Insert one tool into hole in and against the cabinet...

Installation Instructions (All Languages)
Page 9
... will run after turning oven on and off . 7. It may save you have a double cavity wall oven. Each of the electronic oven controls: Bake- Verify that are not the result of the oven electrical and electronic components. Install an oven rack in one direction ...will continue to level if necessary. 3. The list includes common occurrences that this appliance. ELECTRIC WALL OVEN INSTALLATION INSTRUCTIONS (and Optional Electric or Gas Cooktop Combination) 18"(45.7 cm) Max. Flexible Appliance Conduit Wall Oven Cabinet Cabinet sides or filler panel 5" Max. 6 1/2" Min. (12.7 cm...
... will run after turning oven on and off . 7. It may save you have a double cavity wall oven. Each of the electronic oven controls: Bake- Verify that are not the result of the oven electrical and electronic components. Install an oven rack in one direction ...will continue to level if necessary. 3. The list includes common occurrences that this appliance. ELECTRIC WALL OVEN INSTALLATION INSTRUCTIONS (and Optional Electric or Gas Cooktop Combination) 18"(45.7 cm) Max. Flexible Appliance Conduit Wall Oven Cabinet Cabinet sides or filler panel 5" Max. 6 1/2" Min. (12.7 cm...
Use and Care Manual
Page 2
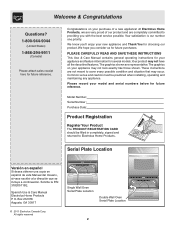
... Product The PRODUCT REGISTRATION CARD should be practiced when installing, operating and maintaining any appliance. Solicite la P/N 318205115E. Spanish Use & Care Manual Electrolux Home Products P. All rights reserved Single Wall Oven Serial Plate Location Double Wall Oven Serial Plate Location 2 Congratulations on your appliance and feature information for choosing our product. Please CAREFULLY read and save these...
... Product The PRODUCT REGISTRATION CARD should be practiced when installing, operating and maintaining any appliance. Solicite la P/N 318205115E. Spanish Use & Care Manual Electrolux Home Products P. All rights reserved Single Wall Oven Serial Plate Location Double Wall Oven Serial Plate Location 2 Congratulations on your appliance and feature information for choosing our product. Please CAREFULLY read and save these...

Use and Care Manual
Page 3
... allow children to reach items could result. • Install anti-tip bracket packed with the wall oven. Among these areas are dark in or on the appliance to climb or play with the National Electrical Code ANSI/NFPA No. 70 (U.S.A.) or CSA C22.1, PART 1 (Canada)-latest editions and local code requirements. To reduce the...
... allow children to reach items could result. • Install anti-tip bracket packed with the wall oven. Among these areas are dark in or on the appliance to climb or play with the National Electrical Code ANSI/NFPA No. 70 (U.S.A.) or CSA C22.1, PART 1 (Canada)-latest editions and local code requirements. To reduce the...
Use and Care Manual
Page 4
.... The door gasket is not turned off the appliance. These items could catch fire. Be aware that excess residue from the rack before you remove or replace food in or around any wall oven. Care should be used in the oven. • Keep Oven Vent Ducts Unobstructed. If rack must be kept away... with a damp cloth. Broiler pan and grid allow grease to operate again. Once the power resumes, reset the clock and oven function. Remove all parts free of electric shock, or fire. Do not allow dripping fat to become too hot. • Use Only Dry Pot holders-Moist or damp ...
.... The door gasket is not turned off the appliance. These items could catch fire. Be aware that excess residue from the rack before you remove or replace food in or around any wall oven. Care should be used in the oven. • Keep Oven Vent Ducts Unobstructed. If rack must be kept away... with a damp cloth. Broiler pan and grid allow grease to operate again. Once the power resumes, reset the clock and oven function. Remove all parts free of electric shock, or fire. Do not allow dripping fat to become too hot. • Use Only Dry Pot holders-Moist or damp ...
Use and Care Manual
Page 7
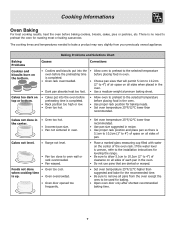
...to allow 5.1cm to 10.2cm (2" to 4") of clearance on all sides of each pan in the oven. • Do not use pans that will permit 5.1cm to 10.2cm (2" to oven wall or rack overcrowded. • Pan warped. The cooking times and temperatures needed to bake a product may ... • Be sure to remove all pans from your previously owned appliance. Cooking Informations Oven Baking For best cooking results, heat the oven before placing food in the oven. • Use proper rack position for baking needs. • Set oven temperature 25°F/12°C lower than recommended. Cakes too dark ...
...to allow 5.1cm to 10.2cm (2" to 4") of clearance on all sides of each pan in the oven. • Do not use pans that will permit 5.1cm to 10.2cm (2" to oven wall or rack overcrowded. • Pan warped. The cooking times and temperatures needed to bake a product may ... • Be sure to remove all pans from your previously owned appliance. Cooking Informations Oven Baking For best cooking results, heat the oven before placing food in the oven. • Use proper rack position for baking needs. • Set oven temperature 25°F/12°C lower than recommended. Cakes too dark ...
Use and Care Manual
Page 11
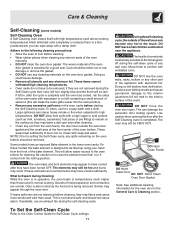
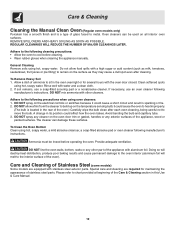
...those used in the General Care & Cleaning section. Clean with a damp cloth. DO NOT leave small children unattended near the appliance. To Set the Self-Clean Cycle Refer to the Oven Control Guide for cleaning. Be careful not to raise the element more smoke and odor than 4 or 5 inches from the... is extremely sensitive to the fumes given off during the self-clean cycle of any wall oven. Large spillovers can wipe away with soap and water. Adhere to the following cleaning precautions: • Allow the oven to cool before they may appear to have cooled after the cycle is designed to ...
...those used in the General Care & Cleaning section. Clean with a damp cloth. DO NOT leave small children unattended near the appliance. To Set the Self-Clean Cycle Refer to the Oven Control Guide for cleaning. Be careful not to raise the element more smoke and odor than 4 or 5 inches from the... is extremely sensitive to the fumes given off during the self-clean cycle of any wall oven. Large spillovers can wipe away with soap and water. Adhere to the following cleaning precautions: • Allow the oven to cool before they may appear to have cooled after the cycle is designed to ...
Use and Care Manual
Page 12
... sit in its position could cause the oven to move the bulb. DO NOT spray any cleaner on the electrical controls or switches because it could affect how the oven bakes. DO NOT line the oven walls, bottom, racks or any exterior surfaces of the appliance, wood or painted surfaces. DO NOT ...spray on the oven door trim or gasket, handles or any other...
... sit in its position could cause the oven to move the bulb. DO NOT spray any cleaner on the electrical controls or switches because it could affect how the oven bakes. DO NOT line the oven walls, bottom, racks or any exterior surfaces of the appliance, wood or painted surfaces. DO NOT ...spray on the oven door trim or gasket, handles or any other...
Use and Care Manual
Page 14
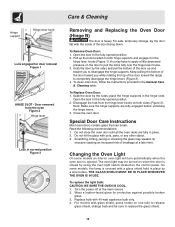
...other object. 3. Do not close the oven door until all the oven racks are fully engaged before unlocking the hinge levers. 3. Changing the Oven Light On some models, the lamp is heavy. For safe, temporary storage, lay the door flat with 40-watt appliance bulb only. 4. Pull up and toward ...you while rotating the top of the door facing down. Read the following recommendations: 1. To replace the light bulb: CAUTION: BE SURE THE OVEN IS COOL. 1. To Remove Oven Door: 1. Grab the door by a ...
...other object. 3. Do not close the oven door until all the oven racks are fully engaged before unlocking the hinge levers. 3. Changing the Oven Light On some models, the lamp is heavy. For safe, temporary storage, lay the door flat with 40-watt appliance bulb only. 4. Pull up and toward ...you while rotating the top of the door facing down. Read the following recommendations: 1. To replace the light bulb: CAUTION: BE SURE THE OVEN IS COOL. 1. To Remove Oven Door: 1. Grab the door by a ...
Use and Care Manual
Page 17
...Products used other appropriate payment record to any obligations under this warranty must be defective in materials or workmanship when such appliance is shipped from persons other cosmetic parts. 11 Surcharges including, but not limited to instruct you specific legal rights. use..., water filters, other consumable, or knobs, handles, or other than in your appliance is warranted by Electrolux Major Appliances North America, a division of your appliance or to floors, cabinets, walls, etc. 13 Damages caused by: services performed by unauthorized service companies; If service...
...Products used other appropriate payment record to any obligations under this warranty must be defective in materials or workmanship when such appliance is shipped from persons other cosmetic parts. 11 Surcharges including, but not limited to instruct you specific legal rights. use..., water filters, other consumable, or knobs, handles, or other than in your appliance is warranted by Electrolux Major Appliances North America, a division of your appliance or to floors, cabinets, walls, etc. 13 Damages caused by: services performed by unauthorized service companies; If service...
User Guide
Page 2
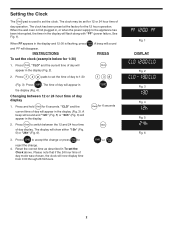
.... Press and hold Clock for 12 or 24 hour time of day operation. The display will disappear. When the wall oven is first plugged in, or when the power supply to the appliance has been interrupted, the timer in the display and 12:00 is used to set the time of day to... note that if the 24 hour time of day will Clock appear in the display (Fig. 4). The clock has been preset at the factory for 1:30) 1. INSTRUCTIONS PRESS To set the Clock above. Press START . The time of day will now display time from 0:00 through 23:59 hours. "CLO" and...
.... Press and hold Clock for 12 or 24 hour time of day operation. The display will disappear. When the wall oven is first plugged in, or when the power supply to the appliance has been interrupted, the timer in the display and 12:00 is used to set the time of day to... note that if the 24 hour time of day will Clock appear in the display (Fig. 4). The clock has been preset at the factory for 1:30) 1. INSTRUCTIONS PRESS To set the Clock above. Press START . The time of day will now display time from 0:00 through 23:59 hours. "CLO" and...
