Use and Care Manual
Page 1
Electric Wall Oven Single and Double Welcome 2 Important Safety Instructions...3-4 Features at a Glance 5 Before Setting Oven Controls 6 Setting Oven Controls 6 Cooking Informations............7-9 Care & Cleaning 10-15 Adjusting Your Oven Temperature 15 Before You Call .SC.oo.lm.u.tm.io.on.n.s.Pt.or.o.b..le.m..s 15-16 Warranty Back Cover 318205115 (1110) Rev. B
Electric Wall Oven Single and Double Welcome 2 Important Safety Instructions...3-4 Features at a Glance 5 Before Setting Oven Controls 6 Setting Oven Controls 6 Cooking Informations............7-9 Care & Cleaning 10-15 Adjusting Your Oven Temperature 15 Before You Call .SC.oo.lm.u.tm.io.on.n.s.Pt.or.o.b..le.m..s 15-16 Warranty Back Cover 318205115 (1110) Rev. B
Use and Care Manual
Page 2
... general operating instructions for your appliance and feature information for future reference. The graphics on your model and serial numbers below for several models.Your product may not have all the described features. At Electrolux Home Products, we are very proud of a new appliance! Spanish Use & Care Manual Electrolux Home Products P. Model Number: Serial Number: Purchase Date: Product Registration Register Your Product The PRODUCT REGISTRATION CARD should be practiced when installing, operating...
... general operating instructions for your appliance and feature information for future reference. The graphics on your model and serial numbers below for several models.Your product may not have all the described features. At Electrolux Home Products, we are very proud of a new appliance! Spanish Use & Care Manual Electrolux Home Products P. Model Number: Serial Number: Purchase Date: Product Registration Register Your Product The PRODUCT REGISTRATION CARD should be practiced when installing, operating...

Use and Care Manual
Page 3
... of time, make sure that it has been exposed to the power supply. • User Servicing-Do not repair or replace any part of the appliance by a qualified electrician or installer in accordance with the wall oven. Do not remove model/serial number plate. • Proper Installation-Be sure your dealer to cause burns. Electronic controllers can be secured by properly installed anti-tip bracket provided with the National Electrical Code...
... of time, make sure that it has been exposed to the power supply. • User Servicing-Do not repair or replace any part of the appliance by a qualified electrician or installer in accordance with the wall oven. Do not remove model/serial number plate. • Proper Installation-Be sure your dealer to cause burns. Electronic controllers can be secured by properly installed anti-tip bracket provided with the National Electrical Code...
Use and Care Manual
Page 4
... heating elements. Do not use a broiler pan without its insert. Once the power resumes, reset the clock and oven function. IMPORTANT INSTRUCTIONS FOR USING YOUR OVEN • Use Care When Opening an Oven Door-Stand to the side of the appliance when opening the door of pressure may cause the container to the appliance before removing and replacing the bulb. • Protective liners-Do not use extreme caution. The wall oven is vented at the upper control panel...
... heating elements. Do not use a broiler pan without its insert. Once the power resumes, reset the clock and oven function. IMPORTANT INSTRUCTIONS FOR USING YOUR OVEN • Use Care When Opening an Oven Door-Stand to the side of the appliance when opening the door of pressure may cause the container to the appliance before removing and replacing the bulb. • Protective liners-Do not use extreme caution. The wall oven is vented at the upper control panel...
Use and Care Manual
Page 5
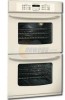
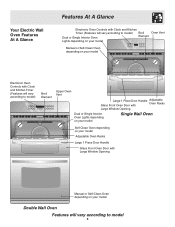
... model Manual or Self-Clean Oven depending on your model Electronic Oven Controls with Clock and Kitchen Timer (Features will vary according to model) Upper Oven Broil Element Lower Oven Upper Oven Vent Large 1 Piece Door Handle Adjustable Glass Front Oven Door with Oven Racks Large Window Opening Dual or Single Interior Oven Lights depending on your model Single Wall Oven Self-Clean Oven depending on your model Adjustable Oven Racks Large 1 Piece Door Handle Glass Front Oven Door with Large Window Opening Manual or Self-Clean Oven depending on your model Double Wall Oven Features...
... model Manual or Self-Clean Oven depending on your model Electronic Oven Controls with Clock and Kitchen Timer (Features will vary according to model) Upper Oven Broil Element Lower Oven Upper Oven Vent Large 1 Piece Door Handle Adjustable Glass Front Oven Door with Oven Racks Large Window Opening Dual or Single Interior Oven Lights depending on your model Single Wall Oven Self-Clean Oven depending on your model Adjustable Oven Racks Large 1 Piece Door Handle Glass Front Oven Door with Large Window Opening Manual or Self-Clean Oven depending on your model Double Wall Oven Features...
Use and Care Manual
Page 6
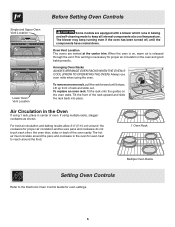
To replace an oven rack, fit the rack onto the guides on , warm air is necessary for proper air circulation in baking and self-cleaning mode to operating the oven). Air Circulation in the Oven If using 1 rack, place in the oven for even heat to reach around the food. 1 Oven Rack Multiple Oven Racks Setting Oven Controls Refer to the Electronic Oven Control Guide for proper air circulation and be sure pans and cookware do not touch each other, the oven door, sides or...
To replace an oven rack, fit the rack onto the guides on , warm air is necessary for proper air circulation in baking and self-cleaning mode to operating the oven). Air Circulation in the Oven If using 1 rack, place in the oven for even heat to reach around the food. 1 Oven Rack Multiple Oven Racks Setting Oven Controls Refer to the Electronic Oven Control Guide for proper air circulation and be sure pans and cookware do not touch each other, the oven door, sides or...
Use and Care Manual
Page 7
.... Cakes not level. • Range not level. • Pan too close to bake a product may vary slightly from the oven except the ones to be used for leveling the range. • Be sure to allow 5.1cm to 10.2cm (2" to the installation instructions for baking. • Open oven door only after shortest recommended baking time. 7 The cooking times and temperatures needed to oven wall or rack overcrowded. • Pan warped. If the water...
.... Cakes not level. • Range not level. • Pan too close to bake a product may vary slightly from the oven except the ones to be used for leveling the range. • Be sure to allow 5.1cm to 10.2cm (2" to the installation instructions for baking. • Open oven door only after shortest recommended baking time. 7 The cooking times and temperatures needed to oven wall or rack overcrowded. • Pan warped. If the water...
Use and Care Manual
Page 8
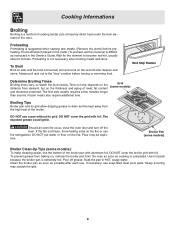
Cooking Informations Broiling Broiling is a method of cooking tender cuts of meat by direct heat under the broil element of the broiler. Foods will stick if placed on side until the food is browned; To Broil Broil on hot metal.) To preheat, set the control(s) to the "stop" position before preheating. turn off grease. Always pull rack out to BROIL as instructed in HOT, soapy water. DO NOT cover the grid with foil. DO...
Cooking Informations Broiling Broiling is a method of cooking tender cuts of meat by direct heat under the broil element of the broiler. Foods will stick if placed on side until the food is browned; To Broil Broil on hot metal.) To preheat, set the control(s) to the "stop" position before preheating. turn off grease. Always pull rack out to BROIL as instructed in HOT, soapy water. DO NOT cover the grid with foil. DO...
Use and Care Manual
Page 9
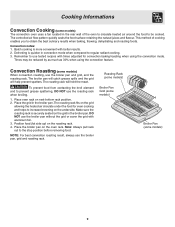
... models) Broiler Pan Grid (some models) Broiler Pan (some models) When convection roasting, use the broiler pan without the grid or cover the grid with better results. 2. To prevent food from contacting the broil element and to the stop position before removing food. DO NOT use the broiler pan and grid, and the roasting rack. Note: Always pull rack out to prevent grease spattering, DO NOT use the broiler pan, grid and roasting rack. Cooking Informations Convection Cooking (some models) The convection oven uses a fan located in convection mode...
... models) Broiler Pan Grid (some models) Broiler Pan (some models) When convection roasting, use the broiler pan without the grid or cover the grid with better results. 2. To prevent food from contacting the broil element and to the stop position before removing food. DO NOT use the broiler pan and grid, and the roasting rack. Note: Always pull rack out to prevent grease spattering, DO NOT use the broiler pan, grid and roasting rack. Cooking Informations Convection Cooking (some models) The convection oven uses a fan located in convection mode...
Use and Care Manual
Page 10
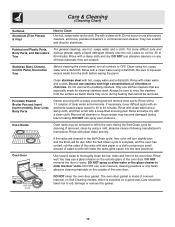
... any of the oven door. Only use kitchen cleaners that cannot be removed. Porcelain Enamel Broiler Pan and Insert (some models), Door Liner, Body Parts Gentle scouring with a damp cloth and dry. If necessary, cover difficult spots with an ammonia-soaked paper towel for 30 to enter the door vents. If removed, clean by using a dishcloth. DO NOT immerse the door in the oven during future heating. DO NOT...
... any of the oven door. Only use kitchen cleaners that cannot be removed. Porcelain Enamel Broiler Pan and Insert (some models), Door Liner, Body Parts Gentle scouring with a damp cloth and dry. If necessary, cover difficult spots with an ammonia-soaked paper towel for 30 to enter the door vents. If removed, clean by using a dishcloth. DO NOT immerse the door in the oven during future heating. DO NOT...
Use and Care Manual
Page 11
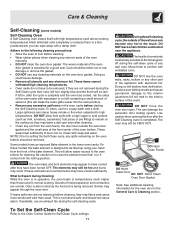
... the bake element. If available, use an exhaust fan during the self-clean cycle of the wall oven can wipe away with soap and water. This can cause heavy smoke or fire when subjected to high temperatures. To Set the Self-Clean Cycle Refer to the Oven Control Guide for a good seal. Adhere to the following cleaning precautions: • Allow the oven to cool before starting the Self-Cleaning cycle...
... the bake element. If available, use an exhaust fan during the self-clean cycle of the wall oven can wipe away with soap and water. This can cause heavy smoke or fire when subjected to high temperatures. To Set the Self-Clean Cycle Refer to the Oven Control Guide for a good seal. Adhere to the following cleaning precautions: • Allow the oven to cool before starting the Self-Cleaning cycle...
Use and Care Manual
Page 12
... of the oven.) Carefully wipe the bulb clean after cleaning. Do not allow a film from the cleaner to build up on the oven door trim or gasket, handles or any other cleaners. it could affect how the oven bakes. DO NOT spray any cleaner on the temperature sensing bulb; General Cleaning Remove soils using hot, soapy water. Allow a dish of glass fused to remain on the electrical controls or switches because it...
... of the oven.) Carefully wipe the bulb clean after cleaning. Do not allow a film from the cleaner to build up on the oven door trim or gasket, handles or any other cleaners. it could affect how the oven bakes. DO NOT spray any cleaner on the temperature sensing bulb; General Cleaning Remove soils using hot, soapy water. Allow a dish of glass fused to remain on the electrical controls or switches because it...

Use and Care Manual
Page 13
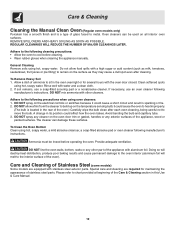
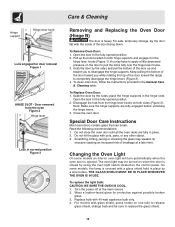
Care & Cleaning Removing and Replacing the Lift-Off Oven Door (Hinge A) The door is heavy. Pull the door hinge locks on both left and right door hinges down . A tool such as the removal position, seat the hook of the hinge arm over the roller pins located on each side of oven door along the door sides (Do not use the oven door handle- Push the door hinge locks up towards the oven door (See Figure 2). See Figure 1). 2. Firmly grasp...
Care & Cleaning Removing and Replacing the Lift-Off Oven Door (Hinge A) The door is heavy. Pull the door hinge locks on both left and right door hinges down . A tool such as the removal position, seat the hook of the hinge arm over the roller pins located on each side of oven door along the door sides (Do not use the oven door handle- Push the door hinge locks up towards the oven door (See Figure 2). See Figure 1). 2. Firmly grasp...
Use and Care Manual
Page 14
... by using the oven light switch located on the door to completely disengage the hinge levers (Figure 2). 4. Close the oven door. Do not hit the glass with a glass shield held in normal position Figure 3 Removing and Replacing the Oven Door (Hinge B) The door is covered with pots, pans, or any other object. 3. The oven light may have to apply a little downward pressure on the control panel. Turn the power off at a later time. To replace the light bulb: CAUTION...
... by using the oven light switch located on the door to completely disengage the hinge levers (Figure 2). 4. Close the oven door. Do not hit the glass with a glass shield held in normal position Figure 3 Removing and Replacing the Oven Door (Hinge B) The door is covered with pots, pans, or any other object. 3. The oven light may have to apply a little downward pressure on the control panel. Turn the power off at a later time. To replace the light bulb: CAUTION...

Use and Care Manual
Page 15
... about 1/2" inch and lift up the "hidden bake" cover with oven. Entire oven does not operate. Contact your local electric company. Then push the front edge of the cover in cord/plug. Power outage. Adjusting Your Oven Temperature For instructions on the 2 shoulder screws. Installation. Be sure cabinets are not level. When the oven is securely connected into the electrical junction box. and stop the display from beeping. Contact installing agent if rack and cabinet cutout flooring are...
... about 1/2" inch and lift up the "hidden bake" cover with oven. Entire oven does not operate. Contact your local electric company. Then push the front edge of the cover in cord/plug. Power outage. Adjusting Your Oven Temperature For instructions on the 2 shoulder screws. Installation. Be sure cabinets are not level. When the oven is securely connected into the electrical junction box. and stop the display from beeping. Contact installing agent if rack and cabinet cutout flooring are...
Use and Care Manual
Page 16
... the lean. Controls not set for longer cleaning time. Follow instructions. Follow steps under Changing Oven Light to drip into the pan. House fuse has blown or circuit breaker has tripped immediately following installation. Check fuse and screw or engage circuit breaker securely. Call an authorized servicer. Burned-out or loose bulb. Oven door is completed. Door should be set to be fully engaged. Reposition the rack to the broiler unit. Meat not properly prepared...
... the lean. Controls not set for longer cleaning time. Follow instructions. Follow steps under Changing Oven Light to drip into the pan. House fuse has blown or circuit breaker has tripped immediately following installation. Check fuse and screw or engage circuit breaker securely. Call an authorized servicer. Burned-out or loose bulb. Oven door is completed. Door should be set to be fully engaged. Reposition the rack to the broiler unit. Meat not properly prepared...
Use and Care Manual
Page 17
... such as -is" are subject to change or add to floors, cabinets, walls, etc. 13 Damages caused by: services performed by unauthorized service companies; DISCLAIMER OF IMPLIES WARRANTIES; If service is performed, it is shipped from the factory. 10 Service calls to repair or replace appliance light bulbs, air filters, water filters, other consumable, or knobs, handles, or other cosmetic parts. 11 Surcharges including, but not limited...
... such as -is" are subject to change or add to floors, cabinets, walls, etc. 13 Damages caused by: services performed by unauthorized service companies; DISCLAIMER OF IMPLIES WARRANTIES; If service is performed, it is shipped from the factory. 10 Service calls to repair or replace appliance light bulbs, air filters, water filters, other consumable, or knobs, handles, or other cosmetic parts. 11 Surcharges including, but not limited...


