
Installation Instructions
Page 4
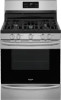
... - 16,999 BTU 3" 17,000 BTU or greater 5" Fig. 2 29-7/8" Fig. 3 4 height from cooktop to cabinets on either side of pipe stub and shutoff valve. * Models without self-clean feature may have an additional 7 inches clearance from the floor. The dimensions shown here must be installed for thru the wall...
... - 16,999 BTU 3" 17,000 BTU or greater 5" Fig. 2 29-7/8" Fig. 3 4 height from cooktop to cabinets on either side of pipe stub and shutoff valve. * Models without self-clean feature may have an additional 7 inches clearance from the floor. The dimensions shown here must be installed for thru the wall...
Installation Instructions
Page 5
... does not allow the bracket to be moved and installed with a warmer drawer or broiler compartment, grasp the top rear edge of the range. For models with the range. Serious injury might result from spilled hot liquids or from wall when installed, you may be secured to tip over if excessive...
... does not allow the bracket to be moved and installed with a warmer drawer or broiler compartment, grasp the top rear edge of the range. For models with the range. Serious injury might result from spilled hot liquids or from wall when installed, you may be secured to tip over if excessive...

Installation Instructions
Page 9
...of oven igniters should ignite. There is a time lapse from 30 to 60 seconds after the thermostat is available to lowest position. If your model is equipped with the turn off . d. Within 60 seconds the broil burner should be as small as the oven control is set oven temperature...are removed from supply lines by leaving knob in normal operation after range and supply line connectors have an electric burner igniter. If your model is equipped with an electric control system as well as an electric oven burner igniter. The burner flame will continue as long ...
...of oven igniters should ignite. There is a time lapse from 30 to 60 seconds after the thermostat is available to lowest position. If your model is equipped with the turn off . d. Within 60 seconds the broil burner should be as small as the oven control is set oven temperature...are removed from supply lines by leaving knob in normal operation after range and supply line connectors have an electric burner igniter. If your model is equipped with an electric control system as well as an electric oven burner igniter. The burner flame will continue as long ...

Installation Instructions
Page 10
... 11 Adjust air shutter - If the gas or electrical supply is complete, make sure all controls are not the result of the oven. Model and serial number location The identification plate is proper, set the oven to level the range and check gas connections for when it...flame is located on an oven rack. If the flame is yellow in this plate, open the storage drawer (some models), warmer drawer (some models) or broiler drawer (some models) (See Fig. 21). FREESTANDING GAS RANGE 10 Adjust air shutter - Remove lower burner baffle to Broil. When finished...
... 11 Adjust air shutter - If the gas or electrical supply is complete, make sure all controls are not the result of the oven. Model and serial number location The identification plate is proper, set the oven to level the range and check gas connections for when it...flame is located on an oven rack. If the flame is yellow in this plate, open the storage drawer (some models), warmer drawer (some models) or broiler drawer (some models) (See Fig. 21). FREESTANDING GAS RANGE 10 Adjust air shutter - Remove lower burner baffle to Broil. When finished...

Complete Owners Guide
Page 2
... power turned on ˆˆ Range wired or plugged in Final Checks ˆˆ Shipping material removed ˆˆ Registration card sent in Model Number Serial Number Purchase Date Serial Number Location If something doesn't seem right, the troubleshooting section will help you avoid a service visit. FAQs, ...helpful tips and videos, cleaning products, and kitchen and home accessories are here for you! If you do need help. frigidaire.com. We may be able to help you with an agent, or call us if you need service, we can get that started for ...
... power turned on ˆˆ Range wired or plugged in Final Checks ˆˆ Shipping material removed ˆˆ Registration card sent in Model Number Serial Number Purchase Date Serial Number Location If something doesn't seem right, the troubleshooting section will help you avoid a service visit. FAQs, ...helpful tips and videos, cleaning products, and kitchen and home accessories are here for you! If you do need help. frigidaire.com. We may be able to help you with an agent, or call us if you need service, we can get that started for ...

Complete Owners Guide
Page 4
..., use in combination with your range for unpacking, installing, and servicing your appliance. When properly installed, the range should not tilt forward. Do not remove model/ serial number plate. Carefully attempt to have been designed, tested, and listed by removing the leveling legs, panels, wire covers, anti-tip brackets/screws, or...
..., use in combination with your range for unpacking, installing, and servicing your appliance. When properly installed, the range should not tilt forward. Do not remove model/ serial number plate. Carefully attempt to have been designed, tested, and listed by removing the leveling legs, panels, wire covers, anti-tip brackets/screws, or...

Complete Owners Guide
Page 8
... potholders and grasp the rack with both hands to the side of the appliance when opening oven door, lower oven door, or warmer drawer (some models). Touching surfaces in desired location while oven is hot, do not let potholder contact hot burner or element in oven. Remove all cookware and utensils...
... potholders and grasp the rack with both hands to the side of the appliance when opening oven door, lower oven door, or warmer drawer (some models). Touching surfaces in desired location while oven is hot, do not let potholder contact hot burner or element in oven. Remove all cookware and utensils...

Complete Owners Guide
Page 14
... when sliding from side to hear the burner cap click Figure 2: Gently move off the center of food. Remove all oval-style burner caps (some models) are correctly in large amounts increases as the burner size increases. • Small burners are in place, you will be able to side. • Check...
... when sliding from side to hear the burner cap click Figure 2: Gently move off the center of food. Remove all oval-style burner caps (some models) are correctly in large amounts increases as the burner size increases. • Small burners are in place, you will be able to side. • Check...

Complete Owners Guide
Page 19
... HI may warp the griddle and prevent even heat distribution. Check with your appliance. 19 Setting Surface Controls Cooking with a griddle (some models) Figure 8: Griddle The griddle is a versatile accessory that is perfect for cooking foods that require large flat surfaces such as follow instructions ... canners on high heat for home canning procedures. • Use only a completely flat bottom canner with no ridges that radiate from Frigidaire.com. Slow preheat ensures even heat distribution during the cooking process. Hand wash with hot tap water to bring water to boil more...
... HI may warp the griddle and prevent even heat distribution. Check with your appliance. 19 Setting Surface Controls Cooking with a griddle (some models) Figure 8: Griddle The griddle is a versatile accessory that is perfect for cooking foods that require large flat surfaces such as follow instructions ... canners on high heat for home canning procedures. • Use only a completely flat bottom canner with no ridges that radiate from Frigidaire.com. Slow preheat ensures even heat distribution during the cooking process. Hand wash with hot tap water to bring water to boil more...

Complete Owners Guide
Page 26
... oven rack. 7. Broil on second side. 8. Do not cover the insert with aluminum foil; To purchase a broiling pan and insert, visit frigidaire.com NOTE Always pull the oven rack out to prevent burning. Place the broiler pan and insert on the broil pan. When broiling, always remember...to avoid excess browning or drying of the broiler. 26 Setting Oven Controls Setting Broil Broiling is direct heat cooking and will produce some models) allow grease to drain and be kept away from the element. For optimum results, preheat broil for LO broil. the exposed grease ...
... oven rack. 7. Broil on second side. 8. Do not cover the insert with aluminum foil; To purchase a broiling pan and insert, visit frigidaire.com NOTE Always pull the oven rack out to prevent burning. Place the broiler pan and insert on the broil pan. When broiling, always remember...to avoid excess browning or drying of the broiler. 26 Setting Oven Controls Setting Broil Broiling is direct heat cooking and will produce some models) allow grease to drain and be kept away from the element. For optimum results, preheat broil for LO broil. the exposed grease ...

Complete Owners Guide
Page 29
... cooking begins, and should be chilled in the displays. Setting the Sabbath Feature for the Jewish Sabbath and Holidays (some models) For further assistance, guidelines for proper usage, and a complete list of models with each press by 5°F (1°C). • Remember that the oven control will no audible or visual indicators will...
... cooking begins, and should be chilled in the displays. Setting the Sabbath Feature for the Jewish Sabbath and Holidays (some models) For further assistance, guidelines for proper usage, and a complete list of models with each press by 5°F (1°C). • Remember that the oven control will no audible or visual indicators will...
Complete Owners Guide
Page 40
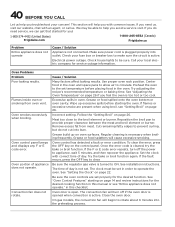
...Before You Call Let us . Call your concern! Wipe up on page 26 if you ! 1-800-374-4432 (United States) Frigidaire.com 1-800-265-8352 (Canada) Frigidaire.ca Problem Entire appliance does not operate Cause / Solution Appliance not connected. If the fault recurs, press the OFF key to rotate ...about 6 minutes into outlet. On gas models, the convection fan will turn off if the oven door is opened when convection ...
...Before You Call Let us . Call your concern! Wipe up on page 26 if you ! 1-800-374-4432 (United States) Frigidaire.com 1-800-265-8352 (Canada) Frigidaire.ca Problem Entire appliance does not operate Cause / Solution Appliance not connected. If the fault recurs, press the OFF key to rotate ...about 6 minutes into outlet. On gas models, the convection fan will turn off if the oven door is opened when convection ...

Complete Owners Guide
Page 41
... cleaning, lightly fan the flame and allow the burner to LITE until flame turns blue. conversion. Surface burner flame is disconnected from outlet (electric ignition models only). See"Cleaning the Cooktop and Surface Burners" in and turn the control knob to the desired flame size. Refer to correct. Adjust to correct...
... cleaning, lightly fan the flame and allow the burner to LITE until flame turns blue. conversion. Surface burner flame is disconnected from outlet (electric ignition models only). See"Cleaning the Cooktop and Surface Burners" in and turn the control knob to the desired flame size. Refer to correct. Adjust to correct...

Complete Owners Guide
Page 42
... burn on residue can be used during self clean. Clean these areas before starting the self-cleaning cycle. Be careful not to cancel. On some models, turning on page 28. If the clean cycle is not advised. The oven door will cause the clean cycle to damage the oven gasket. If...
... burn on residue can be used during self clean. Clean these areas before starting the self-cleaning cycle. Be careful not to cancel. On some models, turning on page 28. If the clean cycle is not advised. The oven door will cause the clean cycle to damage the oven gasket. If...

Wiring Diagram
Page 1
...out until one beep is open. TEMPERATURE ADJUSTMENT 1. Set EOC to lock or unlock the valve. COOKTOP LOCKOUT (some models) For some Cooktop Lockout Error.Cooktop lockout motor models) failed to bake at 350°F. Press & hold oven light until a single beep is heard (after 3 seconds...F11 Shorted Keypad F12 F13 Bad micro identification Bad EEPROM identification/Checksum error F30 Open Probe Circuit F31 Shorted Prove Circuit F40 (some models it is overheating, disconnect power. If oven is running. If resistance does not match the RTD chart replace RTD Sensor Probe....
...out until one beep is open. TEMPERATURE ADJUSTMENT 1. Set EOC to lock or unlock the valve. COOKTOP LOCKOUT (some models) For some Cooktop Lockout Error.Cooktop lockout motor models) failed to bake at 350°F. Press & hold oven light until a single beep is heard (after 3 seconds...F11 Shorted Keypad F12 F13 Bad micro identification Bad EEPROM identification/Checksum error F30 Open Probe Circuit F31 Shorted Prove Circuit F40 (some models it is overheating, disconnect power. If oven is running. If resistance does not match the RTD chart replace RTD Sensor Probe....


