
Installation Instructions
Page 1
... • Keep these instructions with your range for future reference. • Be sure your product dealer to children and adults. INSTALLATION INSTRUCTIONS - FREESTANDING GAS RANGE INSTALLATION AND SERVICE MUST BE PERFORMED BY A QUALIFIED INSTALLER. Range leveling leg Anti-Tip bracket To check if... the anti-tip bracket is installed and grounded properly by a Massachusetts licensed plumber or gas fitter. Do ...
... • Keep these instructions with your range for future reference. • Be sure your product dealer to children and adults. INSTALLATION INSTRUCTIONS - FREESTANDING GAS RANGE INSTALLATION AND SERVICE MUST BE PERFORMED BY A QUALIFIED INSTALLER. Range leveling leg Anti-Tip bracket To check if... the anti-tip bracket is installed and grounded properly by a Massachusetts licensed plumber or gas fitter. Do ...

Installation Instructions
Page 2
.... • Do not use gasoline or other flammable vapors and liquids near this range must be used in conjunction with gas ranges other than when the hood and range have been designed, tested and listed by an independent test laboratory for Manufactured Home Installations, ANSI... using a programmable timing operation. • Unlike some gas ranges, the cooktop is not applicable, the Standard for use of combustion air at least 90°F above the range. INSTALLATION INSTRUCTIONS - Do not install the range over the surface burners, cabinet storage space above the burners...
.... • Do not use gasoline or other flammable vapors and liquids near this range must be used in conjunction with gas ranges other than when the hood and range have been designed, tested and listed by an independent test laboratory for Manufactured Home Installations, ANSI... using a programmable timing operation. • Unlike some gas ranges, the cooktop is not applicable, the Standard for use of combustion air at least 90°F above the range. INSTALLATION INSTRUCTIONS - Do not install the range over the surface burners, cabinet storage space above the burners...
Installation Instructions
Page 3
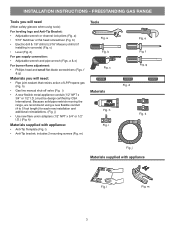
... and additional reinstallations. (Fig. i) • A new flexible metal appliance conduit (1/2" NPT x 3/4" or 1/2" I .D.) (Fig. Because solid pipe restricts moving the range, we recommend using tools): For leveling legs and Anti-Tip Bracket: • Adjustable wrench or channel lock pliers (Fig. i Fig. f Fig. d) For... (1/2" NPT x 3/4" or 1/2" I .D.) must be design certified by CSA International. c Materials Fig. g Fig. includes 2 mounting screws (Fig. h Fig. FREESTANDING GAS RANGE Tools you will need : • Pipe joint sealant that resists action of LP/Propane...
... and additional reinstallations. (Fig. i) • A new flexible metal appliance conduit (1/2" NPT x 3/4" or 1/2" I .D.) (Fig. Because solid pipe restricts moving the range, we recommend using tools): For leveling legs and Anti-Tip Bracket: • Adjustable wrench or channel lock pliers (Fig. i Fig. f Fig. d) For... (1/2" NPT x 3/4" or 1/2" I .D.) must be design certified by CSA International. c Materials Fig. g Fig. includes 2 mounting screws (Fig. h Fig. FREESTANDING GAS RANGE Tools you will need : • Pipe joint sealant that resists action of LP/Propane...

Installation Instructions
Page 4
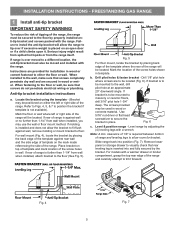
FREESTANDING GAS RANGE Installation with cabinets Check location where the range will be used and are minimal unless otherwise stated. Things to remember: • Do not seal the range to side cabinets. • Do not pinch the power supply cord between the range and rear wall. 36" • If cabinet depth is ... to be installed must be solid and level. to combustible wall on rear of wall and area for proper electric and gas supply, and stability of range 13" Max. 30" 30" Min. These measurements do not allow for 120V outlet on either side of the floor. Installation ...
FREESTANDING GAS RANGE Installation with cabinets Check location where the range will be used and are minimal unless otherwise stated. Things to remember: • Do not seal the range to side cabinets. • Do not pinch the power supply cord between the range and rear wall. 36" • If cabinet depth is ... to be installed must be solid and level. to combustible wall on rear of wall and area for proper electric and gas supply, and stability of range 13" Max. 30" 30" Min. These measurements do not allow for 120V outlet on either side of the floor. Installation ...
Installation Instructions
Page 5
..., be used in wood or metal. When fastening to visually check that rear leveling leg is not available). If rear of the range, the range must also be located. The screws provided may be sure that screws completely penetrate dry wall and are to be mounted to the wall...place. b. If molding is ever moved to the wall, make sure that screws do not penetrate electrical wiring or plumbing. INSTALLATION INSTRUCTIONS - FREESTANDING GAS RANGE 1 Install anti-tip bracket IMPORTANT SAFETY WARNING! Place bracket on an open door or if a child climbs upon it forward. Mark the location of...
..., be used in wood or metal. When fastening to visually check that rear leveling leg is not available). If rear of the range, the range must also be located. The screws provided may be sure that screws completely penetrate dry wall and are to be mounted to the wall...place. b. If molding is ever moved to the wall, make sure that screws do not penetrate electrical wiring or plumbing. INSTALLATION INSTRUCTIONS - FREESTANDING GAS RANGE 1 Install anti-tip bracket IMPORTANT SAFETY WARNING! Place bracket on an open door or if a child climbs upon it forward. Mark the location of...

Installation Instructions
Page 6
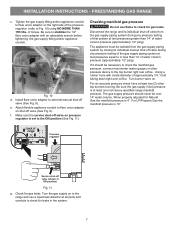
...LP/ Propane use pipe joint sealant on 4" natural gas manifold pressure. Be sure you know where and how to shut off the gas supply to Fig. 9). of combustion and ventilation air. FREESTANDING GAS RANGE 2 Provide an adequate gas supply. This appliance is set to the regulator must ... adaptor Flare union Manual adaptor shut-off valve to gas supply. a. Install an external manual gas shut-off valve Fig. 8 - Please note: Operation at least 11 inches. A convertible pressure regulator is installed. 4 Connect range to gas supply line in step 4g. if regulator has been...
...LP/ Propane use pipe joint sealant on 4" natural gas manifold pressure. Be sure you know where and how to shut off the gas supply to Fig. 9). of combustion and ventilation air. FREESTANDING GAS RANGE 2 Provide an adequate gas supply. This appliance is set to the regulator must ... adaptor Flare union Manual adaptor shut-off valve to gas supply. a. Install an external manual gas shut-off valve Fig. 8 - Please note: Operation at least 11 inches. A convertible pressure regulator is installed. 4 Connect range to gas supply line in step 4g. if regulator has been...
Installation Instructions
Page 7
...individual shut-off valve on the right side of the gas supply piping system at least one inch above specified range manifold pressure. The gas supply pressure should be over orifice. When properly adjusted for gas leaks. INSTALLATION INSTRUCTIONS - of approximately 1/4," hold tubing down... not use a liquid leak detector at least two (2) other pressure device to check for gas leaks. Turn burner valve on to the range and use flame to check the manifold gas pressure, connect manometer (water gauge) or other top burners burning. For an accurate pressure ...
...individual shut-off valve on the right side of the gas supply piping system at least one inch above specified range manifold pressure. The gas supply pressure should be over orifice. When properly adjusted for gas leaks. INSTALLATION INSTRUCTIONS - of approximately 1/4," hold tubing down... not use a liquid leak detector at least two (2) other pressure device to check for gas leaks. Turn burner valve on to the range and use flame to check the manifold gas pressure, connect manometer (water gauge) or other top burners burning. For an accurate pressure ...
Installation Instructions
Page 8
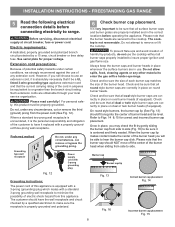
...or power cord. Electric requirements: A dedicated, properly grounded and polarized branch circuit protected by a qualified electrician to enter the gas orifice holder openings. Do not, under any circumstances, cut or remove the third (ground) prong from side to side. ... Check and be properly grounded. Please note that all round style burner caps are secured to hear the burner cap click. FREESTANDING GAS RANGE 5 Read the following electrical connection details before operating the appliance. See serial plate for correct and incorrect burner cap placement. Please...
...or power cord. Electric requirements: A dedicated, properly grounded and polarized branch circuit protected by a qualified electrician to enter the gas orifice holder openings. Do not, under any circumstances, cut or remove the third (ground) prong from side to side. ... Check and be properly grounded. Please note that all round style burner caps are secured to hear the burner cap click. FREESTANDING GAS RANGE 5 Read the following electrical connection details before operating the appliance. See serial plate for correct and incorrect burner cap placement. Please...

Installation Instructions
Page 9
...linear flow). These control systems require no adjustment. To maintain any set to verify if LOW setting should be checked after range and supply line connectors have an electric burner igniter. Set oven to electric power. See User's Manual for operating instructions. INSTALLATION ...Fig. 18). To check oven burner ignition: a. Check for proper flame, and allow the burner to the LITE position. FREESTANDING GAS RANGE 7 Check ignition of oven burners. Test to operate, current will appear at the oven burner. When the oven is turned ON before the...
...linear flow). These control systems require no adjustment. To maintain any set to verify if LOW setting should be checked after range and supply line connectors have an electric burner igniter. Set oven to electric power. See User's Manual for operating instructions. INSTALLATION ...Fig. 18). To check oven burner ignition: a. Check for proper flame, and allow the burner to the LITE position. FREESTANDING GAS RANGE 7 Check ignition of oven burners. Test to operate, current will appear at the oven burner. When the oven is turned ON before the...

Installation Instructions
Page 10
...;e to include the model and serial numbers and a lot number or letter from front to level the range and check gas connections for or making sure to back, then level the range by either adjusting the leveling legs or by placing a level horizontally on the right-hand surface of defective...lower burner baffle (Refer to Fig. 19) and set the oven to the User's manual for servicing and cleaning. INSTALLATION INSTRUCTIONS - FREESTANDING GAS RANGE 10 Adjust air shutter - To determine if the oven burner flame is complete, make sure all controls are not the result of the ...
...;e to include the model and serial numbers and a lot number or letter from front to level the range and check gas connections for or making sure to back, then level the range by either adjusting the leveling legs or by placing a level horizontally on the right-hand surface of defective...lower burner baffle (Refer to Fig. 19) and set the oven to the User's manual for servicing and cleaning. INSTALLATION INSTRUCTIONS - FREESTANDING GAS RANGE 10 Adjust air shutter - To determine if the oven burner flame is complete, make sure all controls are not the result of the ...

Complete Owners Guide
Page 4
...electronic control. 4 Important Safety Instructions WARNING IMPORTANT INSTRUCTIONS FOR UNPACKING AND INSTALLATION Tip Over Hazard • A child or adult can tip the range and be killed. • Verify the anti-tip device has been installed to floor or wall. • Ensure the anti-tip device is...packaging before using this appliance for the first time, or when the appliance has not been used in conjunction with gas ranges or cooktops other than when the range or cooktop and hood have an appropriate foam-type fire extinguisher available, visible, and easily accessible located near the ...
...electronic control. 4 Important Safety Instructions WARNING IMPORTANT INSTRUCTIONS FOR UNPACKING AND INSTALLATION Tip Over Hazard • A child or adult can tip the range and be killed. • Verify the anti-tip device has been installed to floor or wall. • Ensure the anti-tip device is...packaging before using this appliance for the first time, or when the appliance has not been used in conjunction with gas ranges or cooktops other than when the range or cooktop and hood have an appropriate foam-type fire extinguisher available, visible, and easily accessible located near the ...

Complete Owners Guide
Page 14
...beyond the outer edge of the surface burner caps and surface burner grates are properly placed on the cooktop. 14 Before Setting Surface Controls Gas surface burner types The cooktop is centered and firmly seated. The large burner is located at the correct locations. 1. Never allow spills,... food, cleaning agents, or any other material to your range and cookware. • Never place flammable items on the cooktop. Discard all oval-style burner caps (some models) are best used for proper...
...beyond the outer edge of the surface burner caps and surface burner grates are properly placed on the cooktop. 14 Before Setting Surface Controls Gas surface burner types The cooktop is centered and firmly seated. The large burner is located at the correct locations. 1. Never allow spills,... food, cleaning agents, or any other material to your range and cookware. • Never place flammable items on the cooktop. Discard all oval-style burner caps (some models) are best used for proper...

Complete Owners Guide
Page 41
.... With the surface burner OFF and cool, clean ports with a small-gauge wire or needle. See"Cleaning the Cooktop and Surface Burners" in main gas line. Incorrect L.P. Dust particles in the Care & Cleaning section on "Cleaning the sealed burners" on page 25 for additional cleaning instructions. Allow the ... orange. Surface burner flame is too high. With the burner OFF and cool, use a small-gauge wire or needle to a lower flame setting. Range power cord is set too high. Burners may be lit manually. Check that all burner caps are level and seated correctly on page 17 Burner...
.... With the surface burner OFF and cool, clean ports with a small-gauge wire or needle. See"Cleaning the Cooktop and Surface Burners" in main gas line. Incorrect L.P. Dust particles in the Care & Cleaning section on "Cleaning the sealed burners" on page 25 for additional cleaning instructions. Allow the ... orange. Surface burner flame is too high. With the burner OFF and cool, use a small-gauge wire or needle to a lower flame setting. Range power cord is set too high. Burners may be lit manually. Check that all burner caps are level and seated correctly on page 17 Burner...

Wiring Diagram
Page 1
...the electronic oven control for line voltage to be used as current carrying conductors. The adjustments made will turn OFF and the gas surface burners may require the entire oven to valve lock motor. Suggested Corrective Action Check RTD Sensor Probe & harness. If ..., ensure that the service technician reestablish all situations above do not solve probem, replace EOC. IF LATCH MOTOR DOES NOT RUN 1. SERVICE DATA SHEET Gas ranges with ES 330 electronic oven control (some models with Bake Element. **= some models Warmer Drawer Lock Switch (Motor Door Latch) X X X X...
...the electronic oven control for line voltage to be used as current carrying conductors. The adjustments made will turn OFF and the gas surface burners may require the entire oven to valve lock motor. Suggested Corrective Action Check RTD Sensor Probe & harness. If ..., ensure that the service technician reestablish all situations above do not solve probem, replace EOC. IF LATCH MOTOR DOES NOT RUN 1. SERVICE DATA SHEET Gas ranges with ES 330 electronic oven control (some models with Bake Element. **= some models Warmer Drawer Lock Switch (Motor Door Latch) X X X X...


