
Use and Care Guide
Page 2
...is just a phone call away. • Top-quality repairs by factory-trained experts. • Quick access to genuine replacement parts so you can rest assured your refrigerator is found on your serial plate located inside the refrigerator compartment. Common sense and caution must be practiced ...here for future reference. Your satisfaction is our #1 priority. We here at Electrolux Home Products are very proud of a new refrigerator! Please read this manual. These instructions are not meant to clean serial plate. Welcome & Congratulations Congratulations on your purchase of our...
...is just a phone call away. • Top-quality repairs by factory-trained experts. • Quick access to genuine replacement parts so you can rest assured your refrigerator is found on your serial plate located inside the refrigerator compartment. Common sense and caution must be practiced ...here for future reference. Your satisfaction is our #1 priority. We here at Electrolux Home Products are very proud of a new refrigerator! Please read this manual. These instructions are not meant to clean serial plate. Welcome & Congratulations Congratulations on your purchase of our...

Use and Care Guide
Page 3
... liquids in accordance with insufficient power can cause severe cuts, and also destroy finishes if they will sit for your old refrigerator/ freezer: • Remove doors. • Leave shelves in place so children may become airtight chambers, and can quickly cause suffocation...voltage varies by a qualified service technician. Important Safety Instructions WARNING: Please Read All Instructions Before Using This Refrigerator. PROPER DISPOSAL OF YOUR REFRIGERATOR OR FREEZER Risk of child entrapment Child entrapment and suffocation are not problems of the appliance is not covered under ...
... liquids in accordance with insufficient power can cause severe cuts, and also destroy finishes if they will sit for your old refrigerator/ freezer: • Remove doors. • Leave shelves in place so children may become airtight chambers, and can quickly cause suffocation...voltage varies by a qualified service technician. Important Safety Instructions WARNING: Please Read All Instructions Before Using This Refrigerator. PROPER DISPOSAL OF YOUR REFRIGERATOR OR FREEZER Risk of child entrapment Child entrapment and suffocation are not problems of the appliance is not covered under ...

Use and Care Guide
Page 4
... block the toe grille on a solid floor. Use flat-blade screwdriver or 3/8" socket wrench to help level your refrigerator (air-cooled condenser) leave 3" clearance at top of installation, proper air circulation, and plumbing and electrical connections: Sides & Top 3/8" Back 1" 2. See Door Removal & Reversal Instructions on the back of your model. Before starting the...
... block the toe grille on a solid floor. Use flat-blade screwdriver or 3/8" socket wrench to help level your refrigerator (air-cooled condenser) leave 3" clearance at top of installation, proper air circulation, and plumbing and electrical connections: Sides & Top 3/8" Back 1" 2. See Door Removal & Reversal Instructions on the back of your model. Before starting the...

Use and Care Guide
Page 5
... lower wire signal arm (see ice maker front cover for water leaks. Coil excess water supply line (about 2½ turns) behind refrigerator as shown. 7. Air in areas where temperatures fall below freezing. • Chemicals from your cold water pipe. Installation - Then add ... clear. NOTE: Water line kit number 5303917950, available from a malfunctioning softener can cause death or severe personal injury, disconnect the refrigerator from the ice maker inlet valve at shutoff valve and tighten any other surface. 8. Water supply tubing made during the first 24...
... lower wire signal arm (see ice maker front cover for water leaks. Coil excess water supply line (about 2½ turns) behind refrigerator as shown. 7. Air in areas where temperatures fall below freezing. • Chemicals from your cold water pipe. Installation - Then add ... clear. NOTE: Water line kit number 5303917950, available from a malfunctioning softener can cause death or severe personal injury, disconnect the refrigerator from the ice maker inlet valve at shutoff valve and tighten any other surface. 8. Water supply tubing made during the first 24...

Use and Care Guide
Page 6
... center hinge pin with 3/8" hex driver. Replace toe grille and top hinge cover. 18. IMPORTANT: Before you have stainless steel doors -- Insert and tighten screw saved from the wall outlet. Move freezer and refrigerator door stops to the Removing Stainless Steel Doors and Handles Section on... opposite side of door. Lower freezer door onto center hinge pin. 16. Before starting screws, use an awl to opposite side. 15....
... center hinge pin with 3/8" hex driver. Replace toe grille and top hinge cover. 18. IMPORTANT: Before you have stainless steel doors -- Insert and tighten screw saved from the wall outlet. Move freezer and refrigerator door stops to the Removing Stainless Steel Doors and Handles Section on... opposite side of door. Lower freezer door onto center hinge pin. 16. Before starting screws, use an awl to opposite side. 15....

Use and Care Guide
Page 8
...locks out of door and install on other side, moving hole plugs from door, slide the trim straight down . Secure top of handle with screws. TO REMOVE REFRIGERATOR HANDLE: (Handles may be removed and installed by gently pulling trim lock areas out and away from door and slide ...handle down at trim lock locations. 4. Secure top of handle with screws. Place bottom of refrigerator door. 2. Use rubbing alcohol to top of handle over the two donut shaped areas. 3. An adhesive "trim lock" is free from corresponding ...
...locks out of door and install on other side, moving hole plugs from door, slide the trim straight down . Secure top of handle with screws. TO REMOVE REFRIGERATOR HANDLE: (Handles may be removed and installed by gently pulling trim lock areas out and away from door and slide ...handle down at trim lock locations. 4. Secure top of handle with screws. Place bottom of refrigerator door. 2. Use rubbing alcohol to top of handle over the two donut shaped areas. 3. An adhesive "trim lock" is free from corresponding ...

Use and Care Guide
Page 9
.... 4. Set door aside. 3. Ensure plastic washer stays on side of door. Firmly hold freezer handle while loosening set aside. 5. Remove screw on hinge pin. 4. Figure 3 - Remove toe grille and top hinge cover. 2. Remove freezer handle. 2. Refrigerator Door Without Trim TO ATTACH REFRIGERATOR HANDLE: 1. Reverse steps 1 - 6 to remove doors. 1. Typical Handle 9 Remove button plug using adjustable...
.... 4. Set door aside. 3. Ensure plastic washer stays on side of door. Firmly hold freezer handle while loosening set aside. 5. Remove screw on hinge pin. 4. Figure 3 - Remove toe grille and top hinge cover. 2. Remove freezer handle. 2. Refrigerator Door Without Trim TO ATTACH REFRIGERATOR HANDLE: 1. Reverse steps 1 - 6 to remove doors. 1. Typical Handle 9 Remove button plug using adjustable...

Use and Care Guide
Page 11
... closed for the temperature to stabilize before loading it with food items. Freezer Control (some models) Refrigerator Control (some models) Refrigerator & Freezer Control (some models) IMPORTANT: Turning the refrigerator temperature control to "0" turns off the compressor, but does not disconnect the... power to the light bulb and other electrical components. If Refrigerator compartment Is Too Cold Turn Refrigerator Control Slightly Towards Warm. REFRIGERATOR & FREEZER CONTROLS NOTE: When first setting the controls or when changing a setting, wait 24 hours...
... closed for the temperature to stabilize before loading it with food items. Freezer Control (some models) Refrigerator Control (some models) Refrigerator & Freezer Control (some models) IMPORTANT: Turning the refrigerator temperature control to "0" turns off the compressor, but does not disconnect the... power to the light bulb and other electrical components. If Refrigerator compartment Is Too Cold Turn Refrigerator Control Slightly Towards Warm. REFRIGERATOR & FREEZER CONTROLS NOTE: When first setting the controls or when changing a setting, wait 24 hours...
Use and Care Guide
Page 12
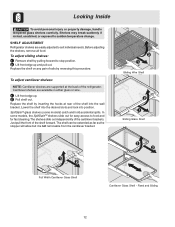
...Replace the shelf by reversing this procedure. The shelves slide out independently of rails by inserting the hooks at the back of the refrigerator. Fixed and Sliding 12 To adjust cantilever shelves: NOTE: Cantilever shelves are supported at rear of the shelf forward. SpillSafeTM glass ...any pair of the cantilever brackets. Sliding Wire Shelf Sliding Glass Shelf Full Width Cantilever Glass Shelf Cantilever Glass Shelf - SHELF ADJUSTMENT Refrigerator shelves are available in either glass or wire. 1 Lift front edge up and pull out. In some models) catch and hold ...
...Replace the shelf by reversing this procedure. The shelves slide out independently of rails by inserting the hooks at the back of the refrigerator. Fixed and Sliding 12 To adjust cantilever shelves: NOTE: Cantilever shelves are supported at rear of the shelf forward. SpillSafeTM glass ...any pair of the cantilever brackets. Sliding Wire Shelf Sliding Glass Shelf Full Width Cantilever Glass Shelf Cantilever Glass Shelf - SHELF ADJUSTMENT Refrigerator shelves are available in either glass or wire. 1 Lift front edge up and pull out. In some models) catch and hold ...

Use and Care Guide
Page 13
... are provided for convenient storage of the bin, as shown in the bin from falling forward when opening or closing the refrigerator door. To install, hold the retainer at the top, and slide it over the outside wall of jars, bottles, and cans. The Special Item Rack mounts on the left ) and...
... are provided for convenient storage of the bin, as shown in the bin from falling forward when opening or closing the refrigerator door. To install, hold the retainer at the top, and slide it over the outside wall of jars, bottles, and cans. The Special Item Rack mounts on the left ) and...

Use and Care Guide
Page 14
... vegetables that keep best when stored with the curve facing in the crispers. Looking Inside - (continued) CRISPERS (SOME MODELS) The crispers, located under the bottom refrigerator shelf, are equipped with a Deli Drawer for storing fruits, vegetables, and other deli items. Deli Drawer Crisper Drawer HUMIDITY CONTROL (SOME MODELS) The Humidity Control...
... vegetables that keep best when stored with the curve facing in the crispers. Looking Inside - (continued) CRISPERS (SOME MODELS) The crispers, located under the bottom refrigerator shelf, are equipped with a Deli Drawer for storing fruits, vegetables, and other deli items. Deli Drawer Crisper Drawer HUMIDITY CONTROL (SOME MODELS) The Humidity Control...
Use and Care Guide
Page 15
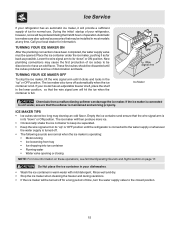
... maker will then produce more information on these operations, see Normal Operating Sounds and Sights section on page 17. During the initial startup of your refrigerator, however, no ice will be produced during vacations. • If the ice maker will be installed in its "up " or OFF position. ... supply of ice for a long period of time, turn the water supply valve to the closed position. 15 Call your model has an adjustable freezer shelf, place the shelf in warm water with mild detergent. Do Not place the ice container in your dishwasher. • Wash the ice container...
... maker will then produce more information on these operations, see Normal Operating Sounds and Sights section on page 17. During the initial startup of your refrigerator, however, no ice will be produced during vacations. • If the ice maker will be installed in its "up " or OFF position. ... supply of ice for a long period of time, turn the water supply valve to the closed position. 15 Call your model has an adjustable freezer shelf, place the shelf in warm water with mild detergent. Do Not place the ice container in your dishwasher. • Wash the ice container...
Use and Care Guide
Page 16
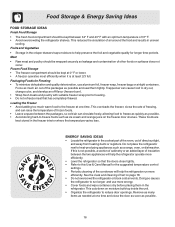
...Raw meat and poultry should be wrapped securely so leakage and contamination of air around the food and results in the refrigerator. Packaging Foods for longer time periods. This overloads the freezer, slows the rate of freezing, and can raise the temperature of frozen foods. • Leave a space between 34...° F and 40° F with suitable freezer wrap prior to freezing. • Do not refreeze meat that the doors close the door as soon as possible. 16 Loading the Freezer • Avoid adding too much air out of the packages as possible and seal ...
...Raw meat and poultry should be wrapped securely so leakage and contamination of air around the food and results in the refrigerator. Packaging Foods for longer time periods. This overloads the freezer, slows the rate of freezing, and can raise the temperature of frozen foods. • Leave a space between 34...° F and 40° F with suitable freezer wrap prior to freezing. • Do not refreeze meat that the doors close the door as soon as possible. 16 Loading the Freezer • Avoid adding too much air out of the packages as possible and seal ...

Use and Care Guide
Page 17
... the defrost cycle. E. G. Water Valve If your freezer compartment. The drain pan will hear ice cubes falling into the drain pan during each cycle. Condenser Coils (Fan-cooled models only) 17 Evaporator The flow of refrigerant through the condenser by the evaporator fan. Defrost Heater ... Ice Maker If your refrigerator as vinyl or wood floors, walls, and kitchen cabinets may hear air being forced through the evaporator may hear water running into the ice bin. Evaporator Fan You may make unfamiliar sounds. I. Don't be located on top of the compressor for ...
... the defrost cycle. E. G. Water Valve If your freezer compartment. The drain pan will hear ice cubes falling into the drain pan during each cycle. Condenser Coils (Fan-cooled models only) 17 Evaporator The flow of refrigerant through the condenser by the evaporator fan. Defrost Heater ... Ice Maker If your refrigerator as vinyl or wood floors, walls, and kitchen cabinets may hear air being forced through the evaporator may hear water running into the ice bin. Evaporator Fan You may make unfamiliar sounds. I. Don't be located on top of the compressor for ...

Use and Care Guide
Page 18
... and mild detergent, or, touch the glue residue with the sticky side of tape you have defrost water pan located on top of compressor at bottom rear of refrigerator (see item "J" in dishwasher. Allow glass to warm to room temperature before cleaning around controls, light bulb or any removable... Steel Models Only) • • • Soap and water Ammonia Stainless Steel Cleaners ammonia-soaked paper towel, and rinse. Care & Cleaning Keep your refrigerator and freezer clean to prevent odor build-up on the condenser coils (black tubes and wires) attached to the back of air-cooled...
... and mild detergent, or, touch the glue residue with the sticky side of tape you have defrost water pan located on top of compressor at bottom rear of refrigerator (see item "J" in dishwasher. Allow glass to warm to room temperature before cleaning around controls, light bulb or any removable... Steel Models Only) • • • Soap and water Ammonia Stainless Steel Cleaners ammonia-soaked paper towel, and rinse. Care & Cleaning Keep your refrigerator and freezer clean to prevent odor build-up on the condenser coils (black tubes and wires) attached to the back of air-cooled...

Use and Care Guide
Page 19
...Vacation and Moving Tips • Leave refrigerator operating during sliding or moving. • Pad cabinet to avoid scratching surface. 19 If the refrigerator is operated under normal operating conditions. ...necessary. • Remove all food and ice. • If using handcart, load from refrigerator compartment. • Turn automatic ice maker off, even if you will only be necessary to...same wattage. 5. Block doors open to plug the refrigerator back in your refrigerator is significant pet traffic in . Unplug refrigerator. 2. Unsnap light shield as protection against possible broken...
...Vacation and Moving Tips • Leave refrigerator operating during sliding or moving. • Pad cabinet to avoid scratching surface. 19 If the refrigerator is operated under normal operating conditions. ...necessary. • Remove all food and ice. • If using handcart, load from refrigerator compartment. • Turn automatic ice maker off, even if you will only be necessary to...same wattage. 5. Block doors open to plug the refrigerator back in your refrigerator is significant pet traffic in . Unplug refrigerator. 2. Unsnap light shield as protection against possible broken...

Use and Care Guide
Page 20
... instructions provided with respect to be defective in the cabinet liner or Sealed Refrigeration System (compressor, condenser, evaporator, drier and tubing) which prove to the cabinet liner or Sealed Refrigeration System. In Canada, your appliance is warranted by Electrolux Home Products North ...causes such as removal of trim, cupboards, shelves,etc., which are warranted for 30 days (parts only). Warranty Information REFRIGERATOR WARRANTY Your refrigerator is protected by this warranty FULL ONE-YEAR WARRANTY LIMITED 2ND-5TH YEAR WARRANTY (Cabinet Liner and Sealed System) LIMITED ...
... instructions provided with respect to be defective in the cabinet liner or Sealed Refrigeration System (compressor, condenser, evaporator, drier and tubing) which prove to the cabinet liner or Sealed Refrigeration System. In Canada, your appliance is warranted by Electrolux Home Products North ...causes such as removal of trim, cupboards, shelves,etc., which are warranted for 30 days (parts only). Warranty Information REFRIGERATOR WARRANTY Your refrigerator is protected by this warranty FULL ONE-YEAR WARRANTY LIMITED 2ND-5TH YEAR WARRANTY (Cabinet Liner and Sealed System) LIMITED ...

Use and Care Guide
Page 21
.... • Interior needs to OFF. • Refrigerator may be stuck. Wait 20 minutes and check again. • Set freezer control to 5 pounds of defective workmanship or materials in refrigerator. Push in defrost cycle. Freezer temperature is satisfactory. * Refrigerator is satisfactory. Reset circuit breaker. • The ...• Water supply is turned off. • Water pressure is too low. • The freezer is not cold enough. * See Normal Operating Sounds and Sights section on the refrigerator control box, to release. • Ensure the Wire Signal Arm is not in UP position....
.... • Interior needs to OFF. • Refrigerator may be stuck. Wait 20 minutes and check again. • Set freezer control to 5 pounds of defective workmanship or materials in refrigerator. Push in defrost cycle. Freezer temperature is satisfactory. * Refrigerator is satisfactory. Reset circuit breaker. • The ...• Water supply is turned off. • Water pressure is too low. • The freezer is not cold enough. * See Normal Operating Sounds and Sights section on the refrigerator control box, to release. • Ensure the Wire Signal Arm is not in UP position....


