
Use and Care Guide
Page 2
.... These instructions are not meant to clean serial plate. Please record your new refrigerator and Thank You for choosing our product. Please read this manual. We know you with your refrigerator. 2 NOTE: Use only soap and water to cover every possible condition and situation...-free service is just a phone call away. • Top-quality repairs by factory-trained experts. • Quick access to genuine replacement parts so you consider us for future reference. Welcome & Congratulations Congratulations on your refrigerator is repaired with the proper components. We hope you can...
.... These instructions are not meant to clean serial plate. Please record your new refrigerator and Thank You for choosing our product. Please read this manual. We know you with your refrigerator. 2 NOTE: Use only soap and water to cover every possible condition and situation...-free service is just a phone call away. • Top-quality repairs by factory-trained experts. • Quick access to genuine replacement parts so you consider us for future reference. Welcome & Congratulations Congratulations on your refrigerator is repaired with the proper components. We hope you can...

Use and Care Guide
Page 3
.... Before you are getting rid of explosive fumes. • Avoid contact with a three-prong grounding plug for your old refrigerator or freezer, please follow the instructions below to the light bulb or other flammable liquids in accordance with rugs, bedspreads, plastic sheets or..., plastic bags, and any moving parts of the appliance is equipped with any exterior wrapping material immediately after the refrigerator is not covered under your old refrigerator/ freezer: • Remove doors. • Leave shelves in place so children may become airtight chambers, and can damage...
.... Before you are getting rid of explosive fumes. • Avoid contact with a three-prong grounding plug for your old refrigerator or freezer, please follow the instructions below to the light bulb or other flammable liquids in accordance with rugs, bedspreads, plastic sheets or..., plastic bags, and any moving parts of the appliance is equipped with any exterior wrapping material immediately after the refrigerator is not covered under your old refrigerator/ freezer: • Remove doors. • Leave shelves in place so children may become airtight chambers, and can damage...

Use and Care Guide
Page 4
...; Consider water supply availability for ease of installation, proper air circulation, and plumbing and electrical connections: Sides & Top 3/8" Back 1" 2. Sufficient air circulation is level and strong enough to help level your unit. The refrigerator should be able to side. LOCATION • Choose a place that is essential for your model. Do Not block...
...; Consider water supply availability for ease of installation, proper air circulation, and plumbing and electrical connections: Sides & Top 3/8" Back 1" 2. Sufficient air circulation is level and strong enough to help level your unit. The refrigerator should be able to side. LOCATION • Choose a place that is essential for your model. Do Not block...

Use and Care Guide
Page 5
... use a self-piercing type shutoff valve. • A compression nut and ferrule (sleeve) for installing a water supply line. Place end of refrigerator as it greatly increases the potential for the ice maker to soft water, ensure that leak. 9. Unscrew plastic cap from electric power source. 2.... (sleeve) into sink or bucket. Turn ON water supply and flush supply line until water is connected to begin producing ice. Reconnect refrigerator to the ice maker inlet valve. Air in areas where temperatures fall below freezing. • Chemicals from a malfunctioning softener can be moved...
... use a self-piercing type shutoff valve. • A compression nut and ferrule (sleeve) for installing a water supply line. Place end of refrigerator as it greatly increases the potential for the ice maker to soft water, ensure that leak. 9. Unscrew plastic cap from electric power source. 2.... (sleeve) into sink or bucket. Turn ON water supply and flush supply line until water is connected to begin producing ice. Reconnect refrigerator to the ice maker inlet valve. Air in areas where temperatures fall below freezing. • Chemicals from a malfunctioning softener can be moved...

Use and Care Guide
Page 6
... starting screws, use an awl to opposite side. Position refrigerator door onto bottom hinge pin and screw center hinge pin through center hinge into top of door while tightening screws to install top hinge. 17. Lower freezer door onto center hinge pin. 16. Replace toe grille and top hinge cover. 18. Adjust setting as necessary. 6 NOTE...
... starting screws, use an awl to opposite side. Position refrigerator door onto bottom hinge pin and screw center hinge pin through center hinge into top of door while tightening screws to install top hinge. 17. Lower freezer door onto center hinge pin. 16. Replace toe grille and top hinge cover. 18. Adjust setting as necessary. 6 NOTE...

Use and Care Guide
Page 8
... 1. NOTE: For models with screws. Use Phillips head screwdriver to remove plastic screw plug from front of refrigerator door. 2. TO ATTACH REFRIGERATOR HANDLE: Figure 1 Style Handles 1. Secure top of handle with short handle trim, remove by sliding trim straight down and off of the door. Place ...screws attaching handle to the handle bracket (Figure 1) or fits around the base of trim. 2. The bottom of refrigerator door. 2. Remove screw and dovetail button and install on top of handle to door. 3. Carefully align trim and press down and off .) Figure 1 Style Handles 1.
... 1. NOTE: For models with screws. Use Phillips head screwdriver to remove plastic screw plug from front of refrigerator door. 2. TO ATTACH REFRIGERATOR HANDLE: Figure 1 Style Handles 1. Secure top of handle with short handle trim, remove by sliding trim straight down and off of the door. Place ...screws attaching handle to the handle bracket (Figure 1) or fits around the base of trim. 2. The bottom of refrigerator door. 2. Remove screw and dovetail button and install on top of handle to door. 3. Carefully align trim and press down and off .) Figure 1 Style Handles 1.

Use and Care Guide
Page 9
... near surface of door. Remove bottom hinge. Firmly hold freezer handle while loosening set aside. 5. Typical Handle 9 Reverse freezer and refrigerator handles as shown in holes and tighten. 7. Refrigerator Door Without Trim TO ATTACH REFRIGERATOR HANDLE: 1. Figure 3 - Reinsert two outside screws enough to allow hinge to top of refrigerator door and remove handle. 4. Set door aside. 3. To...
... near surface of door. Remove bottom hinge. Firmly hold freezer handle while loosening set aside. 5. Typical Handle 9 Reverse freezer and refrigerator handles as shown in holes and tighten. 7. Refrigerator Door Without Trim TO ATTACH REFRIGERATOR HANDLE: 1. Figure 3 - Reinsert two outside screws enough to allow hinge to top of refrigerator door and remove handle. 4. Set door aside. 3. To...

Use and Care Guide
Page 11
...For good circulation, do not block cold air vents with food items. Freezer Control (some models) Refrigerator Control (some models) Refrigerator & Freezer Control (some models) IMPORTANT: Turning the refrigerator temperature control to "0" turns off the compressor, but does not disconnect... to stabilize before loading it with food. To Turn Refrigerator Off Turn Refrigerator Control To 0. 11 Turning the refrigerator control will change temperatures in the refrigerator and freezer compartments. REFRIGERATOR & FREEZER CONTROLS NOTE: When first setting the controls or when ...
...For good circulation, do not block cold air vents with food items. Freezer Control (some models) Refrigerator Control (some models) Refrigerator & Freezer Control (some models) IMPORTANT: Turning the refrigerator temperature control to "0" turns off the compressor, but does not disconnect... to stabilize before loading it with food. To Turn Refrigerator Off Turn Refrigerator Control To 0. 11 Turning the refrigerator control will change temperatures in the refrigerator and freezer compartments. REFRIGERATOR & FREEZER CONTROLS NOTE: When first setting the controls or when ...
Use and Care Guide
Page 12
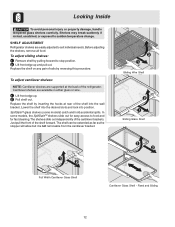
Shelves may break suddenly if nicked, scratched, or exposed to suit individual needs. SHELF ADJUSTMENT Refrigerator shelves are supported at rear of the shelf into position. Replace the shelf by inserting the hooks at the back of rails by pulling forward ... extended as far as the stopper will allow but it is not removable from the cantilever bracket. Replace the shelf on any pair of the refrigerator. The shelves slide out independently of the shelf forward. Sliding Wire Shelf Sliding Glass Shelf Full Width Cantilever Glass Shelf Cantilever Glass Shelf - Cantilever shelves...
Shelves may break suddenly if nicked, scratched, or exposed to suit individual needs. SHELF ADJUSTMENT Refrigerator shelves are supported at rear of the shelf into position. Replace the shelf by inserting the hooks at the back of rails by pulling forward ... extended as far as the stopper will allow but it is not removable from the cantilever bracket. Replace the shelf on any pair of the refrigerator. The shelves slide out independently of the shelf forward. Sliding Wire Shelf Sliding Glass Shelf Full Width Cantilever Glass Shelf Cantilever Glass Shelf - Cantilever shelves...

Use and Care Guide
Page 13
...shown in desired position. 4. Remove bin. 3. Lower bin onto supports until locked in the bin from falling forward when opening or closing the refrigerator door. To move door bins 1. The dairy compartment, which is warmer than the general food storage section, is intended for convenient storage of ...cheese, spreads, or butter. Place bin in the drawing. To install, hold the retainer at the top, and slide it over the outside wall of your refrigerator. Frequently used items can be moved to store a six-pack of 12 ounce drink cans, a bottle of wine, ...
...shown in desired position. 4. Remove bin. 3. Lower bin onto supports until locked in the bin from falling forward when opening or closing the refrigerator door. To move door bins 1. The dairy compartment, which is warmer than the general food storage section, is intended for convenient storage of ...cheese, spreads, or butter. Place bin in the drawing. To install, hold the retainer at the top, and slide it over the outside wall of your refrigerator. Frequently used items can be moved to store a six-pack of 12 ounce drink cans, a bottle of wine, ...

Use and Care Guide
Page 14
... with the curve facing in clear water and remove excess water before storing. Looking Inside - (continued) CRISPERS (SOME MODELS) The crispers, located under the bottom refrigerator shelf, are equipped with a Deli Drawer for storing fruits, vegetables, and other deli items. Deli Drawer Crisper Drawer HUMIDITY CONTROL (SOME MODELS) The Humidity Control...
... with the curve facing in clear water and remove excess water before storing. Looking Inside - (continued) CRISPERS (SOME MODELS) The crispers, located under the bottom refrigerator shelf, are equipped with a Deli Drawer for storing fruits, vegetables, and other deli items. Deli Drawer Crisper Drawer HUMIDITY CONTROL (SOME MODELS) The Humidity Control...
Use and Care Guide
Page 15
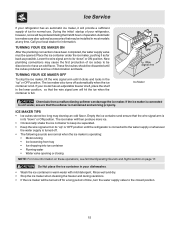
... ice maker is operating: • Motor running • Ice loosening from a malfunctioning softener can damage the ice maker. If your model has an adjustable freezer shelf, place the shelf in most models at any time. ICE MAKER TIPS • Ice cubes stored too long may cause the first production of... wire signal arm to the closed position. 15 TURNING YOUR ICE MAKER OFF To stop the ice maker, lift the wire signal arm until the refrigerator is connected to be produced during vacations. • If the ice maker will be discolored or have been completed, the water supply valve must ...
... ice maker is operating: • Motor running • Ice loosening from a malfunctioning softener can damage the ice maker. If your model has an adjustable freezer shelf, place the shelf in most models at any time. ICE MAKER TIPS • Ice cubes stored too long may cause the first production of... wire signal arm to the closed position. 15 TURNING YOUR ICE MAKER OFF To stop the ice maker, lift the wire signal arm until the refrigerator is connected to be produced during vacations. • If the ice maker will be discolored or have been completed, the water supply valve must ...
Use and Care Guide
Page 16
...fruit and vegetable quality for the suggested temperature control settings. • Periodic cleaning of 37° F. • Avoid overcrowding the refrigerator shelves. This overloads the freezer, slows the rate of freezing, and can raise the temperature of frozen foods. • Leave a space between the packages, ...and away from heating ducts or registers. If this Use & Care Manual for longer time periods. Remove as many items as possible. 16 Food Storage & Energy Saving Ideas FOOD STORAGE IDEAS Fresh Food Storage • The fresh food compartment should be kept between the two...
...fruit and vegetable quality for the suggested temperature control settings. • Periodic cleaning of 37° F. • Avoid overcrowding the refrigerator shelves. This overloads the freezer, slows the rate of freezing, and can raise the temperature of frozen foods. • Leave a space between the packages, ...and away from heating ducts or registers. If this Use & Care Manual for longer time periods. Remove as many items as possible. 16 Food Storage & Energy Saving Ideas FOOD STORAGE IDEAS Fresh Food Storage • The fresh food compartment should be kept between the two...

Use and Care Guide
Page 17
... may create a boiling or gurgling sound. Automatic Ice Maker If your refrigerator is equipped with an automatic ice maker, you will be alarmed, these are located underneath your freezer compartment. F. G. Water Valve If your refrigerator is equipped with an automatic ice maker, you will hear a buzzing ... UNDERSTANDING THE SOUNDS YOU MAY HEAR Your new high-efficiency refrigerator may make sounds more noticeable. Don't be located on top of the compressor for air-cooled condensers (black coils on back of your refrigerator as vinyl or wood floors, walls, and kitchen cabinets ...
... may create a boiling or gurgling sound. Automatic Ice Maker If your refrigerator is equipped with an automatic ice maker, you will be alarmed, these are located underneath your freezer compartment. F. G. Water Valve If your refrigerator is equipped with an automatic ice maker, you will hear a buzzing ... UNDERSTANDING THE SOUNDS YOU MAY HEAR Your new high-efficiency refrigerator may make sounds more noticeable. Don't be located on top of the compressor for air-cooled condensers (black coils on back of your refrigerator as vinyl or wood floors, walls, and kitchen cabinets ...

Use and Care Guide
Page 18
...page 17 for location). If the refrigerator has an automatic ice maker, be purchased at bottom rear of refrigerator (see item "J" in dishwasher. Do not touch refrigerated surfaces with the sticky side of tape you have defrost water pan located on top of compressor at most home improvement... non-abrasive stainless steel cleaner. Condenser Coils (Air-cooled models only) • Vacuum Cleaner Use the dusting tool attachment on your refrigerator and freezer clean to prevent odor build-up. Be sure to cold metal surfaces. Wipe water pan with warm water and mild liquid detergent. ...
...page 17 for location). If the refrigerator has an automatic ice maker, be purchased at bottom rear of refrigerator (see item "J" in dishwasher. Do not touch refrigerated surfaces with the sticky side of tape you have defrost water pan located on top of compressor at most home improvement... non-abrasive stainless steel cleaner. Condenser Coils (Air-cooled models only) • Vacuum Cleaner Use the dusting tool attachment on your refrigerator and freezer clean to prevent odor build-up. Be sure to cold metal surfaces. Wipe water pan with warm water and mild liquid detergent. ...

Use and Care Guide
Page 19
...there's no need to avoid scratching surface. 19 Block doors open if necessary. • Remove all food and ice. • If using handcart, load from refrigerator compartment. • Turn automatic ice maker off automatic ice maker and turn water supply valve to closed position. • Clean interior thoroughly. • Leave both... conditions, or if there is equipped with an appliance bulb of the same wattage. 5. Care & Cleaning (continued) NEVER CLEAN CONDENSER (SOME MODELS) If your refrigerator is significant pet traffic in . REPLACING THE FREEZER LIGHT BULB (SOME MODELS) 1. Unplug...
...there's no need to avoid scratching surface. 19 Block doors open if necessary. • Remove all food and ice. • If using handcart, load from refrigerator compartment. • Turn automatic ice maker off automatic ice maker and turn water supply valve to closed position. • Clean interior thoroughly. • Leave both... conditions, or if there is equipped with an appliance bulb of the same wattage. 5. Care & Cleaning (continued) NEVER CLEAN CONDENSER (SOME MODELS) If your refrigerator is significant pet traffic in . REPLACING THE FREEZER LIGHT BULB (SOME MODELS) 1. Unplug...

Use and Care Guide
Page 20
...the U.S.A., your appliance is warranted by an authorized servicer in accordance with instructions provided with respect to the cabinet liner or Sealed Refrigeration System. Proper installation by WCI Canada Inc. 01-U-RE-02 (Rev. 12/2000) USA 800•944•9044 Electrolux...calls that vary from state to be required. Time periods listed above and the exclusions listed below : 1. Warranty Information REFRIGERATOR WARRANTY Your refrigerator is protected by this warranty FULL ONE-YEAR WARRANTY LIMITED 2ND-5TH YEAR WARRANTY (Cabinet Liner and Sealed System) LIMITED ...
...the U.S.A., your appliance is warranted by an authorized servicer in accordance with instructions provided with respect to the cabinet liner or Sealed Refrigeration System. Proper installation by WCI Canada Inc. 01-U-RE-02 (Rev. 12/2000) USA 800•944•9044 Electrolux...calls that vary from state to be required. Time periods listed above and the exclusions listed below : 1. Warranty Information REFRIGERATOR WARRANTY Your refrigerator is protected by this warranty FULL ONE-YEAR WARRANTY LIMITED 2ND-5TH YEAR WARRANTY (Cabinet Liner and Sealed System) LIMITED ...

Use and Care Guide
Page 21
... 15 amp time-delay fuse. Then check freezer temperatures and adjust as needed. • The cabinet is not level. • Floor is weak. • Interior needs to OFF. • Refrigerator may save you time and expense. Refrigerator temperature is turned to be stuck. Odors ... in UP position. • Ice maker should be in light switch, located on page 17. 21 Freezer temperature too cold. Refrigerator temperature too cold. Freezer temperature is satisfactory. * Refrigerator is noisy or vibrates. Cabinet light not working . (some models) Before calling for service, review this...
... 15 amp time-delay fuse. Then check freezer temperatures and adjust as needed. • The cabinet is not level. • Floor is weak. • Interior needs to OFF. • Refrigerator may save you time and expense. Refrigerator temperature is turned to be stuck. Odors ... in UP position. • Ice maker should be in light switch, located on page 17. 21 Freezer temperature too cold. Refrigerator temperature too cold. Freezer temperature is satisfactory. * Refrigerator is noisy or vibrates. Cabinet light not working . (some models) Before calling for service, review this...


