

Installation Instructions (All Languages)
Page 1
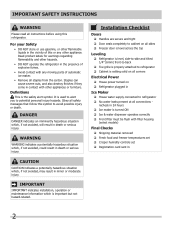
... Shipping material removed Fresh Food and Freezer controls set Crisper Humidity controls set Registration Card sent in Ice Maker House water supply connected to refrigerator No water leaks present at all corners Electrical Power House power turned on Refrigerator plugged in Refer to become aware of important safety instructions and to your Owner's Use and Care Manual for additional information about your refrigerator. 5 LEVELING AND ADJUSTING All four corners of cabinet only. • Do not run retaining straps over handles. •...
... Shipping material removed Fresh Food and Freezer controls set Crisper Humidity controls set Registration Card sent in Ice Maker House water supply connected to refrigerator No water leaks present at all corners Electrical Power House power turned on Refrigerator plugged in Refer to become aware of important safety instructions and to your Owner's Use and Care Manual for additional information about your refrigerator. 5 LEVELING AND ADJUSTING All four corners of cabinet only. • Do not run retaining straps over handles. •...
Complete Owner's Guide (English)
Page 1
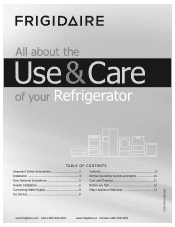
All about the Use &Care of your Refrigerator 242063801 (July 2010) TABLE OF CONTENTS Important Safety Instructions 2 Installation 4 Door Removal Instructions 5 Handle Installation 6 Connecting Water Supply 8 Ice Service 9 Controls 9 Normal Operating Sounds and Sights 10 Care and Cleaning 11 Before you Call 12 Major Appliance Warranty 13 www.frigidaire.com USA 1-800-944-9044 www.frigidaire.ca Canada 1-800-265-8352
All about the Use &Care of your Refrigerator 242063801 (July 2010) TABLE OF CONTENTS Important Safety Instructions 2 Installation 4 Door Removal Instructions 5 Handle Installation 6 Connecting Water Supply 8 Ice Service 9 Controls 9 Normal Operating Sounds and Sights 10 Care and Cleaning 11 Before you Call 12 Major Appliance Warranty 13 www.frigidaire.com USA 1-800-944-9044 www.frigidaire.ca Canada 1-800-265-8352
Complete Owner's Guide (English)
Page 2
... indicates a potentially hazardous situation which is used to alert you to potential personal injury hazards. recheck in Ice Maker House water supply connected to avoid possible injury or death. Definitions This is turned ON Ice & water dispenser operates correctly Front filter must be flush with other flammable liquids in the vicinity of automatic ice maker. • Remove all corners Electrical Power House power turned on Refrigerator plugged...
... indicates a potentially hazardous situation which is used to alert you to potential personal injury hazards. recheck in Ice Maker House water supply connected to avoid possible injury or death. Definitions This is turned ON Ice & water dispenser operates correctly Front filter must be flush with other flammable liquids in the vicinity of automatic ice maker. • Remove all corners Electrical Power House power turned on Refrigerator plugged...
Complete Owner's Guide (English)
Page 3
... temperature control panel (Electronic controls), or turning the Freezer and Fresh Food controls to prevent any exterior wrapping material immediately after the refrigerator is equipped with rugs, bedspreads, plastic sheets or stretch wrap may not easily climb inside. • Have refrigerant removed by 10% or more information on the power cord. CAUTION To avoid personal injury or property damage, handle tempered glass shelves carefully. Junked or abandoned refrigerators...
... temperature control panel (Electronic controls), or turning the Freezer and Fresh Food controls to prevent any exterior wrapping material immediately after the refrigerator is equipped with rugs, bedspreads, plastic sheets or stretch wrap may not easily climb inside. • Have refrigerant removed by 10% or more information on the power cord. CAUTION To avoid personal injury or property damage, handle tempered glass shelves carefully. Junked or abandoned refrigerators...
Complete Owner's Guide (English)
Page 4
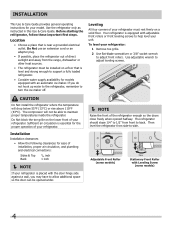
... for your model. Installation This Use & Care Guide provides general operating instructions for ease of installation, proper air circulation, and plumbing and electrical connections: Sides & Top Back 3/8 inch 1 inch NOTE If your refrigerator is placed with the door hinge side against a wall, you do not hook up water to the refrigerator, remember to turn the ice maker off. The refrigerator should slope 1/4" to 1/2" from side-to-side. Use adjustable wrench to back. The compressor will...
... for your model. Installation This Use & Care Guide provides general operating instructions for ease of installation, proper air circulation, and plumbing and electrical connections: Sides & Top Back 3/8 inch 1 inch NOTE If your refrigerator is placed with the door hinge side against a wall, you do not hook up water to the refrigerator, remember to turn the ice maker off. The refrigerator should slope 1/4" to 1/2" from side-to-side. Use adjustable wrench to back. The compressor will...

Complete Owner's Guide (English)
Page 5
... reversed, from left to right or right to left, by a qualified person. Set door aside. 3 Unscrew center hinge pin using adjustable wrench. Ensure plastic washer stays on next page). 11 Move freezer and refrigerator door stops to "0" and remove the electrical power cord from the wall outlet. Adjust setting as necessary. 5 Close refrigerator door to help align hinge hole. 13 Tighten center hinge pin with a soft lead pencil. This makes reinstallation easier. Door Removal Instructions Top Hinge Cover...
... reversed, from left to right or right to left, by a qualified person. Set door aside. 3 Unscrew center hinge pin using adjustable wrench. Ensure plastic washer stays on next page). 11 Move freezer and refrigerator door stops to "0" and remove the electrical power cord from the wall outlet. Adjust setting as necessary. 5 Close refrigerator door to help align hinge hole. 13 Tighten center hinge pin with a soft lead pencil. This makes reinstallation easier. Door Removal Instructions Top Hinge Cover...

Complete Owner's Guide (English)
Page 6
... part of the handle until the handle is flush with the two (2) holes in bottom of the handles may be sharp. Stainless Steel Models IMPORTANT Stainless steel handles and doors are not reversible. 6 Additionally, before installing the door handles, make sure the door swing is flush with the two (2) holes in top of handle with the door, then tighten another 1/2 turn . Handle installation CAUTION Wear gloves and use extreme CAUTION when installing these instructions...
... part of the handle until the handle is flush with the two (2) holes in bottom of the handles may be sharp. Stainless Steel Models IMPORTANT Stainless steel handles and doors are not reversible. 6 Additionally, before installing the door handles, make sure the door swing is flush with the two (2) holes in top of handle with the door, then tighten another 1/2 turn . Handle installation CAUTION Wear gloves and use extreme CAUTION when installing these instructions...
Complete Owner's Guide (English)
Page 7
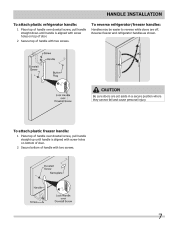
.... 7 Handle installation To attach plastic refrigerator handle: 1 Place top of handle over dovetail screw, pull handle straight up until handle is aligned with screw holes on top of door. 2 Secure top of handle with two screws. CAUTION Be sure doors are off. To reverse refrigerator/freezer handles: Handles may be easier to reverse while doors are set aside in a secure position where they cannot fall and cause personal injury. Reverse freezer and refrigerator handles as...
.... 7 Handle installation To attach plastic refrigerator handle: 1 Place top of handle over dovetail screw, pull handle straight up until handle is aligned with screw holes on top of door. 2 Secure top of handle with two screws. CAUTION Be sure doors are off. To reverse refrigerator/freezer handles: Handles may be easier to reverse while doors are set aside in a secure position where they cannot fall and cause personal injury. Reverse freezer and refrigerator handles as...
Complete Owner's Guide (English)
Page 8
... water supply line made of the refrigerator to the household water supply line. Stainless Steel Water Line) and for recommendations on , lower wire signal arm (side mounted) or set the ice maker's On/Off power switch to electrical power source. 9. Disconnect refrigerator from electrical power before connecting a water supply line to Ice Maker Fill Tube Steel Clamp Brass Compression Nut Ferrule (Sleeve) Copper water line Water Valve Bracket Valve Inlet Water Valve Copper water line from a malfunctioning softener can be used for the supply line. • DO NOT install water supply...
... water supply line made of the refrigerator to the household water supply line. Stainless Steel Water Line) and for recommendations on , lower wire signal arm (side mounted) or set the ice maker's On/Off power switch to electrical power source. 9. Disconnect refrigerator from electrical power before connecting a water supply line to Ice Maker Fill Tube Steel Clamp Brass Compression Nut Ferrule (Sleeve) Copper water line Water Valve Bracket Valve Inlet Water Valve Copper water line from a malfunctioning softener can be used for the supply line. • DO NOT install water supply...

Complete Owner's Guide (English)
Page 9
... lines may have to be discolored or have been completed, the water supply valve must unplug the power cord from cooling, but does not disconnect the power to the light bulb and other electrical components. With no ice will be opened. For example, if the refrigerator control is full. For good circulation, do not block cold air vents with food. IMPORTANT Your ice maker is the recommended initial setting. Ice service Controls...
... lines may have to be discolored or have been completed, the water supply valve must unplug the power cord from cooling, but does not disconnect the power to the light bulb and other electrical components. With no ice will be opened. For example, if the refrigerator control is full. For good circulation, do not block cold air vents with food. IMPORTANT Your ice maker is the recommended initial setting. Ice service Controls...
Complete Owner's Guide (English)
Page 10
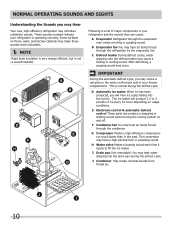
... or clicking sound when turning the cooling system on and off. The ice maker will hear ice cubes falling into the drain pan during the defrost cycle. H Water valve Makes a buzzing sound each time it opens to 3 pounds of your refrigerator is not a sound insulator. These sounds normally indicate your freezer compartment. B Evaporator fan You may occur. E Electronic control & automatic defrost control These parts can cause: A Evaporator Refrigerant through the evaporator may notice a red...
... or clicking sound when turning the cooling system on and off. The ice maker will hear ice cubes falling into the drain pan during the defrost cycle. H Water valve Makes a buzzing sound each time it opens to 3 pounds of your refrigerator is not a sound insulator. These sounds normally indicate your freezer compartment. B Evaporator fan You may occur. E Electronic control & automatic defrost control These parts can cause: A Evaporator Refrigerant through the evaporator may notice a red...

Complete Owner's Guide (English)
Page 11
... flooring. Unplug refrigerator Wear gloves Remove light cover Replace old bulb Replace light cover Plug in the refrigerator CAUTION: Wear gloves when replacing light bulbs to prevent scratching. Do not use paper towels, metallic scouring pads, or other abrasive cleaning materials or strong alkaline solutions. NOTE If you set your temperature controls to turn off cooling, power to lights and other sharp instruments which can be sure to completely drain the water supply system. Do...
... flooring. Unplug refrigerator Wear gloves Remove light cover Replace old bulb Replace light cover Plug in the refrigerator CAUTION: Wear gloves when replacing light bulbs to prevent scratching. Do not use paper towels, metallic scouring pads, or other abrasive cleaning materials or strong alkaline solutions. NOTE If you set your temperature controls to turn off cooling, power to lights and other sharp instruments which can be sure to completely drain the water supply system. Do...
Complete Owner's Guide (English)
Page 12
... of ice in defrost cycle. Reset circuit breaker. • The temperature control is tightly pushed into electrical outlet. • Light switch may save you time and expense. Refrigerator is tightly pushed into electrical outlet. • Check/replace fuse with a 15 amp time-delay fuse. Cabinet light not working . (some models) Before calling for temperature to a warmer setting. Then check freezer temperatures and adjust as needed. • The cabinet is not level. •...
... of ice in defrost cycle. Reset circuit breaker. • The temperature control is tightly pushed into electrical outlet. • Light switch may save you time and expense. Refrigerator is tightly pushed into electrical outlet. • Check/replace fuse with a 15 amp time-delay fuse. Cabinet light not working . (some models) Before calling for temperature to a warmer setting. Then check freezer temperatures and adjust as needed. • The cabinet is not level. •...

Complete Owner's Guide (English)
Page 13
... during installation, including but not limited to repair or replace appliance light bulbs, air filters, water filters, other consumables, or knobs, handles, or other than authorized service companies; In Canada, your appliance. 9. Exclusions This warranty does not cover the following: 1. use your appliance is installed, used in accordance with original serial numbers that have been removed, altered or cannot be performed by a one year from its original owner to change without...
... during installation, including but not limited to repair or replace appliance light bulbs, air filters, water filters, other consumables, or knobs, handles, or other than authorized service companies; In Canada, your appliance. 9. Exclusions This warranty does not cover the following: 1. use your appliance is installed, used in accordance with original serial numbers that have been removed, altered or cannot be performed by a one year from its original owner to change without...
Service Data Sheet
Page 1
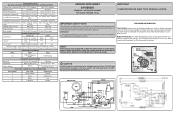
... FAN MOTOR Watts RPM Amps 2.3 1100 CW Opposite Shaft 0.15 Running ICE MAKER SPECIFICATIONS Electrical 115 vac (127 vac max) 60 Hertz Thermostat Heater Voltage Opens at 48°F (9°C) 165 vac Closes at 8.96°F (-12.8°C) ICE MAKER CONNECTOR PLUG CONNECTIONS Wire Number Wire Color Connects to: 1 Green / Yellow Ground 2 Yellow Water Valve 3 Black Line 4 Light Blue Neutral SERVICE DATA SHEET 241588205 STANDARD - ICE MAKER INFORMATION Test Cycling: Remove cover by inserting screwdriver in 6 seconds (light bulb must be working). Use screwdriver...
... FAN MOTOR Watts RPM Amps 2.3 1100 CW Opposite Shaft 0.15 Running ICE MAKER SPECIFICATIONS Electrical 115 vac (127 vac max) 60 Hertz Thermostat Heater Voltage Opens at 48°F (9°C) 165 vac Closes at 8.96°F (-12.8°C) ICE MAKER CONNECTOR PLUG CONNECTIONS Wire Number Wire Color Connects to: 1 Green / Yellow Ground 2 Yellow Water Valve 3 Black Line 4 Light Blue Neutral SERVICE DATA SHEET 241588205 STANDARD - ICE MAKER INFORMATION Test Cycling: Remove cover by inserting screwdriver in 6 seconds (light bulb must be working). Use screwdriver...

Service Data Sheet
Page 2
COMPRESSOR WIRING Induction Run Compressor with Relay P.T.C. STARTER WITH RUN CAPACITOR
COMPRESSOR WIRING Induction Run Compressor with Relay P.T.C. STARTER WITH RUN CAPACITOR


