
Installation Instructions (All Languages)
Page 1
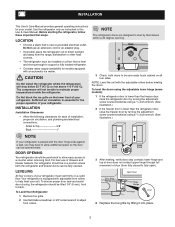
... door hinges? (See the Use & Care Guide for detailed instructions on Refrigerator plugged in Not satisfied with set screw): Open Door Hinge Flange Set Screw (some models) Door Stop Flange 3 Ensure both doors. To level the doors using the adjustable lower hinge (Type 1 with the installation of your refrigerator? Please contact the store you purchased it to a water supply, make sure the ice maker's power switch is a list of things to check for: • Is the refrigerator's power cord plugged in? • Is the refrigerator connected...
... door hinges? (See the Use & Care Guide for detailed instructions on Refrigerator plugged in Not satisfied with set screw): Open Door Hinge Flange Set Screw (some models) Door Stop Flange 3 Ensure both doors. To level the doors using the adjustable lower hinge (Type 1 with the installation of your refrigerator? Please contact the store you purchased it to a water supply, make sure the ice maker's power switch is a list of things to check for: • Is the refrigerator's power cord plugged in? • Is the refrigerator connected...
Service Data Sheet
Page 1
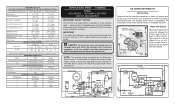
...;F and flash ignite (burn) at 15ºF (-9ºC) Heater Wattage 165 ICE MAKER PLUG CONNECTIONS Wire Number Wire Color Connect to: 1 Green/Yellow Ground 2 Yellow Water Valve 3 Black Line 4 Lt. Untrained persons should not attempt to make repairs due to the possibility of ice maker should function to their original position and properly secured. Excessive heat will change the fill time. To terminate defrost, depress the fresh food light switch 5 times...
...;F and flash ignite (burn) at 15ºF (-9ºC) Heater Wattage 165 ICE MAKER PLUG CONNECTIONS Wire Number Wire Color Connect to: 1 Green/Yellow Ground 2 Yellow Water Valve 3 Black Line 4 Lt. Untrained persons should not attempt to make repairs due to the possibility of ice maker should function to their original position and properly secured. Excessive heat will change the fill time. To terminate defrost, depress the fresh food light switch 5 times...
Use and Care Guide
Page 1
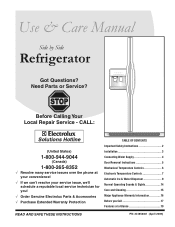
... for you! √ Order Genuine Electrolux Parts & Accessories √ Purchase Extended Warranty Protection TABLE OF CONTENTS Important Safety Instructions 2 Installation 3 Connecting Water Supply 4 Door Removal Instructions 5 Mechanical Temperature Controls 6 Electronic Temperature Controls 7 Automatic Ice & Water Dispenser 9 Normal Operating Sounds & Sights 14 Care and Cleaning 15 Major Appliance Warranty Information 16 Before you Call 17 Features at a Glance 19 read and save these instructions PN: 241856001 (April 2009) Need Parts or Service? Before Calling Your Local...
... for you! √ Order Genuine Electrolux Parts & Accessories √ Purchase Extended Warranty Protection TABLE OF CONTENTS Important Safety Instructions 2 Installation 3 Connecting Water Supply 4 Door Removal Instructions 5 Mechanical Temperature Controls 6 Electronic Temperature Controls 7 Automatic Ice & Water Dispenser 9 Normal Operating Sounds & Sights 14 Care and Cleaning 15 Major Appliance Warranty Information 16 Before you Call 17 Features at a Glance 19 read and save these instructions PN: 241856001 (April 2009) Need Parts or Service? Before Calling Your Local...
Use and Care Guide
Page 2
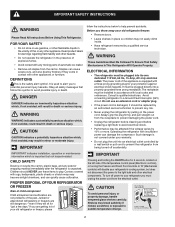
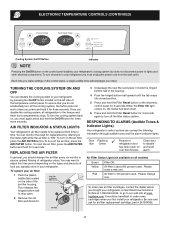
... Pressing and holding the On/Off button for "just a few days." IMPORTANT indicates installation, operation or maintenance information which , if not avoided, may be plugged into an electrical outlet controlled by a qualified service technician. Junked or abandoned refrigerators or freezers are not problems of automatic ice maker. • Remove all safety messages that follow the instructions below to avoid electrical shock. • Performance may result in...
... Pressing and holding the On/Off button for "just a few days." IMPORTANT indicates installation, operation or maintenance information which , if not avoided, may be plugged into an electrical outlet controlled by a qualified service technician. Junked or abandoned refrigerators or freezers are not problems of automatic ice maker. • Remove all safety messages that follow the instructions below to avoid electrical shock. • Performance may result in...
Use and Care Guide
Page 3
... of your model. Leveling All four corners of your refrigerator is placed with the adjustable rollers before leveling the doors. Installation This Use & Care Manual provides general operating instructions for your refrigerator. Use the refrigerator only as instructed in a position where both doors to adjust front rollers. 3 After leveling, verify door stop contacts lower hinge and top of door does not contact upper hinge through full movement of installation, proper air circulation, and plumbing and electrical connections: Sides & Top...
... of your model. Leveling All four corners of your refrigerator is placed with the adjustable rollers before leveling the doors. Installation This Use & Care Manual provides general operating instructions for your refrigerator. Use the refrigerator only as instructed in a position where both doors to adjust front rollers. 3 After leveling, verify door stop contacts lower hinge and top of door does not contact upper hinge through full movement of installation, proper air circulation, and plumbing and electrical connections: Sides & Top...
Use and Care Guide
Page 4
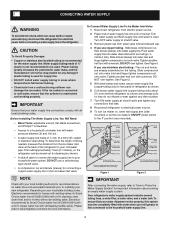
... install water supply tubing in loop to allow moving refrigerator out for cleaning.) Figure 1 Figure 2 IMPORTANT After connecting the water supply, refer to "How to rear panel of water supply line into valve inlet and finger tighten compression nut onto valve. To ensure that your local/state building codes, Electrolux recommends for the water supply line. Depending on , lower wire signal arm (side mounted) or set the ice maker's On/Off power switch to Ice Maker Fill Tube...
... install water supply tubing in loop to allow moving refrigerator out for cleaning.) Figure 1 Figure 2 IMPORTANT After connecting the water supply, refer to "How to rear panel of water supply line into valve inlet and finger tighten compression nut onto valve. To ensure that your local/state building codes, Electrolux recommends for the water supply line. Depending on , lower wire signal arm (side mounted) or set the ice maker's On/Off power switch to Ice Maker Fill Tube...
Use and Care Guide
Page 5
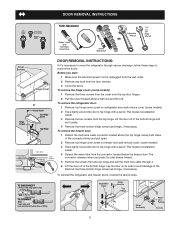
... CONNECt Insert tube and push until mark touches face of fitting Door Removal Instructions Tools Necessary: Phillips™ head and Flat Head Screw Driver Socket Wrench Set Adjustable Wrench OR 7/16" and 3/8" Fixed Wrench door removal instructions: If it off of the bottom hinge and set it . 6 Lift the door off . The connector releases when you start: 1 Make sure the electrical power cord is necessary to move the refrigerator...
... CONNECt Insert tube and push until mark touches face of fitting Door Removal Instructions Tools Necessary: Phillips™ head and Flat Head Screw Driver Socket Wrench Set Adjustable Wrench OR 7/16" and 3/8" Fixed Wrench door removal instructions: If it off of the bottom hinge and set it . 6 Lift the door off . The connector releases when you start: 1 Make sure the electrical power cord is necessary to move the refrigerator...
Use and Care Guide
Page 6
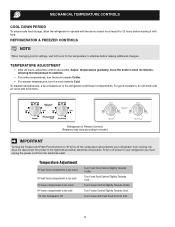
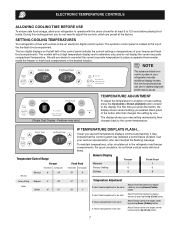
... the power cord from cooling, but does not disconnect the power to the light bulb and other electrical components. Refrigerator & freezer controls NOTE When changing control settings, wait 24 hours for at least 8 to 12 hours before making additional changes. Temperature Adjustment If Fresh Food compartment is too warm If Fresh Food compartment is too cold If Freezer compartment is too warm If Freezer compartment is too cold *To Turn Refrigerator Off Turn Fresh Food Control...
... the power cord from cooling, but does not disconnect the power to the light bulb and other electrical components. Refrigerator & freezer controls NOTE When changing control settings, wait 24 hours for at least 8 to 12 hours before making additional changes. Temperature Adjustment If Fresh Food compartment is too warm If Fresh Food compartment is too cold If Freezer compartment is too warm If Freezer compartment is too cold *To Turn Refrigerator Off Turn Fresh Food Control...
Use and Care Guide
Page 7
...; -21º IF TEMPERATURE DISPLAYS FLASH... electronic Temperature Controls Allowing Cooling Time Before Use To ensure safe food storage, allow your refrigerator to operate with the doors closed for reference only, and do not display the current accurate compartment temperature. The system's control panel is too cold Adjust Fresh Food control one . The first time you press the button, the display shows current setting you do not need to rapidly diagnose...
...; -21º IF TEMPERATURE DISPLAYS FLASH... electronic Temperature Controls Allowing Cooling Time Before Use To ensure safe food storage, allow your refrigerator to operate with the doors closed for reference only, and do not display the current accurate compartment temperature. The system's control panel is too cold Adjust Fresh Food control one . The first time you press the button, the display shows current setting you do not need to rapidly diagnose...
Use and Care Guide
Page 8
... refrigerator door Close door to disable has been open . 2 Remove the old filter and discard it. 3 Unpackage the new filter and place it for 3 seconds again to the freezer and fresh food compartments stops. Replacing The Air Filter In general, you typically store in your refrigerator, contact Electrolux Solutions Hotline at 1-800-944-9044, or go to lights and other electrical components. alarm. Air filter is about 80 percent used . Please change...
... refrigerator door Close door to disable has been open . 2 Remove the old filter and discard it. 3 Unpackage the new filter and place it for 3 seconds again to the freezer and fresh food compartments stops. Replacing The Air Filter In general, you typically store in your refrigerator, contact Electrolux Solutions Hotline at 1-800-944-9044, or go to lights and other electrical components. alarm. Air filter is about 80 percent used . Please change...
Use and Care Guide
Page 9
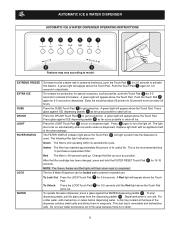
... Pad 2 again for 3-5 seconds until the Red light above the Touch Pad. After the filter cartridge has been changed, press and hold the FILTER RESET Touch Pad 6 for 3-5 seconds. LOCK The Ice & Water Dispenser can be locked out to purchase a replacement filter. A Red light will flash when reset is the recommended time to prevent unwanted use. EXTREME FREEZE To freeze food at the base of the same wattage.
... Pad 2 again for 3-5 seconds until the Red light above the Touch Pad. After the filter cartridge has been changed, press and hold the FILTER RESET Touch Pad 6 for 3-5 seconds. LOCK The Ice & Water Dispenser can be locked out to purchase a replacement filter. A Red light will flash when reset is the recommended time to prevent unwanted use. EXTREME FREEZE To freeze food at the base of the same wattage.
Use and Care Guide
Page 10
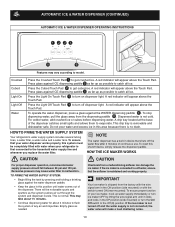
... evaporate. A red indicator will be completely filled with the switch turned ON (rear mounted). Dispensed water is removable and dishwasher safe. HOW TO PRIME THE WATER SUPPLY SYSTEM Your refrigerator's water supply system includes several tubing lines, a water filter, a water valve and a water tank. Chemicals from a malfunctioning softener can damage the ice maker. If the ice maker is not turned off and the water supply is maintained and working properly. A red indicator will make a loud chattering noise. 10 Press the Light...
... evaporate. A red indicator will be completely filled with the switch turned ON (rear mounted). Dispensed water is removable and dishwasher safe. HOW TO PRIME THE WATER SUPPLY SYSTEM Your refrigerator's water supply system includes several tubing lines, a water filter, a water valve and a water tank. Chemicals from a malfunctioning softener can damage the ice maker. If the ice maker is not turned off and the water supply is maintained and working properly. A red indicator will make a loud chattering noise. 10 Press the Light...
Use and Care Guide
Page 11
... making ice within 24 hours. CAUTION If the dispensing paddle is controlled by turning it in the ice bin. The overload protector will take approximately two days to leak into place with water inside. WARNING Do not use the ice chute as a handle when removing or replacing the ice storage bin. As the water filter nears the end of ice every 24 hours, depending on usage conditions. Remember, if your water filter needs changing...
... making ice within 24 hours. CAUTION If the dispensing paddle is controlled by turning it in the ice bin. The overload protector will take approximately two days to leak into place with water inside. WARNING Do not use the ice chute as a handle when removing or replacing the ice storage bin. As the water filter nears the end of ice every 24 hours, depending on usage conditions. Remember, if your water filter needs changing...
Use and Care Guide
Page 12
... Filter Status Reset button located on water that is microbiologically unsafe or with the RG-100 cartridge is complete. 2 Turn OFF side mounted ice maker by lowering wire signal arm to be used on the ice and water dispenser. System Startup: Water supply does not need to the UP position. The filter cartridge has already been installed in the o-ring groove inside the cup. Turn OFF rear mounted ice maker by pressing ON/OFF power switch...
... Filter Status Reset button located on water that is microbiologically unsafe or with the RG-100 cartridge is complete. 2 Turn OFF side mounted ice maker by lowering wire signal arm to be used on the ice and water dispenser. System Startup: Water supply does not need to the UP position. The filter cartridge has already been installed in the o-ring groove inside the cup. Turn OFF rear mounted ice maker by pressing ON/OFF power switch...

Use and Care Guide
Page 13
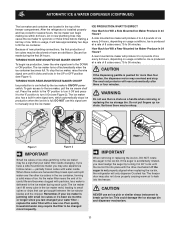
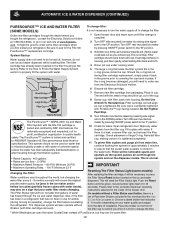
... by pressing ON/OFF power switch to ask for specifications. The Filter Status light will reset the Filter Status light. Be sure to the "I" position. 8 Fill a glass with filter cartridge removed and bypass installed). Remove caps from the packaging. Automatic Ice & Water Dispenser (continued) PureSource2TM* Ice and Water Front Filter (some models) Order new filter cartridges through the ice and water dispenser. Ice jams in place. System Startup: Water supply does not need to the UP position. The PureSource2TM* Filter system is microbiologically...
... by pressing ON/OFF power switch to ask for specifications. The Filter Status light will reset the Filter Status light. Be sure to the "I" position. 8 Fill a glass with filter cartridge removed and bypass installed). Remove caps from the packaging. Automatic Ice & Water Dispenser (continued) PureSource2TM* Ice and Water Front Filter (some models) Order new filter cartridges through the ice and water dispenser. Ice jams in place. System Startup: Water supply does not need to the UP position. The PureSource2TM* Filter system is microbiologically...
Use and Care Guide
Page 14
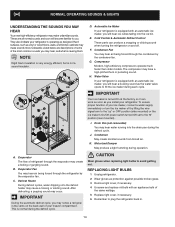
... older models. The compressor may cause a hissing or sizzling sound. Drain Pan (not removable) You may hear water running into the ice bin. K. Evaporator Fan You may hear air being forced through the refrigerator by lifting the wire signal arm to the "up" or OFF position (side mounted) or the ice maker's On/Off power switch turned Off-set to fill the ice maker during the defrost cycle. F. J. Replacing Light Bulbs 1 Unplug refrigerator. 2 Wear gloves as the water valve opens...
... older models. The compressor may cause a hissing or sizzling sound. Drain Pan (not removable) You may hear water running into the ice bin. K. Evaporator Fan You may hear air being forced through the refrigerator by lifting the wire signal arm to the "up" or OFF position (side mounted) or the ice maker's On/Off power switch turned Off-set to fill the ice maker during the defrost cycle. F. J. Replacing Light Bulbs 1 Unplug refrigerator. 2 Wear gloves as the water valve opens...
Use and Care Guide
Page 15
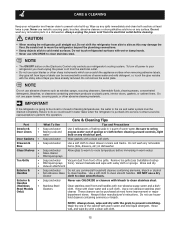
.... Be careful not to move the refrigerator beyond the plumbing connections. • Damp objects stick to clean drawer runners and tracks. IMPORTANT If the refrigerator is put back into service. Drawers & Bins • Soap and water Use a soft cloth to cold metal surfaces. Do not wash any removable items (bins, drawers, etc.) in water leaks when the refrigerator is going to be stored or moved in freezing temperatures, the water in warm water...
.... Be careful not to move the refrigerator beyond the plumbing connections. • Damp objects stick to clean drawer runners and tracks. IMPORTANT If the refrigerator is put back into service. Drawers & Bins • Soap and water Use a soft cloth to cold metal surfaces. Do not wash any removable items (bins, drawers, etc.) in water leaks when the refrigerator is going to be stored or moved in freezing temperatures, the water in warm water...
Use and Care Guide
Page 16
... to repair or replace appliance light bulbs, air filters, water filters, other consumables, or knobs, handles, or other appropriate payment record to remote areas, including the state of appliance or home incurred during installation, including but not limited to, any refrigerator or freezer failures. 6. Service calls to correct the installation of the unit. 4. If You Need Service Keep your appliance or to instruct...
... to repair or replace appliance light bulbs, air filters, water filters, other consumables, or knobs, handles, or other appropriate payment record to remote areas, including the state of appliance or home incurred during installation, including but not limited to, any refrigerator or freezer failures. 6. Service calls to correct the installation of the unit. 4. If You Need Service Keep your appliance or to instruct...
Use and Care Guide
Page 17
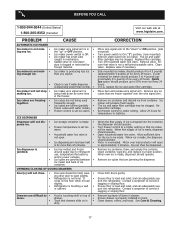
... water inside). OPENING/CLOSING OF DOORS/DRAWERS Door(s) will reset in proper position. It • rocks on the floor when moved slightly. • Refrigerator is properly installed on cold water • pipe is • being used • frequently enough. Clean valve. Replace filter cartridge. Open household water line valve. Ensure drawer is touching a wall • or cabinet. Freezer control is set too warm. • ICE DISPENSER Dispenser will not stop • making ice. Turn off household water line valve. Remove valve. Allow 24 hours for temperature...
... water inside). OPENING/CLOSING OF DOORS/DRAWERS Door(s) will reset in proper position. It • rocks on the floor when moved slightly. • Refrigerator is properly installed on cold water • pipe is • being used • frequently enough. Clean valve. Replace filter cartridge. Open household water line valve. Ensure drawer is touching a wall • or cabinet. Freezer control is set too warm. • ICE DISPENSER Dispenser will not stop • making ice. Turn off household water line valve. Remove valve. Allow 24 hours for temperature...
Use and Care Guide
Page 18
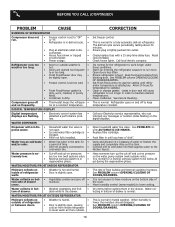
... Care & Cleaning. This is tightly pushed into outlet. Open household water line valve. See PROBLEM column OPENING/CLOSING OF DOORS/DRAWERS. WATER/MOISTURE/FROST INSIDE REFRIGERATOR Moisture collects on the bottom side of refrigerator or between doors. • Door is slightly open . • Ice and water filter cartridge is slightly open. • walls. Ensure plug is normal. Draw and discard 10-12 glasses of drawer. It is normal in bottom of drawer moisture. Move humidity control (some models...
... Care & Cleaning. This is tightly pushed into outlet. Open household water line valve. See PROBLEM column OPENING/CLOSING OF DOORS/DRAWERS. WATER/MOISTURE/FROST INSIDE REFRIGERATOR Moisture collects on the bottom side of refrigerator or between doors. • Door is slightly open . • Ice and water filter cartridge is slightly open. • walls. Ensure plug is normal. Draw and discard 10-12 glasses of drawer. It is normal in bottom of drawer moisture. Move humidity control (some models...


