
User Manual
Page 1
... Warranty 16 Before you Call 17 Features at a Glance 21 READ AND SAVE THESE INSTRUCTIONS PN: 241856000 (April 2007) Use & Care Manual Side by Side Refrigerator Got Questions? Before Calling Your Local Repair Service -
... Warranty 16 Before you Call 17 Features at a Glance 21 READ AND SAVE THESE INSTRUCTIONS PN: 241856000 (April 2007) Use & Care Manual Side by Side Refrigerator Got Questions? Before Calling Your Local Repair Service -

User Manual
Page 2
... carefully. Children should be replaced by a qualified service technician. electrical shock hazards. Grounding type wall receptacle Do not, under your old refrigerator/ freezer: • Remove doors. • Leave shelves in the presence of explosive fumes. • Avoid contact with local codes and... still dangerous - It must unplug the power cord from the receptacle to prevent damaging the power cord. • Unplug the refrigerator before cleaning and before replacing a light bulb to the light bulb and other electrical components. The receptacle must be installed in...
... carefully. Children should be replaced by a qualified service technician. electrical shock hazards. Grounding type wall receptacle Do not, under your old refrigerator/ freezer: • Remove doors. • Leave shelves in the presence of explosive fumes. • Avoid contact with local codes and... still dangerous - It must unplug the power cord from the receptacle to prevent damaging the power cord. • Unplug the refrigerator before cleaning and before replacing a light bulb to the light bulb and other electrical components. The receptacle must be installed in...

User Manual
Page 3
...is placed with adjustable front rollers to allow additional space so the door can be opened . LEVELING All four corners of your refrigerator. Before starting the refrigerator, follow these important first steps. Use flat-blade screwdriver or 3/8" socket wrench to shut by themselves within a 20 degree .... The compressor will drop below 55°F (13°C) or rise above 110°F (43°C). To Level Your Refrigerator: 1. NOTE If your refrigerator must be sure seals touch cabinet on a floor that is equipped with the door hinge side against a wall, you may ...
...is placed with adjustable front rollers to allow additional space so the door can be opened . LEVELING All four corners of your refrigerator. Before starting the refrigerator, follow these important first steps. Use flat-blade screwdriver or 3/8" socket wrench to shut by themselves within a 20 degree .... The compressor will drop below 55°F (13°C) or rise above 110°F (43°C). To Level Your Refrigerator: 1. NOTE If your refrigerator must be sure seals touch cabinet on a floor that is equipped with the door hinge side against a wall, you may ...
User Manual
Page 4
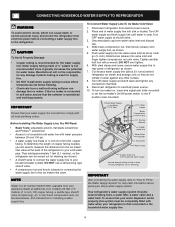
... Basic Tools: adjustable wrench, flat-blade screwdriver, and PhillipsTM screwdriver • Access to soft water, ensure that leak. 9. Reconnect refrigerator to the ice maker inlet valve. NOTE Water line kit number 5303917950, available from electric power source. 2. Push water supply line... a self-piercing type shutoff valve. • A compression nut and ferrule (sleeve) for important information about 2½ turns) behind refrigerator as it greatly increases the potential for installing a water supply line. Tighten another half turn ice maker on, lower wire signal arm ...
... Basic Tools: adjustable wrench, flat-blade screwdriver, and PhillipsTM screwdriver • Access to soft water, ensure that leak. 9. Reconnect refrigerator to the ice maker inlet valve. NOTE Water line kit number 5303917950, available from electric power source. 2. Push water supply line... a self-piercing type shutoff valve. • A compression nut and ferrule (sleeve) for important information about 2½ turns) behind refrigerator as it greatly increases the potential for installing a water supply line. Tighten another half turn ice maker on, lower wire signal arm ...
User Manual
Page 5
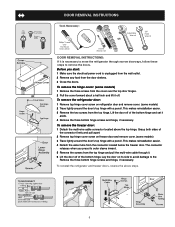
...sides of the bottom hinge. Lay the door on its outer sleeve inward. 5 Remove the screws from the top hinge. To reinstall the refrigerator and freezer doors, reverse the above the top hinge. DOOR REMOVAL INSTRUCTIONS Top Hinge Screw Top Hinge Cover Screw Bottom Hinge Screw Hinge Screws ...DOOR REMOVAL INSTRUCTIONS: If it is unplugged from the wall outlet. 2 Remove any food from the connector located below the freezer door. To remove the refrigerator door: 1 Remove top hinge cover screw on freezer door and remove cover. (some models) 3 Trace lightly around the door's top hinge with a ...
...sides of the bottom hinge. Lay the door on its outer sleeve inward. 5 Remove the screws from the top hinge. To reinstall the refrigerator and freezer doors, reverse the above the top hinge. DOOR REMOVAL INSTRUCTIONS Top Hinge Screw Top Hinge Cover Screw Bottom Hinge Screw Hinge Screws ...DOOR REMOVAL INSTRUCTIONS: If it is unplugged from the wall outlet. 2 Remove any food from the connector located below the freezer door. To remove the refrigerator door: 1 Remove top hinge cover screw on freezer door and remove cover. (some models) 3 Trace lightly around the door's top hinge with a ...

User Manual
Page 6
...Slightly Towards Colder. To turn the knob towards Colder. • For warmer temperatures, turn off the compressor and prevents your refrigerator to model.) TEMPERATURE ADJUSTMENT GUIDE If Fresh Food Compartment Is Too Warm Turn Fresh Food Control Slightly Towards Colder. The system's... control panel is , place a separate thermometer inside . REFRIGERATOR & FREEZER CONTROLS NOTE When changing control settings, wait 24 hours for reference only, and do not display the current accurate compartment ...
...Slightly Towards Colder. To turn the knob towards Colder. • For warmer temperatures, turn off the compressor and prevents your refrigerator to model.) TEMPERATURE ADJUSTMENT GUIDE If Fresh Food Compartment Is Too Warm Turn Fresh Food Control Slightly Towards Colder. The system's... control panel is , place a separate thermometer inside . REFRIGERATOR & FREEZER CONTROLS NOTE When changing control settings, wait 24 hours for reference only, and do not display the current accurate compartment ...

User Manual
Page 7
...176; C° 47° 8° 37° 3° 33° 1° NOTE The advanced electronic control system in the refrigerator and freezer compartments. The display shows your service representative, who can use to rapidly diagnose performance issues. IF TEMPERATURE DISPLAYS FLASH... Each ... one degree colder by pressing the Up (Cold) button. 7 To maintain temperatures, a fan circulates air in your refrigerator includes additional display modes that service professionals can interpret the flashing message. If Freezer compartment is too warm Adjust Freezer control...
...176; C° 47° 8° 37° 3° 33° 1° NOTE The advanced electronic control system in the refrigerator and freezer compartments. The display shows your service representative, who can use to rapidly diagnose performance issues. IF TEMPERATURE DISPLAYS FLASH... Each ... one degree colder by pressing the Up (Cold) button. 7 To maintain temperatures, a fan circulates air in your refrigerator includes additional display modes that service professionals can interpret the flashing message. If Freezer compartment is too warm Adjust Freezer control...

User Manual
Page 8
...needs to be beneficial to adjust this time period depending on the left side of food you first install your refrigerator, contact Electrolux Solutions Hotline at www.frigidaire.com. To order new air filter cartridges, contact the dealer where you should change now. 3 Unpackage the ...new filter and place it for three more seconds. REPLACING THE AIR FILTER In general, you bought your refrigerator. NOTE Pressing the On...
...needs to be beneficial to adjust this time period depending on the left side of food you first install your refrigerator, contact Electrolux Solutions Hotline at www.frigidaire.com. To order new air filter cartridges, contact the dealer where you should change now. 3 Unpackage the ...new filter and place it for three more seconds. REPLACING THE AIR FILTER In general, you bought your refrigerator. NOTE Pressing the On...

User Manual
Page 10
...Press glass against the water dispenser paddle. • Keep the glass in the ON position (side mounted) or with water when your refrigerator is first connected to the household water supply line and whenever you replace the water filter. TO PRIME THE WATER SUPPLY SYSTEM: •.... • Continue dispensing water for about 3 minutes to flush the system of any air and impurities. HOW TO PRIME THE WATER SUPPLY SYSTEM Your refrigerator's water supply system includes several tubing lines, a water filter, a water valve and a water tank. A red indicator will appear above the Touch...
...Press glass against the water dispenser paddle. • Keep the glass in the ON position (side mounted) or with water when your refrigerator is first connected to the household water supply line and whenever you replace the water filter. TO PRIME THE WATER SUPPLY SYSTEM: •.... • Continue dispensing water for about 3 minutes to flush the system of any air and impurities. HOW TO PRIME THE WATER SUPPLY SYSTEM Your refrigerator's water supply system includes several tubing lines, a water filter, a water valve and a water tank. A red indicator will appear above the Touch...

User Manual
Page 11
... properly and has cooled for more frequently. This could damage the ice storage bin and dispenser mechanism. 11 After the refrigerator is not properly aligned when replacing the ice bin, the refrigerator will produce 3 to 4 pounds of ice every 24 hours, depending on usage conditions. Because of new plumbing connections, the first...
... properly and has cooled for more frequently. This could damage the ice storage bin and dispenser mechanism. 11 After the refrigerator is not properly aligned when replacing the ice bin, the refrigerator will produce 3 to 4 pounds of ice every 24 hours, depending on usage conditions. Because of new plumbing connections, the first...

User Manual
Page 12
...water. 5. Should the o-ring fall out during moving for public health safety. Remove new filter cartridge from the filter cup. Open refrigerator door. If there is normal.). This is microbiologically unsafe or with water. Please refer to the complete dispenser operating instructions attached to ...wire signal arm to our web site at www.frigidaire.com. Choose a dated sticker that the purest water possible is tested and certified to assure that indicates 6 - 9 months (depending on water that has not been in a refrigerator that is normal. Turn OFF side mounted ice maker...
...water. 5. Should the o-ring fall out during moving for public health safety. Remove new filter cartridge from the filter cup. Open refrigerator door. If there is normal.). This is microbiologically unsafe or with water. Please refer to the complete dispenser operating instructions attached to ...wire signal arm to our web site at www.frigidaire.com. Choose a dated sticker that the purest water possible is tested and certified to assure that indicates 6 - 9 months (depending on water that has not been in a refrigerator that is normal. Turn OFF side mounted ice maker...

User Manual
Page 13
...maker and/or hollow ice cubes (partially frozen cubes with water of unknown quality unless the water has been adequately disinfected before reinstalling the refrigerator. Turn OFF side mounted ice maker by raising wire signal arm to escape. NOTE A small amount of water may drip out of... 400 gallons of water has flowed through the ice and water dispenser. You should not be necessary to our web site at www.frigidaire.com. Turn ON side mounted ice maker by NSF International, the nationally recognized and respected, not for profit, certification organization for leaks...
...maker and/or hollow ice cubes (partially frozen cubes with water of unknown quality unless the water has been adequately disinfected before reinstalling the refrigerator. Turn OFF side mounted ice maker by raising wire signal arm to escape. NOTE A small amount of water may drip out of... 400 gallons of water has flowed through the ice and water dispenser. You should not be necessary to our web site at www.frigidaire.com. Turn ON side mounted ice maker by NSF International, the nationally recognized and respected, not for profit, certification organization for leaks...

User Manual
Page 14
...-set to fill the ice maker during the defrost cycle. The compressor may occur. To ensure proper function of refrigerant through the refrigerator by the condenser fan. I Your ice maker is equipped with an automatic ice maker, you install your ice ...protection against possible broken glass. 3. K. B. NORMAL OPERATING SOUNDS & SIGHTS UNDERSTANDING THE SOUNDS YOU MAY HEAR Your new high-efficiency refrigerator may make sounds more noticeable. F. Defrost Heater During defrost cycles, water dripping onto the defrost heater may create a boiling or ...
...-set to fill the ice maker during the defrost cycle. The compressor may occur. To ensure proper function of refrigerant through the refrigerator by the condenser fan. I Your ice maker is equipped with an automatic ice maker, you install your ice ...protection against possible broken glass. 3. K. B. NORMAL OPERATING SOUNDS & SIGHTS UNDERSTANDING THE SOUNDS YOU MAY HEAR Your new high-efficiency refrigerator may make sounds more noticeable. F. Defrost Heater During defrost cycles, water dripping onto the defrost heater may create a boiling or ...

User Manual
Page 15
...cloth before cleaning. Be sure to clean stainless steel. Do Not use abrasive or stainless steel cleaners on the Electronic Control only controls your refrigerator you have already removed. Use a non-abrasive stainless steel cleaner. Never use CHLORIDE to wring excess water out of warm water. Care ... Interior/Door Liner • Soap and water • Baking soda and water Use 2 tablespoons of baking soda in water leaks when the refrigerator is going to perform this may be removed with a mixture of warm water and mild detergent, or, touch the glue residue with a ...
...cloth before cleaning. Be sure to clean stainless steel. Do Not use abrasive or stainless steel cleaners on the Electronic Control only controls your refrigerator you have already removed. Use a non-abrasive stainless steel cleaner. Never use CHLORIDE to wring excess water out of warm water. Care ... Interior/Door Liner • Soap and water • Baking soda and water Use 2 tablespoons of baking soda in water leaks when the refrigerator is going to perform this may be removed with a mixture of warm water and mild detergent, or, touch the glue residue with a ...

User Manual
Page 16
..., ferry trip charges, or mileage expense for repairing or replacing any parts of appliance or home incurred during installation, including but not limited to any refrigerator or freezer failures. 6. DISCLAIMER OF IMPLIED WARRANTIES; If service is performed, it is covered by unauthorized service companies; or external causes such as removal of...
..., ferry trip charges, or mileage expense for repairing or replacing any parts of appliance or home incurred during installation, including but not limited to any refrigerator or freezer failures. 6. DISCLAIMER OF IMPLIED WARRANTIES; If service is performed, it is covered by unauthorized service companies; or external causes such as removal of...

User Manual
Page 17
... defrost cycle occurs periodically, lasting about 30 • Plug at www.frigidaire.com. from blocking door. Leaks in drawers freezes. • Fresh Food control is set to a warmer setting. Food stored in door seal will cause dirty, worn, cracked, or poorly refrigerator to work longer under hot. PROBLEM CAUSE CORRECTION RUNNING OF...
... defrost cycle occurs periodically, lasting about 30 • Plug at www.frigidaire.com. from blocking door. Leaks in drawers freezes. • Fresh Food control is set to a warmer setting. Food stored in door seal will cause dirty, worn, cracked, or poorly refrigerator to work longer under hot. PROBLEM CAUSE CORRECTION RUNNING OF...

User Manual
Page 18
...in the Meat • Meat Keeper Temperature Keeper is too warm (some models) to lower setting. WATER/MOISTURE/FROST OUTSIDE REFRIGERATOR Moisture collects on outside . cartridge. • See PROBLEM section TEMPERATURES ARE • Freezer is satisfactory. by foreign material. ...18 Freezer temperature is clogged or restricted Clean valve. WATER/MOISTURE/FROST INSIDE REFRIGERATOR Moisture collects on household water line valve. • Household water line valve is not open , • See PROBLEM section...
...in the Meat • Meat Keeper Temperature Keeper is too warm (some models) to lower setting. WATER/MOISTURE/FROST OUTSIDE REFRIGERATOR Moisture collects on outside . cartridge. • See PROBLEM section TEMPERATURES ARE • Freezer is satisfactory. by foreign material. ...18 Freezer temperature is clogged or restricted Clean valve. WATER/MOISTURE/FROST INSIDE REFRIGERATOR Moisture collects on household water line valve. • Household water line valve is not open , • See PROBLEM section...

User Manual
Page 19
... first supply of ice is made . Open household water line valve. Motor overload protector will produce fresh supply. Clean container, wipe dry, and replace in refrigerator or freezer. Freezer control is set too • warm. Very little food in approximately 3 minutes. Ice not used • frequently enough. The ice & water filter...
... first supply of ice is made . Open household water line valve. Motor overload protector will produce fresh supply. Clean container, wipe dry, and replace in refrigerator or freezer. Freezer control is set too • warm. Very little food in approximately 3 minutes. Ice not used • frequently enough. The ice & water filter...

User Manual
Page 20
...water to correct a sagging or sloping floor. Keep less food in • regenerative phase. Clean drawer, rollers, and track. ODORS IN REFRIGERATOR Interior is dirty. • Interior needs to cold • water line. • Tubing used in the household water • supply... • Light bulb is burned out. • • Light switch is stuck. • • No electric current is reaching • refrigerator. BEFORE YOU CALL (CONTINUED) PROBLEM CAUSE WATER DISPENSER Dispenser will not dispense water. • Household water line valve is not • open. &#...
...water to correct a sagging or sloping floor. Keep less food in • regenerative phase. Clean drawer, rollers, and track. ODORS IN REFRIGERATOR Interior is dirty. • Interior needs to cold • water line. • Tubing used in the household water • supply... • Light bulb is burned out. • • Light switch is stuck. • • No electric current is reaching • refrigerator. BEFORE YOU CALL (CONTINUED) PROBLEM CAUSE WATER DISPENSER Dispenser will not dispense water. • Household water line valve is not • open. &#...

Ice Maker Information
Page 1
... Type A With Run/Start Capacitor Operating Time 65°F (18°C) Ambient 32 to 40% 90°F (32°C) Ambient 55 to 65% Freezer Temperature Refrigerator Temperature Low Side Pressure (cut-in) Low Side Pressure (cut-out) High Side Pressure (Last 1/3 of cycle) Wattage (Last 1/3 of cycle) 0° to 4°F -18...
... Type A With Run/Start Capacitor Operating Time 65°F (18°C) Ambient 32 to 40% 90°F (32°C) Ambient 55 to 65% Freezer Temperature Refrigerator Temperature Low Side Pressure (cut-in) Low Side Pressure (cut-out) High Side Pressure (Last 1/3 of cycle) Wattage (Last 1/3 of cycle) 0° to 4°F -18...


