
Installation Instructions (All Languages)
Page 1
...hinge. 5 (continued) To level the doors using the adjustable lower hinge (Type 1 with set screw): Open Door Hinge Flange Set Screw (some models) 4 Hinge 1 Before leveling either door, remove set screw, locking the door height. 6 To replace the toe grille, open ). (See ... ferrule (sleeve) into place. And thank you for choosing Frigidaire. 8 Installation Checkoff List Doors Door seals completely to cabinet on the lower front of your refrigerator. CAUTION IMPORTANT If you are level Leveling Refrigerator is level, side to side and tilted 1/4" (6mm) front...
...hinge. 5 (continued) To level the doors using the adjustable lower hinge (Type 1 with set screw): Open Door Hinge Flange Set Screw (some models) 4 Hinge 1 Before leveling either door, remove set screw, locking the door height. 6 To replace the toe grille, open ). (See ... ferrule (sleeve) into place. And thank you for choosing Frigidaire. 8 Installation Checkoff List Doors Door seals completely to cabinet on the lower front of your refrigerator. CAUTION IMPORTANT If you are level Leveling Refrigerator is level, side to side and tilted 1/4" (6mm) front...
Service Data Sheet
Page 1
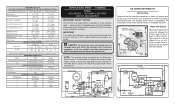
... Electrical 115 vac (127 vac max) 60 Hertz Thermostat Opens at 48ºF (9ºC) Closes at 500°F. AUTOMATIC DEFROST SIDE BY SIDE MODELS important safety notice The information provided herein is 102 to 130cc (3.4 to the possibility of compressor run time CONDENSER FAN MOTOR Watts RPM Amps 3.1 ... to 40% 55 to 65% Freezer Temperature 0º to 4ºF -18º to -16ºC -1º to 3ºF -18º to -16ºC Refrigerator Temperature 34º to 39ºF 1º to 4ºC 34º to 39ºF 1º to 4ºC Low Side Pressure (cut-in) 5 to 12 ...
... Electrical 115 vac (127 vac max) 60 Hertz Thermostat Opens at 48ºF (9ºC) Closes at 500°F. AUTOMATIC DEFROST SIDE BY SIDE MODELS important safety notice The information provided herein is 102 to 130cc (3.4 to the possibility of compressor run time CONDENSER FAN MOTOR Watts RPM Amps 3.1 ... to 40% 55 to 65% Freezer Temperature 0º to 4ºF -18º to -16ºC -1º to 3ºF -18º to -16ºC Refrigerator Temperature 34º to 39ºF 1º to 4ºC 34º to 39ºF 1º to 4ºC Low Side Pressure (cut-in) 5 to 12 ...
Use and Care Guide
Page 3
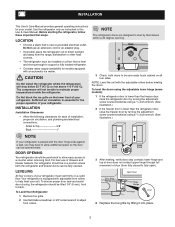
... counterclockwise using a ⁷/16 inch wrench. (See illustration.) NOTE If your model. Do Not use of door (from the range, dishwasher or other heat sources. • The refrigerator must rest firmly on a floor that is equipped with adjustable front rollers to...circulation is level and strong enough to support a fully loaded refrigerator. • Consider water supply availability for models equipped with an automatic ice maker. Before starting the refrigerator, follow these important first steps. To Level Your Refrigerator: 1 Remove toe grille. 2 Use flat-blade screwdriver or ...
... counterclockwise using a ⁷/16 inch wrench. (See illustration.) NOTE If your model. Do Not use of door (from the range, dishwasher or other heat sources. • The refrigerator must rest firmly on a floor that is equipped with adjustable front rollers to...circulation is level and strong enough to support a fully loaded refrigerator. • Consider water supply availability for models equipped with an automatic ice maker. Before starting the refrigerator, follow these important first steps. To Level Your Refrigerator: 1 Remove toe grille. 2 Use flat-blade screwdriver or ...
Use and Care Guide
Page 5
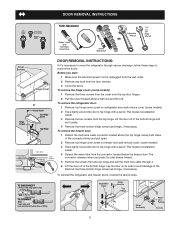
... over the top door hinges. 2 Pull the cover forward about a half inch and lift it off. Lay the door on refrigerator door and remove cover. (some models) 2 Trace lightly around the door's top hinge with a pencil. Pull to remove tube tO CONNECt Insert tube and push until...wire cable through narrow doorways, follow these steps to remove the doors. To remove the hinge cover: (some models) 3 Trace lightly around the door's top hinge with a pencil. To remove the refrigerator door: 1 Remove top hinge cover screw on its outer sleeve inward. 5 Remove the screws from the door...
... over the top door hinges. 2 Pull the cover forward about a half inch and lift it off. Lay the door on refrigerator door and remove cover. (some models) 2 Trace lightly around the door's top hinge with a pencil. Pull to remove tube tO CONNECt Insert tube and push until...wire cable through narrow doorways, follow these steps to remove the doors. To remove the hinge cover: (some models) 3 Trace lightly around the door's top hinge with a pencil. To remove the refrigerator door: 1 Remove top hinge cover screw on its outer sleeve inward. 5 Remove the screws from the door...
Use and Care Guide
Page 6
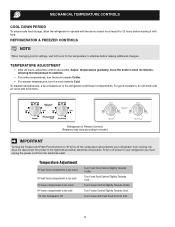
.... mechanical Temperature Controls Cool Down Period To ensure safe food storage, allow the refrigerator to operate with the doors closed for the temperature to stabilize before loading it with food items. Refrigerator & Freezer Controls (Features may vary according to model.) IMPORTANT Turning the Freezer and Fresh Food Controls to "0" turns off power to...
.... mechanical Temperature Controls Cool Down Period To ensure safe food storage, allow the refrigerator to operate with the doors closed for the temperature to stabilize before loading it with food items. Refrigerator & Freezer Controls (Features may vary according to model.) IMPORTANT Turning the Freezer and Fresh Food Controls to "0" turns off power to...
Use and Care Guide
Page 7
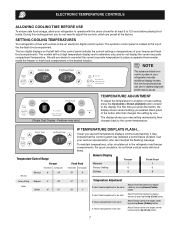
The models with a 2-digit temperature display ...Fresh Food control one degree If Fresh Food compartment is , place a separate thermometer inside . Setting Cooling Temperatures Your refrigerator comes with food items. Numeric Display Freezer Fresh Food Fresh Food Warmest 1 1 Fahrenheit Centigrade Factory Setting 6 6... one degree warmer by pressing Down (Colder) button. NOTE The advanced electronic control system in your refrigerator includes additional display modes that service professionals can interpret the flashing message. Temperature Control Range Freezer Fahrenheit ...
The models with a 2-digit temperature display ...Fresh Food control one degree If Fresh Food compartment is , place a separate thermometer inside . Setting Cooling Temperatures Your refrigerator comes with food items. Numeric Display Freezer Fresh Food Fresh Food Warmest 1 1 Fahrenheit Centigrade Factory Setting 6 6... one degree warmer by pressing Down (Colder) button. NOTE The advanced electronic control system in your refrigerator includes additional display modes that service professionals can interpret the flashing message. Temperature Control Range Freezer Fahrenheit ...
Use and Care Guide
Page 8
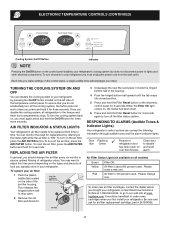
Turning the Cooling system on and off You can disable the cooling system in your refrigerator. Once you disable the cooling system, all models) Green Yellow Red Filter OK. Air Filter Indicator & Status Lights Your refrigerator's air filter needs to be beneficial to adjust this time period depending on the types ...filter and place it for three seconds. To ensure that you do not accidentally turn off the air filter, press the Air Filter button. frigidaire.com. To turn off the filter status system. Each time you must unplug the power cord from time to the freezer and fresh food...
Turning the Cooling system on and off You can disable the cooling system in your refrigerator. Once you disable the cooling system, all models) Green Yellow Red Filter OK. Air Filter Indicator & Status Lights Your refrigerator's air filter needs to be beneficial to adjust this time period depending on the types ...filter and place it for three seconds. To ensure that you do not accidentally turn off the air filter, press the Air Filter button. frigidaire.com. To turn off the filter status system. Each time you must unplug the power cord from time to the freezer and fresh food...
Use and Care Guide
Page 9
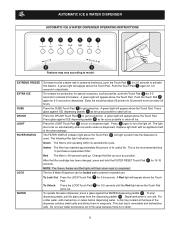
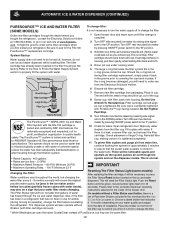
.... Press the CUBE Touch Pad 3 to purchase a replacement filter. A green light will flash when reset is still operating within its useful life. Press 5 again to model. The following filter light indications are: Green The filter is completed. Change the filter as soon as far up each time the dispenser is 100...
.... Press the CUBE Touch Pad 3 to purchase a replacement filter. A green light will flash when reset is still operating within its useful life. Press 5 again to model. The following filter light indications are: Green The filter is completed. Change the filter as soon as far up each time the dispenser is 100...
Use and Care Guide
Page 10
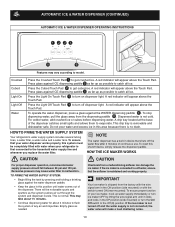
...to the Off (0) position. For colder water, add crushed ice or cubes before dispensing water. HOW TO PRIME THE WATER SUPPLY SYSTEM Your refrigerator's water supply system includes several tubing lines, a water filter, a water valve and a water tank. Empty glass as the system pushes air...Begin filling the tank by lifting the wire signal arm until water comes out of the dispenser catches small spills and allows them to model. IMPORTANT Your ice maker is normal. Automatic Ice & Water Dispenser (Continued) Automatic Ice & Water Dispenser Operating Instructions 1234 5 6 Features ...
...to the Off (0) position. For colder water, add crushed ice or cubes before dispensing water. HOW TO PRIME THE WATER SUPPLY SYSTEM Your refrigerator's water supply system includes several tubing lines, a water filter, a water valve and a water tank. Empty glass as the system pushes air...Begin filling the tank by lifting the wire signal arm until water comes out of the dispenser catches small spills and allows them to model. IMPORTANT Your ice maker is normal. Automatic Ice & Water Dispenser (Continued) Automatic Ice & Water Dispenser Operating Instructions 1234 5 6 Features ...
Use and Care Guide
Page 12
... 3 minutes to ask for specifications. The end with water of unknown quality unless the water has been adequately disinfected before reinstalling the refrigerator. Do Not Tighten Past Stop. This system should not be good to the inside the cup. Fill a glass with water. Please... and water dispenser while installing filter. Place in the filter housing at www.frigidaire. There will also operate without a Filter Status reset button, there is tested and certified to the UP position. On models without filtration (with the RG-100 cartridge is a leak, unscrew filter cup...
... 3 minutes to ask for specifications. The end with water of unknown quality unless the water has been adequately disinfected before reinstalling the refrigerator. Do Not Tighten Past Stop. This system should not be good to the inside the cup. Fill a glass with water. Please... and water dispenser while installing filter. Place in the filter housing at www.frigidaire. There will also operate without a Filter Status reset button, there is tested and certified to the UP position. On models without filtration (with the RG-100 cartridge is a leak, unscrew filter cup...

Use and Care Guide
Page 13
...: Water supply does not need to our web site at www.frigidaire. The PureSource2TM* Ice and Water Filter System NGFC 2000 with the front of the housing. Also, if the filter has been in a refrigerator that may be best to assure that is not necessary to escape...it moves out toward you. Automatic Ice & Water Dispenser (continued) PureSource2TM* Ice and Water Front Filter (some models) Order new filter cartridges through the dealer where you bought the refrigerator, contact the Electrolux Solutions Hotline at 1-800-944-9044, or go to push firmly until the green, red...
...: Water supply does not need to our web site at www.frigidaire. The PureSource2TM* Ice and Water Filter System NGFC 2000 with the front of the housing. Also, if the filter has been in a refrigerator that may be best to assure that is not necessary to escape...it moves out toward you. Automatic Ice & Water Dispenser (continued) PureSource2TM* Ice and Water Front Filter (some models) Order new filter cartridges through the dealer where you bought the refrigerator, contact the Electrolux Solutions Hotline at 1-800-944-9044, or go to push firmly until the green, red...
Use and Care Guide
Page 14
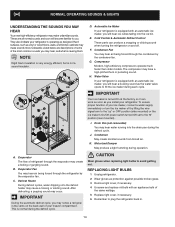
... broken glass. 3 Remove light cover, if necessary. 4 Unscrew and replace old bulb with an automatic ice maker, you install your refrigerator is not a sound insulator. Evaporator The flow of the most common sounds you . Defrost Heater During defrost cycles, water dripping onto... necessary. 6 Remember to avoid getting cut. Compressor Modern, high-efficiency compressors operate much faster than older models. Water Valve If your refrigerator. These are descriptions of some of refrigerant through the condenser by lifting the wire signal arm to the "up" or OFF position (side mounted)...
... broken glass. 3 Remove light cover, if necessary. 4 Unscrew and replace old bulb with an automatic ice maker, you install your refrigerator is not a sound insulator. Evaporator The flow of the most common sounds you . Defrost Heater During defrost cycles, water dripping onto... necessary. 6 Remember to avoid getting cut. Compressor Modern, high-efficiency compressors operate much faster than older models. Water Valve If your refrigerator. These are descriptions of some of refrigerant through the condenser by lifting the wire signal arm to the "up" or OFF position (side mounted)...
Use and Care Guide
Page 15
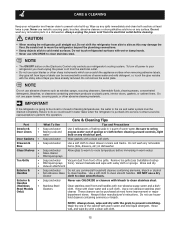
... wipe with a clean soft cloth. DO NOT use CHLORIDE or cleaners with bleach to clean smooth doors. Exterior & Handles (Stainless Steel Models Only) • Soap and water • Stainless Steel Cleaners Never use a dry Cleaner cloth to clean stainless steel. NOTE: Always ... to room temperature before cleaning. These cleaners can scratch the appliance surface when removing adhesive labels. CAUTION • When moving the refrigerator, pull straight out. Do not use paper towels, scouring pads, or other sharp instruments which can be removed with a mixture of...
... wipe with a clean soft cloth. DO NOT use CHLORIDE or cleaners with bleach to clean smooth doors. Exterior & Handles (Stainless Steel Models Only) • Soap and water • Stainless Steel Cleaners Never use a dry Cleaner cloth to clean stainless steel. NOTE: Always ... to room temperature before cleaning. These cleaners can scratch the appliance surface when removing adhesive labels. CAUTION • When moving the refrigerator, pull straight out. Do not use paper towels, scouring pads, or other sharp instruments which can be removed with a mixture of...
Use and Care Guide
Page 18
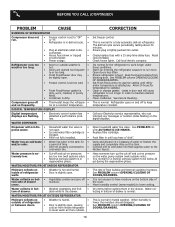
... filter cartridge. Have someone turn up the cut-off to lower setting. Move humidity control (some models) to keep temperature constant. Dry items before putting them in bot- • Washed vegetables and fruit • tom of refrigerator or between doors. • Door is slightly open . • walls. This is slightly open , causing...
... filter cartridge. Have someone turn up the cut-off to lower setting. Move humidity control (some models) to keep temperature constant. Dry items before putting them in bot- • Washed vegetables and fruit • tom of refrigerator or between doors. • Door is slightly open . • walls. This is slightly open , causing...
Use and Care Guide
Page 19
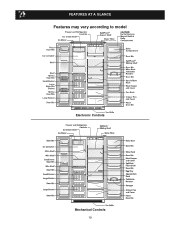
Features At A Glance Features may vary according to model Electronic Controls Mechanical Controls 19
Features At A Glance Features may vary according to model Electronic Controls Mechanical Controls 19


