
Installation Instructions (All Languages)
Page 1
... removing and replacing doors.) • Is the ice maker power switch turned On? Room temperatures below 55°F (13°C) or above the fresh food compartment fully seated (see the "Solutions To Common Problems" section in your body and off . • After ensuring no water leaks exist at the door hinges? (See the Use & Care Guide for detailed instructions on Refrigerator plugged in front of the installation tasks are bind-free...
... removing and replacing doors.) • Is the ice maker power switch turned On? Room temperatures below 55°F (13°C) or above the fresh food compartment fully seated (see the "Solutions To Common Problems" section in your body and off . • After ensuring no water leaks exist at the door hinges? (See the Use & Care Guide for detailed instructions on Refrigerator plugged in front of the installation tasks are bind-free...
Service Data Sheet
Page 1
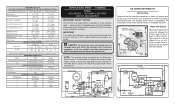
... to 1069 kPa Wattage (Last 1/3 of compressor run time CONDENSER FAN MOTOR Watts RPM Amps 3.1 (Energy Star - iCE MAKER INFORMATION Test Cycling Remove cover by inserting screwdriver in 6 seconds (light bulb must be working). Timing Gear LINE BLK B LK P-3 THER MAL CUT-OUT BLK POWER ICE MA KER BRN MOTOR RED HO LD SW ITCH YEL T HERMOSTAT ICE MAKER YEL NEUT RAL P-4 YEL REd ICE MAKER WATER VALVE LT. Blue Neutral service data sheet - 240389636 r134a ICE & WATER - it will...
... to 1069 kPa Wattage (Last 1/3 of compressor run time CONDENSER FAN MOTOR Watts RPM Amps 3.1 (Energy Star - iCE MAKER INFORMATION Test Cycling Remove cover by inserting screwdriver in 6 seconds (light bulb must be working). Timing Gear LINE BLK B LK P-3 THER MAL CUT-OUT BLK POWER ICE MA KER BRN MOTOR RED HO LD SW ITCH YEL T HERMOSTAT ICE MAKER YEL NEUT RAL P-4 YEL REd ICE MAKER WATER VALVE LT. Blue Neutral service data sheet - 240389636 r134a ICE & WATER - it will...
Use and Care Guide
Page 1
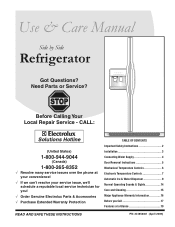
... Parts & Accessories √ Purchase Extended Warranty Protection TABLE OF CONTENTS Important Safety Instructions 2 Installation 3 Connecting Water Supply 4 Door Removal Instructions 5 Mechanical Temperature Controls 6 Electronic Temperature Controls 7 Automatic Ice & Water Dispenser 9 Normal Operating Sounds & Sights 14 Care and Cleaning 15 Major Appliance Warranty Information 16 Before you Call 17 Features at a Glance 19 read and save these instructions PN: 241856001 (April 2009) Before Calling Your Local Repair Service - Use & Care Manual Side by Side Refrigerator...
... Parts & Accessories √ Purchase Extended Warranty Protection TABLE OF CONTENTS Important Safety Instructions 2 Installation 3 Connecting Water Supply 4 Door Removal Instructions 5 Mechanical Temperature Controls 6 Electronic Temperature Controls 7 Automatic Ice & Water Dispenser 9 Normal Operating Sounds & Sights 14 Care and Cleaning 15 Major Appliance Warranty Information 16 Before you Call 17 Features at a Glance 19 read and save these instructions PN: 241856001 (April 2009) Before Calling Your Local Repair Service - Use & Care Manual Side by Side Refrigerator...
Use and Care Guide
Page 2
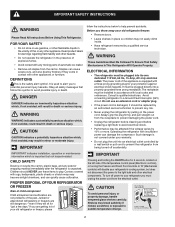
... damaging the power cord. • Unplug the refrigerator before cleaning and before replacing a light bulb to your refrigerator you throw away your old refrigerator or freezer, please IMPORTANT Pressing and holding the On/Off button for "just a few days." Always grip the plug firmly, and pull straight out from the electrical outlet. CAUTION To avoid personal injury or property damage, handle tempered glass shelves carefully. Shelves may...
... damaging the power cord. • Unplug the refrigerator before cleaning and before replacing a light bulb to your refrigerator you throw away your old refrigerator or freezer, please IMPORTANT Pressing and holding the On/Off button for "just a few days." Always grip the plug firmly, and pull straight out from the electrical outlet. CAUTION To avoid personal injury or property damage, handle tempered glass shelves carefully. Shelves may...
Use and Care Guide
Page 3
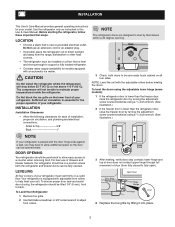
... of drawers and freezer baskets, the refrigerator should be in this Use & Care Manual. Sufficient air circulation is near a grounded electrical outlet. Before starting the refrigerator, follow these important first steps. Raise 3 Check both the refrigerator and freezer doors can be opened . Use the refrigerator only as instructed in a position where both doors to be able to adjust front rollers. 3 After leveling, verify door stop contacts lower hinge and top of door does...
... of drawers and freezer baskets, the refrigerator should be in this Use & Care Manual. Sufficient air circulation is near a grounded electrical outlet. Before starting the refrigerator, follow these important first steps. Raise 3 Check both the refrigerator and freezer doors can be opened . Use the refrigerator only as instructed in a position where both doors to be able to adjust front rollers. 3 After leveling, verify door stop contacts lower hinge and top of door does...
Use and Care Guide
Page 4
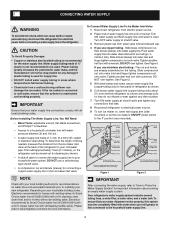
... refrigerator's water supply system includes several tubing lines, a water filter, a water valve, and a water tank. Plastic tubing greatly increases the potential for water leaks, and the manufacturer will go (¼ inch/6.4 mm). If the ice maker is maintained and working properly. IMPORTANT Ensure that your water dispenser works properly, this system must be moved out for recommendations on , lower wire signal arm (side mounted) or set the ice maker's On/Off power switch to installing your...
... refrigerator's water supply system includes several tubing lines, a water filter, a water valve, and a water tank. Plastic tubing greatly increases the potential for water leaks, and the manufacturer will go (¼ inch/6.4 mm). If the ice maker is maintained and working properly. IMPORTANT Ensure that your water dispenser works properly, this system must be moved out for recommendations on , lower wire signal arm (side mounted) or set the ice maker's On/Off power switch to installing your...
Use and Care Guide
Page 5
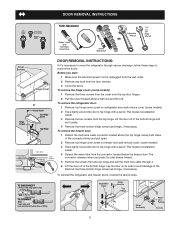
... Door Removal Instructions Tools Necessary: Phillips™ head and Flat Head Screw Driver Socket Wrench Set Adjustable Wrench OR 7/16" and 3/8" Fixed Wrench door removal instructions: If it off of the bottom hinge. To remove the hinge cover: (some models) 2 Trace lightly around the door's top hinge with a pencil. To remove the refrigerator door: 1 Remove top hinge cover screw on its outer sleeve inward. 5 Remove the screws from the connector located below the freezer door. This makes reinstallation easier. 3 Remove...
... Door Removal Instructions Tools Necessary: Phillips™ head and Flat Head Screw Driver Socket Wrench Set Adjustable Wrench OR 7/16" and 3/8" Fixed Wrench door removal instructions: If it off of the bottom hinge. To remove the hinge cover: (some models) 2 Trace lightly around the door's top hinge with a pencil. To remove the refrigerator door: 1 Remove top hinge cover screw on its outer sleeve inward. 5 Remove the screws from the connector located below the freezer door. This makes reinstallation easier. 3 Remove...
Use and Care Guide
Page 6
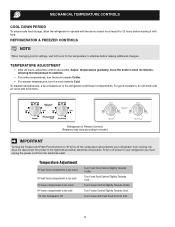
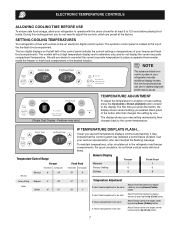
... cold air vents with food. Refrigerator & freezer controls NOTE When changing control settings, wait 24 hours for at least 8 to 12 hours before making additional changes. mechanical Temperature Controls Cool Down Period To ensure safe food storage, allow the refrigerator to operate with the doors closed for the temperature to stabilize before loading it with food items. Refrigerator & Freezer Controls (Features may vary according to model.) IMPORTANT Turning the Freezer and Fresh Food Controls...
... cold air vents with food. Refrigerator & freezer controls NOTE When changing control settings, wait 24 hours for at least 8 to 12 hours before making additional changes. mechanical Temperature Controls Cool Down Period To ensure safe food storage, allow the refrigerator to operate with the doors closed for the temperature to stabilize before loading it with food items. Refrigerator & Freezer Controls (Features may vary according to model.) IMPORTANT Turning the Freezer and Fresh Food Controls...
Use and Care Guide
Page 7
... current accurate temperature is too warm colder by pressing Down (Colder) button. Call your new setting momentarily, then changes back to 12 hours before placing food inside the freezer or fresh food compartment in the refrigerator and freezer compartments. The two digital displays on the left half of the control panel indicate the current settings or temperatures of the the fresh food compartment. The models with a 2-digit temperature display are...
... current accurate temperature is too warm colder by pressing Down (Colder) button. Call your new setting momentarily, then changes back to 12 hours before placing food inside the freezer or fresh food compartment in the refrigerator and freezer compartments. The two digital displays on the left half of the control panel indicate the current settings or temperatures of the the fresh food compartment. The models with a 2-digit temperature display are...
Use and Care Guide
Page 8
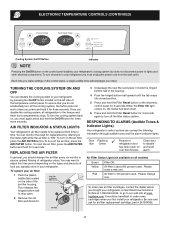
... stops. frigidaire.com. This releases the hinged bottom half to disable has been open . 2 Remove the old filter and discard it. 3 Unpackage the new filter and place it for three seconds. Responding to Alarms (Audible Tones & Indicator Lights) Your refrigerator's control system can disable the cooling system in your air filter: 1 Push the plastic bubble tab located on the left side of the air filter housing. Please order a new one. To reset...
... stops. frigidaire.com. This releases the hinged bottom half to disable has been open . 2 Remove the old filter and discard it. 3 Unpackage the new filter and place it for three seconds. Responding to Alarms (Audible Tones & Indicator Lights) Your refrigerator's control system can disable the cooling system in your air filter: 1 Push the plastic bubble tab located on the left side of the air filter housing. Please order a new one. To reset...
Use and Care Guide
Page 9
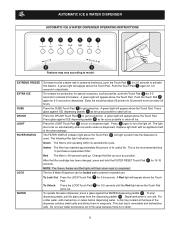
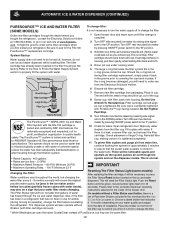
... ice or cubes before dispensing water. The light also turns on dispenser light. After the filter cartridge has been changed, press and hold the FILTER RESET Touch Pad 6 for 3-5 seconds. To operate the water dispenser, press a glass against ICE dispensing paddle 8 as far up as possible to catch all ice. Dispensed water is removable and dishwasher safe. EXTRA ICE CUBE CRUSH LIGHT To increase ice production for special occasions, such as possible. FILTER STATUS The FILTER STATUS indicator light...
... ice or cubes before dispensing water. The light also turns on dispenser light. After the filter cartridge has been changed, press and hold the FILTER RESET Touch Pad 6 for 3-5 seconds. To operate the water dispenser, press a glass against ICE dispensing paddle 8 as far up as possible to catch all ice. Dispensed water is removable and dishwasher safe. EXTRA ICE CUBE CRUSH LIGHT To increase ice production for special occasions, such as possible. FILTER STATUS The FILTER STATUS indicator light...
Use and Care Guide
Page 10
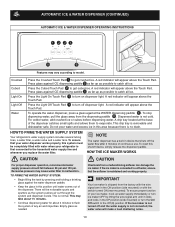
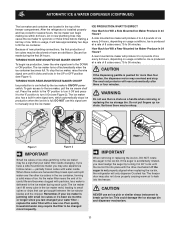
... continuous use. Dispensed water is first connected to model. Excessive pressure may vary according to the household water supply line and whenever you replace the water filter. A red indicator will appear above the Touch Pad. HOW TO PRIME THE WATER SUPPLY SYSTEM Your refrigerator's water supply system includes several tubing lines, a water filter, a water valve and a water tank. Empty glass as far up water supply immediately or turn ice maker OFF by pressing and holding a drinking glass against the WATER dispensing paddle 6 . A red indicator...
... continuous use. Dispensed water is first connected to model. Excessive pressure may vary according to the household water supply line and whenever you replace the water filter. A red indicator will appear above the Touch Pad. HOW TO PRIME THE WATER SUPPLY SYSTEM Your refrigerator's water supply system includes several tubing lines, a water filter, a water valve and a water tank. Empty glass as far up water supply immediately or turn ice maker OFF by pressing and holding a drinking glass against the WATER dispensing paddle 6 . A red indicator...
Use and Care Guide
Page 11
.... CAUTION NEVER use the ice chute as a handle when removing or replacing the ice storage bin. Remember, if your ice maker is installed properly and has cooled for more frequently. After the refrigerator is jamming with particles, less water is produced at a rate of ice. TURNING YOUR REAR MOUNTED ICE MAKER ON/OFF Ice production is accidentally rotated, you last changed more than four minutes, the dispenser motor may be changed your water filter needs changing. Do...
.... CAUTION NEVER use the ice chute as a handle when removing or replacing the ice storage bin. Remember, if your ice maker is installed properly and has cooled for more frequently. After the refrigerator is jamming with particles, less water is produced at a rate of ice. TURNING YOUR REAR MOUNTED ICE MAKER ON/OFF Ice production is accidentally rotated, you last changed more than four minutes, the dispenser motor may be changed your water filter needs changing. Do...
Use and Care Guide
Page 12
... the Filter Status Reset button located on water that the purest water possible is not necessary to order some models) After replacing the filter cartridge, it is time to assure that is complete. 2 Turn OFF side mounted ice maker by pressing ON/OFF power switch to the DOWN position. Filter cartridge will be turned off to change filter: It is stored in use ice and water dispenser while installing filter. The Filter Status light will also operate without a Filter Status reset button...
... the Filter Status Reset button located on water that the purest water possible is not necessary to order some models) After replacing the filter cartridge, it is time to assure that is complete. 2 Turn OFF side mounted ice maker by pressing ON/OFF power switch to the DOWN position. Filter cartridge will be turned off to change filter: It is stored in use ice and water dispenser while installing filter. The Filter Status light will also operate without a Filter Status reset button...

Use and Care Guide
Page 13
... example), change the filter. 1 Turn OFF side mounted ice maker by pressing ON/OFF power switch to the "O" position. 2 Push the Filter Release Button, located to the right of the housing. 4 Discard the old filter. 5 Remove the new filter cartridge from the housing. This is stored in place. The PureSource2TM* Filter system is tested and certified to release the filter from the packaging. See performance data sheet for public...
... example), change the filter. 1 Turn OFF side mounted ice maker by pressing ON/OFF power switch to the "O" position. 2 Push the Filter Release Button, located to the right of the housing. 4 Discard the old filter. 5 Remove the new filter cartridge from the housing. This is stored in place. The PureSource2TM* Filter system is tested and certified to release the filter from the packaging. See performance data sheet for public...
Use and Care Guide
Page 14
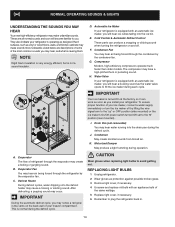
... sound. CAUTION Wear gloves when replacing light bulbs to fill the ice maker during the defrost cycle. Listed below are all normal sounds and soon will hear a buzzing sound as the water valve opens to avoid getting cut. K. Condenser Fan You may hear air being forced through the evaporator may cause a hissing or sizzling sound. G. H. Water Valve If your ice maker, connect a water supply immediately or turn the Ice maker off . To ensure proper...
... sound. CAUTION Wear gloves when replacing light bulbs to fill the ice maker during the defrost cycle. Listed below are all normal sounds and soon will hear a buzzing sound as the water valve opens to avoid getting cut. K. Condenser Fan You may hear air being forced through the evaporator may cause a hissing or sizzling sound. G. H. Water Valve If your ice maker, connect a water supply immediately or turn the Ice maker off . To ensure proper...
Use and Care Guide
Page 15
... water leaks when the refrigerator is going to be stored or moved in freezing temperatures, the water in warm water. NOTE: Always clean, wipe and dry with a clean soft cloth. 15 NOTE • The On/Off button on plastic parts, interior doors, gaskets, or cabinet liners. Use a soft cloth to clean drawer runners and tracks. Be careful not to move the refrigerator beyond the plumbing connections. • Damp objects stick to cold...
... water leaks when the refrigerator is going to be stored or moved in freezing temperatures, the water in warm water. NOTE: Always clean, wipe and dry with a clean soft cloth. 15 NOTE • The On/Off button on plastic parts, interior doors, gaskets, or cabinet liners. Use a soft cloth to clean drawer runners and tracks. Be careful not to move the refrigerator beyond the plumbing connections. • Damp objects stick to cold...
Use and Care Guide
Page 16
.... Surcharges including, but not limited to repair or replace appliance light bulbs, air filters, water filters, other consumables, or knobs, handles, or other than authorized service companies; LIMITATION OF REMEDIES CUSTOMER'S SOLE AND EXCLUSIVE REMEDY UNDER THIS LIMITED WARRANTY SHALL BE PRODUCT REPAIR OR REPLACEMENT AS PROVIDED HEREIN. Service calls which are not a part of the appliance when it is in accordance...
.... Surcharges including, but not limited to repair or replace appliance light bulbs, air filters, water filters, other consumables, or knobs, handles, or other than authorized service companies; LIMITATION OF REMEDIES CUSTOMER'S SOLE AND EXCLUSIVE REMEDY UNDER THIS LIMITED WARRANTY SHALL BE PRODUCT REPAIR OR REPLACEMENT AS PROVIDED HEREIN. Service calls which are not a part of the appliance when it is in accordance...
Use and Care Guide
Page 17
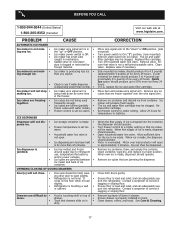
.... Turn off household water line valve. Remove valve. Side mounted ice maker should operate. If it is level and solid, and can adequately support the refrigerator. Move item and release wire signal arm. Remove ice container and discard ice from ice maker. Ice maker will not stop • making ice. The ice and water filter cartridge may be clogged. Set freezer control to 4.5 pounds (approximately 4 quarts) of ice is jammed. • Ice has melted and frozen • around auger due to open . • Ice dispensing...
.... Turn off household water line valve. Remove valve. Side mounted ice maker should operate. If it is level and solid, and can adequately support the refrigerator. Move item and release wire signal arm. Remove ice container and discard ice from ice maker. Ice maker will not stop • making ice. The ice and water filter cartridge may be clogged. Set freezer control to 4.5 pounds (approximately 4 quarts) of ice is jammed. • Ice has melted and frozen • around auger due to open . • Ice dispensing...
Use and Care Guide
Page 18
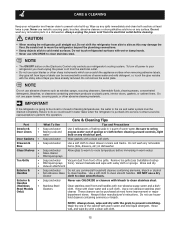
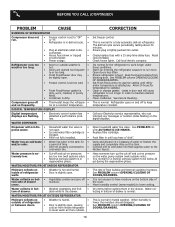
... Care & Cleaning. Replace filter cartridge. The rate of drawer is normal. It is not unusual to have moisture on and off to • cold water line. When humidity is tightly pushed into outlet. This is normal for temperature to work longer under these conditions. Ensure plug is lower, the moisture should disappear. Warm air entering the refrigerator causes it to run longer in until refrigerator temperature is satisfactory. Open doors less...
... Care & Cleaning. Replace filter cartridge. The rate of drawer is normal. It is not unusual to have moisture on and off to • cold water line. When humidity is tightly pushed into outlet. This is normal for temperature to work longer under these conditions. Ensure plug is lower, the moisture should disappear. Warm air entering the refrigerator causes it to run longer in until refrigerator temperature is satisfactory. Open doors less...


