
Complete Owner's Guide (English)
Page 2
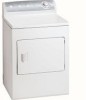
.... Follow the gas supplier's instructions. • If you to such substances. Model Number Serial Number Purchase Date This Use and Care Guide provides general operating instructions for your dryer. Table of Contents Product Registration 2 Important Safety Instructions 2-4 Drying Procedures 4 Operating Instructions 5 Features 6 Care and Cleaning 6-7 Common Drying Problems 7 Avoid Service checklist 8 Warranty 9 Español 10 Product Record Read and Save These Instructions Record Your Model and Serial Numbers The model and serial numbers of your dryer are soot and...
.... Follow the gas supplier's instructions. • If you to such substances. Model Number Serial Number Purchase Date This Use and Care Guide provides general operating instructions for your dryer. Table of Contents Product Registration 2 Important Safety Instructions 2-4 Drying Procedures 4 Operating Instructions 5 Features 6 Care and Cleaning 6-7 Common Drying Problems 7 Avoid Service checklist 8 Warranty 9 Español 10 Product Record Read and Save These Instructions Record Your Model and Serial Numbers The model and serial numbers of your dryer are soot and...

Complete Owner's Guide (English)
Page 3
... into a properly grounded and polarized 3-prong outlet. If the dryer is removed from electrical power cord. The third grounding prong must never be installed and electrically grounded by the manufacturer of the fabric softener or product. Do not use an adaptor plug or extension cord or remove grounding prong from service or discarded, remove the dryer door to prevent accidental entrapment. • Failure to INSTALLATION INSTRUCTIONS for play on or in...
... into a properly grounded and polarized 3-prong outlet. If the dryer is removed from electrical power cord. The third grounding prong must never be installed and electrically grounded by the manufacturer of the fabric softener or product. Do not use an adaptor plug or extension cord or remove grounding prong from service or discarded, remove the dryer door to prevent accidental entrapment. • Failure to INSTALLATION INSTRUCTIONS for play on or in...

Complete Owner's Guide (English)
Page 4
...; A thermal limiter switch automatically turns off the motor in place. 3. A service technician must replace the thermal limiter switch after 6. Dryer heat may permanently set some stains. • Place delicate or small items in this Use and Care Guide before reaching into the dryer if the drum is running, open the door. Items need room to prevent snagging and tangling. 2. Use only authorized factory parts. • Do not tamper with controls. • Do not install...
...; A thermal limiter switch automatically turns off the motor in place. 3. A service technician must replace the thermal limiter switch after 6. Dryer heat may permanently set some stains. • Place delicate or small items in this Use and Care Guide before reaching into the dryer if the drum is running, open the door. Items need room to prevent snagging and tangling. 2. Use only authorized factory parts. • Do not tamper with controls. • Do not install...

Complete Owner's Guide (English)
Page 5
... dry. • For items requiring more drying time, set cycle selector on more dry. • For items requiring less drying time, set cycle selector on fabric care labels. • Casual medium heat is suggested for knit and delicate items. Drying time is best for permanent press - The heat automatically turns off and the load continues to help reduce wrinkling if the dried load cannot be removed promptly. on normal dry. Use air fluff to freshen clothing...
... dry. • For items requiring more drying time, set cycle selector on more dry. • For items requiring less drying time, set cycle selector on fabric care labels. • Casual medium heat is suggested for knit and delicate items. Drying time is best for permanent press - The heat automatically turns off and the load continues to help reduce wrinkling if the dried load cannot be removed promptly. on normal dry. Use air fluff to freshen clothing...

Complete Owner's Guide (English)
Page 6
... located at the end of the lint screen opening and in place. • If the dryer drum becomes stained from using the drying rack. 4.Select Timed Dry. The door can collect lint and dust over the sides or through the grids. A clothes dryer produces combustible lint. Remove by -step instructions on top of lint build-up could occur. Clean the lint filter after every load. Weight should clean the dryer cabinet interior and exhaust duct. Care...
... located at the end of the lint screen opening and in place. • If the dryer drum becomes stained from using the drying rack. 4.Select Timed Dry. The door can collect lint and dust over the sides or through the grids. A clothes dryer produces combustible lint. Remove by -step instructions on top of lint build-up could occur. Clean the lint filter after every load. Weight should clean the dryer cabinet interior and exhaust duct. Care...

Complete Owner's Guide (English)
Page 7
... load size and tumble at medium or low heat for proper tumbling. • Some "silk-like" fabrics should be air dried. • Use proper drying temperature. • Place fabric softener sheet on top of load before starting the dryer. • Do not overload dryer. • Use fabric softener in washer or dryer to reduce static electricity. • Remove items when they are slightly damp to avoid overdrying. • Check...
... load size and tumble at medium or low heat for proper tumbling. • Some "silk-like" fabrics should be air dried. • Use proper drying temperature. • Place fabric softener sheet on top of load before starting the dryer. • Do not overload dryer. • Use fabric softener in washer or dryer to reduce static electricity. • Remove items when they are slightly damp to avoid overdrying. • Check...

Complete Owner's Guide (English)
Page 8
... outlet. Exhaust duct requirements have not been followed. Make sure electrical line is not overloaded and the dryer is open (gas models). Check to support the burner flame (gas models). Drying time will not operate. (electric models) Gas supply valve is not covered by the warranty. 8 Drying procedures have not been met. Outside exhaust hood or exhaust duct may save both time and expense. Use a dehumidifier near the dryer. Insufficient sorting of the dryer feels too hot...
... outlet. Exhaust duct requirements have not been followed. Make sure electrical line is not overloaded and the dryer is open (gas models). Check to support the burner flame (gas models). Drying time will not operate. (electric models) Gas supply valve is not covered by the warranty. 8 Drying procedures have not been met. Outside exhaust hood or exhaust duct may save both time and expense. Use a dehumidifier near the dryer. Insufficient sorting of the dryer feels too hot...
Complete Owner's Guide (English)
Page 9
... mileage expense for service and parts under this warranty. 5. Food loss due to repair or replace appliance light bulbs, air filters, water filters, other consumables, or knobs, handles, or other than genuine Electrolux parts or parts obtained from its original owner to another party or removed outside the USA or Canada. 3. or external causes such as described or illustrated are not covered by unauthorized service companies; ELECTROLUX...
... mileage expense for service and parts under this warranty. 5. Food loss due to repair or replace appliance light bulbs, air filters, water filters, other consumables, or knobs, handles, or other than genuine Electrolux parts or parts obtained from its original owner to another party or removed outside the USA or Canada. 3. or external causes such as described or illustrated are not covered by unauthorized service companies; ELECTROLUX...
Complete Owner's Guide (English)
Page 11
... Major Appliances North America, a division of powered appliances for kitchen, cleaning and outdoor use combined. The Electrolux Group. P.O. More than 150 countries around the world. Box 212378 Augusta, GA 30917 CANADA, CANADÁ Electrolux Major Appliances... North America, a division of Electrolux Home Products, Inc. 5855 Terry Fox Way Mississauga, Ontario, Canada L5R 4C2 Or, O, Ou Visit Frigidaire's Web Site at: Visite la página de Frigidaire en Internet: Visitez le site Internet de Frigidaire au: http://www/frigidaire...
... Major Appliances North America, a division of powered appliances for kitchen, cleaning and outdoor use combined. The Electrolux Group. P.O. More than 150 countries around the world. Box 212378 Augusta, GA 30917 CANADA, CANADÁ Electrolux Major Appliances... North America, a division of Electrolux Home Products, Inc. 5855 Terry Fox Way Mississauga, Ontario, Canada L5R 4C2 Or, O, Ou Visit Frigidaire's Web Site at: Visite la página de Frigidaire en Internet: Visitez le site Internet de Frigidaire au: http://www/frigidaire...
Installation Instructions (All Languages)
Page 2
... and trap lint. drivers • Adjustable wrench • Pipe wrench for gas supply (gas dryer) • LP-resistant thread tape (for play. Table of Contents Important Safety Instructions 2 Pre-installation Requirements 2 Installation Requirements 3-7 Installed Dimensions 8 Installation Instructions 9-11 Reversing door 12 Accessories/Replacement parts 12 Español 13 Important Safety Instructions For your safety the information in this manual and all other literature included with this dryer are not meant to cover...
... and trap lint. drivers • Adjustable wrench • Pipe wrench for gas supply (gas dryer) • LP-resistant thread tape (for play. Table of Contents Important Safety Instructions 2 Pre-installation Requirements 2 Installation Requirements 3-7 Installed Dimensions 8 Installation Instructions 9-11 Reversing door 12 Accessories/Replacement parts 12 Español 13 Important Safety Instructions For your safety the information in this manual and all other literature included with this dryer are not meant to cover...
Installation Instructions (All Languages)
Page 3
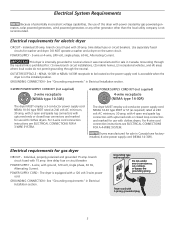
... requirements" in Electrical Installation section. 3-WIRE POWER SUPPLY CORD KIT (not supplied) 3-wire receptacle (NEMA type 10-30R) 4-WIRE POWER SUPPLY CORD KIT (not supplied) 4-wire receptacle (NEMA type 14-30R) The dryer MUST employ a 3-conductor power supply cord NEMA 10-30 type SRDT rated at 240 volt AC minimum, 30 amp, with 4 open end spade lug connectors with upturned ends or closed loop connectors and marked for gas dryer CIRCUIT - OUTLET RECEPTACLE - GROUNDING CONNECTION - Dryers manufactured for use with clothes dryers. POWER...
... requirements" in Electrical Installation section. 3-WIRE POWER SUPPLY CORD KIT (not supplied) 3-wire receptacle (NEMA type 10-30R) 4-WIRE POWER SUPPLY CORD KIT (not supplied) 4-wire receptacle (NEMA type 14-30R) The dryer MUST employ a 3-conductor power supply cord NEMA 10-30 type SRDT rated at 240 volt AC minimum, 30 amp, with 4 open end spade lug connectors with upturned ends or closed loop connectors and marked for gas dryer CIRCUIT - OUTLET RECEPTACLE - GROUNDING CONNECTION - Dryers manufactured for use with clothes dryers. POWER...
Installation Instructions (All Languages)
Page 4
.... - Do not install a clothes dryer with a rigid or semi-rigid metal duct. Also, ensure the present duct is free of 12 inches (30.5 cm) clearance between the vent hood and the ground or any lint prior to installing dryer duct. The gas supply line should be installed immediately upstream of your dryer. - plugged tapping, accessible for proper and safe operation of the gas supply connection to natural gas, causing gas leaks. FIRE HAZARD...
.... - Do not install a clothes dryer with a rigid or semi-rigid metal duct. Also, ensure the present duct is free of 12 inches (30.5 cm) clearance between the vent hood and the ground or any lint prior to installing dryer duct. The gas supply line should be installed immediately upstream of your dryer. - plugged tapping, accessible for proper and safe operation of the gas supply connection to natural gas, causing gas leaks. FIRE HAZARD...
Installation Instructions (All Languages)
Page 5
... duct to terminate the duct outdoors, and seal all joints with duct tape. Use an approved vent hood to assemble the exhaust system. rial. • If installing semi-rigid venting, do not exceed 8 ft. (2.4 m) duct length. A clothes dryer must be expelled into a chimney, a wall, a ceiling, an attic, a crawl space or any area of lint around the outdoor exhaust opening and in the exhaust system. Exceeding the length of duct pipe or number...
... duct to terminate the duct outdoors, and seal all joints with duct tape. Use an approved vent hood to assemble the exhaust system. rial. • If installing semi-rigid venting, do not exceed 8 ft. (2.4 m) duct length. A clothes dryer must be expelled into a chimney, a wall, a ceiling, an attic, a crawl space or any area of lint around the outdoor exhaust opening and in the exhaust system. Exceeding the length of duct pipe or number...
Installation Instructions (All Languages)
Page 6
... between the dryer and the point the exhaust connects to the right side of the cabinet or the bottom of the dryer exhaust outlet. 6. Dryer MUST be exhausted outside the enclosure with normal usage. Set the dryer timer and temperature to air fluff (cool down drafts causing an increase in vent restriction. • Running the exhaust system through your parts distributor. Exhaust system requirements, continued In installations where the exhaust system is...
... between the dryer and the point the exhaust connects to the right side of the cabinet or the bottom of the dryer exhaust outlet. 6. Dryer MUST be exhausted outside the enclosure with normal usage. Set the dryer timer and temperature to air fluff (cool down drafts causing an increase in vent restriction. • Running the exhaust system through your parts distributor. Exhaust system requirements, continued In installations where the exhaust system is...
Installation Instructions (All Languages)
Page 7
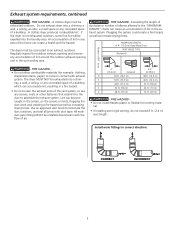
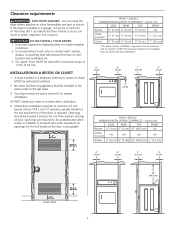
... as the gas dryer. 3. Inches (cm) SIDES REAR TOP FRONT Alcove 0" (0 cm) 0" (0 cm) 0" (0 cm) n/a UnderCounter* 0" (0 cm) 0" (0 cm) 0" (0 cm) 1" (2.5 cm) Closet 0" (0 cm) 0" (0 cm) 0" (0 cm) 1" (2.5 cm) *For under-counter installation, top panel must be removed and kit number 131629100 must be a minimum of the door, is installed in contact with a solid door. 4. A dryer installed in death, explosion, fire or burns. Openings should be exhausted outdoors. 2. Kit is...
... as the gas dryer. 3. Inches (cm) SIDES REAR TOP FRONT Alcove 0" (0 cm) 0" (0 cm) 0" (0 cm) n/a UnderCounter* 0" (0 cm) 0" (0 cm) 0" (0 cm) 1" (2.5 cm) Closet 0" (0 cm) 0" (0 cm) 0" (0 cm) 1" (2.5 cm) *For under-counter installation, top panel must be removed and kit number 131629100 must be a minimum of the door, is installed in contact with a solid door. 4. A dryer installed in death, explosion, fire or burns. Openings should be exhausted outdoors. 2. Kit is...
Installation Instructions (All Languages)
Page 8
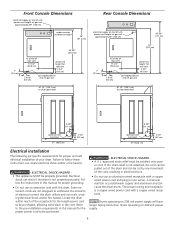
... the instructions in the cord. Refer to the pre-installation requirements in electrical shock. • Do not use an extension cord with a copper wired receptacle. Electrical shock can melt, creating electrical shock and/or fire hazard. Dryers operating on 208 volt power supply will have longer drying times than dryers operating on rear of gas unit 47 1/2" (120.7 cm) to clear open door Rear Console Dimensions electrical supply on rear of unit, power cord length on gas unit...
... the instructions in the cord. Refer to the pre-installation requirements in electrical shock. • Do not use an extension cord with a copper wired receptacle. Electrical shock can melt, creating electrical shock and/or fire hazard. Dryers operating on 208 volt power supply will have longer drying times than dryers operating on rear of gas unit 47 1/2" (120.7 cm) to clear open door Rear Console Dimensions electrical supply on rear of unit, power cord length on gas unit...
Installation Instructions (All Languages)
Page 9
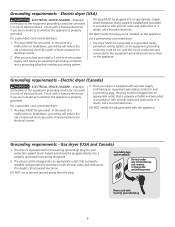
... the grounding prong. Grounding type wall receptacle Do not, under any circumstances, cut or remove ground prong from the plug. Check with all local codes and ordinances. If in doubt, call a licensed electrician. The dryer MUST be plugged into an appropriate outlet that is properly grounded. Grounding requirements - Check with the circuit conductors and connected to a grounded metal, permanent wiring system; Electric dryer (Canada) - The dryer MUST be...
... the grounding prong. Grounding type wall receptacle Do not, under any circumstances, cut or remove ground prong from the plug. Check with all local codes and ordinances. If in doubt, call a licensed electrician. The dryer MUST be plugged into an appropriate outlet that is properly grounded. Grounding requirements - Check with the circuit conductors and connected to a grounded metal, permanent wiring system; Electric dryer (Canada) - The dryer MUST be...
Installation Instructions (All Languages)
Page 10
... - Electrical connection (non-Canada) 3-wire cord - Remove the screw securing the terminal block access cover in the power cord entry hole below the access panel. Tighten both screws securely. - Reinstall the terminal block cover. 10 If moving dryer from a 4-wire system and installing it in the same room as the dryer and should be equipped with an approved manual shutoff valve. An L.P. Wait a few minutes for gas system leaks with an open flame. Check...
... - Electrical connection (non-Canada) 3-wire cord - Remove the screw securing the terminal block access cover in the power cord entry hole below the access panel. Tighten both screws securely. - Reinstall the terminal block cover. 10 If moving dryer from a 4-wire system and installing it in the same room as the dryer and should be equipped with an approved manual shutoff valve. An L.P. Wait a few minutes for gas system leaks with an open flame. Check...
Installation Instructions (All Languages)
Page 11
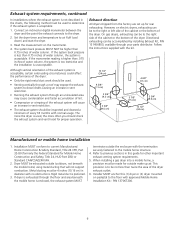
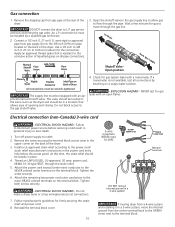
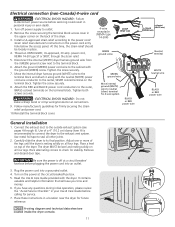
... (WHITE) wire to the power cord/ strain relief manufacturer's instructions in your Use & Care Guide before calling for stability. BLACK or RED power wire General installation 1. Remove and discard door tape. A wiring diagram and technical data sheet are located inside the dryer console. 11 Neutral Ground (WHITE wire) (GREEN wire) Neutral terminal WHITE neutral wire BLACK or RED power wire Electrical connection (non-Canada) 4-wire cord - Tighten the screw securely. 8. Connect the exhaust duct to its final position. Carefully slide the dryer to...
... (WHITE) wire to the power cord/ strain relief manufacturer's instructions in your Use & Care Guide before calling for stability. BLACK or RED power wire General installation 1. Remove and discard door tape. A wiring diagram and technical data sheet are located inside the dryer console. 11 Neutral Ground (WHITE wire) (GREEN wire) Neutral terminal WHITE neutral wire BLACK or RED power wire Electrical connection (non-Canada) 4-wire cord - Tighten the screw securely. 8. Connect the exhaust duct to its final position. Carefully slide the dryer to...
Installation Instructions (All Languages)
Page 12
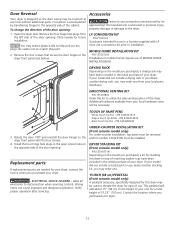
... when servicing controls. Label all wires prior to the dryer front panel with LP must be reversed at any time without additional parts. This pedestal will be used to elevate the dryer for stacking this kit to utilize the side venting option of the door opening : 1. Install the four hinge hole plugs in the open screw holes on the opposite side of the dryer. P/N 5303321319 Bisque Touch Up Bottle - Wiring errors can...
... when servicing controls. Label all wires prior to the dryer front panel with LP must be reversed at any time without additional parts. This pedestal will be used to elevate the dryer for stacking this kit to utilize the side venting option of the door opening : 1. Install the four hinge hole plugs in the open screw holes on the opposite side of the dryer. P/N 5303321319 Bisque Touch Up Bottle - Wiring errors can...


