
Complete Owner's Guide (English)
Page 2
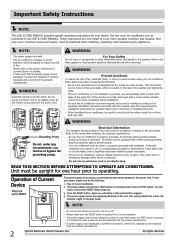
...It must be repaired. Save this device to operating. Refer to the separate installation instructions provided with a cord from sharp metal fins on the serial plate. Important Safety Instructions NOTE: This USE & CARE MANUAL provides specific operating instructions for your power supply cord do the following : Be... model you will notice a click as the button engages. WARNING For Your Safety Do not store or use this manual and the installation instructions for possible future use an extension cord or an adaptor plug. To test your model. You will have a qualified electrician...
...It must be repaired. Save this device to operating. Refer to the separate installation instructions provided with a cord from sharp metal fins on the serial plate. Important Safety Instructions NOTE: This USE & CARE MANUAL provides specific operating instructions for your power supply cord do the following : Be... model you will notice a click as the button engages. WARNING For Your Safety Do not store or use this manual and the installation instructions for possible future use an extension cord or an adaptor plug. To test your model. You will have a qualified electrician...
Installation Instructions (All Languages)
Page 1
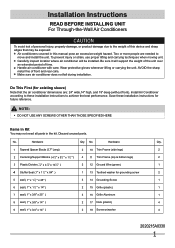
... OTHER THAN THOSE SPECIFIED HERE Items in this manual pose an excessive weight hazard. AVOID the sharp metal fins of front and rear coils. Two or more people are : 24" wide,14" high, and 19" deep (without front). Save these installation instructions to move and install the unit. Discard unused parts. Hardware Qty...
... OTHER THAN THOSE SPECIFIED HERE Items in this manual pose an excessive weight hazard. AVOID the sharp metal fins of front and rear coils. Two or more people are : 24" wide,14" high, and 19" deep (without front). Save these installation instructions to move and install the unit. Discard unused parts. Hardware Qty...
Installation Instructions (All Languages)
Page 4
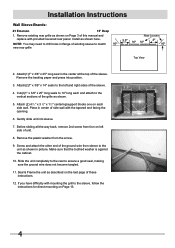
... seal, making sure the ground wire does not become tangled. 11. Attach(1)1" x 3/8" x 25" long seal in center of this manual and replace with provided louvered rear panel. Remove the plastic washer from fron on Page 3 of side wall with mounting the grill to ...3/8" x 14" seals to the vertical sections of the sleeve. 4. Cut(2)1" x 3/8" x 25" long seals to 14" long each side wall. Install as shown. 5. NOTE: You may need to drill holes in picture. Installation Instructions Wall Sleeve Brands: #1 Emerson 15" Deep 1. Remove the backing paper and press into sleeve. 7.
... seal, making sure the ground wire does not become tangled. 11. Attach(1)1" x 3/8" x 25" long seal in center of this manual and replace with provided louvered rear panel. Remove the plastic washer from fron on Page 3 of side wall with mounting the grill to ...3/8" x 14" seals to the vertical sections of the sleeve. 4. Cut(2)1" x 3/8" x 25" long seals to 14" long each side wall. Install as shown. 5. NOTE: You may need to drill holes in picture. Installation Instructions Wall Sleeve Brands: #1 Emerson 15" Deep 1. Remove the backing paper and press into sleeve. 7.
Installation Instructions (All Languages)
Page 5
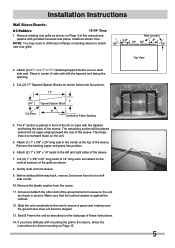
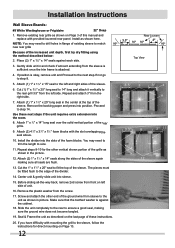
... on left and right sides of these instructions. 14. Make sure that the toothed washer is placed in front of the rib on the unit. 5. Install as shown below into two pieces. 17" 1" 3/4" Tapered Spacer Block Cut Here 4" protection Paper Backing 4. Remove the backing paper and press into sleeve. 9. Cut... 80º Top View 2. Attach (2) 1" x 3/8" x 14" seals to the left side of existing sleeve to the vertical sections of this manual and replace with the tapered end facing the opening. 3. NOTE: You may need to ensure a good seal, making sure the ground wire does not ...
... on left and right sides of these instructions. 14. Make sure that the toothed washer is placed in front of the rib on the unit. 5. Install as shown below into two pieces. 17" 1" 3/4" Tapered Spacer Block Cut Here 4" protection Paper Backing 4. Remove the backing paper and press into sleeve. 9. Cut... 80º Top View 2. Attach (2) 1" x 3/8" x 14" seals to the left side of existing sleeve to the vertical sections of this manual and replace with the tapered end facing the opening. 3. NOTE: You may need to ensure a good seal, making sure the ground wire does not ...
Installation Instructions (All Languages)
Page 6
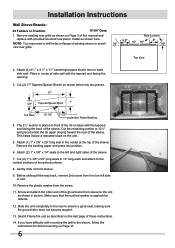
... back of the sleeve. 7. Cut (2) 17" Tapered Spacer Blocks as described on base with mounting the grill to the vertical sections of this manual and replace with the tapered end facing the opening. 3. Gently slide unit into position. 6. Slide the unit completely to the rear to 12 ... from the screw. 11. Make sure that the toothed washer is placed in picture. Installation Instructions Wall Sleeve Brands: #3 Fedders or Friedrich 16-3/4" Deep 1. Remove existing rear grille as shown here. Install as shown on the unit. 5. Place in the center at the top of side wall...
... back of the sleeve. 7. Cut (2) 17" Tapered Spacer Blocks as described on base with mounting the grill to the vertical sections of this manual and replace with the tapered end facing the opening. 3. Gently slide unit into position. 6. Slide the unit completely to the rear to 12 ... from the screw. 11. Make sure that the toothed washer is placed in picture. Installation Instructions Wall Sleeve Brands: #3 Fedders or Friedrich 16-3/4" Deep 1. Remove existing rear grille as shown here. Install as shown on the unit. 5. Place in the center at the top of side wall...

Installation Instructions (All Languages)
Page 7
... on Page 3 of the sleeve. Seal & Frame the unit as shown in the center at the top of this manual and replace with provided louvered rear panel. Install as shown with mounting the grill to the unit as described on the unit. 4. Center unit & gently slide unit ...into sleeve. 8. Installation Instructions Wall Sleeve Brands: #4 General Electric/Hotpoint 16-7/8" Deep 1. Install as shown on left and right sides of the sleeve. Remove existing rear grille as shown here. Screw and attach...
... on Page 3 of the sleeve. Seal & Frame the unit as shown in the center at the top of this manual and replace with provided louvered rear panel. Install as shown with mounting the grill to the unit as described on the unit. 4. Center unit & gently slide unit ...into sleeve. 8. Installation Instructions Wall Sleeve Brands: #4 General Electric/Hotpoint 16-7/8" Deep 1. Install as shown on left and right sides of the sleeve. Remove existing rear grille as shown here. Screw and attach...

Installation Instructions (All Languages)
Page 8
...unit as shown. 7. Before sliding all-the-way back, remove 2nd screw from the back of the grille as described on the unit. 4. Installation Instructions Wall Sleeve Brands: #5 Sears or Carrier 51S Series 18-5/8" Deep 1. NOTE: You may need to drill holes in flange of existing ...Attach (1) 1" x 3/8" x 25" long seal in picture. Slide the unit completely to the rear to the floor of this manual and replace with provided louvered rear panel. Install (2) tapered spacer blocks to ensure a good seal, making sure the ground wire does not become tangled. 12. If you have ...
...unit as shown. 7. Before sliding all-the-way back, remove 2nd screw from the back of the grille as described on the unit. 4. Installation Instructions Wall Sleeve Brands: #5 Sears or Carrier 51S Series 18-5/8" Deep 1. NOTE: You may need to drill holes in flange of existing ...Attach (1) 1" x 3/8" x 25" long seal in picture. Slide the unit completely to the rear to the floor of this manual and replace with provided louvered rear panel. Install (2) tapered spacer blocks to ensure a good seal, making sure the ground wire does not become tangled. 12. If you have ...

Installation Instructions (All Languages)
Page 9
... as shown here. If you have difficulty with provided louvered rear panel. Installation Instructions Wall Sleeve Brands: #6 Whirlpool 17-1/8" Deep 1. Install as shown. Install to the floor of existing sleeve to drill holes in the center at the top of this manual and replace with mounting the grill to the sleeve, follow the instructions...
... as shown here. If you have difficulty with provided louvered rear panel. Installation Instructions Wall Sleeve Brands: #6 Whirlpool 17-1/8" Deep 1. Install as shown. Install to the floor of existing sleeve to drill holes in the center at the top of this manual and replace with mounting the grill to the sleeve, follow the instructions...

Installation Instructions (All Languages)
Page 10
...the cabinet. 19. If position is attached. 4. Screw and attach the other vertical shown portion of the sleeve. Installation Instructions Wall Sleeve Brands: #7 Whirlpool 23" Deep 1. Install as shown on the last page of the sleeve again making sure the ground wire does not become tangled. 20....here. NOTE: You may need to the unit as described on Page 3 of the foam blocks. Install the divider into sleeve. 16. Center unit & gently slide unit into the slots of this manual and replace with provided louvered rear panel. Attach (1) 1" x 1 1 2" x 25" long...
...the cabinet. 19. If position is attached. 4. Screw and attach the other vertical shown portion of the sleeve. Installation Instructions Wall Sleeve Brands: #7 Whirlpool 23" Deep 1. Install as shown on the last page of the sleeve again making sure the ground wire does not become tangled. 20....here. NOTE: You may need to the unit as described on Page 3 of the foam blocks. Install the divider into sleeve. 16. Center unit & gently slide unit into the slots of this manual and replace with provided louvered rear panel. Attach (1) 1" x 1 1 2" x 25" long...
Installation Instructions (All Languages)
Page 11
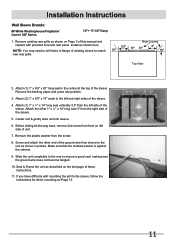
Install as described on Page 3 of this manual and replace with mounting the grill to the sleeve, follow the instructions for direct mounting on left side of the sleeve. 5. Attach (2) 1" x 3/8" x 14" seals to ..." long seal vertically 3.5" from sleeve to match 80º new rear grille Rear Louvers 50º 50º 80º Top View 2. Installation Instructions Wall Sleeve Brands: #8 White Westinghouse/Frigidaire/ Carrier 52F Series 16"+ 17-1/2" Deep 1. Remove existing rear grille as shown in flange of existing sleeve to the unit as shown...
Install as described on Page 3 of this manual and replace with mounting the grill to the sleeve, follow the instructions for direct mounting on left side of the sleeve. 5. Attach (2) 1" x 3/8" x 14" seals to ..." long seal vertically 3.5" from sleeve to match 80º new rear grille Rear Louvers 50º 50º 80º Top View 2. Installation Instructions Wall Sleeve Brands: #8 White Westinghouse/Frigidaire/ Carrier 52F Series 16"+ 17-1/2" Deep 1. Remove existing rear grille as shown in flange of existing sleeve to the unit as shown...
Installation Instructions (All Languages)
Page 12
Install the divider into position. Remove the plastic washer from front on Page 3 of this manual and replace with the slot overlapping the seal above. 10. Slide the unit completely to the rear to ensure a good seal, making sure all ...page of the ground wire from the right side. 7. Use these instructions. 20. Make sure that the toothed washer is attached. 4. Installation Instructions Wall Sleeve Brands: #9 White Westinghouse or Frigidaire 22" Deep 1. Proceed to fit the top of the increased unit depth, first try dry fitting using the method described below: 2....
Install the divider into position. Remove the plastic washer from front on Page 3 of this manual and replace with the slot overlapping the seal above. 10. Slide the unit completely to the rear to ensure a good seal, making sure all ...page of the ground wire from the right side. 7. Use these instructions. 20. Make sure that the toothed washer is attached. 4. Installation Instructions Wall Sleeve Brands: #9 White Westinghouse or Frigidaire 22" Deep 1. Proceed to fit the top of the increased unit depth, first try dry fitting using the method described below: 2....

