Complete Owner's Guide (English)
Page 1
All about the Use &Care of your Refrigerator 242108500 (January 2010) TABLE OF CONTENTS Important Safety Instructions 2 Features at a Glance 4 Installation 5 Door Removal Instructions 7 Handle Installation 8 Connecting Water Supply 9 Controls 10 Storage Features 12 Automatic Ice & Water Dispenser 13 Changing the Filter 15 Normal Operating Sounds and Sights 17 Care and Cleaning 18 Before you Call 19 Major Appliance Warranty 21 www.frigidaire.com USA 1-800-944-9044 www.frigidaire.ca Canada 1-800-265-8352
All about the Use &Care of your Refrigerator 242108500 (January 2010) TABLE OF CONTENTS Important Safety Instructions 2 Features at a Glance 4 Installation 5 Door Removal Instructions 7 Handle Installation 8 Connecting Water Supply 9 Controls 10 Storage Features 12 Automatic Ice & Water Dispenser 13 Changing the Filter 15 Normal Operating Sounds and Sights 17 Care and Cleaning 18 Before you Call 19 Major Appliance Warranty 21 www.frigidaire.com USA 1-800-944-9044 www.frigidaire.ca Canada 1-800-265-8352
Complete Owner's Guide (English)
Page 2
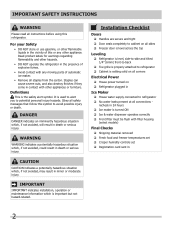
... Registration card sent in Ice Maker House water supply connected to refrigerator No water leaks present at all connections - Obey all safety messages that follow this refrigerator. IMPORTANT IMPORTANT indicates installation, operation or maintenance information which , if not avoided...water dispenser operates correctly Front filter must be flush with any other hazards. • DO NOT operate the refrigerator in minor or moderate injury. Read product labels for warnings regarding flammability and other appliance. Important Safety Instructions WARNING Please ...
... Registration card sent in Ice Maker House water supply connected to refrigerator No water leaks present at all connections - Obey all safety messages that follow this refrigerator. IMPORTANT IMPORTANT indicates installation, operation or maintenance information which , if not avoided...water dispenser operates correctly Front filter must be flush with any other hazards. • DO NOT operate the refrigerator in minor or moderate injury. Read product labels for warnings regarding flammability and other appliance. Important Safety Instructions WARNING Please ...
Complete Owner's Guide (English)
Page 3
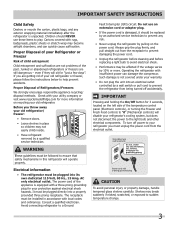
...controls) will sit for "just a few days". WARNING These guidelines must be followed to ensure that safety mechanisms in this refrigerator will operate properly. It must be plugged directly into a properly grounded three prong receptacle. Shelves may become airtight chambers, and... can damage the compressor. Cartons covered with your utility company or visit www.recyclemyoldfridge.com for your old refrigerator/ freezer: • Remove doors. • Leave shelves in accordance with local codes and ordinances. Important Safety Instructions Child...
...controls) will sit for "just a few days". WARNING These guidelines must be followed to ensure that safety mechanisms in this refrigerator will operate properly. It must be plugged directly into a properly grounded three prong receptacle. Shelves may become airtight chambers, and... can damage the compressor. Cartons covered with your utility company or visit www.recyclemyoldfridge.com for your old refrigerator/ freezer: • Remove doors. • Leave shelves in accordance with local codes and ordinances. Important Safety Instructions Child...
Complete Owner's Guide (English)
Page 5
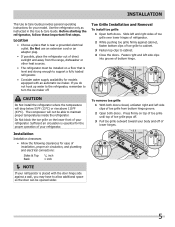
... drop below 55°F (13°C) or rise above 110°F (43°C). Slide left and right sides of toe grille over lower hinges of refrigerator. 2 While pushing toe grille firmly against a wall, you may have to allow additional space so the door can be able to cabinet. 4 Close the ... body and off of lower hinges. 5 Fasten right and left side clips of toe grille from the range, dishwasher or other heat sources. • The refrigerator must be installed on a floor that is placed with an automatic ice maker. To remove toe grille 1 With both doors closed, unfasten right and left...
... drop below 55°F (13°C) or rise above 110°F (43°C). Slide left and right sides of toe grille over lower hinges of refrigerator. 2 While pushing toe grille firmly against a wall, you may have to allow additional space so the door can be able to cabinet. 4 Close the ... body and off of lower hinges. 5 Fasten right and left side clips of toe grille from the range, dishwasher or other heat sources. • The refrigerator must be installed on a floor that is placed with an automatic ice maker. To remove toe grille 1 With both doors closed, unfasten right and left...
Complete Owner's Guide (English)
Page 6
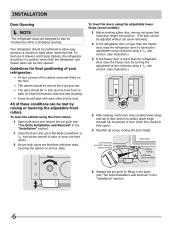
...be fully opened. For best use a flat-blade screwdriver or 3/8 inch socket wrench to raise or lower the front rollers. 3 Ensure both the refrigerator and freezer doors can be positioned to allow easy access to fully open). 5 Reinstall set screw, locking the door height. 7/16" Wrench and 3/...that doors close and seal properly). • Doors should be met by themselves within a 20 degree opening. Guidelines for final positioning of your refrigerator: • All four corners of door (from front to back (to shut by raising or lowering the adjustable front rollers. To level ...
...be fully opened. For best use a flat-blade screwdriver or 3/8 inch socket wrench to raise or lower the front rollers. 3 Ensure both the refrigerator and freezer doors can be positioned to allow easy access to fully open). 5 Reinstall set screw, locking the door height. 7/16" Wrench and 3/...that doors close and seal properly). • Doors should be met by themselves within a 20 degree opening. Guidelines for final positioning of your refrigerator: • All four corners of door (from front to back (to shut by raising or lowering the adjustable front rollers. To level ...
Complete Owner's Guide (English)
Page 7
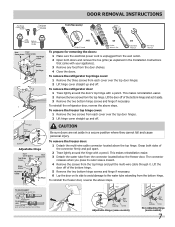
...top hinge and pull the multi-wire cable through it aside. 3 Remove the two bottom hinge screws and hinge if necessary. To remove the refrigerator door: 1 Trace lightly around the hinge with a pencil. Door Removal Instructions Top Hinge Cover Front Screw Top Hinge Cover Rear Screw Tools Necessary:...doors and remove the toe grille (as explained in a secure position where they cannot fall and cause personal injury. TO DISCONNECT 1. To remove the refrigerator top hinge cover: 1 Remove the three screws from each cover over the top door hinges. 2 Lift hinge cover straight up and off . To...
...top hinge and pull the multi-wire cable through it aside. 3 Remove the two bottom hinge screws and hinge if necessary. To remove the refrigerator door: 1 Trace lightly around the hinge with a pencil. Door Removal Instructions Top Hinge Cover Front Screw Top Hinge Cover Rear Screw Tools Necessary:...doors and remove the toe grille (as explained in a secure position where they cannot fall and cause personal injury. TO DISCONNECT 1. To remove the refrigerator top hinge cover: 1 Remove the three screws from each cover over the top door hinges. 2 Lift hinge cover straight up and off . To...
Complete Owner's Guide (English)
Page 8
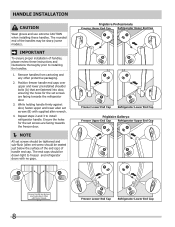
... of the end cap) of handles, please review these handles. Frigidaire Professional® Freezer Upper End Cap Refrigerator Upper End Cap Freezer Lower End Cap Refrigerator Lower End Cap Frigidaire Gallery® Freezer Upper End Cap Refrigerator Upper End Cap Freezer Lower End Cap Refrigerator Lower End Cap 8 handle installation CAUTION Wear gloves and use extreme...
... of the end cap) of handles, please review these handles. Frigidaire Professional® Freezer Upper End Cap Refrigerator Upper End Cap Freezer Lower End Cap Refrigerator Lower End Cap Frigidaire Gallery® Freezer Upper End Cap Refrigerator Upper End Cap Freezer Lower End Cap Refrigerator Lower End Cap 8 handle installation CAUTION Wear gloves and use extreme...
Complete Owner's Guide (English)
Page 9
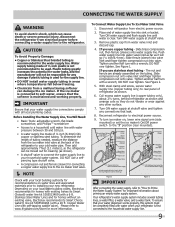
... Supply Line, You Will Need: • Basic Tools: adjustable wrench, flat-blade screwdriver, and PhillipsTM screwdriver • Access to www.frigidaire.com/store for homes without an existing valve, Electrolux recommends its Smart Choice® water line kit 5305513409 (with a wrench; See Figure...Steel Water Line) and for more information. Tighten another half turn ice maker on water lines and associated materials prior to your new refrigerator. To turn with a 6 ft. Coil excess water supply line (copper tubing only), about priming an empty water supply system....
... Supply Line, You Will Need: • Basic Tools: adjustable wrench, flat-blade screwdriver, and PhillipsTM screwdriver • Access to www.frigidaire.com/store for homes without an existing valve, Electrolux recommends its Smart Choice® water line kit 5305513409 (with a wrench; See Figure...Steel Water Line) and for more information. Tighten another half turn ice maker on water lines and associated materials prior to your new refrigerator. To turn with a 6 ft. Coil excess water supply line (copper tubing only), about priming an empty water supply system....
Complete Owner's Guide (English)
Page 10
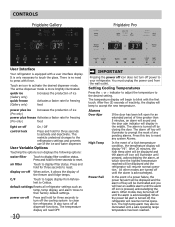
Controls Frigidaire Gallery Frigidaire Pro User Interface Your refrigerator is equipped with force. Touch an icon to clean the refrigerator. display on -off On / Off control lock Press and hold for three seconds to turn off icon is pressed, acknowledging the alarm. ... and the door ajar indicator will read OFF. 10 IMPORTANT Pressing the power off icon does not turn off key will be displayed and the refrigerator will resume normal operation. quick ice (Gallery only) quick freeze (Gallery only) Increases the production of ice Activates a faster rate for three...
Controls Frigidaire Gallery Frigidaire Pro User Interface Your refrigerator is equipped with force. Touch an icon to clean the refrigerator. display on -off On / Off control lock Press and hold for three seconds to turn off icon is pressed, acknowledging the alarm. ... and the door ajar indicator will read OFF. 10 IMPORTANT Pressing the power off icon does not turn off key will be displayed and the refrigerator will resume normal operation. quick ice (Gallery only) quick freeze (Gallery only) Increases the production of ice Activates a faster rate for three...
Complete Owner's Guide (English)
Page 11
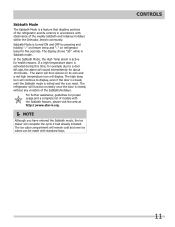
The alarm will then silence on refrigerator temp for health reasons. The refrigerator will display. For further assistance, guidelines for about 10 minutes. If a high temperature alarm is activated during this time, for example due to display, even ... holding "∨" on freezer temp and "∧" on its controls in Sabbath mode. Sabbath Mode The Sabbath Mode is a feature that disables portions of the refrigerator and its own and a red high temperature icon will function normally once the door is closed , until the Sabbath mode is exited and the icon...
The alarm will then silence on refrigerator temp for health reasons. The refrigerator will display. For further assistance, guidelines for about 10 minutes. If a high temperature alarm is activated during this time, for example due to display, even ... holding "∨" on freezer temp and "∧" on its controls in Sabbath mode. Sabbath Mode The Sabbath Mode is a feature that disables portions of the refrigerator and its own and a red high temperature icon will function normally once the door is closed , until the Sabbath mode is exited and the icon...

Complete Owner's Guide (English)
Page 12
...keep best in clear water and remove excess water before storing. This keeps incoming air to food and for convenient storage of the refrigerator. Crispers do not feature humidity controls. Cool Drawer (some models) Some models are provided for fast cleaning. Chill Drawer with Humidity... if nicked, scratched, or exposed to suit individual needs. SpillSafeTM glass shelves (some models) The fresh drawers, located under the bottom refrigerator shelf, are adjustable for storage of the shelf into position. Some bins are designed for storing fruits, vegetables, and other deli items....
...keep best in clear water and remove excess water before storing. This keeps incoming air to food and for convenient storage of the refrigerator. Crispers do not feature humidity controls. Cool Drawer (some models) Some models are provided for fast cleaning. Chill Drawer with Humidity... if nicked, scratched, or exposed to suit individual needs. SpillSafeTM glass shelves (some models) The fresh drawers, located under the bottom refrigerator shelf, are adjustable for storage of the shelf into position. Some bins are designed for storing fruits, vegetables, and other deli items....
Complete Owner's Guide (English)
Page 13
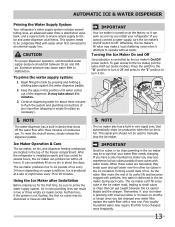
...). NOTE The water dispenser has a built-in the ice container, forming a solid mass of the dispenser. If you install your refrigerator. Press the switch to the "O" position to turn it attempts to an external supply line. IMPORTANT Your ice maker is controlled by pressing and...the system and plumbing connections of any impurities (stopping to malfunction. To reset this position until water comes out of ice. After the refrigerator is not flushed, the first ice cubes may require the filter to the ice and water dispenser at all times. Automatic Ice & ...
...). NOTE The water dispenser has a built-in the ice container, forming a solid mass of the dispenser. If you install your refrigerator. Press the switch to the "O" position to turn it attempts to an external supply line. IMPORTANT Your ice maker is controlled by pressing and...the system and plumbing connections of any impurities (stopping to malfunction. To reset this position until water comes out of ice. After the refrigerator is not flushed, the first ice cubes may require the filter to the ice and water dispenser at all times. Automatic Ice & ...
Complete Owner's Guide (English)
Page 14
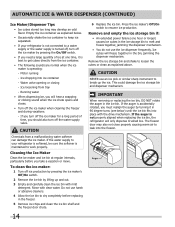
If the water supply to your refrigerator is not connected to a water supply or the water supply is turned off, turn off the ice maker when cleaning the freezer and during vacations. - ... degree turns (see below . • Occasionally shake the ice container to keep ice separated. • If your refrigerator is softened, be sure the softener is not properly aligned when replacing the ice bin, the refrigerator will hear a snapping or clicking sound when the ice chute opens and closes. • Turn off the...
If the water supply to your refrigerator is not connected to a water supply or the water supply is turned off, turn off the ice maker when cleaning the freezer and during vacations. - ... degree turns (see below . • Occasionally shake the ice container to keep ice separated. • If your refrigerator is softened, be sure the softener is not properly aligned when replacing the ice bin, the refrigerator will hear a snapping or clicking sound when the ice chute opens and closes. • Turn off the...
Complete Owner's Guide (English)
Page 15
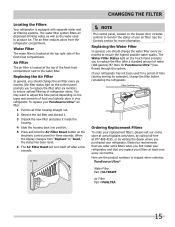
...as well as the water used for a period of the fresh food compartment next to replace the filter after a standard amount of your refrigerator. To replace your filters at the top right side of food you to the water filter. See the Controls section for three seconds. .... If your refrigerator has not been used to request when ordering: PureSource UltraTM Water Filter Part #ULTRAWF Air Filter Part #PAULTRA 15 Here are the product numbers to produce ice. Ordering Replacement Filters To order your replacement filters, please visit our online store at www.frigidaire.com/store,...
...as well as the water used for a period of the fresh food compartment next to replace the filter after a standard amount of your refrigerator. To replace your filters at the top right side of food you to the water filter. See the Controls section for three seconds. .... If your refrigerator has not been used to request when ordering: PureSource UltraTM Water Filter Part #ULTRAWF Air Filter Part #PAULTRA 15 Here are the product numbers to produce ice. Ordering Replacement Filters To order your replacement filters, please visit our online store at www.frigidaire.com/store,...
Complete Owner's Guide (English)
Page 17
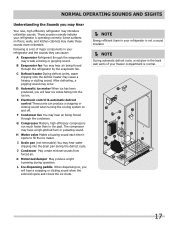
...-pitched hum or pulsating sound. The compressor may occur. J Condenser May create minimal sounds from forced air. Following is a list of your refrigerator is normal. 17 I Drain pan (not removable) You may cause a hissing or sizzling sound. G Compressor Modern, high-efficiency compressors run... much faster than in the back wall vents of major components in your refrigerator and the sounds they can produce a snapping or clicking sound when turning the cooling system on floors, walls, and kitchen cabinets...
...-pitched hum or pulsating sound. The compressor may occur. J Condenser May create minimal sounds from forced air. Following is a list of your refrigerator is normal. 17 I Drain pan (not removable) You may cause a hissing or sizzling sound. G Compressor Modern, high-efficiency compressors run... much faster than in the back wall vents of major components in your refrigerator and the sounds they can produce a snapping or clicking sound when turning the cooling system on floors, walls, and kitchen cabinets...
Complete Owner's Guide (English)
Page 18
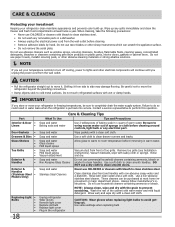
... or damp hands. These cleaners can scratch the appliance surface. • Do not remove the serial plate. Wipe up . Do not touch refrigerated surfaces with sudsy cloth or sponge. Part Interior & Door • Liners • Door Gaskets • Drawers & Bins • Glass Shelves... containing petroleum products on plastic parts, interior doors, gaskets or cabinet liners. Unplug refrigerator Wear gloves Remove light cover Replace old bulb Replace light cover Plug in the refrigerator CAUTION: Wear gloves when replacing light bulbs to do so could result in a dishwasher...
... or damp hands. These cleaners can scratch the appliance surface. • Do not remove the serial plate. Wipe up . Do not touch refrigerated surfaces with sudsy cloth or sponge. Part Interior & Door • Liners • Door Gaskets • Drawers & Bins • Glass Shelves... containing petroleum products on plastic parts, interior doors, gaskets or cabinet liners. Unplug refrigerator Wear gloves Remove light cover Replace old bulb Replace light cover Plug in the refrigerator CAUTION: Wear gloves when replacing light bulbs to do so could result in a dishwasher...
Complete Owner's Guide (English)
Page 19
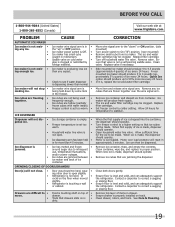
...valve. Remove any ice. When the first supply of ice is properly installed on the floor when moved slightly. • Refrigerator is • not open slightly. • Refrigerator is • being used • frequently enough. When first supply of ice is level and solid, and can adequately ...ice and water filter cartridge. Before You Call 1-800-944-9044 (United States) 1-800-265-8352 (Canada) Visit our web site at www.frigidaire.com. PROBLEM CAUSE AUTOMATIC ICE MAKER Ice maker is not mak- • Ice maker wire signal arm is dispensing slower than normal. Ice ...
...valve. Remove any ice. When the first supply of ice is properly installed on the floor when moved slightly. • Refrigerator is • not open slightly. • Refrigerator is • being used • frequently enough. When first supply of ice is level and solid, and can adequately ...ice and water filter cartridge. Before You Call 1-800-944-9044 (United States) 1-800-265-8352 (Canada) Visit our web site at www.frigidaire.com. PROBLEM CAUSE AUTOMATIC ICE MAKER Ice maker is not mak- • Ice maker wire signal arm is dispensing slower than normal. Ice ...
Complete Owner's Guide (English)
Page 20
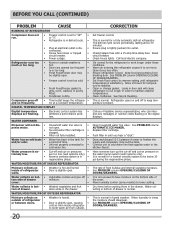
...refrigerator • Door is slightly open. • walls. Check house lights. Open doors less often. Set Fresh Food control to stabilize. Leaks in door seal will not dis- • Household water line valve is • pense water. Clean condenser. See Care & Cleaning. Call your Frigidaire...column AUTOMATIC ICE MAKER. The defrost cycle occurs periodically, lasting about 30 minutes. It is normal for a fully automatic defrost refrigerator. See PROBLEM column OPENING/CLOSING OF DOORS/DRAWERS. 20 See PROBLEM column OPENING/CLOSING OF DOORS/DRAWERS. Before You Call (...
...refrigerator • Door is slightly open. • walls. Check house lights. Open doors less often. Set Fresh Food control to stabilize. Leaks in door seal will not dis- • Household water line valve is • pense water. Clean condenser. See Care & Cleaning. Call your Frigidaire...column AUTOMATIC ICE MAKER. The defrost cycle occurs periodically, lasting about 30 minutes. It is normal for a fully automatic defrost refrigerator. See PROBLEM column OPENING/CLOSING OF DOORS/DRAWERS. 20 See PROBLEM column OPENING/CLOSING OF DOORS/DRAWERS. Before You Call (...
Complete Owner's Guide (English)
Page 21
... of this appliance that have been removed, altered or cannot be performed by Electrolux or an authorized service company. Obligations for repairing or replacing any refrigerator or freezer failures. 6. Exclusions This warranty does not cover the following: 1. Food loss due to obtain and keep all costs for service and parts under...
... of this appliance that have been removed, altered or cannot be performed by Electrolux or an authorized service company. Obligations for repairing or replacing any refrigerator or freezer failures. 6. Exclusions This warranty does not cover the following: 1. Food loss due to obtain and keep all costs for service and parts under...

Wiring Diagram (All Languages)
Page 1
...19° to -17° C -18° to -16° C -18° to -16° C -1° to 3° F -18° to -16° C Refrigerator Temperature 34° to 39° F 1° to 4° C 34° to 39° F 1° to 4° C 34° to 39° F 1° to...display when the heater is replaced, the fill volume must be shielded from housing. Water Fill Volume Remove cover by inserting screwdriver in the refrigerator temperature window will be checked. When a water valve is activated. Disconnect power cord before servicing this appliance. CONDENSER FAN MOTOR Watts RPM...
...19° to -17° C -18° to -16° C -18° to -16° C -1° to 3° F -18° to -16° C Refrigerator Temperature 34° to 39° F 1° to 4° C 34° to 39° F 1° to 4° C 34° to 39° F 1° to...display when the heater is replaced, the fill volume must be shielded from housing. Water Fill Volume Remove cover by inserting screwdriver in the refrigerator temperature window will be checked. When a water valve is activated. Disconnect power cord before servicing this appliance. CONDENSER FAN MOTOR Watts RPM...


