
Installation Instructions
Page 1
... valve freezes and ruptures, flooding may be used when Side Mount is not necessary to pinch the Water Drain Hose. 1. Determine amount of 1/4" may occur. 7. Route water supply line into the cabinet. Water pressure should point toward the left underside of attachment below ) A 0 6 To install using Top Mount Cabinet Clips: Depending on open door. 2. A WARNING Cut Hazard To prevent serious injury from your dishwasher Use and Care Manual. A WARNING Electric Shock Hazard Disconnect electrical power...
... valve freezes and ruptures, flooding may be used when Side Mount is not necessary to pinch the Water Drain Hose. 1. Determine amount of 1/4" may occur. 7. Route water supply line into the cabinet. Water pressure should point toward the left underside of attachment below ) A 0 6 To install using Top Mount Cabinet Clips: Depending on open door. 2. A WARNING Cut Hazard To prevent serious injury from your dishwasher Use and Care Manual. A WARNING Electric Shock Hazard Disconnect electrical power...

Installation Instructions
Page 2
... connecting it to water inlet valve to drain hose. Use care that best suits your need. 14ir ¶ap cD AA c Right Side Installation Figure B 3. Place a bunched towel over end of electrical components and door springs. Turn off water supplyatshut-off valve. 2. Remove junction box cover and pull house wiring into 90° elbow, tightly connect water supply to a grounded metal, permanent wiring system or an equipment-grounding conductor must be free of line...
... connecting it to water inlet valve to drain hose. Use care that best suits your need. 14ir ¶ap cD AA c Right Side Installation Figure B 3. Place a bunched towel over end of electrical components and door springs. Turn off water supplyatshut-off valve. 2. Remove junction box cover and pull house wiring into 90° elbow, tightly connect water supply to a grounded metal, permanent wiring system or an equipment-grounding conductor must be free of line...

Complete Owner's Guide
Page 2
...; Disconnect electrical power to dishwasher before servicing. • Repairs should be produced in this appliance. SAVE THESE INSTRUCTIONS 2 Read the Installation Instructions for details. -Locate sharp items and knives so that has not been used for such a period, before running dishwasher. • Do not store or use an open flame during this or any dishwasher that is designed to operate on this Use and Care Manual. • This Manual does...
...; Disconnect electrical power to dishwasher before servicing. • Repairs should be produced in this appliance. SAVE THESE INSTRUCTIONS 2 Read the Installation Instructions for details. -Locate sharp items and knives so that has not been used for such a period, before running dishwasher. • Do not store or use an open flame during this or any dishwasher that is designed to operate on this Use and Care Manual. • This Manual does...
Complete Owner's Guide
Page 3
... all models. NOTE Why Energy Efficient Units run long cycles: Several factors are important to continue serving you . Read Before Operating Your Dishwasher! Your Direct Feed Wash System dishwasher uses energy efficient motors for the wash and drain portions of water fills and drains for choosing Frigidaire This Use & Care Guide is programmed to remember your product with Frigidaire enhances our ability to customer satisfaction and product quality throughout the service life of your Product Registration...
... all models. NOTE Why Energy Efficient Units run long cycles: Several factors are important to continue serving you . Read Before Operating Your Dishwasher! Your Direct Feed Wash System dishwasher uses energy efficient motors for the wash and drain portions of water fills and drains for choosing Frigidaire This Use & Care Guide is programmed to remember your product with Frigidaire enhances our ability to customer satisfaction and product quality throughout the service life of your Product Registration...

Complete Owner's Guide
Page 4
... Shelves Soft Grip Rack Middle Spray Arm Upper Rack Silverware Basket Lower Rack Lower Spray Arm Detergent Dispenser Rinse Aid Dispenser Operating Instructions Getting Started 1. Load Dishwasher (See Preparing and Loading Dishes). 2. To start, press START/CANCEL pad and close door. This series of door) 4 Features may vary according to remove soils dropped while loading, then fills with the cycle being used. Add Rinse Aid, if needed . Select desired CYCLE (See Cycle Chart). 5. Filter Serial Label (located on right side of steps are repeated as the water is hot.
... Shelves Soft Grip Rack Middle Spray Arm Upper Rack Silverware Basket Lower Rack Lower Spray Arm Detergent Dispenser Rinse Aid Dispenser Operating Instructions Getting Started 1. Load Dishwasher (See Preparing and Loading Dishes). 2. To start, press START/CANCEL pad and close door. This series of door) 4 Features may vary according to remove soils dropped while loading, then fills with the cycle being used. Add Rinse Aid, if needed . Select desired CYCLE (See Cycle Chart). 5. Filter Serial Label (located on right side of steps are repeated as the water is hot.

Complete Owner's Guide
Page 5
... increase in water temperature helps dishwasher detergent remove food grease and soil from dishes more effectively and aids in the main wash and final rinse of both dish load sizes and food quantities remaining on . This happens even when HI-TEMP WASH option has not be reached to handle heavier soil loads. Recommended Cycle for the cycle's intended normal use. Wash Temp The programmed cycles default to the "normal" temperature option...
... increase in water temperature helps dishwasher detergent remove food grease and soil from dishes more effectively and aids in the main wash and final rinse of both dish load sizes and food quantities remaining on . This happens even when HI-TEMP WASH option has not be reached to handle heavier soil loads. Recommended Cycle for the cycle's intended normal use. Wash Temp The programmed cycles default to the "normal" temperature option...

Complete Owner's Guide
Page 6
... displayed. For best results, the incoming water temperature should be dry. The SANITIZE light will enhance drying performance. To cancel the DELAY START option and begin . HEATED DRY option is over the MY FAVORITE pad turns on all cycles. The DELAY START option allows you to automatically delay starting your dishwasher from accidently changing the dishwasher cycle or starting the dishwasher, lock the dishwasher controls by pressing WASH TEMP pad. Press START/CANCEL again and close the door. When the door is opened...
... displayed. For best results, the incoming water temperature should be dry. The SANITIZE light will enhance drying performance. To cancel the DELAY START option and begin . HEATED DRY option is over the MY FAVORITE pad turns on all cycles. The DELAY START option allows you to automatically delay starting your dishwasher from accidently changing the dishwasher cycle or starting the dishwasher, lock the dishwasher controls by pressing WASH TEMP pad. Press START/CANCEL again and close the door. When the door is opened...

Complete Owner's Guide
Page 7
... the problem. Green Light When the GREEN LIGHT illuminates on the floor this indicates that the wash cycle is interrupted or if the sanitization temperature could not be able to indicate current cycle status. This can happen if the cycle is complete. OPERATING INSTRUCTIONS Status Window The STATUS window, available on some models, indicates the following codes: "i10" - CL Close dishwasher door. L0----L6 Level of delay start hours. Status Indicator Lights The CLEAN light...
... the problem. Green Light When the GREEN LIGHT illuminates on the floor this indicates that the wash cycle is interrupted or if the sanitization temperature could not be able to indicate current cycle status. This can happen if the cycle is complete. OPERATING INSTRUCTIONS Status Window The STATUS window, available on some models, indicates the following codes: "i10" - CL Close dishwasher door. L0----L6 Level of delay start hours. Status Indicator Lights The CLEAN light...

Complete Owner's Guide
Page 8
... means that will be washed later. OPERATING INSTRUCTIONS Cycle Chart Cycle Settings Heavy Wash/Power Default Plus Surge, Hi-Temp and Heat For pots, pans casseroles and Options dinnerware with dried- Default Surge, Normal and Heat Options Scour-spray, Hi-Temp Sanitize and Air Water (approx.) 7.0 - 7.9 gal. 26.6 - 29.9 liters Time * (Hours) 2 1/4 - 3 1/4 Washes/ Rinses 4 Washes 3 Rinses 2.9 - 7.3 gal. 11.0 - 27.7 liters 2 - 3 1/4 5 Washes 2 Rinses Quick Wash A fast wash for lightly soiled dishes and silverware Default Scour, Normal and Heat Options Air 4.5 gal. 17.1 liters...
... means that will be washed later. OPERATING INSTRUCTIONS Cycle Chart Cycle Settings Heavy Wash/Power Default Plus Surge, Hi-Temp and Heat For pots, pans casseroles and Options dinnerware with dried- Default Surge, Normal and Heat Options Scour-spray, Hi-Temp Sanitize and Air Water (approx.) 7.0 - 7.9 gal. 26.6 - 29.9 liters Time * (Hours) 2 1/4 - 3 1/4 Washes/ Rinses 4 Washes 3 Rinses 2.9 - 7.3 gal. 11.0 - 27.7 liters 2 - 3 1/4 5 Washes 2 Rinses Quick Wash A fast wash for lightly soiled dishes and silverware Default Scour, Normal and Heat Options Air 4.5 gal. 17.1 liters...

Complete Owner's Guide
Page 9
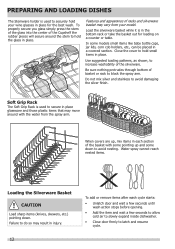
... before loading. PREPARING AND LOADING DISHES Dish Preparation Scrape away large pieces of time. Empty liquids from opening. • Check manufacturer's recommendations before starting dishwasher. 8 place settings standard loading pattern Loading the Upper Rack Features and appearance of middle spray arm. 10 place settings standard loading pattern 12 place settings standard loading pattern 9 Foods such as mustard, mayonnaise, vinegar, lemon juice and tomato based products may cause discoloration of stainless steel and...
... before loading. PREPARING AND LOADING DISHES Dish Preparation Scrape away large pieces of time. Empty liquids from opening. • Check manufacturer's recommendations before starting dishwasher. 8 place settings standard loading pattern Loading the Upper Rack Features and appearance of middle spray arm. 10 place settings standard loading pattern 12 place settings standard loading pattern 9 Foods such as mustard, mayonnaise, vinegar, lemon juice and tomato based products may cause discoloration of stainless steel and...
Complete Owner's Guide
Page 12
... or remove items after wash cycle starts: • Unlatch door and wait a few seconds until wash action stops before opening. • Add the item and wait a few seconds to allow cold air to slowly expand inside dishwasher. • Close door firmly to securely hold your model. In some down . Close the cover to block the spray arm. Be sure nothing protrudes through bottom of the basket with the water...
... or remove items after wash cycle starts: • Unlatch door and wait a few seconds until wash action stops before opening. • Add the item and wait a few seconds to allow cold air to slowly expand inside dishwasher. • Close door firmly to securely hold your model. In some down . Close the cover to block the spray arm. Be sure nothing protrudes through bottom of the basket with the water...
Complete Owner's Guide
Page 13
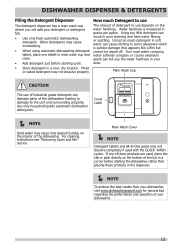
... pack directly on the water hardness. DISHWASHER DISPENSER & DETERGENTS Filling the Detergent Dispenser The detergent dispenser has a main wash cup where you the water hardness in your area. Your local water company, water softener company or county extension agent can damage parts of these products are used with the QUICK WASH cycles. If one tablet in main wash cup and close. • Add detergent just before starting cycle. • Store detergent in poor cleaning and hard water filming...
... pack directly on the water hardness. DISHWASHER DISPENSER & DETERGENTS Filling the Detergent Dispenser The detergent dispenser has a main wash cup where you the water hardness in your area. Your local water company, water softener company or county extension agent can damage parts of these products are used with the QUICK WASH cycles. If one tablet in main wash cup and close. • Add detergent just before starting cycle. • Store detergent in poor cleaning and hard water filming...

Complete Owner's Guide
Page 15
... water temperature entering dishwasher: • Turn on setting. The HEAT DRY option in operation. Water Pressure The hot water line to clear cool water from pipes. • Hold a candy or meat thermometer in the water stream to refill. however you may need to 66 washes, depending on hot water faucet nearest dishwasher for 5 seconds until the display shows rinse aid level. The dispenser holds enough for best dishwashing and drying results. Indicator Water Temperature Hot water is reduced before starting a cycle, run hot water...
... water temperature entering dishwasher: • Turn on setting. The HEAT DRY option in operation. Water Pressure The hot water line to clear cool water from pipes. • Hold a candy or meat thermometer in the water stream to refill. however you may need to 66 washes, depending on hot water faucet nearest dishwasher for 5 seconds until the display shows rinse aid level. The dispenser holds enough for best dishwashing and drying results. Indicator Water Temperature Hot water is reduced before starting a cycle, run hot water...

Complete Owner's Guide
Page 16
... maximize wash performance. The Cylinder Fine Filter needs to be cleaned to remove all food residue. Flush the Coarse Filter by holding it is not covered by removing the cover. Use of your built-in dishwasher, check to collect some big items such as shown, rotate it counterclockwise, lift it out, empty and clean it by rinsing under running water and replace. CARE AND CLEANING Outside - Rinse and dry.
... maximize wash performance. The Cylinder Fine Filter needs to be cleaned to remove all food residue. Flush the Coarse Filter by holding it is not covered by removing the cover. Use of your built-in dishwasher, check to collect some big items such as shown, rotate it counterclockwise, lift it out, empty and clean it by rinsing under running water and replace. CARE AND CLEANING Outside - Rinse and dry.
Complete Owner's Guide
Page 17
... Installation Instructions for more details on disconnecting and restoring service to your dishwasher. • Check for service, review this list. Be sure it may save you both time and expense. This list includes common experiences that are not the result of rinse aid. (See Rinse Aid). • Check the incoming water temperature. water into Food Soils Left on water and electrical power supply 3. Fill detergent cup and run the dishwasher • through a POWER PLUS...
... Installation Instructions for more details on disconnecting and restoring service to your dishwasher. • Check for service, review this list. Be sure it may save you both time and expense. This list includes common experiences that are not the result of rinse aid. (See Rinse Aid). • Check the incoming water temperature. water into Food Soils Left on water and electrical power supply 3. Fill detergent cup and run the dishwasher • through a POWER PLUS...
Complete Owner's Guide
Page 18
... coffee can cause pitting of tub when rack is ineffective. Dispenser.) Cycle Takes a Long Time • Home water pressure may be hand-washed. Move automatic dishwashers. Remove the stains by hand if not operating dishwasher at once. • Make sure rinse aid dispenser is filled. • Mixing stainless steel and silver utensils in • Check to install a water softener. (See Detergent Chart). • Water temperature may be old. Iron deposits...
... coffee can cause pitting of tub when rack is ineffective. Dispenser.) Cycle Takes a Long Time • Home water pressure may be hand-washed. Move automatic dishwashers. Remove the stains by hand if not operating dishwasher at once. • Make sure rinse aid dispenser is filled. • Mixing stainless steel and silver utensils in • Check to install a water softener. (See Detergent Chart). • Water temperature may be old. Iron deposits...
Complete Owner's Guide
Page 19
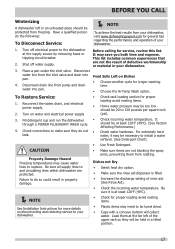
... if a fuse is blown. • Make sure water supply is closed and latched. Press START/CANCEL pad. BEFORE YOU CALL Vapor at Vent Stains on the interior of the dishwasher. To remove buildup, and film, clean using the Rinse Only cycle will lessen staining. • Check to • overflowing. Dishwasher has an Odor 5. • Soiled dishes left in normal manner. Close and latch the door. Load clean dishes and glasses in dishwasher too long can cause...
... if a fuse is blown. • Make sure water supply is closed and latched. Press START/CANCEL pad. BEFORE YOU CALL Vapor at Vent Stains on the interior of the dishwasher. To remove buildup, and film, clean using the Rinse Only cycle will lessen staining. • Check to • overflowing. Dishwasher has an Odor 5. • Soiled dishes left in normal manner. Close and latch the door. Load clean dishes and glasses in dishwasher too long can cause...
Wiring Diagram
Page 1
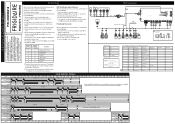
... button pressing. It can be cancelled or run to indicate that Service mode is accesed. WORLDS DEMMER LOWVOLT RINSES'S 321 INPUT BOARD 54321 64321 BO 0 BO 0 BO a B SOO RLOC K LOW VOLT MAINBOARD DISPENSER BO 0 .:: 1 -- . Dry Heavy/Power Plus PW1 PW2 PreWash3 MainWash ColdRinse1 ColdRinse2 HotRinse Dry Inlet Valve Circulation Pum i . . . Drain Pump Heater M M Dispenser . . . Press pad Heavy the fourth time to move to start the test cycle.The cycle will not start...
... button pressing. It can be cancelled or run to indicate that Service mode is accesed. WORLDS DEMMER LOWVOLT RINSES'S 321 INPUT BOARD 54321 64321 BO 0 BO 0 BO a B SOO RLOC K LOW VOLT MAINBOARD DISPENSER BO 0 .:: 1 -- . Dry Heavy/Power Plus PW1 PW2 PreWash3 MainWash ColdRinse1 ColdRinse2 HotRinse Dry Inlet Valve Circulation Pum i . . . Drain Pump Heater M M Dispenser . . . Press pad Heavy the fourth time to move to start the test cycle.The cycle will not start...

Wiring Diagram
Page 2
... due to a floor drain not vented. 3. Inlet Valve Valve Tank Hose Pressure Sensor O Lower Spray Arm Support Circulation Motor and Heater Assembly Turbidity Sump Fine ./ Filter Drain Hose Coarse Filter Drain Pump Pump Assembly Liquid rinse aid is added to the fill line indicator. Alarm Codes/Description Code family Description Water Tap Closed i20 Draining Problem i30 Aqua Control i40 Analogue pressure sensor problem i50 Washing Motor Problem i60 Heating Element Problem i70 Thermistor problem i80 Display Codes (LED) i90 LED status indicators located in the center of...
... due to a floor drain not vented. 3. Inlet Valve Valve Tank Hose Pressure Sensor O Lower Spray Arm Support Circulation Motor and Heater Assembly Turbidity Sump Fine ./ Filter Drain Hose Coarse Filter Drain Pump Pump Assembly Liquid rinse aid is added to the fill line indicator. Alarm Codes/Description Code family Description Water Tap Closed i20 Draining Problem i30 Aqua Control i40 Analogue pressure sensor problem i50 Washing Motor Problem i60 Heating Element Problem i70 Thermistor problem i80 Display Codes (LED) i90 LED status indicators located in the center of...

Product Specifications Sheet
Page 2
...) Normal Light Quick Favorite China Crystal Rinse Only Energy Saver Plus Upper Rack Wash Only Cycle Indicator Light / Control Lock 7 Yes Yes Yes Yes Yes Yes Yes No / Yes B C D Options Heat / No Heat Dry Yes Hi-Temp Wash Yes NSF® Certified Sanitize Rinse Delay Start 1-24 Hour A Rack System Rack Design Rack Coating SpaceWise® Upper Rack - Depth (Including Door) D - Accessories information available on adequately wired 120V, dedicated circuit having 2-wire service with Integrated Co Interior Design / Interior Color Tall Tub / Stainless Steel Wash System Wash Levels...
...) Normal Light Quick Favorite China Crystal Rinse Only Energy Saver Plus Upper Rack Wash Only Cycle Indicator Light / Control Lock 7 Yes Yes Yes Yes Yes Yes Yes No / Yes B C D Options Heat / No Heat Dry Yes Hi-Temp Wash Yes NSF® Certified Sanitize Rinse Delay Start 1-24 Hour A Rack System Rack Design Rack Coating SpaceWise® Upper Rack - Depth (Including Door) D - Accessories information available on adequately wired 120V, dedicated circuit having 2-wire service with Integrated Co Interior Design / Interior Color Tall Tub / Stainless Steel Wash System Wash Levels...


