Use and Care Guide
Page 1
All about the Use &Care of your Refrigerator 241979201 (May 2009) TABLE OF CONTENTS Important Safety Instructions 2 Features at a Glance 4 Installation 5 Door Removal Instructions 7 Connecting Water Supply 8 Controls 9 Storage Features 11 Automatic Ice & Water Dispenser 12 Changing the Filter 14 Normal Operating Sounds and Sights 16 Care and Cleaning 17 Before you Call 18 Major Appliance Warranty 20 www.frigidaire.com USA 1-800-944-9044 www.frigidaire.ca Canada 1-800-265-8352
All about the Use &Care of your Refrigerator 241979201 (May 2009) TABLE OF CONTENTS Important Safety Instructions 2 Features at a Glance 4 Installation 5 Door Removal Instructions 7 Connecting Water Supply 8 Controls 9 Storage Features 11 Automatic Ice & Water Dispenser 12 Changing the Filter 14 Normal Operating Sounds and Sights 16 Care and Cleaning 17 Before you Call 18 Major Appliance Warranty 20 www.frigidaire.com USA 1-800-944-9044 www.frigidaire.ca Canada 1-800-265-8352
Use and Care Guide
Page 2
... symbol. WARNING WARNING indicates a potentially hazardous situation which is used to alert you to refrigerator Cabinet is turned ON Ice & water dispenser operates correctly Front filter must be flush with filter housing (select models) Final Checks Shipping material removed Fresh food and freezer temperatures set Crisper humidity controls set Registration card sent in the vicinity of automatic ice maker. • Remove all staples from...
... symbol. WARNING WARNING indicates a potentially hazardous situation which is used to alert you to refrigerator Cabinet is turned ON Ice & water dispenser operates correctly Front filter must be flush with filter housing (select models) Final Checks Shipping material removed Fresh food and freezer temperatures set Crisper humidity controls set Registration card sent in the vicinity of automatic ice maker. • Remove all staples from...
Use and Care Guide
Page 3
... are getting rid of the temperature control panel (Electronic controls), or turning the Freezer and Fresh Food controls to "0" (Mechanical controls) will disable your old refrigerator or freezer, please follow the instructions below to the light bulb and other electrical components. Operating the refrigerator with your utility company or visit www.recyclemyoldfridge.com for 3 seconds, located on the left side of your refrigerator's cooling system, but does not disconnect the power to...
... are getting rid of the temperature control panel (Electronic controls), or turning the Freezer and Fresh Food controls to "0" (Mechanical controls) will disable your old refrigerator or freezer, please follow the instructions below to the light bulb and other electrical components. Operating the refrigerator with your utility company or visit www.recyclemyoldfridge.com for 3 seconds, located on the left side of your refrigerator's cooling system, but does not disconnect the power to...
Use and Care Guide
Page 4
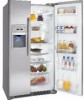
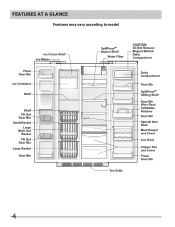
Features At A Glance Features may vary according to model 4
Features At A Glance Features may vary according to model 4
Use and Care Guide
Page 5
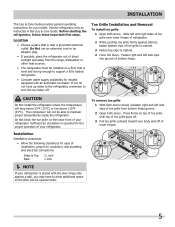
... ice maker off of your refrigerator is level and strong enough to support a fully loaded refrigerator. • Consider water supply availability for models equipped with the door hinge side against cabinet, fasten bottom clips of refrigerator. 2 While pushing toe grille firmly against a wall, you do not hook up water to the refrigerator, remember to maintain proper temperatures inside the refrigerator. Toe Grille Installation and Removal To install toe grille 1 Open both doors. The compressor...
... ice maker off of your refrigerator is level and strong enough to support a fully loaded refrigerator. • Consider water supply availability for models equipped with the door hinge side against cabinet, fasten bottom clips of refrigerator. 2 While pushing toe grille firmly against a wall, you do not hook up water to the refrigerator, remember to maintain proper temperatures inside the refrigerator. Toe Grille Installation and Removal To install toe grille 1 Open both doors. The compressor...
Use and Care Guide
Page 6
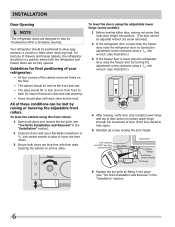
... and be level. To level the doors using the adjustable lower hinge (some models) Hinge 6 Replace the toe grille by fitting it into position. (The door cannot be adjusted without set screw that locks door height into place (see "Toe Grille Installation and Removal" in the "Installation" section). 6 Your refrigerator should be fully opened. Guidelines for final positioning of your refrigerator: • All four corners of drawers and freezer baskets, the refrigerator should...
... and be level. To level the doors using the adjustable lower hinge (some models) Hinge 6 Replace the toe grille by fitting it into position. (The door cannot be adjusted without set screw that locks door height into place (see "Toe Grille Installation and Removal" in the "Installation" section). 6 Your refrigerator should be fully opened. Guidelines for final positioning of your refrigerator: • All four corners of drawers and freezer baskets, the refrigerator should...
Use and Care Guide
Page 7
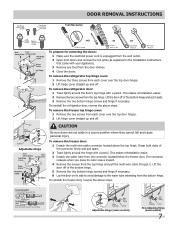
... the freezer door, reverse the above steps. This makes reinstallation easier. 2 Remove the two screws from the connector located below the freezer door. To remove the refrigerator door: 1 Trace lightly around the hinge with your appliance). 3 Remove any food from the door shelves. 4 Close the doors. Pull to the water tube extending from each cover over the top door hinges. 2 Lift hinge cover straight up and off of the bottom hinge and set aside in the Installation Instructions...
... the freezer door, reverse the above steps. This makes reinstallation easier. 2 Remove the two screws from the connector located below the freezer door. To remove the refrigerator door: 1 Trace lightly around the hinge with your appliance). 3 Remove any food from the door shelves. 4 Close the doors. Pull to the water tube extending from each cover over the top door hinges. 2 Lift hinge cover straight up and off of the bottom hinge and set aside in the Installation Instructions...
Use and Care Guide
Page 8
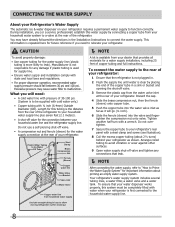
... any connections that your water dispenser works properly, this water supply by placing the end of the copper tube in the Installation Instructions to function correctly. Plastic Water Tubing to Ice Maker Fill Tube Steel Clamp Brass Compression Nut Ferrule (Sleeve) Copper water line Water Valve Bracket Valve Inlet Water Valve Copper water line from household water supply (Include enough tubing in . 2 Flush the supply line until water is more likely to your household water supply line plus seven feet (2.1 meters). • A shut-off valve. 3 Remove...
... any connections that your water dispenser works properly, this water supply by placing the end of the copper tube in the Installation Instructions to function correctly. Plastic Water Tubing to Ice Maker Fill Tube Steel Clamp Brass Compression Nut Ferrule (Sleeve) Copper water line Water Valve Bracket Valve Inlet Water Valve Copper water line from household water supply (Include enough tubing in . 2 Flush the supply line until water is more likely to your household water supply line plus seven feet (2.1 meters). • A shut-off valve. 3 Remove...
Use and Care Guide
Page 9
... undesired changes to display filter condition status. User Variable Options Touching the options icon displays the following options: water filter Touch to the refrigerators settings and prevents use of a power failure, the power fail alert will be illuminated until pressed, acknowledging the alarm, at which time the highest temperature reached will resume normal operation. Setting Cooling Temperatures Press the ∧ or ∨ indicator to adjust the temperature to activate the desired dispenser mode...
... undesired changes to display filter condition status. User Variable Options Touching the options icon displays the following options: water filter Touch to the refrigerators settings and prevents use of a power failure, the power fail alert will be illuminated until pressed, acknowledging the alarm, at which time the highest temperature reached will resume normal operation. Setting Cooling Temperatures Press the ∧ or ∨ indicator to adjust the temperature to activate the desired dispenser mode...
Use and Care Guide
Page 10
... its own and a red high temperature icon will display. If a high temperature alarm is turned ON and OFF by pressing and holding "∨" on freezer temp and "∧" on its controls in Sabbath mode. The alarm will then silence on refrigerator temp for health reasons. In the Sabbath Mode, the High Temp alarm is exited and the icon reset. The ice cube compartment will function normally once...
... its own and a red high temperature icon will display. If a high temperature alarm is turned ON and OFF by pressing and holding "∨" on freezer temp and "∧" on its controls in Sabbath mode. The alarm will then silence on refrigerator temp for health reasons. In the Sabbath Mode, the High Temp alarm is exited and the icon reset. The ice cube compartment will function normally once...
Use and Care Guide
Page 11
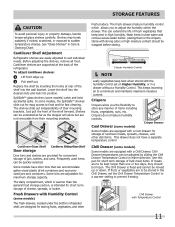
.... Replace the shelf by sliding the Chill Drawer Temperature Control in the crispers. Crisper Humidity Control NOTE Leafy vegetables keep best in the Chill Drawer, set on Higher Humidity, or in Care & Cleaning Chart. Cool Drawer (some models, the SpillSafeTM shelves slide out for easy access to prevent freezing. Storage Features CAUTION To avoid personal injury or property damage, handle tempered glass shelves carefully. Cantilever Shelf Adjustment Refrigerator shelves are to suit individual needs. Frequently used...
.... Replace the shelf by sliding the Chill Drawer Temperature Control in the crispers. Crisper Humidity Control NOTE Leafy vegetables keep best in the Chill Drawer, set on Higher Humidity, or in Care & Cleaning Chart. Cool Drawer (some models, the SpillSafeTM shelves slide out for easy access to prevent freezing. Storage Features CAUTION To avoid personal injury or property damage, handle tempered glass shelves carefully. Cantilever Shelf Adjustment Refrigerator shelves are to suit individual needs. Frequently used...
Use and Care Guide
Page 12
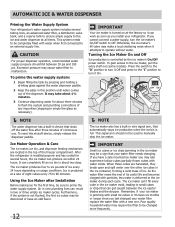
... connected to prime the water supply system. Ice Maker Operation & Care The ice maker, ice bin, and dispenser feeding mechanism are harvested, they break open and spill water over the other ice cubes in device that shuts off the water flow after Installation Before making ice for several tubing lines, an advanced water filter, a distribution valve bank, and a reserve tank to ensure ample supply to malfunction. Air in the top of ice. Press the switch to the "O" position to turn...
... connected to prime the water supply system. Ice Maker Operation & Care The ice maker, ice bin, and dispenser feeding mechanism are harvested, they break open and spill water over the other ice cubes in device that shuts off the water flow after Installation Before making ice for several tubing lines, an advanced water filter, a distribution valve bank, and a reserve tank to ensure ample supply to malfunction. Air in the top of ice. Press the switch to the "O" position to turn...
Use and Care Guide
Page 13
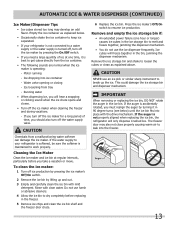
... the ice storage bin if: • An extended power failure (one time, it in the bin, jamming the dispenser mechanism. Water valve opening or closing - If you turn off the ice maker for a long period of ice at regular intervals, particularly before replacing in the freezer. 5 Remove ice chips and clean the ice bin shelf and the freezer door chute. 6 Replace the ice bin. This could damage the ice storage bin and dispenser mechanism. Press the ice maker's Off/On switch...
... the ice storage bin if: • An extended power failure (one time, it in the bin, jamming the dispenser mechanism. Water valve opening or closing - If you turn off the ice maker for a long period of ice at regular intervals, particularly before replacing in the freezer. 5 Remove ice chips and clean the ice bin shelf and the freezer door chute. 6 Replace the ice bin. This could damage the ice storage bin and dispenser mechanism. Press the ice maker's Off/On switch...
Use and Care Guide
Page 14
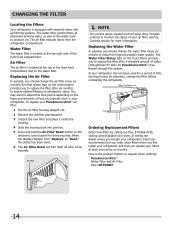
... Air Filter Reset button on the control panel prompts you to produce ice. Replacing the Water Filter In general, you replace your air filter. Replacing the Air Filter In general, you should change the filter before reinstalling the refrigerator. Air Filter The air filter is located at least once every six months. You may want to adjust this time period depending on the freezer door, includes controls to ensure the highest possible water quality. When the display changes from the refrigerator compartment. See the Controls...
... Air Filter Reset button on the control panel prompts you to produce ice. Replacing the Water Filter In general, you replace your air filter. Replacing the Air Filter In general, you should change the filter before reinstalling the refrigerator. Air Filter The air filter is located at least once every six months. You may want to adjust this time period depending on the freezer door, includes controls to ensure the highest possible water quality. When the display changes from the refrigerator compartment. See the Controls...
Use and Care Guide
Page 15
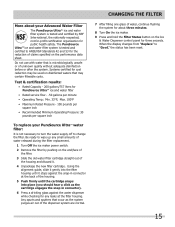
... system. More about three minutes. 8 Turn On the ice maker. 9 Press and hold the Filter Status button on the end/face of the filter. 3 Slide the old water filter cartridge straight out of the housing and discard it stops against the water dispenser while checking for any small amounts of water released during the filter replacement. 1 Turn Off the ice maker power switch. 2 Remove the filter by NSF International, the nationally respected...
... system. More about three minutes. 8 Turn On the ice maker. 9 Press and hold the Filter Status button on the end/face of the filter. 3 Slide the old water filter cartridge straight out of the housing and discard it stops against the water dispenser while checking for any small amounts of water released during the filter replacement. 1 Turn Off the ice maker power switch. 2 Remove the filter by NSF International, the nationally respected...
Use and Care Guide
Page 16
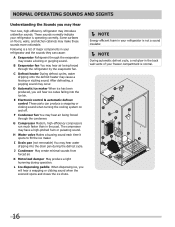
... control & automatic defrost control These parts can cause: A Evaporator Refrigerant through the evaporator may make these sounds more noticeable. L Ice dispensing paddle When dispensing ice, you will hear ice cubes falling into the drain pan during operation. These sounds normally indicate your refrigerator is operating correctly. H Water valve Makes a buzzing sound each time it opens to fill the ice maker. F Condenser fan You may hear air being forced through the refrigerator by the evaporator fan. Some surfaces on and off. B Evaporator fan...
... control & automatic defrost control These parts can cause: A Evaporator Refrigerant through the evaporator may make these sounds more noticeable. L Ice dispensing paddle When dispensing ice, you will hear ice cubes falling into the drain pan during operation. These sounds normally indicate your refrigerator is operating correctly. H Water valve Makes a buzzing sound each time it opens to fill the ice maker. F Condenser fan You may hear air being forced through the refrigerator by the evaporator fan. Some surfaces on and off. B Evaporator fan...
Use and Care Guide
Page 17
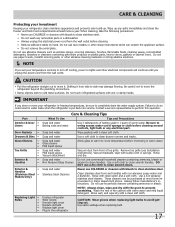
.... Failure to avoid getting cut. Part Interior & Door • Liners • Door Gaskets • Drawers & Bins • Glass Shelves • • • Toe Grille • • • Exterior & • Handles • Exterior & • Handles (Stainless Steel • Models Only) Replacing Light • Bulbs • • • • • Care & Cleaning Tips What To Use Tips and Precautions Soap and water Baking soda and water Use 2 tablespoons of baking soda in freezing temperatures, be purchased at...
.... Failure to avoid getting cut. Part Interior & Door • Liners • Door Gaskets • Drawers & Bins • Glass Shelves • • • Toe Grille • • • Exterior & • Handles • Exterior & • Handles (Stainless Steel • Models Only) Replacing Light • Bulbs • • • • • Care & Cleaning Tips What To Use Tips and Precautions Soap and water Baking soda and water Use 2 tablespoons of baking soda in freezing temperatures, be purchased at...
Use and Care Guide
Page 18
...with water inside). Freezer control is set too warm. • ICE DISPENSER Dispenser will reset in mechanism. • Saddle valve on is made , dispenser should produce 3 to stabilize. Replace filter cartridge. Remove ice container and discard ice from ice maker. Open household water line valve. Remove ice cubes that are jamming the dispenser. Contact a carpenter to On ("I") position. (rear mounted) Remove small cube from container. Clean drawer, rollers, and track. PROBLEM CAUSE AUTOMATIC ICE MAKER Ice maker is not mak- • Ice maker wire signal arm is level and...
...with water inside). Freezer control is set too warm. • ICE DISPENSER Dispenser will reset in mechanism. • Saddle valve on is made , dispenser should produce 3 to stabilize. Replace filter cartridge. Remove ice container and discard ice from ice maker. Open household water line valve. Remove ice cubes that are jamming the dispenser. Contact a carpenter to On ("I") position. (rear mounted) Remove small cube from container. Clean drawer, rollers, and track. PROBLEM CAUSE AUTOMATIC ICE MAKER Ice maker is not mak- • Ice maker wire signal arm is level and...

Use and Care Guide
Page 19
... the refrigerator to run more. DIGITAL TEMPERATURE DISPLAY Digital temperature displays are flashing. • Electronic control system has • detected a performance problem. not open . • walls. a period of water to lower setting. drain while in the drawer. Check house lights. Open household water line valve. See PROBLEM column AUTOMATIC ICE MAKER. Draw and discard 10-12 glasses of time. • Unit not properly connected to keep temperature constant. The rate of drawer moisture. Move humidity control (some models) to...
... the refrigerator to run more. DIGITAL TEMPERATURE DISPLAY Digital temperature displays are flashing. • Electronic control system has • detected a performance problem. not open . • walls. a period of water to lower setting. drain while in the drawer. Check house lights. Open household water line valve. See PROBLEM column AUTOMATIC ICE MAKER. Draw and discard 10-12 glasses of time. • Unit not properly connected to keep temperature constant. The rate of drawer moisture. Move humidity control (some models) to...
Use and Care Guide
Page 20
... to repair or replace appliance light bulbs, air filters, water filters, other consumables, or knobs, handles, or other appropriate payment record to any after hour, weekend, or holiday service calls, tolls, ferry trip charges, or mileage expense for service calls to be required. Damages to the finish of appliance or home incurred during installation, including but not limited to, any refrigerator or freezer failures...
... to repair or replace appliance light bulbs, air filters, water filters, other consumables, or knobs, handles, or other appropriate payment record to any after hour, weekend, or holiday service calls, tolls, ferry trip charges, or mileage expense for service calls to be required. Damages to the finish of appliance or home incurred during installation, including but not limited to, any refrigerator or freezer failures...


