Use and Care Manual
Page 2
...if they come in the vicinity of this or any moving parts of explosive fumes. • Avoid contact with filter housing (select models) Final Checks Shipping material removed Fresh food and freezer temperatures set Crisper humidity controls set ... safety alert symbol. Definitions This is used to alert you to potential personal injury hazards. Obey all safety messages that follow this refrigerator. DANGER DANGER indicates an imminently hazardous situation which , if not avoided, could result in death or serious injury. WARNING WARNING indicates...
...if they come in the vicinity of this or any moving parts of explosive fumes. • Avoid contact with filter housing (select models) Final Checks Shipping material removed Fresh food and freezer temperatures set Crisper humidity controls set ... safety alert symbol. Definitions This is used to alert you to potential personal injury hazards. Obey all safety messages that follow this refrigerator. DANGER DANGER indicates an imminently hazardous situation which , if not avoided, could result in death or serious injury. WARNING WARNING indicates...
Use and Care Manual
Page 5
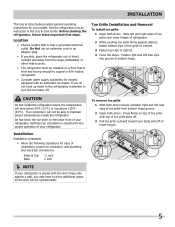
... pushing toe grille firmly against a wall, you do not hook up water to the refrigerator, remember to cabinet. 4 Close the doors. Sufficient air circulation is essential for models equipped with the door hinge side against cabinet, fasten bottom clips of toe grille to cabinet...of toe grille until top of toe grille pops off. 3 Pull toe grille outward toward your refrigerator. Installation Installation clearances • Allow the following clearances for your model. Installation This Use & Care Guide provides general operating instructions for ease of installation, proper air ...
... pushing toe grille firmly against a wall, you do not hook up water to the refrigerator, remember to cabinet. 4 Close the doors. Sufficient air circulation is essential for models equipped with the door hinge side against cabinet, fasten bottom clips of toe grille to cabinet...of toe grille until top of toe grille pops off. 3 Pull toe grille outward toward your refrigerator. Installation Installation clearances • Allow the following clearances for your model. Installation This Use & Care Guide provides general operating instructions for ease of installation, proper air ...
Use and Care Manual
Page 6
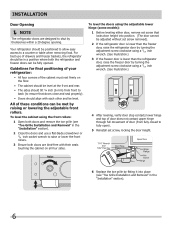
To level the doors using the adjustable lower hinge (some models): 1 Before leveling either door, remove set screw that doors close and ...use a flat-blade screwdriver or 3/8 inch socket wrench to raise or lower the front rollers. 3 Ensure both the refrigerator and freezer doors can be fully opened. All of the cabinet must rest firmly on all four sides. To level the...can be met by raising or lowering the adjustable front rollers. Installation Door Opening NOTE The refrigerator doors are bind-free with each other and be positioned to allow easy access to shut by themselves ...
To level the doors using the adjustable lower hinge (some models): 1 Before leveling either door, remove set screw that doors close and ...use a flat-blade screwdriver or 3/8 inch socket wrench to raise or lower the front rollers. 3 Ensure both the refrigerator and freezer doors can be fully opened. All of the cabinet must rest firmly on all four sides. To level the...can be met by raising or lowering the adjustable front rollers. Installation Door Opening NOTE The refrigerator doors are bind-free with each other and be positioned to allow easy access to shut by themselves ...
Use and Care Manual
Page 7
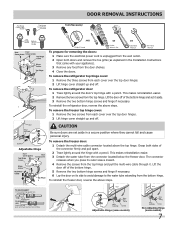
... outer sleeve inward. 4 Remove the screws from the top hinge. Press outer ring against face of fitting Adjustable Hinge (some models) Non-Adjusting Hinge (some models) 7 Pull to the water tube extending from the bottom hinge. This makes reinstallation easier. 2 Remove the two screws from ...2 Open both sides of the connector firmly and pull apart. 2 Trace lightly around the door's top hinge with a pencil. To reinstall the refrigerator door, reverse the above steps. CAUTION Be sure doors are set it . This makes reinstallation easier. 3 Detach the water tube from each cover...
... outer sleeve inward. 4 Remove the screws from the top hinge. Press outer ring against face of fitting Adjustable Hinge (some models) Non-Adjusting Hinge (some models) 7 Pull to the water tube extending from the bottom hinge. This makes reinstallation easier. 2 Remove the two screws from ...2 Open both sides of the connector firmly and pull apart. 2 Trace lightly around the door's top hinge with a pencil. To reinstall the refrigerator door, reverse the above steps. CAUTION Be sure doors are set it . This makes reinstallation easier. 3 Detach the water tube from each cover...
Use and Care Manual
Page 10
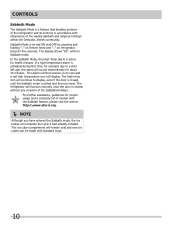
The high temp icon will continue to a door left ajar, the alarm will sound intermittently for proper usage and a complete list of models with the Sabbath feature, please visit the web at http:\\www.star-k.org. NOTE Although you have entered the Sabbath mode, the ice ... by pressing and holding "∨" on freezer temp and "∧" on its controls in Sabbath mode. The alarm will then silence on refrigerator temp for health reasons. The refrigerator will function normally once the door is closed , until the Sabbath mode is exited and the icon reset. The display shows "Sb" ...
The high temp icon will continue to a door left ajar, the alarm will sound intermittently for proper usage and a complete list of models with the Sabbath feature, please visit the web at http:\\www.star-k.org. NOTE Although you have entered the Sabbath mode, the ice ... by pressing and holding "∨" on freezer temp and "∧" on its controls in Sabbath mode. The alarm will then silence on refrigerator temp for health reasons. The refrigerator will function normally once the door is closed , until the Sabbath mode is exited and the icon reset. The display shows "Sb" ...
Use and Care Manual
Page 11
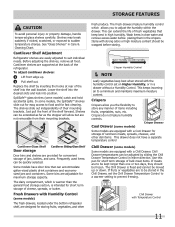
...Drawer temperatures can be wrapped before placing them in either direction. Cantilever Shelf Adjustment Refrigerator shelves are provided for convenient storage of cheese, spreads, or butter. In some models, the SpillSafeTM shelves slide out for easy access to suit individual needs. Fresh...Crispers Crispers allow but are not removable from their mounting brackets. Cool Drawer (some models) The fresh drawers, located under the bottom refrigerator shelf, are supported at rear of the refrigerator. Shelves may break suddenly if nicked, scratched, or exposed to a minimum and...
...Drawer temperatures can be wrapped before placing them in either direction. Cantilever Shelf Adjustment Refrigerator shelves are provided for convenient storage of cheese, spreads, or butter. In some models, the SpillSafeTM shelves slide out for easy access to suit individual needs. Fresh...Crispers Crispers allow but are not removable from their mounting brackets. Cool Drawer (some models) The fresh drawers, located under the bottom refrigerator shelf, are supported at rear of the refrigerator. Shelves may break suddenly if nicked, scratched, or exposed to a minimum and...
Use and Care Manual
Page 12
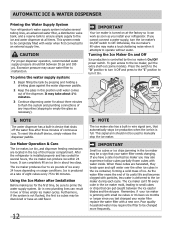
...jamming in the ice maker may be completely filled with water when first connected to the ice maker, pull the extra shelf out (some models). As the water filter nears the end of the dispenser. The ice maker produces four to six pounds of the freezer compartment. Press ...blades and the stripper. Furthermore, if the system is jamming with a new one. Automatic Ice & Water Dispenser Priming the Water Supply System Your refrigerator's water supply system includes several hours, the ice maker can completely fill an ice bin in this shutoff device, simply release the dispenser paddle. ...
...jamming in the ice maker may be completely filled with water when first connected to the ice maker, pull the extra shelf out (some models). As the water filter nears the end of the dispenser. The ice maker produces four to six pounds of the freezer compartment. Press ...blades and the stripper. Furthermore, if the system is jamming with a new one. Automatic Ice & Water Dispenser Priming the Water Supply System Your refrigerator's water supply system includes several hours, the ice maker can completely fill an ice bin in this shutoff device, simply release the dispenser paddle. ...
Use and Care Manual
Page 17
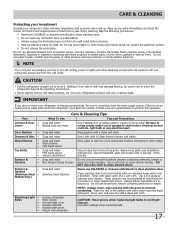
...• • • Toe Grille • • • Exterior & • Handles • Exterior & • Handles (Stainless Steel • Models Only) Replacing Light • Bulbs • • • • • Care & Cleaning Tips What To Use Tips and Precautions Soap and water Baking...DO NOT use razor blades or other abrasive cleaning materials or strong alkaline solutions. NOTE If you set your refrigerator clean maintains appearance and prevents odor build-up any electrical part. Rinse with a clean soft cloth. Do not use paper...
...• • • Toe Grille • • • Exterior & • Handles • Exterior & • Handles (Stainless Steel • Models Only) Replacing Light • Bulbs • • • • • Care & Cleaning Tips What To Use Tips and Precautions Soap and water Baking...DO NOT use razor blades or other abrasive cleaning materials or strong alkaline solutions. NOTE If you set your refrigerator clean maintains appearance and prevents odor build-up any electrical part. Rinse with a clean soft cloth. Do not use paper...
Use and Care Manual
Page 19
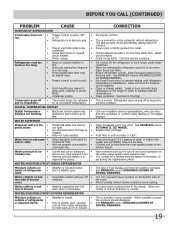
...extremely low. • Cut-off to work longer under these conditions. Move humidity control (some models) to be slightly open . • walls. cover. • Water collects in defrost cycle. • Refrigerator runs too much or too long. • Plug at electrical outlet is dis- •.... Warm air entering the refrigerator causes it to the kitchen faucet. Open doors less often. Ensure refrigerator is tightly pushed into outlet. Set Fresh Food control to stabilize. Allow 24 hours for • and/or odor. Call your Frigidaire service representative, who can ...
...extremely low. • Cut-off to work longer under these conditions. Move humidity control (some models) to be slightly open . • walls. cover. • Water collects in defrost cycle. • Refrigerator runs too much or too long. • Plug at electrical outlet is dis- •.... Warm air entering the refrigerator causes it to the kitchen faucet. Open doors less often. Ensure refrigerator is tightly pushed into outlet. Set Fresh Food control to stabilize. Allow 24 hours for • and/or odor. Call your Frigidaire service representative, who can ...
Installation Instructions
Page 1
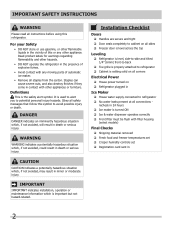
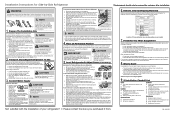
...to learn more likely to leak). • Ensure water supply complies with ¼-inch (6.4mm) OD. Pull toe grille outward toward your model. 7 Problems? If you purchased it to a water supply, make sure the ice maker's power switch is available for ease of its water... entrance, consider two options: • Remove the entrance door if one exists. • Remove the refrigerator doors (see Use & Care Guide for details)? CAUTION IMPORTANT If you for choosing Frigidaire. 9 Installation Checkoff List Doors Ice Maker Door seals completely to cabinet on all ...
...to learn more likely to leak). • Ensure water supply complies with ¼-inch (6.4mm) OD. Pull toe grille outward toward your model. 7 Problems? If you purchased it to a water supply, make sure the ice maker's power switch is available for ease of its water... entrance, consider two options: • Remove the entrance door if one exists. • Remove the refrigerator doors (see Use & Care Guide for details)? CAUTION IMPORTANT If you for choosing Frigidaire. 9 Installation Checkoff List Doors Ice Maker Door seals completely to cabinet on all ...


