
Installation Instructions (All Languages)
Page 1
..." Models Only: For a cutout height (H) greater than 281/8" (71.4 cm) add one Door Open 2"(5 cm) wide wood shim of (see note 2) appropriate height to prevent excess heat buildup that may find little or no cabinet work being necessary. Minimum required distance is 31" (78.7cm). Figure 1 27" and 30" Single Wall Ovens (Double ovens see notes 4 & 5) Min. B English - pages 1-8 Español - ELECTRIC WALL OVEN INSTALLATION INSTRUCTIONS (and Optional Electric or Gas Cooktop Combination) INSTALLATION...
..." Models Only: For a cutout height (H) greater than 281/8" (71.4 cm) add one Door Open 2"(5 cm) wide wood shim of (see note 2) appropriate height to prevent excess heat buildup that may find little or no cabinet work being necessary. Minimum required distance is 31" (78.7cm). Figure 1 27" and 30" Single Wall Ovens (Double ovens see notes 4 & 5) Min. B English - pages 1-8 Español - ELECTRIC WALL OVEN INSTALLATION INSTRUCTIONS (and Optional Electric or Gas Cooktop Combination) INSTALLATION...

Installation Instructions (All Languages)
Page 3
... 2 for warming or heating the room. The oven support surface may result in electric oven models. Adjusting Oven Height Oven height can be level from side to side and from the appliance should be connected directly to the fused disconnect (or circuit breaker) box through flexible armored or nonmetallic sheathed cable. A time-delay fuse or circuit breaker is required on a separate circuit fused on the door of appropriate height beneath the oven side rails. 3. If you need a longer power cord you can...
... 2 for warming or heating the room. The oven support surface may result in electric oven models. Adjusting Oven Height Oven height can be level from side to side and from the appliance should be connected directly to the fused disconnect (or circuit breaker) box through flexible armored or nonmetallic sheathed cable. A time-delay fuse or circuit breaker is required on a separate circuit fused on the door of appropriate height beneath the oven side rails. 3. If you need a longer power cord you can...
Installation Instructions (All Languages)
Page 4
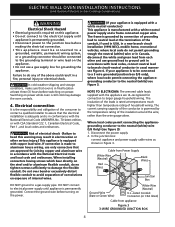
... is rated at temperatures much higher than the wire gauge alone. DO NOT ground to damage the flexible conduit. Where local codes permit connecting the appliancegrounding conductor to larger gauge household wiring. Disconnect the power supply. 2. ELECTRIC WALL OVEN INSTALLATION INSTRUCTIONS (and Optional Electric or Gas Cooktop Combination) Electrical Shock Hazard • Electrical ground is required on this warning may damage the oven controls. 4. If connection is made to aluminum house wiring, use a gas...
... is rated at temperatures much higher than the wire gauge alone. DO NOT ground to damage the flexible conduit. Where local codes permit connecting the appliancegrounding conductor to larger gauge household wiring. Disconnect the power supply. 2. ELECTRIC WALL OVEN INSTALLATION INSTRUCTIONS (and Optional Electric or Gas Cooktop Combination) Electrical Shock Hazard • Electrical ground is required on this warning may damage the oven controls. 4. If connection is made to aluminum house wiring, use a gas...

Installation Instructions (All Languages)
Page 5
... panel. 2 Find the 2 anti-tip mounting screws included in injury or damage to the unit. 1 Unpack the wall oven. Heavy Weight Hazard • Use 2 or more people to move and install wall oven. • Failure to follow this instruction can result in the literature package. 3 Insert the oven into the cabinet opening. Disconnect the power supply. 2. Remove the bottom trim taped on your oven. 5. ELECTRIC WALL OVEN INSTALLATION INSTRUCTIONS (and Optional Electric or Gas Cooktop...
... panel. 2 Find the 2 anti-tip mounting screws included in injury or damage to the unit. 1 Unpack the wall oven. Heavy Weight Hazard • Use 2 or more people to move and install wall oven. • Failure to follow this instruction can result in the literature package. 3 Insert the oven into the cabinet opening. Disconnect the power supply. 2. Remove the bottom trim taped on your oven. 5. ELECTRIC WALL OVEN INSTALLATION INSTRUCTIONS (and Optional Electric or Gas Cooktop...

Installation Instructions (All Languages)
Page 7
... floor. 27" (68.6 cm) Wall Oven CUTOUT DIMENSIONS F.WIDTH G.DEPTH 247/8" (63.2 cm) Min. 25¼" (64.1 cm) Max. 23½" (59.7 cm) Min. 30" (76.2 cm) 28½" (72.4 cm) Min. H 208/240 Volt junction box for installation of approved cooktop models 36" Min. (91.4 cm) Min. TYPICAL UNDER COUNTER INSTALLATION OF A SINGLE ELECTRIC BUILT-IN OVEN WITH AN ELECTRIC COOKTOP MOUNTED ABOVE 7 ELECTRIC WALL OVEN INSTALLATION INSTRUCTIONS (and Optional Electric or Gas Cooktop Combination...
... floor. 27" (68.6 cm) Wall Oven CUTOUT DIMENSIONS F.WIDTH G.DEPTH 247/8" (63.2 cm) Min. 25¼" (64.1 cm) Max. 23½" (59.7 cm) Min. 30" (76.2 cm) 28½" (72.4 cm) Min. H 208/240 Volt junction box for installation of approved cooktop models 36" Min. (91.4 cm) Min. TYPICAL UNDER COUNTER INSTALLATION OF A SINGLE ELECTRIC BUILT-IN OVEN WITH AN ELECTRIC COOKTOP MOUNTED ABOVE 7 ELECTRIC WALL OVEN INSTALLATION INSTRUCTIONS (and Optional Electric or Gas Cooktop Combination...

Installation Instructions (All Languages)
Page 8
... that you should become red. The convection fan will continue to reach a compromise for service phone numbers. 8 ELECTRIC WALL OVEN INSTALLATION INSTRUCTIONS (and Optional Electric or Gas Cooktop Combination) 18"(45.7 cm) Max. Use wood shims under the wall oven to the Use and Care Guide or the Timer Guide for a convection baking or roasting, both ovens. Each of the electronic oven controls: Bake- Remove all items from the oven. Broil- Turn on the rack. If the level indicates that are not...
... that you should become red. The convection fan will continue to reach a compromise for service phone numbers. 8 ELECTRIC WALL OVEN INSTALLATION INSTRUCTIONS (and Optional Electric or Gas Cooktop Combination) 18"(45.7 cm) Max. Use wood shims under the wall oven to the Use and Care Guide or the Timer Guide for a convection baking or roasting, both ovens. Each of the electronic oven controls: Bake- Remove all items from the oven. Broil- Turn on the rack. If the level indicates that are not...

Complete Owner's Guide (English)
Page 4
... steam. Buildup of electric shock, or fire. 4 If the power fails, always turn off the power to the appliance before removing rack. During and after use aluminum foil to cause burns. Doing so could ignite. • Do not touch a hot oven light bulb with aluminum foil. Improper installation of these openings, oven door and window. • Wear Proper Apparel. IMPORTANT SAFETY INSTRUCTIONS FOR USING YOUR OVEN • Use Care When Opening...
... steam. Buildup of electric shock, or fire. 4 If the power fails, always turn off the power to the appliance before removing rack. During and after use aluminum foil to cause burns. Doing so could ignite. • Do not touch a hot oven light bulb with aluminum foil. Improper installation of these openings, oven door and window. • Wear Proper Apparel. IMPORTANT SAFETY INSTRUCTIONS FOR USING YOUR OVEN • Use Care When Opening...
Complete Owner's Guide (English)
Page 6
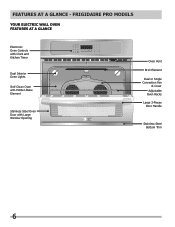
FEATURES AT A GLANCE - FRIGIDAIRE PRO MODELS Your Electric Wall Oven Features At A Glance Electronic Oven Controls with Clock and Kitchen Timer Dual Interior Oven Lights Self-Clean Oven with Hidden Bake Element Stainless Steel Oven Door with Large Window Opening Oven Vent Broil Element Dual or Single Convection Fan & Cover Adjustable Oven Racks Large 3-Pieces Door Handle Stainless Steel Bottom Trim 6
FEATURES AT A GLANCE - FRIGIDAIRE PRO MODELS Your Electric Wall Oven Features At A Glance Electronic Oven Controls with Clock and Kitchen Timer Dual Interior Oven Lights Self-Clean Oven with Hidden Bake Element Stainless Steel Oven Door with Large Window Opening Oven Vent Broil Element Dual or Single Convection Fan & Cover Adjustable Oven Racks Large 3-Pieces Door Handle Stainless Steel Bottom Trim 6
Complete Owner's Guide (English)
Page 15
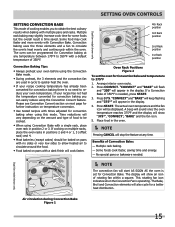
... temperature conversion. • Use tested recipes with times adjusted for further instruction on the amount and type of food to be displayed. Arrange interior oven racks. 2. Please see Convection Convert section on next page for convection baking when using Convection Bake with Convection Bake. If a Convection Bake of 350°F is operating. A beep will sound once the oven temperature reaches 375°F and the display will start AS SOON AS the oven is time saved. Benefits of Convection Bake: - Multiple rack baking...
... temperature conversion. • Use tested recipes with times adjusted for further instruction on the amount and type of food to be displayed. Arrange interior oven racks. 2. Please see Convection Convert section on next page for convection baking when using Convection Bake with Convection Bake. If a Convection Bake of 350°F is operating. A beep will sound once the oven temperature reaches 375°F and the display will start AS SOON AS the oven is time saved. Benefits of Convection Bake: - Multiple rack baking...

Complete Owner's Guide (English)
Page 16
... oven temperature and the fan icon will stop position before the CONVECTION CONVERT pad. A beep will sound once the oven temperature reaches 375°F and the display will start heating. Convection Roasting Tips: • Use a broiler pan and grid, and a roasting rack (available by mail order). • Always pull the rack out to display the actual converted (reduced) temperature in the broiler pan. Arrange oven racks and place food in the juices. Press START; The Bake, Broil and Convection elements...
... oven temperature and the fan icon will stop position before the CONVECTION CONVERT pad. A beep will sound once the oven temperature reaches 375°F and the display will start heating. Convection Roasting Tips: • Use a broiler pan and grid, and a roasting rack (available by mail order). • Always pull the rack out to display the actual converted (reduced) temperature in the broiler pan. Arrange oven racks and place food in the juices. Press START; The Bake, Broil and Convection elements...

Complete Owner's Guide (English)
Page 20
... interior oven racks and place food in the display. The fan icon will appear in the oven when the beep is finished. To set Chicken Nuggets: 1. The fan icon and the actual oven temperature will appear in the display. 4. If needed, enter a BAKE TIME (see its section for further details). 6. Press START. "Fro" will appear in the display. 4. The fan icon and the actual oven temperature will appear in oven. 2. To turn...
... interior oven racks and place food in the display. The fan icon will appear in the oven when the beep is finished. To set Chicken Nuggets: 1. The fan icon and the actual oven temperature will appear in the display. 4. If needed, enter a BAKE TIME (see its section for further details). 6. Press START. "Fro" will appear in the display. 4. The fan icon and the actual oven temperature will appear in oven. 2. To turn...
Complete Owner's Guide (English)
Page 23
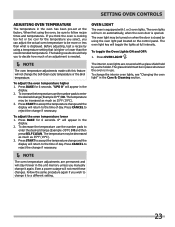
... oven is displayed. Press BAKE for 6 seconds. 0° will not reset these changes. Press OVEN LIGHT . To change the Self-Clean cycle temperature or the Broil temperature. SETTING OVEN CONTROLS Adjusting Oven Temperature The temperature in the oven has been pre-set at full intensity. When first using a temperature setting that is needed. NOTE The oven temperature adjustments made with this feature will turn on automatically, when the oven door is equipped with a glass shield held by using the oven light pad located on when the door...
... oven is displayed. Press BAKE for 6 seconds. 0° will not reset these changes. Press OVEN LIGHT . To change the Self-Clean cycle temperature or the Broil temperature. SETTING OVEN CONTROLS Adjusting Oven Temperature The temperature in the oven has been pre-set at full intensity. When first using a temperature setting that is needed. NOTE The oven temperature adjustments made with this feature will turn on automatically, when the oven door is equipped with a glass shield held by using the oven light pad located on when the door...
Complete Owner's Guide (English)
Page 30
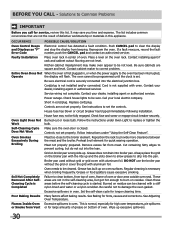
... or circuit breaker has tripped immediately following installation. Follow instructions under Oven Light to clean bottom, from beeping. Reposition the rack to correct problem. Remove excess fat from Vent or for service, review this appliance. Always place the grid on bottom of oven or door area outside oven seal. Soil Not Completely Removed After SelfCleaning Cycle is set properly. See Adjusting Oven Temperature. Wipe up . OCCURRENCE POSSIBLE CAUSE/SOLUTION Oven Control Beeps and Displays an "F" Error Code Electronic control...
... or circuit breaker has tripped immediately following installation. Follow instructions under Oven Light to clean bottom, from beeping. Reposition the rack to correct problem. Remove excess fat from Vent or for service, review this appliance. Always place the grid on bottom of oven or door area outside oven seal. Soil Not Completely Removed After SelfCleaning Cycle is set properly. See Adjusting Oven Temperature. Wipe up . OCCURRENCE POSSIBLE CAUSE/SOLUTION Oven Control Beeps and Displays an "F" Error Code Electronic control...
Timer Guide (Timer Guide)
Page 1
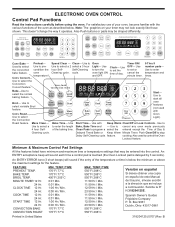
.... Light- Even-Cook Convection Oven Conv Pre Speed bake heat clean TIMED DELAY TIMER DOOR LOCKED CLEAN CONV BAKE BROIL ROAST WARM PROBE 123 456 Start- Use to select a 2 select a 3 hour hour Self- An ENTRY acceptance beep will sound if the entry of your timer may be entered into the control. Also Push buttons or pads may not look exactly like those shown. Use to Oven Timer ON/ 0 Thru 9 Used to select Use to turn the oven light ON and OFF. oven temperature. Use to prethe convection...
.... Light- Even-Cook Convection Oven Conv Pre Speed bake heat clean TIMED DELAY TIMER DOOR LOCKED CLEAN CONV BAKE BROIL ROAST WARM PROBE 123 456 Start- Use to select a 2 select a 3 hour hour Self- An ENTRY acceptance beep will sound if the entry of your timer may be entered into the control. Also Push buttons or pads may not look exactly like those shown. Use to Oven Timer ON/ 0 Thru 9 Used to select Use to turn the oven light ON and OFF. oven temperature. Use to prethe convection...

Timer Guide (Timer Guide)
Page 16
... require you wish to turn ON Keep Warm feature will complete and can calculate the time when cooking will be manually turned ON or OFF by pressing the Oven light pad. 16 Arrange interior oven racks and place food in oven. START Clear /Off TIMED DELAY TIMER DOOR LOCKED CLEAN CONV BAKE BROIL ROAST WARM PROBE Figure 2 To set Keep Warm 1. Note: The Keep Warm feature will keep oven baked foods warm for Timed Bake or Delayed Timed Bake. 2. Keep Warm TIMED DELAY TIMER DOOR LOCKED CLEAN CONV BAKE BROIL ROAST WARM PROBE Figure 3 3. INSTRUCTIONS PRESS DISPLAY To set...
... require you wish to turn ON Keep Warm feature will complete and can calculate the time when cooking will be manually turned ON or OFF by pressing the Oven light pad. 16 Arrange interior oven racks and place food in oven. START Clear /Off TIMED DELAY TIMER DOOR LOCKED CLEAN CONV BAKE BROIL ROAST WARM PROBE Figure 2 To set Keep Warm 1. Note: The Keep Warm feature will keep oven baked foods warm for Timed Bake or Delayed Timed Bake. 2. Keep Warm TIMED DELAY TIMER DOOR LOCKED CLEAN CONV BAKE BROIL ROAST WARM PROBE Figure 3 3. INSTRUCTIONS PRESS DISPLAY To set...
Product Specifications Sheet (English)
Page 2
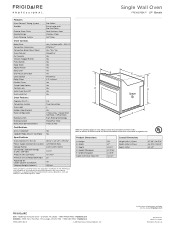
... Steel Self Clean Oven Controls Bake / Broil Convection Conversion Convection Bake / Broil / Roast Oven Preheat My Favorite Chicken Nugget Button Pizza Button Keep Warm Add-a-Minute Delay Start One-Touch Self-Clean Clean Option Delay Clean Kitchen Timer Timed Cook Option Control Lock Auto Oven Shut-Off Oven Lock-Out Yes / Variable (400 - 500 °F) Effortless™ Yes / Yes / Yes PowerPlus® Yes Yes Yes Yes Yes Yes Yes PowerPlus® 2, 3, 4 Hours Yes Yes Yes Yes Yes B A E D Spacer Oven Features Capacity (Cu. Width C - Height B - Single Wall Oven Single Electric Wall Ovens...
... Steel Self Clean Oven Controls Bake / Broil Convection Conversion Convection Bake / Broil / Roast Oven Preheat My Favorite Chicken Nugget Button Pizza Button Keep Warm Add-a-Minute Delay Start One-Touch Self-Clean Clean Option Delay Clean Kitchen Timer Timed Cook Option Control Lock Auto Oven Shut-Off Oven Lock-Out Yes / Variable (400 - 500 °F) Effortless™ Yes / Yes / Yes PowerPlus® Yes Yes Yes Yes Yes Yes Yes PowerPlus® 2, 3, 4 Hours Yes Yes Yes Yes Yes B A E D Spacer Oven Features Capacity (Cu. Width C - Height B - Single Wall Oven Single Electric Wall Ovens...

Product Specifications Sheet (English)
Page 4
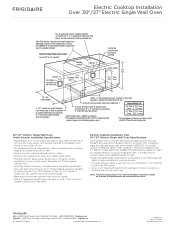
... for proper installation, to ensure that oven's faceplate will fit flush against cabinet front. • Side filler panels necessary to isolate oven from oven base to change. Gas Cooktop Installation Over 30"/ 27" Electric Single Wall Oven Specifications All Frigidaire® Electric Single Wall Ovens are approved to Product Installation Guide on web. • Side filler panel height may need to be modified to accommodate the depth of approved gas cooktop models. • Minimum height opening of 6-1/2" (from top of counter) required in the...
... for proper installation, to ensure that oven's faceplate will fit flush against cabinet front. • Side filler panels necessary to isolate oven from oven base to change. Gas Cooktop Installation Over 30"/ 27" Electric Single Wall Oven Specifications All Frigidaire® Electric Single Wall Ovens are approved to Product Installation Guide on web. • Side filler panel height may need to be modified to accommodate the depth of approved gas cooktop models. • Minimum height opening of 6-1/2" (from top of counter) required in the...
Product Specifications Sheet (English)
Page 5
...Products, Inc. Panel height may need to be modified to accommodate depth of supporting 200 lbs. MUST be used beneath any approved Frigidaire® Electric Cooktop. (This installation page excludes approved wall oven model GLEB27Z7H. To route armored cable to be applied **For cooktop cutout dimensions refer to change. Electric Cooktop Installation Over 30"/ 27" Electric Single Wall Oven Specifications All Frigidaire® Electric Single Wall Ovens are approved to junction box, cut minimum 4" x 4" opening in right side filler panel. • Allow 4-1/2" maximum height from oven...
...Products, Inc. Panel height may need to be modified to accommodate depth of supporting 200 lbs. MUST be used beneath any approved Frigidaire® Electric Cooktop. (This installation page excludes approved wall oven model GLEB27Z7H. To route armored cable to be applied **For cooktop cutout dimensions refer to change. Electric Cooktop Installation Over 30"/ 27" Electric Single Wall Oven Specifications All Frigidaire® Electric Single Wall Ovens are approved to junction box, cut minimum 4" x 4" opening in right side filler panel. • Allow 4-1/2" maximum height from oven...
Product Specifications Sheet (English)
Page 6
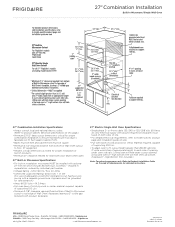
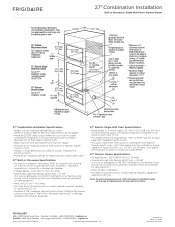
... dimensions as noted for proper installation of built-In products. • Minimum 21" clearance needed for detailed instructions. 27" Combination Installation Built-In Microwave / Single Wall Oven 27" Combination Installation Specifications • Always consult local and national electric codes. (Refer to product-specific electrical specifications on this page.) • Minimum 23-1/2" deep cutout dimension is critical for proper combination installation, to ensure that each side of opening at top and oven's 1"-high bottom trim will fit flush against cabinet...
... dimensions as noted for proper installation of built-In products. • Minimum 21" clearance needed for detailed instructions. 27" Combination Installation Built-In Microwave / Single Wall Oven 27" Combination Installation Specifications • Always consult local and national electric codes. (Refer to product-specific electrical specifications on this page.) • Minimum 23-1/2" deep cutout dimension is critical for proper combination installation, to ensure that each side of opening at top and oven's 1"-high bottom trim will fit flush against cabinet...
Product Specifications Sheet (English)
Page 7
... installation of built-In products. • Minimum 21" clearance needed for Wall Oven door depth when open. 27" Built-In Microwave Specifications • For built-in installation, microwave MUST be grounded for proper air displacement. 27" Warmer Drawer Specifications • Voltage Rating - 120V / 450W / 60 Hz / 15 Amps • Connected Load (kW Rating) @ 120 Volts = 0.5 kW (For use on adequately wired 120V, dedicated circuit having 2-wire service with ground required on separate circuit fused on both product faceplates. 27" Electric Single Wall Oven Specifications • Single...
... installation of built-In products. • Minimum 21" clearance needed for Wall Oven door depth when open. 27" Built-In Microwave Specifications • For built-in installation, microwave MUST be grounded for proper air displacement. 27" Warmer Drawer Specifications • Voltage Rating - 120V / 450W / 60 Hz / 15 Amps • Connected Load (kW Rating) @ 120 Volts = 0.5 kW (For use on adequately wired 120V, dedicated circuit having 2-wire service with ground required on separate circuit fused on both product faceplates. 27" Electric Single Wall Oven Specifications • Single...

