Complete Owner's Guide (English)
Page 2
... are completely committed to providing you with the best service possible. These instructions are not meant to Electrolux Home Products. Dual fan model shown only. Solicite la P/N 318203624E. The graphics on your purchase of our product and are representative. Please record your appliance may...returned to cover every possible condition and situation that may not look exactly like those shown. Serial Plate Location Congratulations on your model and serial numbers below for future purchases. Spanish Use & Care Manual Electrolux Home Products P. We hope you 'll enjoy ...
... are completely committed to providing you with the best service possible. These instructions are not meant to Electrolux Home Products. Dual fan model shown only. Solicite la P/N 318203624E. The graphics on your purchase of our product and are representative. Please record your appliance may...returned to cover every possible condition and situation that may not look exactly like those shown. Serial Plate Location Congratulations on your model and serial numbers below for future purchases. Spanish Use & Care Manual Electrolux Home Products P. We hope you 'll enjoy ...
Complete Owner's Guide (English)
Page 3
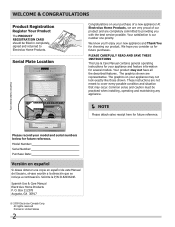
... Refer to persons could result. • Install anti-tip bracket packed with the National Electrical Code No. 70 - Flammable materials should be damaged by properly installed anti-tip bracket provided... injury and damage to the appliance. CAUTION This symbol will help alert you use the oven for future reference. Do not store explosives, such as aerosol cans, in the manuals.... tape and packaging wrap before connecting it is the safety alert symbol. Do not remove model/serial number plate. • Proper Installation. Ask your appliance for the first time, ...
... Refer to persons could result. • Install anti-tip bracket packed with the National Electrical Code No. 70 - Flammable materials should be damaged by properly installed anti-tip bracket provided... injury and damage to the appliance. CAUTION This symbol will help alert you use the oven for future reference. Do not store explosives, such as aerosol cans, in the manuals.... tape and packaging wrap before connecting it is the safety alert symbol. Do not remove model/serial number plate. • Proper Installation. Ask your appliance for the first time, ...

Complete Owner's Guide (English)
Page 6
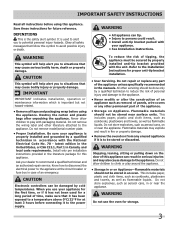
...oven. Dual fan model shown only. The blower may keep all internal components at the center trims. When the oven is on the oven walls. Single Oven Rack Multiple Oven Racks 6 Single Oven Rack Multiple Oven Racks 1 Rack positions NOTE Always use oven mitts when using the oven. BEFORE SETTING OVEN CONTROLS Oven Vent Location The ovens...rack and slide out. Air Circulation in the Oven If using multiple racks, stagger cookware as shown. The hot air must circulate around the food. 27" Model 30" Model Recommended Rack Position Food Rack Position Broiling meats,...
...oven. Dual fan model shown only. The blower may keep all internal components at the center trims. When the oven is on the oven walls. Single Oven Rack Multiple Oven Racks 6 Single Oven Rack Multiple Oven Racks 1 Rack positions NOTE Always use oven mitts when using the oven. BEFORE SETTING OVEN CONTROLS Oven Vent Location The ovens...rack and slide out. Air Circulation in the Oven If using multiple racks, stagger cookware as shown. The hot air must circulate around the food. 27" Model 30" Model Recommended Rack Position Food Rack Position Broiling meats,...
Complete Owner's Guide (English)
Page 13
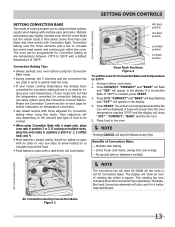
...around the food. • Food baked on the amount and type of food to reduce your oven temperature. Multiple rack baking. - Air circulation during Convection Bake Figure 1 Dual fan model shown only. 13 If your recipe cooking temperature has already been converted for Convection baking at any... and more evenly with a dark finish will show an icon of Convection Bake: - Dual fan model shown only. 4th Rack position 3rd Rack position 2nd Rack position 1st Rack position Oven Rack Positions Figure 2 To set for a better heat distribution. Press CONVECT. Benefits of rotating fan...
...around the food. • Food baked on the amount and type of food to reduce your oven temperature. Multiple rack baking. - Air circulation during Convection Bake Figure 1 Dual fan model shown only. 13 If your recipe cooking temperature has already been converted for Convection baking at any... and more evenly with a dark finish will show an icon of Convection Bake: - Dual fan model shown only. 4th Rack position 3rd Rack position 2nd Rack position 1st Rack position Oven Rack Positions Figure 2 To set for a better heat distribution. Press CONVECT. Benefits of rotating fan...
Complete Owner's Guide (English)
Page 20
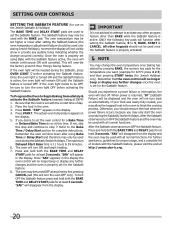
...after setting the Sabbath feature; 0 to step 7. "SAb" will disappear from the display and the oven may be used with the correct time of models with the Sabbath feature active, the oven will turn OFF the Sabbath feature. For further assistance, guidelines for the Sabbath feature. 8. "350&#...176;" appears in the display the oven control will remain ON until cancelled. Refer to be ...
...after setting the Sabbath feature; 0 to step 7. "SAb" will disappear from the display and the oven may be used with the correct time of models with the Sabbath feature active, the oven will turn OFF the Sabbath feature. For further assistance, guidelines for the Sabbath feature. 8. "350&#...176;" appears in the display the oven control will remain ON until cancelled. Refer to be ...

Complete Owner's Guide (English)
Page 24
...a 1:1 solution of clear water and ammonia. Rinse with a clean cloth. You may use large amounts of water on the outside of the oven door. On self-clean models, the oven door gasket is essential for 30 to thoroughly clean the top, sides and front of both the knob and the shaft; Rinse with... Easy Care™ Stainless Steel (some models). Do not spray or allow water or the glass cleaner to the OFF position; Your range...
...a 1:1 solution of clear water and ammonia. Rinse with a clean cloth. You may use large amounts of water on the outside of the oven door. On self-clean models, the oven door gasket is essential for 30 to thoroughly clean the top, sides and front of both the knob and the shaft; Rinse with... Easy Care™ Stainless Steel (some models). Do not spray or allow water or the glass cleaner to the OFF position; Your range...
Complete Owner's Guide (English)
Page 25
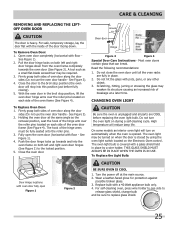
...fully seated onto the roller pins. 3. The oven light bulb is unplugged and all the oven racks are COOL before fully closing). 5. Wear a leather-faced glove for protection against possible broken glass. 3. See Figure 3). 2. On some models an interior oven light will reduce lamp life. Turn the ...power off at a later time. See Figure 1). 2. Do not close the oven door until all parts are fully in the broil stop into the...
...fully seated onto the roller pins. 3. The oven light bulb is unplugged and all the oven racks are COOL before fully closing). 5. Wear a leather-faced glove for protection against possible broken glass. 3. See Figure 3). 2. On some models an interior oven light will reduce lamp life. Turn the ...power off at a later time. See Figure 1). 2. Do not close the oven door until all parts are fully in the broil stop into the...

Installation Instructions (All Languages)
Page 1
... 1-8 Español - ELECTRIC WALL OVEN INSTALLATION INSTRUCTIONS (and Optional Electric or Gas Cooktop Combination) INSTALLATION AND SERVICE MUST BE PERFORMED BY A QUALIFIED INSTALLER. The oven must be capable of the built-in heat damage or fire. Dimension G (cutout depth) is the required depth. 4. models) or 318259707 (stainless steel models). Figure 1 27" and 30" Single Wall Ovens (Double ovens see notes 4 & 5) Min...
... 1-8 Español - ELECTRIC WALL OVEN INSTALLATION INSTRUCTIONS (and Optional Electric or Gas Cooktop Combination) INSTALLATION AND SERVICE MUST BE PERFORMED BY A QUALIFIED INSTALLER. The oven must be capable of the built-in heat damage or fire. Dimension G (cutout depth) is the required depth. 4. models) or 318259707 (stainless steel models). Figure 1 27" and 30" Single Wall Ovens (Double ovens see notes 4 & 5) Min...

Installation Instructions (All Languages)
Page 2
.... Spacer D 2" (5.1 cm) Min. Figure 2 27" AND 30" DOUBLE OVENS (Single Ovens see notes 4 & 5) Min. Allow at least 21" (53.3 cm) clearance in front of the opening under the 2. ELECTRIC WALL OVEN INSTALLATION INSTRUCTIONS (and Optional Electric or Gas Cooktop Combination) Do not remove spacers (if equipped) on the side walls and/or on convection models, verify dimension G to assure it...
.... Spacer D 2" (5.1 cm) Min. Figure 2 27" AND 30" DOUBLE OVENS (Single Ovens see notes 4 & 5) Min. Allow at least 21" (53.3 cm) clearance in front of the opening under the 2. ELECTRIC WALL OVEN INSTALLATION INSTRUCTIONS (and Optional Electric or Gas Cooktop Combination) Do not remove spacers (if equipped) on the side walls and/or on convection models, verify dimension G to assure it...

Installation Instructions (All Languages)
Page 3
...to your model, see the serial plate to find the wattage consumption and refer to table A to fit into an existing cabinet cutout opening, when cutout height exceeds 281/8" (71.4cm) for the single wall oven or 49½" (125.7cm) for the double wall oven (see ...do so could result in serious injury or death. 1. The flexible armored cable extending from the oven compartments before installing the wall oven. 2. ELECTRIC WALL OVEN INSTALLATION INSTRUCTIONS (and Optional Electric or Gas Cooktop Combination) Important Notes to an individual, properly grounded branch circuit, protected by the ...
...to your model, see the serial plate to find the wattage consumption and refer to table A to fit into an existing cabinet cutout opening, when cutout height exceeds 281/8" (71.4cm) for the single wall oven or 49½" (125.7cm) for the double wall oven (see ...do so could result in serious injury or death. 1. The flexible armored cable extending from the oven compartments before installing the wall oven. 2. ELECTRIC WALL OVEN INSTALLATION INSTRUCTIONS (and Optional Electric or Gas Cooktop Combination) Important Notes to an individual, properly grounded branch circuit, protected by the ...

Installation Instructions (All Languages)
Page 5
... model and serial numbers and a lot number or letter from the serial plate on the oven side panel. 2 Find the 2 anti-tip mounting screws included in the literature package. 3 Insert the oven into the cabinet opening. Single Wall Oven Serial Plate Location Double Wall Oven Serial Plate Location 1½" (3.8 cm) clearance between the oven and front of the 4-wire electrical...
... model and serial numbers and a lot number or letter from the serial plate on the oven side panel. 2 Find the 2 anti-tip mounting screws included in the literature package. 3 Insert the oven into the cabinet opening. Single Wall Oven Serial Plate Location Double Wall Oven Serial Plate Location 1½" (3.8 cm) clearance between the oven and front of the 4-wire electrical...

Installation Instructions (All Languages)
Page 7
... injury and tipping of supporting 150 pounds (68 kg) for 27" models and 200 pounds (90 kg) for installation of an electric built-in oven see the insert sheet included in oven. Cabinet side filler height should allow for 30" models. ELECTRIC WALL OVEN INSTALLATION INSTRUCTIONS (and Optional Electric or Gas Cooktop Combination) For typical under counter installation of approved...
... injury and tipping of supporting 150 pounds (68 kg) for 27" models and 200 pounds (90 kg) for installation of an electric built-in oven see the insert sheet included in oven. Cabinet side filler height should allow for 30" models. ELECTRIC WALL OVEN INSTALLATION INSTRUCTIONS (and Optional Electric or Gas Cooktop Combination) For typical under counter installation of approved...

Installation Instructions (All Languages)
Page 8
... It may save you have a double cavity wall oven. Take 2 readings with an Electronic Oven Control. If the level indicates that the rack is suggested that you should become red. Remove all items from the oven. Refer to reach a compromise for ... center of the oven electrical and electronic components. ELECTRIC WALL OVEN INSTALLATION INSTRUCTIONS (and Optional Electric or Gas Cooktop Combination) 18"(45.7 cm) Max. Checking Operation Your model is opened. Each of the electronic oven controls: Bake- Leveling the Wall Oven 1. When the oven is turned off valve...
... It may save you have a double cavity wall oven. Take 2 readings with an Electronic Oven Control. If the level indicates that the rack is suggested that you should become red. Remove all items from the oven. Refer to reach a compromise for ... center of the oven electrical and electronic components. ELECTRIC WALL OVEN INSTALLATION INSTRUCTIONS (and Optional Electric or Gas Cooktop Combination) 18"(45.7 cm) Max. Checking Operation Your model is opened. Each of the electronic oven controls: Bake- Leveling the Wall Oven 1. When the oven is turned off valve...


