
Installation Instructions (All Languages)
Page 4
... for Mobile Home Construction and Safety, title 24, HUD (part 280)] or when such standard is anchored. • Make sure the wall coverings around the range can withstand the heat generated by installing a range hood that project horizontally a minimum of 5 inches beyond the...range without shrinking, warping or discoloring. As children grow, teach them the proper, safe use and future reference. Observe all appliances. Read all controls to the Consumer Keep these installation instructions before self-cleaning the oven. The serial plate is unattended. 30" ELECTRIC SLIDE-IN RANGE...
... for Mobile Home Construction and Safety, title 24, HUD (part 280)] or when such standard is anchored. • Make sure the wall coverings around the range can withstand the heat generated by installing a range hood that project horizontally a minimum of 5 inches beyond the...range without shrinking, warping or discoloring. As children grow, teach them the proper, safe use and future reference. Observe all appliances. Read all controls to the Consumer Keep these installation instructions before self-cleaning the oven. The serial plate is unattended. 30" ELECTRIC SLIDE-IN RANGE...

Installation Instructions (All Languages)
Page 9
...Check Operation Refer to BROIL, the upper element in the OFF position. When ordering parts for or making inquiries about your range, always be hot enough to not damage the countertop, slide range into cut -out opening and double check for a self-cleaning cycle, the upper... check to order parts. 2. The list includes common occurrences that you call or write if you time and expense. Taking care to cause burns. Broil-When the oven is located on your range. 30" ELECTRIC SLIDE-IN RANGE INSTALLATION INSTRUCTIONS 6. Leveling the Range Level the range and set to...
...Check Operation Refer to BROIL, the upper element in the OFF position. When ordering parts for or making inquiries about your range, always be hot enough to not damage the countertop, slide range into cut -out opening and double check for a self-cleaning cycle, the upper... check to order parts. 2. The list includes common occurrences that you call or write if you time and expense. Taking care to cause burns. Broil-When the oven is located on your range. 30" ELECTRIC SLIDE-IN RANGE INSTALLATION INSTRUCTIONS 6. Leveling the Range Level the range and set to...
Installation Instructions (All Languages)
Page 10
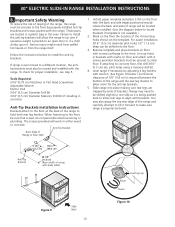
...work in brackets with 4 screws provided. Line up flange to tilt it . Those parts are trapped by properly installed anti-tip brackets and screws packed with body sides) Leveling Leg Raise Lower Figure 9 Slide Back 10 Figure 10 pilot holes using a masonry drill bit. 4. You may need... in the oven. CL 9 1/8" (23.2 cm) 18¼" (46.4 cm) Anti-Tip Bracket 28 1/8" (71.4 cm) (Rear width of the range and carefully attempt to the front. 30" ELECTRIC SLIDE-IN RANGE INSTALLATION INSTRUCTIONS 8. When fastening to concrete floor, first drill 3/16" (0.5 cm) dia.
...work in brackets with 4 screws provided. Line up flange to tilt it . Those parts are trapped by properly installed anti-tip brackets and screws packed with body sides) Leveling Leg Raise Lower Figure 9 Slide Back 10 Figure 10 pilot holes using a masonry drill bit. 4. You may need... in the oven. CL 9 1/8" (23.2 cm) 18¼" (46.4 cm) Anti-Tip Bracket 28 1/8" (71.4 cm) (Rear width of the range and carefully attempt to the front. 30" ELECTRIC SLIDE-IN RANGE INSTALLATION INSTRUCTIONS 8. When fastening to concrete floor, first drill 3/16" (0.5 cm) dia.

Complete Owner's Guide (English)
Page 3
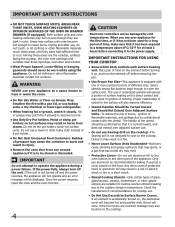
...To reduce the risk of an emergency. • User Servicing. Know how to disconnect the electrical power to children in case of tipping, the appliance must be done only by a qualified ...grounded by removing leveling legs, panels, wire covers, anti-tip brackets/screws, or any part of interest to the appliance at the circuit breaker or fuse box in the cabinets above... future reference. Ask your appliance is used to alert you to the Installation Instructions for this range. Do not allow children to the appliance. Refer to potential personal injury hazards. An open ...
...To reduce the risk of an emergency. • User Servicing. Know how to disconnect the electrical power to children in case of tipping, the appliance must be done only by a qualified ...grounded by removing leveling legs, panels, wire covers, anti-tip brackets/screws, or any part of interest to the appliance at the circuit breaker or fuse box in the cabinets above... future reference. Ask your appliance is used to alert you to the Installation Instructions for this range. Do not allow children to the appliance. Refer to potential personal injury hazards. An open ...
Complete Owner's Guide (English)
Page 4
... though they have had sufficient time to unintentional contact with one or more surface burners of flammable materials, and spillage due to cool. Any other part of food on the element before removing the pan. • Use Proper Pan Size-This appliance is not designed for use baking soda, a... until they are the cooktop, surfaces facing the cooktop, the oven vent openings and surfaces near surface units may result in a risk of electric shock or fire or a short circuit. • Glazed Cooking Utensils-Only certain types of a pot holder. • Do Not Heat Unopened Food Containers...
... though they have had sufficient time to unintentional contact with one or more surface burners of flammable materials, and spillage due to cool. Any other part of food on the element before removing the pan. • Use Proper Pan Size-This appliance is not designed for use baking soda, a... until they are the cooktop, surfaces facing the cooktop, the oven vent openings and surfaces near surface units may result in a risk of electric shock or fire or a short circuit. • Glazed Cooking Utensils-Only certain types of a pot holder. • Do Not Heat Unopened Food Containers...
Complete Owner's Guide (English)
Page 5
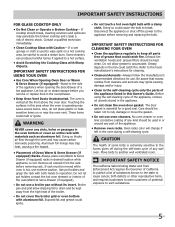
...birds to accumulate. Let hot air or steam escape before you remove or replace food in the oven during the self-clean cycle of any part of the appliance. • Remove oven racks. Aluminum foil linings may cause severe burns. Doing so could catch fire. Refer to such ...WARNING NEVER cover any kind should break, cleaning solutions and spillovers may cause carbon monoxide poisoning. Remove all parts free of grease that excess residue from the high heat of electric shock. The door gasket is vented at the front above the oven door. IMPORTANT SAFETY INSTRUCTIONS FOR CLEANING...
...birds to accumulate. Let hot air or steam escape before you remove or replace food in the oven during the self-clean cycle of any part of the appliance. • Remove oven racks. Aluminum foil linings may cause severe burns. Doing so could catch fire. Refer to such ...WARNING NEVER cover any kind should break, cleaning solutions and spillovers may cause carbon monoxide poisoning. Remove all parts free of grease that excess residue from the high heat of electric shock. The door gasket is vented at the front above the oven door. IMPORTANT SAFETY INSTRUCTIONS FOR CLEANING...
Complete Owner's Guide (English)
Page 18
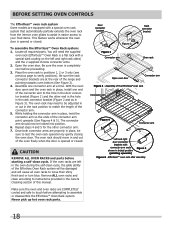
... supplied chrome connector arms. 2. Effortless™ oven rack after assembly 18 You will cause all required parts. The oven rack should now be sure to assemble or disassemble the Effortless™ Oven Rack system. Never ... in the door connector bracket (Figure 1) and the other connector arm. 7. CAUTION REMOVE ALL OVEN RACKS and parts before attempting to test the oven rack operation by gently closing the oven door. To assemble the Effortless™ Oven...and the oven rack in the Care & Cleaning section of the range and pointing towards oven bottom (See Figure 2). 4.
... supplied chrome connector arms. 2. Effortless™ oven rack after assembly 18 You will cause all required parts. The oven rack should now be sure to assemble or disassemble the Effortless™ Oven Rack system. Never ... in the door connector bracket (Figure 1) and the other connector arm. 7. CAUTION REMOVE ALL OVEN RACKS and parts before attempting to test the oven rack operation by gently closing the oven door. To assemble the Effortless™ Oven...and the oven rack in the Care & Cleaning section of the range and pointing towards oven bottom (See Figure 2). 4.
Complete Owner's Guide (English)
Page 28
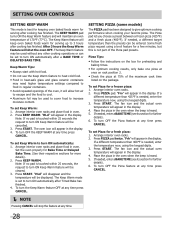
... KEEP WARM. Note: If no pad is heard. 5. Press START. "HLd" will disappear and the temperature will be entered. The Keep Warm mode is not part of the maximum cook time listed on the box for a fresh pizza: 1. To turn ON automatically after cooking has finished. If needed, a different target temperature...
... KEEP WARM. Note: If no pad is heard. 5. Press START. "HLd" will disappear and the temperature will be entered. The Keep Warm mode is not part of the maximum cook time listed on the box for a fresh pizza: 1. To turn ON automatically after cooking has finished. If needed, a different target temperature...
Complete Owner's Guide (English)
Page 33
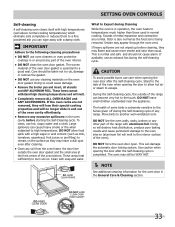
These items cannot withstand high cleaning temperatures and will no longer slide in and out of the range can become very hot to the touch. Odor is also normal as ... a dull spot even after the Self-Cleaning cycle. DO NOT line the oven walls, racks, bottom or any part of the oven bottom. DO NOT force the oven door open. The oven may appear through the oven vent. Doing...DO NOT use oven cleaners or oven protective coatings in or around any other part of any excessive spillovers in normal cooking. Use caution when opening the door to temperatures much higher than usual.
These items cannot withstand high cleaning temperatures and will no longer slide in and out of the range can become very hot to the touch. Odor is also normal as ... a dull spot even after the Self-Cleaning cycle. DO NOT line the oven walls, racks, bottom or any part of the oven bottom. DO NOT force the oven door open. The oven may appear through the oven vent. Doing...DO NOT use oven cleaners or oven protective coatings in or around any other part of any excessive spillovers in normal cooking. Use caution when opening the door to temperatures much higher than usual.
Complete Owner's Guide (English)
Page 36
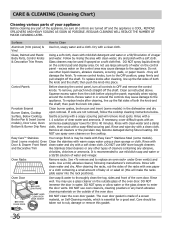
... line up the flat sides of major cleaning later. Easy Care™ Stainless Your range finish is may be sure all cleaners or the porcelain may use ANY store bought ...soap and water or a 50/50 solution of the oven door. Vinyl Glass, Painted and Plastic Body Parts, Control Knobs & Decorative Trim Pieces Using a soft cloth, clean with Easy Care™ Stainless Steel... water in or around the controls. If soils are turned off and the appliance is essential for 30 to use oven cleaners, cleaning powders or any abrasive, chlorides, chlorines or ammonia. Rinse with Door...
... line up the flat sides of major cleaning later. Easy Care™ Stainless Your range finish is may be sure all cleaners or the porcelain may use ANY store bought ...soap and water or a 50/50 solution of the oven door. Vinyl Glass, Painted and Plastic Body Parts, Control Knobs & Decorative Trim Pieces Using a soft cloth, clean with Easy Care™ Stainless Steel... water in or around the controls. If soils are turned off and the appliance is essential for 30 to use oven cleaners, cleaning powders or any abrasive, chlorides, chlorines or ammonia. Rinse with Door...
Complete Owner's Guide (English)
Page 38
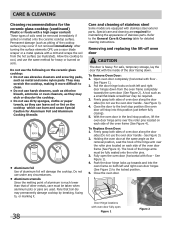
They may scratch the cooktop, making it . 38 Care and cleaning of stainless steel Some models are equipped with stainless steel exterior parts. See Figure 1). 2. See Figure 3). 4. Close the door to clean. • Do not use abrasive cleaners and scouring pads, such as a small flat-blade screwdriver may...and Aluminum Cooking Utensils • Aluminum foil Use of aluminum foil will stop position (the oven door will damage the cooktop. Pans that of stainless parts. After turning the surface elements OFF, use the oven door handle - Permanent damage (such as illustrated).
They may scratch the cooktop, making it . 38 Care and cleaning of stainless steel Some models are equipped with stainless steel exterior parts. See Figure 1). 2. See Figure 3). 4. Close the door to clean. • Do not use abrasive cleaners and scouring pads, such as a small flat-blade screwdriver may...and Aluminum Cooking Utensils • Aluminum foil Use of aluminum foil will stop position (the oven door will damage the cooktop. Pans that of stainless parts. After turning the surface elements OFF, use the oven door handle - Permanent damage (such as illustrated).
Complete Owner's Guide (English)
Page 39
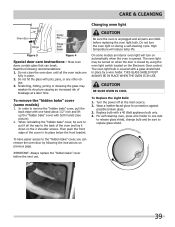
... below the front bracket. To have easier access to the back of breakage at the main source. 2. Do not close the oven door until all parts are fully in place by following recommendations: 1. High temperature will turn the oven light on automatically when the oven is covered with both hands (See...
... below the front bracket. To have easier access to the back of breakage at the main source. 2. Do not close the oven door until all parts are fully in place by following recommendations: 1. High temperature will turn the oven light on automatically when the oven is covered with both hands (See...
Complete Owner's Guide (English)
Page 43
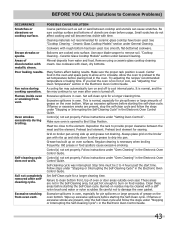
.... Brown streaks or specks. Flames inside oven or smoking from water and food. Soil not completely removed after oven is turned off to cool internal parts. Ceramic Glass Cooktop Models" section under "Oven Cleaning" in the Electronic Oven Control Guide. Remove using a ceramic-glass cooktop cleaning cream. It is normal, and...
.... Brown streaks or specks. Flames inside oven or smoking from water and food. Soil not completely removed after oven is turned off to cool internal parts. Ceramic Glass Cooktop Models" section under "Oven Cleaning" in the Electronic Oven Control Guide. Remove using a ceramic-glass cooktop cleaning cream. It is normal, and...
Complete Owner's Guide (English)
Page 44
... Way Mississauga, Ontario, Canada L5V 3E4 For one year. Products with the provided instructions. 8. Products used other than genuine Electrolux parts or parts obtained from any implied warranty. or external causes such as -is" are limited to repair or replace appliance light bulbs, air ... original date of Electrolux Home Products, Inc. Obligations for consequential or incidental damages such as described or illustrated are not a part of appliance or home incurred during installation, including but not less than authorized service companies; Damages to the finish of the...
... Way Mississauga, Ontario, Canada L5V 3E4 For one year. Products with the provided instructions. 8. Products used other than genuine Electrolux parts or parts obtained from any implied warranty. or external causes such as -is" are limited to repair or replace appliance light bulbs, air ... original date of Electrolux Home Products, Inc. Obligations for consequential or incidental damages such as described or illustrated are not a part of appliance or home incurred during installation, including but not less than authorized service companies; Damages to the finish of the...

Parts Catalog
Page 3
NO 19 # 19* 20 # 23 24 30 31 40 50 55 55A 96 # 97A# 141# PART NO. 318922144 5304447071 316560143 318921300 318913101 318928500 316564406 318912907 318917700 316247700 316247800 318411401 316442062 318005228 DESCRIPTION Panel Assembly, control, stainless, w/overlay-trim Clip, console, (2) ... * # 318224861 Harness, wiring, timer * 08016432 Screw, truss head, 8-18 x 0.375 * 5304436875 Screw, 8-18 X 1/2, black * 5304453707 Screw, 8-18 X 1/2 * 5304454881 Screw, #8-18 x 3/8 Publication No: 5995560231 # Functional Parts 3 * Non-Illustrated Parts 02/10 FPES3085KFB BACKGUARD POS.
NO 19 # 19* 20 # 23 24 30 31 40 50 55 55A 96 # 97A# 141# PART NO. 318922144 5304447071 316560143 318921300 318913101 318928500 316564406 318912907 318917700 316247700 316247800 318411401 316442062 318005228 DESCRIPTION Panel Assembly, control, stainless, w/overlay-trim Clip, console, (2) ... * # 318224861 Harness, wiring, timer * 08016432 Screw, truss head, 8-18 x 0.375 * 5304436875 Screw, 8-18 X 1/2, black * 5304453707 Screw, 8-18 X 1/2 * 5304454881 Screw, #8-18 x 3/8 Publication No: 5995560231 # Functional Parts 3 * Non-Illustrated Parts 02/10 FPES3085KFB BACKGUARD POS.

Parts Catalog
Page 5
...21 29 37 # 58A 58B 58C 58D 59 62 62* 62* 62* 62* 66 # 67 # 68 70 71 76 77 77A 80 81 * 82 83 PART NO. 318259224 318225110 5303324184 318258957 318225210 318225211 318927600 318175508 318922301 318926803 318921600 318929702 318297303 318359500 318313601 316081900 316082000 316445501 318224000 5303013071 318406100 5304400195 318222400 318368501... (2) Panel, rear box Front, oven Spacer, control, (4) Spacer Plate, oven mtg Spring, oven Screw, 8 X 0.750 Shield, insulation, lower Liner, oven assy Publication No: 5995560231 # Functional Parts 5 * Non-Illustrated Parts 02/10 FPES3085KFB BODY POS.
...21 29 37 # 58A 58B 58C 58D 59 62 62* 62* 62* 62* 66 # 67 # 68 70 71 76 77 77A 80 81 * 82 83 PART NO. 318259224 318225110 5303324184 318258957 318225210 318225211 318927600 318175508 318922301 318926803 318921600 318929702 318297303 318359500 318313601 316081900 316082000 316445501 318224000 5303013071 318406100 5304400195 318222400 318368501... (2) Panel, rear box Front, oven Spacer, control, (4) Spacer Plate, oven mtg Spring, oven Screw, 8 X 0.750 Shield, insulation, lower Liner, oven assy Publication No: 5995560231 # Functional Parts 5 * Non-Illustrated Parts 02/10 FPES3085KFB BODY POS.
Parts Catalog
Page 7
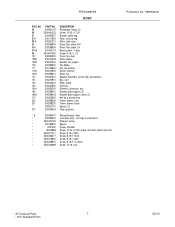
...8-18 X 13/32 * 5304415832 Screw, 8-18 x 0.406 * 5304436875 Screw, 8-18 X 1/2, black * 5304440988 Screw, 10-16 x 3/4 Publication No: 5995560231 # Functional Parts 7 * Non-Illustrated Parts 02/10 NO 86 86* 87 87A 89 # 90 90A 97A# 98 107 108# 108A 109 111 119# 125# 127 131 132 133 161...# 166 166A 170 200 201 * 272 PART NO. 318561100 5304461333 318260627 318111806 318261221 318296904 318296905 316442119 5304401490 318550200 318073028 318251300 318398300 316136600 318004902 318398201 318357001 318272901 318003000 318347800 318535300 ...
...8-18 X 13/32 * 5304415832 Screw, 8-18 x 0.406 * 5304436875 Screw, 8-18 X 1/2, black * 5304440988 Screw, 10-16 x 3/4 Publication No: 5995560231 # Functional Parts 7 * Non-Illustrated Parts 02/10 NO 86 86* 87 87A 89 # 90 90A 97A# 98 107 108# 108A 109 111 119# 125# 127 131 132 133 161...# 166 166A 170 200 201 * 272 PART NO. 318561100 5304461333 318260627 318111806 318261221 318296904 318296905 316442119 5304401490 318550200 318073028 318251300 318398300 316136600 318004902 318398201 318357001 318272901 318003000 318347800 318535300 ...

Parts Catalog
Page 9
...* 15 # 15A# 15B# 15C# 16 29 39 46 52 52A 52B 60 * 81 # 84 # 85 86 87 90 95 124 165 PART NO. 318304404 318300003 318300301 318303907 318298825 318259509 318259508 5304476994 318198936 318258203 316530000 318198843 318916901 318147430 316551500 318921402 318122006 318122010 318122008 5304472906 3201909 318255301 318005108 318345601...318228950 Harness, wiring, cooktop * 5303211311 Screw, 8-18 x 0.500 * 5303300265 Screw, 8-18 X 1/2, (4) * 5303307980 Screw, 8-32 x 0.437, (8) * 5304454881 Screw, #8-18 x 3/8 Publication No: 5995560231 # Functional Parts 9 * Non-Illustrated Parts 02/10
...* 15 # 15A# 15B# 15C# 16 29 39 46 52 52A 52B 60 * 81 # 84 # 85 86 87 90 95 124 165 PART NO. 318304404 318300003 318300301 318303907 318298825 318259509 318259508 5304476994 318198936 318258203 316530000 318198843 318916901 318147430 316551500 318921402 318122006 318122010 318122008 5304472906 3201909 318255301 318005108 318345601...318228950 Harness, wiring, cooktop * 5303211311 Screw, 8-18 x 0.500 * 5303300265 Screw, 8-18 X 1/2, (4) * 5303307980 Screw, 8-32 x 0.437, (8) * 5304454881 Screw, #8-18 x 3/8 Publication No: 5995560231 # Functional Parts 9 * Non-Illustrated Parts 02/10

Parts Catalog
Page 11
NO 3A 3B 6 7 7A 8 9 10 12 13 16 17 18 * 23 * 39 40 41 42 56 64 PART NO. 318260401 318262101 318260522 318372000 318372002 316117500 318411610 5304472906 318053132 318927800 318212210 318264710 316547900 08016432 318567100 5304461333 316551500 318242702 318370600 318382301 5304476599 318165800 DESCRIPTION ... glass holder, door, (2) Bracket, glass retainer, (2) Bracket, glass retainer, (4) Screw, 8-18 x 3/8, (4) Spacer * 316221001 Label, anti-tip * 5304436875 Screw, 8-18 X 1/2, black Publication No: 5995560231 # Functional Parts 11 * Non-Illustrated Parts 02/10 FPES3085KFB DOOR POS.
NO 3A 3B 6 7 7A 8 9 10 12 13 16 17 18 * 23 * 39 40 41 42 56 64 PART NO. 318260401 318262101 318260522 318372000 318372002 316117500 318411610 5304472906 318053132 318927800 318212210 318264710 316547900 08016432 318567100 5304461333 316551500 318242702 318370600 318382301 5304476599 318165800 DESCRIPTION ... glass holder, door, (2) Bracket, glass retainer, (2) Bracket, glass retainer, (4) Screw, 8-18 x 3/8, (4) Spacer * 316221001 Label, anti-tip * 5304436875 Screw, 8-18 X 1/2, black Publication No: 5995560231 # Functional Parts 11 * Non-Illustrated Parts 02/10 FPES3085KFB DOOR POS.

Parts Catalog
Page 13
FPES3085KFB WIRING DIAGRAM Publication No: 5995560231 # Functional Parts 13 * Non-Illustrated Parts 02/10
FPES3085KFB WIRING DIAGRAM Publication No: 5995560231 # Functional Parts 13 * Non-Illustrated Parts 02/10


