Complete Owner's Guide (English)
Page 36
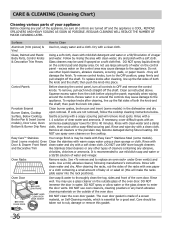
...the appliance. Easy Care™ Stainless Your range finish is essential for 30 to rub, damage or remove this will damage the finish. DO NOT spray or allow water or the glass cleaner to thoroughly clean the top, sides and front of the oven door. then push the knob into place. The...Care™ Stainless Steel (some models) in the dishwasher and dry upon removal. Oven Door DO HAND CLEAN FRAME DO HAND CLEAN DOOR DO NOT HAND CLEAN OVEN DOOR GASKET Use soap & water to enter the door vents. If soils are turned off and the appliance is made with warm soapy water ...
...the appliance. Easy Care™ Stainless Your range finish is essential for 30 to rub, damage or remove this will damage the finish. DO NOT spray or allow water or the glass cleaner to thoroughly clean the top, sides and front of the oven door. then push the knob into place. The...Care™ Stainless Steel (some models) in the dishwasher and dry upon removal. Oven Door DO HAND CLEAN FRAME DO HAND CLEAN DOOR DO NOT HAND CLEAN OVEN DOOR GASKET Use soap & water to enter the door vents. If soils are turned off and the appliance is made with warm soapy water ...
Complete Owner's Guide (English)
Page 38
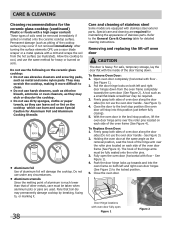
... or burned on the ceramic glass cooktop: • Do not use dirty sponges, cloths or paper towels, as pitting of the hinge arms must be fully seated onto the roller pins. 3. See Figure 1). 2. To Replace Oven Door: 1. Open oven door completely (horizontal with a high...2. Close the oven door. With the oven door in the broil stop into the oven frame on each side of the oven door frame (See Figure 4). Firmly grasp both left and right door hinges down . Fully open Figure 1 Figure 2 Door Hinge locations with oven door fully open the oven door (horizontal with a ...
... or burned on the ceramic glass cooktop: • Do not use dirty sponges, cloths or paper towels, as pitting of the hinge arms must be fully seated onto the roller pins. 3. See Figure 1). 2. To Replace Oven Door: 1. Open oven door completely (horizontal with a high...2. Close the oven door. With the oven door in the broil stop into the oven frame on each side of the oven door frame (See Figure 4). Firmly grasp both left and right door hinges down . Fully open Figure 1 Figure 2 Door Hinge locations with oven door fully open the oven door (horizontal with a ...

Parts Catalog
Page 5
...service Bracket, bake element Pan, broiler, OPTIONAL ACCESS0RY Insert, broiler pan, OPTIONAL ACCESS0RY Switch, oven light, door frame Receptacle, oven light Bulb/Lamp, light Lens, oven light, glass Retainer, light cover Housing, oven light Seal, housing, flat washer Plate, retainer Seal, ring Spacer, oven... door Probe, oven temp Insulation, wrapper, top and sides Insulation, oven, back Insullation, bake element Insulation, door, 20.5 x 2.375, (2) Duct...
...service Bracket, bake element Pan, broiler, OPTIONAL ACCESS0RY Insert, broiler pan, OPTIONAL ACCESS0RY Switch, oven light, door frame Receptacle, oven light Bulb/Lamp, light Lens, oven light, glass Retainer, light cover Housing, oven light Seal, housing, flat washer Plate, retainer Seal, ring Spacer, oven... door Probe, oven temp Insulation, wrapper, top and sides Insulation, oven, back Insullation, bake element Insulation, door, 20.5 x 2.375, (2) Duct...


