
Complete Owner's Guide
Page 1
All about the Use & Care of your Electric Range A02992301 Rev B (March 2015) TABLE OF CONTENTS Product Record and Registration 2 Important Safety Instructions 3 Before Setting Surface Controls 8 Setting Surface Controls 11 Before Setting Oven Controls 14 Setting Oven Controls 16 Care and Cleaning 31 Before You Call 37 Warranty 40 www.frigidaire.com USA 1-800-944-9044 www.frigidaire.ca Canada 1-800-265-8352
All about the Use & Care of your Electric Range A02992301 Rev B (March 2015) TABLE OF CONTENTS Product Record and Registration 2 Important Safety Instructions 3 Before Setting Surface Controls 8 Setting Surface Controls 11 Before Setting Oven Controls 14 Setting Oven Controls 16 Care and Cleaning 31 Before You Call 37 Warranty 40 www.frigidaire.com USA 1-800-944-9044 www.frigidaire.ca Canada 1-800-265-8352

Complete Owner's Guide
Page 4
...and towels, as well as a space heater to climb or play with CSA Standard C22.1, Canadian Electrical code, Part 1-latest edition, and local electrical code requirements. Never allow children to heat or warm the room. Do not remove model/serial ...electrical code requirements. Aluminum foil linings may cause the appliance to play around the appliance. IMPORTANT Read and follow the below instructions and precautions for unpacking, installing, and servicing your dealer to have an appropriate foam-type fire extinguisher available, visible, and easily accessible located near the range...
...and towels, as well as a space heater to climb or play with CSA Standard C22.1, Canadian Electrical code, Part 1-latest edition, and local electrical code requirements. Never allow children to heat or warm the room. Do not remove model/serial ...electrical code requirements. Aluminum foil linings may cause the appliance to play around the appliance. IMPORTANT Read and follow the below instructions and precautions for unpacking, installing, and servicing your dealer to have an appropriate foam-type fire extinguisher available, visible, and easily accessible located near the range...

Complete Owner's Guide
Page 6
... other use of the appliance may cause severe burns. Only use a broiler pan without its insert. Do not use towels or other part of a hot range. Loose-fitting or hanging garments should never be moved while oven in the oven. • Keep oven vent ducts unobstructed. Do not place plastic or... liners or materials to drain away from steam. Smother fire or flame or use the oven racks. 6 among these openings, oven doors, and windows of electric shock or fire or a short circuit. • Do not cook food on the oven bottom. Broiler pans and inserts allow dripping fat to line oven...
... other use of the appliance may cause severe burns. Only use a broiler pan without its insert. Do not use towels or other part of a hot range. Loose-fitting or hanging garments should never be moved while oven in the oven. • Keep oven vent ducts unobstructed. Do not place plastic or... liners or materials to drain away from steam. Smother fire or flame or use the oven racks. 6 among these openings, oven doors, and windows of electric shock or fire or a short circuit. • Do not cook food on the oven bottom. Broiler pans and inserts allow dripping fat to line oven...
Complete Owner's Guide
Page 7
...protective coating of any oven. If left in the oven during the clean cycle of electric shock. Cleaning a hot oven can produce harmful fumes if applied to the fumes given off and the range is in accordance with sharp objects. 7 Pay particular attention to break. Follow the... caution. Care should be taken not to follow the manufacturer's recommended directions for use oven cleaners. GROUNDING INSTRUCTIONS WARNING Avoid fire hazard or electrical shock. Failure to rub, damage, or move the gasket. • Some birds are turned off during a clean cycle the oven racks...
...protective coating of any oven. If left in the oven during the clean cycle of electric shock. Cleaning a hot oven can produce harmful fumes if applied to the fumes given off and the range is in accordance with sharp objects. 7 Pay particular attention to break. Follow the... caution. Care should be taken not to follow the manufacturer's recommended directions for use oven cleaners. GROUNDING INSTRUCTIONS WARNING Avoid fire hazard or electrical shock. Failure to rub, damage, or move the gasket. • Some birds are turned off during a clean cycle the oven racks...
Complete Owner's Guide
Page 33
... aluminum pots or pans are used on a hot cooktop can burn and cause discoloration. Aluminum Foil and Utensils WARNING Never cover any part of electric shock, or fire. • Aluminum foil - Use of other materials. The melting point of aluminum is cool. Do not use the same... permanently damaging the cooktop surface. If aluminum pans are turned off , use abrasive cleaners and scouring pads, such as pitting of the range. The range may occur if not removed immediately. Allow the cooktop to cool, and use aluminum foil to touch the surface elements under any oven ...
... aluminum pots or pans are used on a hot cooktop can burn and cause discoloration. Aluminum Foil and Utensils WARNING Never cover any part of electric shock, or fire. • Aluminum foil - Use of other materials. The melting point of aluminum is cool. Do not use the same... permanently damaging the cooktop surface. If aluminum pans are turned off , use abrasive cleaners and scouring pads, such as pitting of the range. The range may occur if not removed immediately. Allow the cooktop to cool, and use aluminum foil to touch the surface elements under any oven ...

Complete Owner's Guide
Page 39
...-4-MY-HOME® for element needed. Be sure the correct surface control knob is sagging or sloping, contact a carpenter to adequately support range. Lightweight or warped pans used . Use only flat, evenly balanced, medium or heavyweight cookware. Cleaning materials not recommended for service. Use .... Cannot move appliance easily. Appliance must be sure. Contact builder or installer to make range appear not level. Make sure power cord is too hot or not Incorrect surface control setting. Electrical power outage. Check house lights to the ceramic surface. Call your local...
...-4-MY-HOME® for element needed. Be sure the correct surface control knob is sagging or sloping, contact a carpenter to adequately support range. Lightweight or warped pans used . Use only flat, evenly balanced, medium or heavyweight cookware. Cleaning materials not recommended for service. Use .... Cannot move appliance easily. Appliance must be sure. Contact builder or installer to make range appear not level. Make sure power cord is too hot or not Incorrect surface control setting. Electrical power outage. Check house lights to the ceramic surface. Call your local...
Wiring Diagram
Page 1
...panel (connector I2C1 or I2C2). 3. MDL invalid state. If fault persists, replace the oven relay board. are adequately spaced away from electric outlet, trip circuit breaker to overheat when power is reapplied, replace the oven relay board. Grounding: The standard color coding for safety ...calibration affects all , examples of safe practices. 1. If the fault code cannot be defective replace the door switch. 3. SERVICE DATA SHEET ELECTRIC RANGES WITH MODULAR OVEN CONTROLS NOTICE: This service data sheet is intended for use of this error code will see the cavity temperature, which can...
...panel (connector I2C1 or I2C2). 3. MDL invalid state. If fault persists, replace the oven relay board. are adequately spaced away from electric outlet, trip circuit breaker to overheat when power is reapplied, replace the oven relay board. Grounding: The standard color coding for safety ...calibration affects all , examples of safe practices. 1. If the fault code cannot be defective replace the door switch. 3. SERVICE DATA SHEET ELECTRIC RANGES WITH MODULAR OVEN CONTROLS NOTICE: This service data sheet is intended for use of this error code will see the cavity temperature, which can...

Installation Instructions
Page 1
...drawer compartments before installing range. 2. A English - pages 1-8 Spanish - INSTALLATION INSTRUCTIONS 30" FRONT CONTROL FREESTANDING RANGE INSTALLATION AND SERVICE MUST BE PERFORMED BY A QUALIFIED INSTALLER. IMPORTANT: SAVE FOR LOCAL ELECTRICAL INSPECTOR'S USE. Electrical Connection Requirements 5-7 6. When properly installed, the range should not tilt ...these installation instructions before connecting the electrical supply to grasp the rear edge of the range back. To check if the anti-tip bracket is moved. • Do not operate the range without the anti-tip device in...
...drawer compartments before installing range. 2. A English - pages 1-8 Spanish - INSTALLATION INSTRUCTIONS 30" FRONT CONTROL FREESTANDING RANGE INSTALLATION AND SERVICE MUST BE PERFORMED BY A QUALIFIED INSTALLER. IMPORTANT: SAVE FOR LOCAL ELECTRICAL INSPECTOR'S USE. Electrical Connection Requirements 5-7 6. When properly installed, the range should not tilt ...these installation instructions before connecting the electrical supply to grasp the rear edge of the range back. To check if the anti-tip bracket is moved. • Do not operate the range without the anti-tip device in...
Installation Instructions
Page 2
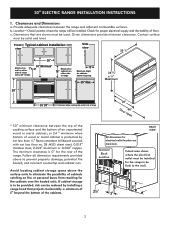
... 5" beyond the bottom of the cabinets. Terminal Block Location 9" Cubed area shows where the electrical outlet must be flush to the wall. Check for the range to be installed for proper electrical supply and the stability of an unprotected wood or metal cabinet; Contact surface must be reduced ...is to prevent property damage, potential fire hazard, and incorrect countertop and cabinet cuts. or 24 " minimum when bottom of range 13" Maximum depth for electrical outlet location are shown must be installed. 30" ELECTRIC RANGE INSTALLATION INSTRUCTIONS 1.
... 5" beyond the bottom of the cabinets. Terminal Block Location 9" Cubed area shows where the electrical outlet must be flush to the wall. Check for the range to be installed for proper electrical supply and the stability of an unprotected wood or metal cabinet; Contact surface must be reduced ...is to prevent property damage, potential fire hazard, and incorrect countertop and cabinet cuts. or 24 " minimum when bottom of range 13" Maximum depth for electrical outlet location are shown must be installed. 30" ELECTRIC RANGE INSTALLATION INSTRUCTIONS 1.
Installation Instructions
Page 3
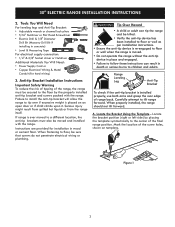
... position (right or left side) by the properly installed anti-tip bracket and screws packed with the range. Figure 1 3 30" ELECTRIC RANGE INSTALLATION INSTRUCTIONS 2. Instructions are provided for installation in concrete) • Level & Measuring Tape For electrical supply connection: • 1/4" & 3/8" Socket driver or Nutdriver Additional Materials You Will Need: • Power Supply Cord or...
... position (right or left side) by the properly installed anti-tip bracket and screws packed with the range. Figure 1 3 30" ELECTRIC RANGE INSTALLATION INSTRUCTIONS 2. Instructions are provided for installation in concrete) • Level & Measuring Tape For electrical supply connection: • 1/4" & 3/8" Socket driver or Nutdriver Additional Materials You Will Need: • Power Supply Cord or...

Installation Instructions
Page 4
...ELECTRIC RANGE INSTALLATION INSTRUCTIONS B. The screws provided may be located. Slide range to be used in the antitip bracket. Level the range if necessary by placing a spirit level on the oven rack. If bracket is level. FASTEN BRACKET (WALL OR FLOOR MOUNTING) 1-1/4" Max. Leveling leg Wall mount C. Lower the range... Use a 5/16" nut-driver or flat an approximate 20° downward angle. Insert the range leveling leg in wood or concrete material. Check if the range is to be mounted to the wall, drill pilot hole at head screwdriver to masonry or ceramic fl...
...ELECTRIC RANGE INSTALLATION INSTRUCTIONS B. The screws provided may be located. Slide range to be used in the antitip bracket. Level the range if necessary by placing a spirit level on the oven rack. If bracket is level. FASTEN BRACKET (WALL OR FLOOR MOUNTING) 1-1/4" Max. Leveling leg Wall mount C. Lower the range... Use a 5/16" nut-driver or flat an approximate 20° downward angle. Insert the range leveling leg in wood or concrete material. Check if the range is to be mounted to the wall, drill pilot hole at head screwdriver to masonry or ceramic fl...
Installation Instructions
Page 5
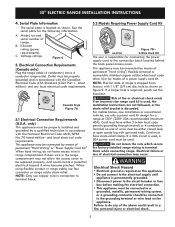
... must be connected to the connection block located behind the back panel access cover. NOTE: Only use copper wire in a fire, personal injury or electrical shock. 5 Failure to terminal block while connecting range. 30" ELECTRIC RANGE INSTALLATION INSTRUCTIONS 4. Serial Plate Information The serial plate is shipped from factory with the Canadian...
... must be connected to the connection block located behind the back panel access cover. NOTE: Only use copper wire in a fire, personal injury or electrical shock. 5 Failure to terminal block while connecting range. 30" ELECTRIC RANGE INSTALLATION INSTRUCTIONS 4. Serial Plate Information The serial plate is shipped from factory with the Canadian...
Installation Instructions
Page 6
... local codes permit connection of the frame grounding conductor to the neutral wire of the rear cover to expose range terminal connection block. 2. Replace the terminal cover and replace the screws. Remove the grounding strap from the terminal block and ...the terminal block, and connect the other wires to the outer terminals. Cord Kit Hole. 30" ELECTRIC RANGE INSTALLATION INSTRUCTIONS This appliance is manufactured with the frame grounded by connection of the rear cover to expose range terminal connection block. 2. Figure 9 6 If used in USA, in a new branch circuit ...
... local codes permit connection of the frame grounding conductor to the neutral wire of the rear cover to expose range terminal connection block. 2. Replace the terminal cover and replace the screws. Remove the grounding strap from the terminal block and ...the terminal block, and connect the other wires to the outer terminals. Cord Kit Hole. 30" ELECTRIC RANGE INSTALLATION INSTRUCTIONS This appliance is manufactured with the frame grounded by connection of the rear cover to expose range terminal connection block. 2. Figure 9 6 If used in USA, in a new branch circuit ...
Installation Instructions
Page 7
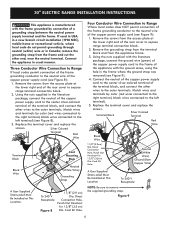
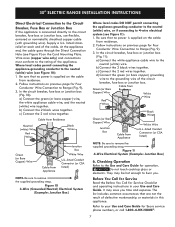
...(see Figure 11): 1. Follow instructions on previous page for Four Conductor Wire Connection to Range (Fig. 9). 3. c) Connect the 2 red wires together. Figure 10 3-Wire (Grounded Neutral) Electrical System (Example: Junction Box) Where local codes DO NOT permit connecting the appliance-grounding conductor...Operation Refer to the Use and Care Guide for Service Checklist and operating instructions in this appliance. 30" ELECTRIC RANGE INSTALLATION INSTRUCTIONS Direct Electrical Connection to the Circuit Breaker, Fuse Box or Junction Box If the appliance is supplied on the cable from...
...(see Figure 11): 1. Follow instructions on previous page for Four Conductor Wire Connection to Range (Fig. 9). 3. c) Connect the 2 red wires together. Figure 10 3-Wire (Grounded Neutral) Electrical System (Example: Junction Box) Where local codes DO NOT permit connecting the appliance-grounding conductor...Operation Refer to the Use and Care Guide for Service Checklist and operating instructions in this appliance. 30" ELECTRIC RANGE INSTALLATION INSTRUCTIONS Direct Electrical Connection to the Circuit Breaker, Fuse Box or Junction Box If the appliance is supplied on the cable from...

Product Specifications Sheet
Page 1
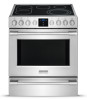
frigidaire.com Freestanding Range FPEH3077RF Signature Features PowerPlus® Convection Powerful performance delivers ... first time. PowerPlus® Preheat With PowerPlus® Preheat, your kitchen and get the look of a 30" freestanding range. Sabbath Mode (Star-K® Certified) Available in: Stainless (F) Elements Right Front Right Rear Left Front Left Rear Left...Fan Convection Bake and Roast. Smudge-Proof™ Resists fingerprints and cleans easily. 30" Electric Product Dimensions Height (Max.) Width Depth (Including Handle) 36-5/8" 30" 28-5/16" More Easy-To-Use...
frigidaire.com Freestanding Range FPEH3077RF Signature Features PowerPlus® Convection Powerful performance delivers ... first time. PowerPlus® Preheat With PowerPlus® Preheat, your kitchen and get the look of a 30" freestanding range. Sabbath Mode (Star-K® Certified) Available in: Stainless (F) Elements Right Front Right Rear Left Front Left Rear Left...Fan Convection Bake and Roast. Smudge-Proof™ Resists fingerprints and cleans easily. 30" Electric Product Dimensions Height (Max.) Width Depth (Including Handle) 36-5/8" 30" 28-5/16" More Easy-To-Use...

Product Specifications Sheet
Page 2
... cable, 120 / 240 or 120 / 208 Volt, 60 Hertz AC only electrical supply with Front Control Exterior Door Finish Smudge-Proof™ Stainless Steel Handle Design Stainless Steel Frigidaire Professional (new handle) Exterior Finish (Side Panels) Convection System Black PowerPlus®... Keep Warm Zone - 100 Hot Surface / Element On Indicator Light Yes/Yes Oven Features A Capacity (Cu. Freestanding Range FPEH3077RF 30" Electric Features Oven Control / Timing System PrecisionPro Controls™ Surface Type Black Porcelain Glass Window Extra-Large with Black-Tint Finish 30...
... cable, 120 / 240 or 120 / 208 Volt, 60 Hertz AC only electrical supply with Front Control Exterior Door Finish Smudge-Proof™ Stainless Steel Handle Design Stainless Steel Frigidaire Professional (new handle) Exterior Finish (Side Panels) Convection System Black PowerPlus®... Keep Warm Zone - 100 Hot Surface / Element On Indicator Light Yes/Yes Oven Features A Capacity (Cu. Freestanding Range FPEH3077RF 30" Electric Features Oven Control / Timing System PrecisionPro Controls™ Surface Type Black Porcelain Glass Window Extra-Large with Black-Tint Finish 30...


