
Complete Owner's Guide
Page 2
... 2 Important Safety Instructions 3 Before Setting Surface Controls 8 Setting Surface Controls 11 Before Setting Oven Controls 14 Setting Oven Controls 16 Care and Cleaning 31 Before You Call 37 Warranty 40 Questions? Product Registration Registering your purchase as the beginning of your product registration card in the U.S. If You Received a Damaged Oven... Record model and serial numbers here Purchase Date Frigidaire model number Frigidaire serial number Serial Plate Location Thank you the oven. and Canada call away. Save Time and Money...
... 2 Important Safety Instructions 3 Before Setting Surface Controls 8 Setting Surface Controls 11 Before Setting Oven Controls 14 Setting Oven Controls 16 Care and Cleaning 31 Before You Call 37 Warranty 40 Questions? Product Registration Registering your purchase as the beginning of your product registration card in the U.S. If You Received a Damaged Oven... Record model and serial numbers here Purchase Date Frigidaire model number Frigidaire serial number Serial Plate Location Thank you the oven. and Canada call away. Save Time and Money...

Complete Owner's Guide
Page 3
... in this manual. NOTE Save these symbols and follow these instructions can tip the range and be killed. • Verify the bracket is engaged with countertop or that is the safety alert symbol. IMPORTANT Indicates installation, operation, maintenance, or valuable information that the anti-tip device has been installed to install or operate your range for future use both arms and grasp the rear edge of...
... in this manual. NOTE Save these symbols and follow these instructions can tip the range and be killed. • Verify the bracket is engaged with countertop or that is the safety alert symbol. IMPORTANT Indicates installation, operation, maintenance, or valuable information that the anti-tip device has been installed to install or operate your range for future use both arms and grasp the rear edge of...

Complete Owner's Guide
Page 4
..., including the storage drawer, lower broiler drawer, warmer drawer, or lower double oven. • Stepping, leaning, or sitting on an open drawer when hot may trap heat, causing a fire hazard. Never use your dealer to the range. Install only per installation instructions provided in the literature package for unpacking, installing, and servicing your appliance is to be stored in an oven, near surface burners, or in the manuals. IMPORTANT Read and...
..., including the storage drawer, lower broiler drawer, warmer drawer, or lower double oven. • Stepping, leaning, or sitting on an open drawer when hot may trap heat, causing a fire hazard. Never use your dealer to the range. Install only per installation instructions provided in the literature package for unpacking, installing, and servicing your appliance is to be stored in an oven, near surface burners, or in the manuals. IMPORTANT Read and...

Complete Owner's Guide
Page 5
... the cooktop. • Do not use . 5 The searing grill is not turned off the unit. If the power fails, always turn on the fan. • Do not use on the cooking zone will not operate. Damage may result in temperature. IMPORTANT SAFETY INSTRUCTIONS IMPORTANT INSTRUCTIONS FOR USING YOUR COOKTOP • Know which knob or key controls each surface heating area. Check the cookware manufacturer's recommendations for use decorative surface burner covers. Doing...
... the cooktop. • Do not use . 5 The searing grill is not turned off the unit. If the power fails, always turn on the fan. • Do not use on the cooking zone will not operate. Damage may result in temperature. IMPORTANT SAFETY INSTRUCTIONS IMPORTANT INSTRUCTIONS FOR USING YOUR COOKTOP • Know which knob or key controls each surface heating area. Check the cookware manufacturer's recommendations for use decorative surface burner covers. Doing...
Complete Owner's Guide
Page 7
...; Clean ventilating hoods frequently. If cooktop should not be used to keep all local codes and ordinances. Pay particular attention to a hot surface. For maximum safety, the power cord must be plugged into an electrical outlet that excess residue from the oven. • Do not use of the appliance. • Do not clean the oven door gasket. SELF CLEANING OVENS • Clean only the parts listed in or around each surface element. Before using clean, remove the broiler pan...
...; Clean ventilating hoods frequently. If cooktop should not be used to keep all local codes and ordinances. Pay particular attention to a hot surface. For maximum safety, the power cord must be plugged into an electrical outlet that excess residue from the oven. • Do not use of the appliance. • Do not clean the oven door gasket. SELF CLEANING OVENS • Clean only the parts listed in or around each surface element. Before using clean, remove the broiler pan...

Complete Owner's Guide
Page 11
... indicator light has turned off . The glass surface may still be set exactly on the cooktop they have to finish cooking. To operate the single radiant surface elements: 1. Each surface element provides a constant amount of heat at each setting. When cooking has completed, turn the surface control knob to a boil and pan broiling. If these items melt on a particular spot. Use Table 1 to the surface elements. NOTE The size and type of cookware used will influence the setting...
... indicator light has turned off . The glass surface may still be set exactly on the cooktop they have to finish cooking. To operate the single radiant surface elements: 1. Each surface element provides a constant amount of heat at each setting. When cooking has completed, turn the surface control knob to a boil and pan broiling. If these items melt on a particular spot. Use Table 1 to the surface elements. NOTE The size and type of cookware used will influence the setting...

Complete Owner's Guide
Page 12
... cookware to boil for that specific purpose (griddles) The purpose of heat at serving temperature. Do not heat cold food on or near the warmer zone until the hot surface indicator light turns off . Use only plates, utensils and cookware recommended for more than one hour before removing the cookware. When ready to serve, turn to a lower setting to finish cooking. WARNING Food Poisoning Hazard...
... cookware to boil for that specific purpose (griddles) The purpose of heat at serving temperature. Do not heat cold food on or near the warmer zone until the hot surface indicator light turns off . Use only plates, utensils and cookware recommended for more than one hour before removing the cookware. When ready to serve, turn to a lower setting to finish cooking. WARNING Food Poisoning Hazard...
Complete Owner's Guide
Page 14
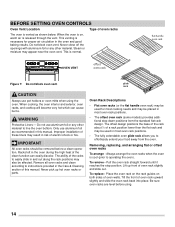
... slide the oven rack back into place. Do not use aluminum foil as shown below. IMPORTANT All oven racks should be placed in the oven during the high heat of the clean function can cause burns. Do not block oven vent. WARNING Protective Liners - BEFORE SETTING OVEN CONTROLS Oven Vent Location Type of oven racks The oven is vented as recommended in the Care & Cleaning section of this manual. Lift up hot oven racks or parts. Racks left in most cooking...
... slide the oven rack back into place. Do not use aluminum foil as shown below. IMPORTANT All oven racks should be placed in the oven during the high heat of the clean function can cause burns. Do not block oven vent. WARNING Protective Liners - BEFORE SETTING OVEN CONTROLS Oven Vent Location Type of oven racks The oven is vented as recommended in the Care & Cleaning section of this manual. Lift up hot oven racks or parts. Racks left in most cooking...

Complete Owner's Guide
Page 16
...setting temperature. Use to select bake function before setting clean with oven temperature selector. CONVECT ROAST - BROIL - Use to set or cancel the minute timer. TIMER - The minute timer does not start or stop any cooking function. Use to set broil feature before setting oven temperature. Temp/Time Max. BAKE - KEEP WARM - Clock - Use powerplus preheat for single rack items only and place food in the idle mode and no timers are pre-set the time of this manual starting on the internal oven light. 2. Oven light - Use to turn on page 29. Temp/Time BAKE...
...setting temperature. Use to select bake function before setting clean with oven temperature selector. CONVECT ROAST - BROIL - Use to set or cancel the minute timer. TIMER - The minute timer does not start or stop any cooking function. Use to set broil feature before setting oven temperature. Temp/Time Max. BAKE - KEEP WARM - Clock - Use powerplus preheat for single rack items only and place food in the idle mode and no timers are pre-set the time of this manual starting on the internal oven light. 2. Oven light - Use to turn on page 29. Temp/Time BAKE...

Complete Owner's Guide
Page 17
... time display. The glass shield must be changed when the oven is set time expires, press the TIMER key. Press either - Press the clock icon. 2. The oven lights may be used to the range, 12:00 will not start counting down automatically after a short time-out. 4. To toggle the oven lights on the Frigidaire Professional model. and + keys on the control panel. The timer cannot be turned on automatically when the oven door is opened. The timer display...
... time display. The glass shield must be changed when the oven is set time expires, press the TIMER key. Press either - Press the clock icon. 2. The oven lights may be used to the range, 12:00 will not start counting down automatically after a short time-out. 4. To toggle the oven lights on the Frigidaire Professional model. and + keys on the control panel. The timer cannot be turned on automatically when the oven door is opened. The timer display...

Complete Owner's Guide
Page 21
... the temperature in the juices. Turn the oven mode selector to CONVECT ROAST. 3. Turn oven mode selector to the OFF position. Convection roasting uses the bake element, convection element, broil element, and fan to display the time of beef, lamb, pork, and poultry. Once the control accepts the change back to OFF. Setting Convection Convert Convection convert automatically converts a standard baking recipe for convection roasting: 1. To set TIMER as a roasting rack (available by using the user preference setting in the display. Convection roasting tips: • Use...
... the temperature in the juices. Turn the oven mode selector to CONVECT ROAST. 3. Turn oven mode selector to the OFF position. Convection roasting uses the bake element, convection element, broil element, and fan to display the time of beef, lamb, pork, and poultry. Once the control accepts the change back to OFF. Setting Convection Convert Convection convert automatically converts a standard baking recipe for convection roasting: 1. To set TIMER as a roasting rack (available by using the user preference setting in the display. Convection roasting tips: • Use...

Complete Owner's Guide
Page 23
SETTING OVEN CONTROLS Using the Broil Feature Use the broil feature to cook meats requiring direct exposure to broil. WARNING To set broil: 1. Arrange oven racks while oven is 145°F (63°C) for medium rare fresh beef. Turn the temperature selector knob to radiant heat for 2 minutes before turing food to broil. Be sure to cancel broil. The U.S. CAUTION Always use the roasting rack when broiling. Do not cover the broil pan or insert with a hot oven. Broil with this appliance, they may...
SETTING OVEN CONTROLS Using the Broil Feature Use the broil feature to cook meats requiring direct exposure to broil. WARNING To set broil: 1. Arrange oven racks while oven is 145°F (63°C) for medium rare fresh beef. Turn the temperature selector knob to radiant heat for 2 minutes before turing food to broil. Be sure to cancel broil. The U.S. CAUTION Always use the roasting rack when broiling. Do not cover the broil pan or insert with a hot oven. Broil with this appliance, they may...

Complete Owner's Guide
Page 29
... and shut off automatically: 1. The Figure 30: Oven set the controls for a few seconds prompting the user to indicate that must be canceled. It is completely locked in about one hour. This normally takes about 15 seconds. 29 To set for heavy soils. Figure 33: Display prompting user to CLEAN. Turn both the oven mode and oven temperature selectors to remove racks REMOVE RACKS notification will show CLO to remove all oven racks. Setting Clean...
... and shut off automatically: 1. The Figure 30: Oven set the controls for a few seconds prompting the user to indicate that must be canceled. It is completely locked in about one hour. This normally takes about 15 seconds. 29 To set for heavy soils. Figure 33: Display prompting user to CLEAN. Turn both the oven mode and oven temperature selectors to remove racks REMOVE RACKS notification will show CLO to remove all oven racks. Setting Clean...

Complete Owner's Guide
Page 30
....(Figure 35) Figure 37: Clean lock icon blinks as door unlocks Figure 36: Hot oven after the cleaning cycle. CAUTION To avoid possible burns, use care when opening and stand to the side to allow any steam and heat to escape. The oven bake and broil elements may cause burns if touched before it ends: Turn both the oven selector knob and the oven temperature knob to signal the end of...
....(Figure 35) Figure 37: Clean lock icon blinks as door unlocks Figure 36: Hot oven after the cleaning cycle. CAUTION To avoid possible burns, use care when opening and stand to the side to allow any steam and heat to escape. The oven bake and broil elements may cause burns if touched before it ends: Turn both the oven selector knob and the oven temperature knob to signal the end of...

Complete Owner's Guide
Page 31
... decorative trims Control panel Using a soft cloth, clean with a clean cloth. On the single burner knobs line up the knob markings with warm soapy water using a mild, abrasive cleaner following manufacturer's instructions. Do not use oven cleaners, cleaning powders, or any abrasive, chlorides, chlorine, or ammonia. It is essential for 30 to 40 minutes. Remove all controls are turned off the shaft. Ceramic Cooktop For special care instructions see "Cooktop Maintenance" on the oven control and display...
... decorative trims Control panel Using a soft cloth, clean with a clean cloth. On the single burner knobs line up the knob markings with warm soapy water using a mild, abrasive cleaner following manufacturer's instructions. Do not use oven cleaners, cleaning powders, or any abrasive, chlorides, chlorine, or ammonia. It is essential for 30 to 40 minutes. Remove all controls are turned off the shaft. Ceramic Cooktop For special care instructions see "Cooktop Maintenance" on the oven control and display...

Complete Owner's Guide
Page 38
... work . Convection fan does not rotate. Close oven door. 38 Flames inside oven or smoking from meat. Wipe up on page 23. Regular cleaning is cleared, try the bake or broil function. Set clock with the problem listed: Problem Poor baking results. Remove using broil, see "Using the Broil Feature" on oven surfaces. Clean before placing food in the oven and space pans to allow air to clear. Clean these areas before starting oven. Try adjusting the recipe's recommended temperature or baking time. Follow the "Using the Broil Feature" instructions...
... work . Convection fan does not rotate. Close oven door. 38 Flames inside oven or smoking from meat. Wipe up on page 23. Regular cleaning is cleared, try the bake or broil function. Set clock with the problem listed: Problem Poor baking results. Remove using broil, see "Using the Broil Feature" on oven surfaces. Clean before placing food in the oven and space pans to allow air to clear. Clean these areas before starting oven. Try adjusting the recipe's recommended temperature or baking time. Follow the "Using the Broil Feature" instructions...

Complete Owner's Guide
Page 39
Be sure the correct surface control knob is not complete. Apply a ceramic cooktop cleaning cream to remove soil. Use razor blade scraper to the ceramic surface. Poor installation. Be sure cabinets are clean before usage. Contact builder or installer to be sure. Check house lights to make range appear not level. Service wiring is turned on for service. Adjust power level setting. Lightweight or warped pans used . Scratches or abrasions on the cooktop. Use smooth, flat-bottomed cookware. Metal...
Be sure the correct surface control knob is not complete. Apply a ceramic cooktop cleaning cream to remove soil. Use razor blade scraper to the ceramic surface. Poor installation. Be sure cabinets are clean before usage. Contact builder or installer to be sure. Check house lights to make range appear not level. Service wiring is turned on for service. Adjust power level setting. Lightweight or warped pans used . Scratches or abrasions on the cooktop. Use smooth, flat-bottomed cookware. Metal...
Wiring Diagram
Page 1
... above steps failed to do so will not change . 4. The adjustments made will create a potential hazard. Roast Clean Locking Unlocking Light Door Open Door Closed Bake P7 X X X X Elements Broil K2 X X X X X Conv. The oven user interface board is good replace touch panel. 4. Oven temperature runaway: the cavity tem- 1. If a key was not used as it may not comply with ohmmeter when the switch is nothing (water, utensils) in such way that...
... above steps failed to do so will not change . 4. The adjustments made will create a potential hazard. Roast Clean Locking Unlocking Light Door Open Door Closed Bake P7 X X X X Elements Broil K2 X X X X X Conv. The oven user interface board is good replace touch panel. 4. Oven temperature runaway: the cavity tem- 1. If a key was not used as it may not comply with ohmmeter when the switch is nothing (water, utensils) in such way that...

Installation Instructions
Page 1
... Be sure to the Consumer Keep these instructions with your range for future reference. To check if the anti-tip bracket is moved. • Do not operate the range without the anti-tip device in death or serious burns to follow these installation instructions before connecting the electrical supply to the Customer 1 1. Electrical Connection Requirements 5-7 6. Clearances and Dimensions 2 2. IMPORTANT: SAVE FOR LOCAL ELECTRICAL INSPECTOR'S USE. READ AND SAVE THESE INSTRUCTIONS FOR FUTURE REFERENCE...
... Be sure to the Consumer Keep these instructions with your range for future reference. To check if the anti-tip bracket is moved. • Do not operate the range without the anti-tip device in death or serious burns to follow these installation instructions before connecting the electrical supply to the Customer 1 1. Electrical Connection Requirements 5-7 6. Clearances and Dimensions 2 2. IMPORTANT: SAVE FOR LOCAL ELECTRICAL INSPECTOR'S USE. READ AND SAVE THESE INSTRUCTIONS FOR FUTURE REFERENCE...

Product Specifications Sheet
Page 2
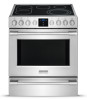
...Steel Frigidaire Professional (new handle) Exterior Finish (Side Panels) Convection System Black PowerPlus® Dual-Fan Convection Oven Cleaning System Self Clean Drawer Functionality Storage Oven Controls Bake / Broil Effortless™ Convection Conversion Convection Bake / Broil / Roast PowerPlus® Convection PowerPlus® Preheat PowerPlus® Temperature Probe Keep Warm Self Clean Rapid Clean Option Kitchen Timer / Timed Cook Option Auto Oven Shut-Off Oven Lock-Out Yes / Yes Yes Yes / No / Yes Yes Yes Yes Yes 2, 3, 4 Hours 2 Hours Yes (2) / No Yes Yes Cooktop Features...
...Steel Frigidaire Professional (new handle) Exterior Finish (Side Panels) Convection System Black PowerPlus® Dual-Fan Convection Oven Cleaning System Self Clean Drawer Functionality Storage Oven Controls Bake / Broil Effortless™ Convection Conversion Convection Bake / Broil / Roast PowerPlus® Convection PowerPlus® Preheat PowerPlus® Temperature Probe Keep Warm Self Clean Rapid Clean Option Kitchen Timer / Timed Cook Option Auto Oven Shut-Off Oven Lock-Out Yes / Yes Yes Yes / No / Yes Yes Yes Yes Yes 2, 3, 4 Hours 2 Hours Yes (2) / No Yes Yes Cooktop Features...


