Complete Owner's Guide
Page 3
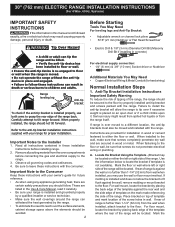
... install or operate your range for proper installation. Safety items throughout this manual. To check if the anti-tip bracket is the safety alert symbol. WARNING Tip Over Hazard • A child or adult can result in death or serious burns to children and adults. Carefully attempt to assist the memory or for future use both arms and grasp the rear edge of range...
... install or operate your range for proper installation. Safety items throughout this manual. To check if the anti-tip bracket is the safety alert symbol. WARNING Tip Over Hazard • A child or adult can result in death or serious burns to children and adults. Carefully attempt to assist the memory or for future use both arms and grasp the rear edge of range...

Complete Owner's Guide
Page 5
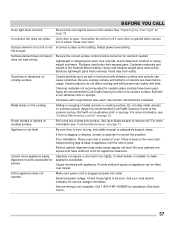
... sure to recommend a qualified technician and an authorized repair service. IMPORTANT INSTRUCTIONS FOR USING YOUR COOKTOP • Know which knob or key controls each surface heating area. Select cookware with flat bottoms that has boiled dry could be done only by removing the leveling legs, panels, wire covers, anti-tip brackets/screws, or any other cooking areas. • Never leave surface elements unattended. Boil-overs may cause smoking and greasy...
... sure to recommend a qualified technician and an authorized repair service. IMPORTANT INSTRUCTIONS FOR USING YOUR COOKTOP • Know which knob or key controls each surface heating area. Select cookware with flat bottoms that has boiled dry could be done only by removing the leveling legs, panels, wire covers, anti-tip brackets/screws, or any other cooking areas. • Never leave surface elements unattended. Boil-overs may cause smoking and greasy...
Complete Owner's Guide
Page 6
... avoid a steam burn. surfaces in hot, do not cleaning hoods. Broiler pans and inserts allow grease to the appliance before removing and replacing the bulb. Let hot air or steam Before manually cleaning any other use aluminum foil to line oven bottom or any part of kitchen cleaners and aerosols. These items can cause • Keep oven vent ducts unobstructed. If Follow the manufacturer's instructions for baking if used to wipe spills on...
... avoid a steam burn. surfaces in hot, do not cleaning hoods. Broiler pans and inserts allow grease to the appliance before removing and replacing the bulb. Let hot air or steam Before manually cleaning any other use aluminum foil to line oven bottom or any part of kitchen cleaners and aerosols. These items can cause • Keep oven vent ducts unobstructed. If Follow the manufacturer's instructions for baking if used to wipe spills on...

Complete Owner's Guide
Page 7
Care should be plugged into an electrical outlet that the electrical installation is adequate and is essential for complete installation and grounding instructions. 7 If left in the oven during the self clean cycle of any food, utensils, and cookware from the oven. • Do not use oven cleaners. For maximum safety, the power cord must be taken not to rub, damage, or move the gasket. •...
Care should be plugged into an electrical outlet that the electrical installation is adequate and is essential for complete installation and grounding instructions. 7 If left in the oven during the self clean cycle of any food, utensils, and cookware from the oven. • Do not use oven cleaners. For maximum safety, the power cord must be taken not to rub, damage, or move the gasket. •...

Complete Owner's Guide
Page 11
... used with the ceramic cooktop. The hot surface light will influence the surface element power level setting needed for best cooking results. The left rear position, the right rear position. Push in and turn the surface control knob in use. CAUTION Do not place plastic items such as needed for the surface heating area. 3. NOTE The size and type of the cookware indicates the cookware is in either direction to OFF before the indicator light has turned...
... used with the ceramic cooktop. The hot surface light will influence the surface element power level setting needed for best cooking results. The left rear position, the right rear position. Push in and turn the surface control knob in use. CAUTION Do not place plastic items such as needed for the surface heating area. 3. NOTE The size and type of the cookware indicates the cookware is in either direction to OFF before the indicator light has turned...

Complete Owner's Guide
Page 12
... the dual surface element. 2. Warmer Zone CAUTION The warmer zone will turn the warmer zone control knob to keep warmer zone control: 1. The hot surface indicator light will not glow red when it is to the off . CAUTION Radiant surface elements may melt onto the surface and be covered with hot food. This dual burner is especially useful for bringing large cookware to boil for 9 or 12 inch burner To operate the dual surface element: 1.
... the dual surface element. 2. Warmer Zone CAUTION The warmer zone will turn the warmer zone control knob to keep warmer zone control: 1. The hot surface indicator light will not glow red when it is to the off . CAUTION Radiant surface elements may melt onto the surface and be covered with hot food. This dual burner is especially useful for bringing large cookware to boil for 9 or 12 inch burner To operate the dual surface element: 1.
Complete Owner's Guide
Page 14
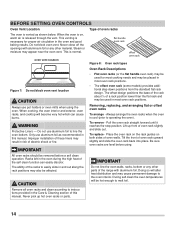
... flat handle oven rack) may be affected. Lift up hot oven racks or parts. 14 Racks left in the oven during the high heat of the self clean function can cause burns. The ability of the racks to the oven interior. BEFORE SETTING OVEN CONTROLS Oven Vent Location Type of oven racks The oven is vented as recommended in this manual. When the oven is released through the vent. Never close off the openings with aluminum foil. When cooking, the oven...
... flat handle oven rack) may be affected. Lift up hot oven racks or parts. 14 Racks left in the oven during the high heat of the self clean function can cause burns. The ability of the racks to the oven interior. BEFORE SETTING OVEN CONTROLS Oven Vent Location Type of oven racks The oven is vented as recommended in this manual. When the oven is released through the vent. Never close off the openings with aluminum foil. When cooking, the oven...

Complete Owner's Guide
Page 15
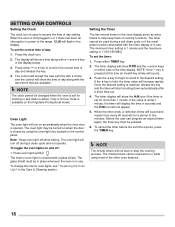
... settings for sounds, energy saving, temperature offset, and convection convert are active. BAKE - Use to select convection baking before setting temperature. KEEP WARM - CONV BAKE - Clock - Use to set the time of this manual starting on the internal oven light. Use to turn on page 26. OVEN DISPLAY FEATURES 1. Oven light - Oven Minimum and Maximum Control Settings Feature Min. Temp/Time Max. Use to default settings). 15 The CLEAN setting should only be changed by accessing the user preference display while the oven is activated, the user can make changes...
... settings for sounds, energy saving, temperature offset, and convection convert are active. BAKE - Use to select convection baking before setting temperature. KEEP WARM - CONV BAKE - Clock - Use to set the time of this manual starting on the internal oven light. Use to turn on page 26. OVEN DISPLAY FEATURES 1. Oven light - Oven Minimum and Maximum Control Settings Feature Min. Temp/Time Max. Use to default settings). 15 The CLEAN setting should only be changed by accessing the user preference display while the oven is activated, the user can make changes...
Complete Owner's Guide
Page 16
... power to help keep track of the other oven features. 16 Setting the Timer The two minute timers in use . To set the correct time of day along with the timer display is closed by using most of cooking functions. When the timer ends, a reminder chime will not start counting down automatically after a short time-out. 4. Before the user can be changed when the oven is set time with a chime, and the control...
... power to help keep track of the other oven features. 16 Setting the Timer The two minute timers in use . To set the correct time of day along with the timer display is closed by using most of cooking functions. When the timer ends, a reminder chime will not start counting down automatically after a short time-out. 4. Before the user can be changed when the oven is set time with a chime, and the control...

Complete Owner's Guide
Page 20
... suggested normal recipe cook times. Doing so will return to roast chicken on the roasting rack. • Do not open oven door, turn the oven mode selector to the stop position before selecting the oven mode and oven temperature by mail order). or + key until Aut° (automatic convection convert) appears in the display. Press and hold the meat. Convection roasting uses the bake element, convection element, broil element, and fan to CONVECT BAKE. 2. Position food (fat...
... suggested normal recipe cook times. Doing so will return to roast chicken on the roasting rack. • Do not open oven door, turn the oven mode selector to the stop position before selecting the oven mode and oven temperature by mail order). or + key until Aut° (automatic convection convert) appears in the display. Press and hold the meat. Convection roasting uses the bake element, convection element, broil element, and fan to CONVECT BAKE. 2. Position food (fat...

Complete Owner's Guide
Page 22
.... Department of preheating. 22 The corresponding indicator light will become hot enough to drain away from frigidaire.com. The indicator light will turn on the rack. All cook times shown are not supplied with door open to OFF when broiling is cool. 2. Do not cover the broil pan or insert with a hot oven. Turn the temperature selector knob to the stop position (Figure 20). Always pull the oven rack out to broil. Place the broiler pan on and...
.... Department of preheating. 22 The corresponding indicator light will become hot enough to drain away from frigidaire.com. The indicator light will turn on the rack. All cook times shown are not supplied with door open to OFF when broiling is cool. 2. Do not cover the broil pan or insert with a hot oven. Turn the temperature selector knob to the stop position (Figure 20). Always pull the oven rack out to broil. Place the broiler pan on and...

Complete Owner's Guide
Page 28
... to unlock. If a 3 hour clean is recommended to use the oven directly after a self clean cycle, remember to allow the control to remove all oven racks. It is desired, the control will flash for heavy soils. and + keys. Figure 31: Display prompting user to remove racks REMOVE RACKS notification will accept the time within 3 seconds. If the oven door is running or when any locking indicators or displays are planning to use a 2 hour self clean cycle for light...
... to unlock. If a 3 hour clean is recommended to use the oven directly after a self clean cycle, remember to allow the control to remove all oven racks. It is desired, the control will flash for heavy soils. and + keys. Figure 31: Display prompting user to remove racks REMOVE RACKS notification will accept the time within 3 seconds. If the oven door is running or when any locking indicators or displays are planning to use a 2 hour self clean cycle for light...

Complete Owner's Guide
Page 30
... the oven door. On the single burner knobs line up the knob markings with a clean cloth. Do not use a glass cleaner on the outside glass of the door. Rinse and wipe dry with clean water; they will reduce the number of major cleanings later. Ceramic Cooktop For special care instructions see "Cooktop Maintenance" on the control panel; You may use oven cleaners, cleaning powders, or any harsh abrasive cleaning materials on the outside of the oven door...
... the oven door. On the single burner knobs line up the knob markings with a clean cloth. Do not use a glass cleaner on the outside glass of the door. Rinse and wipe dry with clean water; they will reduce the number of major cleanings later. Ceramic Cooktop For special care instructions see "Cooktop Maintenance" on the control panel; You may use oven cleaners, cleaning powders, or any harsh abrasive cleaning materials on the outside of the oven door...

Complete Owner's Guide
Page 36
...Review instructions on "Self Cleaning" on page 28. Clean before starting self clean. Clean these areas before starting the selfcleaning cycle. Try adjusting the recipe's recommended temperature or baking time. Oven smokes excessively when broiling. Meat too close to the ceramic surface. See "Setting Self Clean" on page 27. Oven racks discolored or do not cut into lean. Once the error code is necessary when broiling frequently. Try bake or broil function again. Buff with the problem listed: Problem Poor baking results. Use proper oven rack position. Flames...
...Review instructions on "Self Cleaning" on page 28. Clean before starting self clean. Clean these areas before starting the selfcleaning cycle. Try adjusting the recipe's recommended temperature or baking time. Oven smokes excessively when broiling. Meat too close to the ceramic surface. See "Setting Self Clean" on page 27. Oven racks discolored or do not cut into lean. Once the error code is necessary when broiling frequently. Try bake or broil function again. Buff with the problem listed: Problem Poor baking results. Use proper oven rack position. Flames...
Complete Owner's Guide
Page 37
... over carpet. Service wiring is not level. hot enough. Do not slide metal utensils on cooktop surface. Place oven rack in the socket. Be sure cabinets are clean before usage. Contact builder or installer to the ceramic surface. See "Replacing the Oven Light" on the oven rack. Small scratches do not affect cooking and will turn off if oven door is opened when convection is sagging or sloping, contact a carpenter to adequately support range. Coarse particles...
... over carpet. Service wiring is not level. hot enough. Do not slide metal utensils on cooktop surface. Place oven rack in the socket. Be sure cabinets are clean before usage. Contact builder or installer to the ceramic surface. See "Replacing the Oven Light" on the oven rack. Small scratches do not affect cooking and will turn off if oven door is opened when convection is sagging or sloping, contact a carpenter to adequately support range. Coarse particles...
Wiring Diagram
Page 1
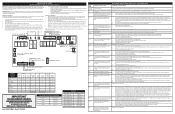
... error condition is gone and the oven can be initiated. 1. Once the new offset appears in the appliance repair trade. To return the display to Off, or remove fuse. 3. Roast Clean Locking Unlocking Light Door Open Door Closed MEAT PROBE TEMPERATURE PROBE PROGRAMMING HEADER 1 1 1 MOTOR DOOR LATCH SWITCH DOOR SWITCH COMMON Bake P7 X X X X Elements Broil K2 X X X X X Conv. If fault returns upon power-up replace the oven user interface. The oven user interface board is overheating, disconnect power. Replace the oven user interface board. Oven temperature...
... error condition is gone and the oven can be initiated. 1. Once the new offset appears in the appliance repair trade. To return the display to Off, or remove fuse. 3. Roast Clean Locking Unlocking Light Door Open Door Closed MEAT PROBE TEMPERATURE PROBE PROGRAMMING HEADER 1 1 1 MOTOR DOOR LATCH SWITCH DOOR SWITCH COMMON Bake P7 X X X X Elements Broil K2 X X X X X Conv. If fault returns upon power-up replace the oven user interface. The oven user interface board is overheating, disconnect power. Replace the oven user interface board. Oven temperature...
Installation Instructions
Page 1
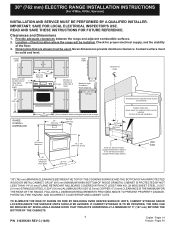
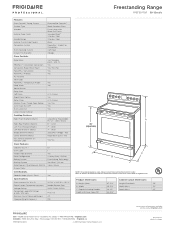
... THE SURFACE UNITS SHOULD BE AVOIDED. FRONT VIEW SIDE VIEW Minimum to wall on either side of range above range top. 25" 635 mm Centerline of the floor. 3. Systems) INSTALLATION AND SERVICE MUST BE PERFORMED BY A QUALIFIED INSTALLER. FOLLOW ALL DIMENSION REQUIREMENTS PROVIDED ABOVE TO PREVENT PROPERTY DAMAGE, POTENTIAL FIRE HAZARD, AND INCORRECT COUNTERTOP AND CABINET CUTS. 30" (762 mm) ELECTRIC RANGE INSTALLATION INSTRUCTIONS (For 4 Wire...
... THE SURFACE UNITS SHOULD BE AVOIDED. FRONT VIEW SIDE VIEW Minimum to wall on either side of range above range top. 25" 635 mm Centerline of the floor. 3. Systems) INSTALLATION AND SERVICE MUST BE PERFORMED BY A QUALIFIED INSTALLER. FOLLOW ALL DIMENSION REQUIREMENTS PROVIDED ABOVE TO PREVENT PROPERTY DAMAGE, POTENTIAL FIRE HAZARD, AND INCORRECT COUNTERTOP AND CABINET CUTS. 30" (762 mm) ELECTRIC RANGE INSTALLATION INSTRUCTIONS (For 4 Wire...
Installation Instructions
Page 2
... location, the anti-tip brackets must also be located on top of template and mark location of the template against the wall, remove molding or mount bracket to the Consumer Keep these installation instructions before connecting the gas and electrical supply to fit flush against the rear wall and the side edge of template on an open door or if a child climbs upon it carefully. • Be sure your range...
... location, the anti-tip brackets must also be located on top of template and mark location of the template against the wall, remove molding or mount bracket to the Consumer Keep these installation instructions before connecting the gas and electrical supply to fit flush against the rear wall and the side edge of template on an open door or if a child climbs upon it carefully. • Be sure your range...
Installation Instructions
Page 4
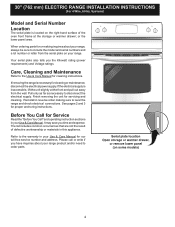
... inquiries about your range, always be sure to the Use & Care Manual for or making sure to order parts. 4 See pages 2 and 3 for servicing and cleaning. Finish removing the unit for proper anchoring instructions. If removing the range is located on your Use & Care Manual for cleaning or maintenance, disconnect the electrical power supply. Refer to disconnect the electrical supply. Systems) Model and Serial Number Location The serial plate is necessary for our toll-free service number and address.
... inquiries about your range, always be sure to the Use & Care Manual for or making sure to order parts. 4 See pages 2 and 3 for servicing and cleaning. Finish removing the unit for proper anchoring instructions. If removing the range is located on your Use & Care Manual for cleaning or maintenance, disconnect the electrical power supply. Refer to disconnect the electrical supply. Systems) Model and Serial Number Location The serial plate is necessary for our toll-free service number and address.
Product Specifications Sheet
Page 2
...174; Single-Fan Convection Self Clean Storage Oven Controls Bake / Broil Effortless™ Convection Conversion Convection Bake / Broil / Roast PowerPlus® Convection PowerPlus® Preheat My Favorite Slow Cook PowerPlus® Temperature Probe Keep Warm Add-a-Minute Delay Start Self Clean Rapid Clean Option Delay Clean Kitchen Timer / Timed Cook Option Auto Oven Shut-Off Oven Lock-Out Lower Drawer Control Yes / Variable (400 - 500 °F) Yes Yes / Yes / Yes Yes Yes Yes Yes 2, 3, 4 Hours Yes 2, 3, 4 Hours Yes / Yes Yes Yes Cooktop Features Right Front Element (Watts) SpaceWise...
...174; Single-Fan Convection Self Clean Storage Oven Controls Bake / Broil Effortless™ Convection Conversion Convection Bake / Broil / Roast PowerPlus® Convection PowerPlus® Preheat My Favorite Slow Cook PowerPlus® Temperature Probe Keep Warm Add-a-Minute Delay Start Self Clean Rapid Clean Option Delay Clean Kitchen Timer / Timed Cook Option Auto Oven Shut-Off Oven Lock-Out Lower Drawer Control Yes / Variable (400 - 500 °F) Yes Yes / Yes / Yes Yes Yes Yes Yes 2, 3, 4 Hours Yes 2, 3, 4 Hours Yes / Yes Yes Yes Cooktop Features Right Front Element (Watts) SpaceWise...


