User Manual
Page 9
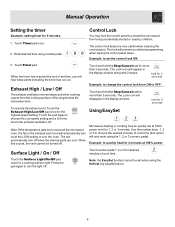
... turn the light off when the internal parts are cool. hold the Stop/Cancel pad for a cooking surface light. Using EasySet Microwave heating or cooking may lock the control panel to choose the desired minutes of the range below the microwave oven. Note: the EasySet function cannot be ...more than 3 seconds. Touch and hold the Stop/Cancel pad for 5 minutes: 1. Note: If the temperature gets too hot around the microwave oven, the fan in the exhaust vent hood will appear in the display window. Exhaust High / Low / Off The exhaust ventilation moves steam ...
... turn the light off when the internal parts are cool. hold the Stop/Cancel pad for a cooking surface light. Using EasySet Microwave heating or cooking may lock the control panel to choose the desired minutes of the range below the microwave oven. Note: the EasySet function cannot be ...more than 3 seconds. Touch and hold the Stop/Cancel pad for 5 minutes: 1. Note: If the temperature gets too hot around the microwave oven, the fan in the exhaust vent hood will appear in the display window. Exhaust High / Low / Off The exhaust ventilation moves steam ...
User Manual
Page 14
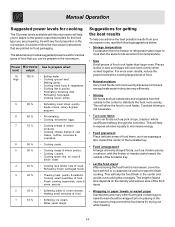
...of the turntable tray. • Food arrangement Arrange unevenly shaped foods, such as chicken pieces or salmon, with the thicker or meatier parts toward the outside to the center to distribute the heat more evenly. For more even results, reduce the power levels when cooking large ...suited for getting the best results To help you achieve the best possible results from your microwave oven, read the following suggestions below provides suggested power levels for various types of food that are preparing. Power Microwave Use to prepare when: level output 10 High 100 % • Boiling water. ...
...of the turntable tray. • Food arrangement Arrange unevenly shaped foods, such as chicken pieces or salmon, with the thicker or meatier parts toward the outside to the center to distribute the heat more evenly. For more even results, reduce the power levels when cooking large ...suited for getting the best results To help you achieve the best possible results from your microwave oven, read the following suggestions below provides suggested power levels for various types of food that are preparing. Power Microwave Use to prepare when: level output 10 High 100 % • Boiling water. ...
User Manual
Page 20
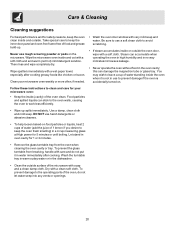
... the microwave oven inside and out with a clean soft cloth. Food particles and spilled liquids can damage the magnetron tube or glass tray. Dry with a soft cloth and and warm (not hot) mild detergent solution. this can stick to the oven walls, causing the oven to the operating parts of water... tray from breaking, handle with care and do not let water seep into any vents or openings. 20 Clean your microwave oven: • Keep the inside and outside the oven door, wipe with soap and a clean damp cloth. Never use harsh detergents or abrasive cleaners. • To help...
... the microwave oven inside and out with a clean soft cloth. Food particles and spilled liquids can damage the magnetron tube or glass tray. Dry with a soft cloth and and warm (not hot) mild detergent solution. this can stick to the oven walls, causing the oven to the operating parts of water... tray from breaking, handle with care and do not let water seep into any vents or openings. 20 Clean your microwave oven: • Keep the inside and outside the oven door, wipe with soap and a clean damp cloth. Never use harsh detergents or abrasive cleaners. • To help...
User Manual
Page 24
...repair or replace appliance light bulbs, air filters, water filters, other consumables, or knobs, handles, or other than genuine Electrolux parts or parts obtained from the factory. 10. Surcharges including, but not limited to establish the warranty period should service be readily determined. ...household use your best interest to change without notice. or external causes such as described or illustrated are not a part of parts other cosmetic parts. 11. Electrolux authorizes no person to obtain and keep all costs for repairing or replacing any refrigerator or freezer failures...
...repair or replace appliance light bulbs, air filters, water filters, other consumables, or knobs, handles, or other than genuine Electrolux parts or parts obtained from the factory. 10. Surcharges including, but not limited to establish the warranty period should service be readily determined. ...household use your best interest to change without notice. or external causes such as described or illustrated are not a part of parts other cosmetic parts. 11. Electrolux authorizes no person to obtain and keep all costs for repairing or replacing any refrigerator or freezer failures...
Installation Instructions
Page 2
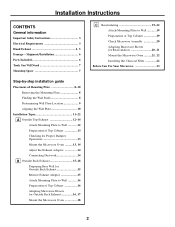
Installation Instructions CONTENTS General information Important Safety Instructions 3 Electrical Requirements 3 Hood Exhaust 4, 5 Damage - Shipment/Installation 6 Parts Included 6 Tools You Will Need 7 Mounting Space 7 Step-by-step installation guide Placement of Mounting Plate 8-10 Removing the ...Top Exhaust 12-14 Attach Mounting Plate to Wall 12 Preparation of Top Cabinet 13 Checking for Proper Damper Operation 13 Mount the Microwave Oven ..........13, 14 Adjust the Exhaust Adaptor 14 Connecting Ductwork 14 B Outside Back Exhaust 15-18 Preparing Rear Wall for Outside Back...
Installation Instructions CONTENTS General information Important Safety Instructions 3 Electrical Requirements 3 Hood Exhaust 4, 5 Damage - Shipment/Installation 6 Parts Included 6 Tools You Will Need 7 Mounting Space 7 Step-by-step installation guide Placement of Mounting Plate 8-10 Removing the ...Top Exhaust 12-14 Attach Mounting Plate to Wall 12 Preparation of Top Cabinet 13 Checking for Proper Damper Operation 13 Mount the Microwave Oven ..........13, 14 Adjust the Exhaust Adaptor 14 Connecting Ductwork 14 B Outside Back Exhaust 15-18 Preparing Rear Wall for Outside Back...
Installation Instructions
Page 6
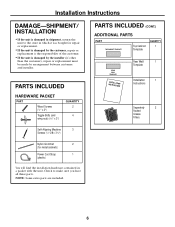
...; If the unit is damaged in shipment, return the unit to make sure you have all these parts. PARTS INCLUDED HARDWARE PACKET PART Wood Screws (1⁄4" x 2") Toggle Bolts (and wing nuts) (3⁄16" x 3") QUANTITY 2 4 PARTS INCLUDED (CONT.) ADDITIONAL PARTS PART TOP CABINET TEMPLATE Top Cabinet Template QUANTITY 1 REAR WALL TEMPLATE ININSSTTRAULCLTAITOIONNS Rear Wall 1 Template Installation 1 Instructions...
...; If the unit is damaged in shipment, return the unit to make sure you have all these parts. PARTS INCLUDED HARDWARE PACKET PART Wood Screws (1⁄4" x 2") Toggle Bolts (and wing nuts) (3⁄16" x 3") QUANTITY 2 4 PARTS INCLUDED (CONT.) ADDITIONAL PARTS PART TOP CABINET TEMPLATE Top Cabinet Template QUANTITY 1 REAR WALL TEMPLATE ININSSTTRAULCLTAITOIONNS Rear Wall 1 Template Installation 1 Instructions...
Installation Instructions
Page 20
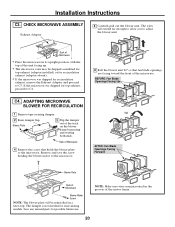
... FOR RECIRCULATION 1 Remove tape securing damper. 2 Raise damper flap. Back of Microwave • Place the microwave in its upright position, with the top of the unit facing up. • The microwave oven may be reinstalled in the grooves of the track on the blower frame by pressing and ... to adjust the blower unit. Remove and save the screw holding the blower motor to the microwave. NOTE: Make sure wires remain routed in a later step. Save any unused parts for recirculating models. Installation Instructions C3. The wires will be shipped assembled for top exhaust (...
... FOR RECIRCULATION 1 Remove tape securing damper. 2 Raise damper flap. Back of Microwave • Place the microwave in its upright position, with the top of the unit facing up. • The microwave oven may be reinstalled in the grooves of the track on the blower frame by pressing and ... to adjust the blower unit. Remove and save the screw holding the blower motor to the microwave. NOTE: Make sure wires remain routed in a later step. Save any unused parts for recirculating models. Installation Instructions C3. The wires will be shipped assembled for top exhaust (...


