User Manual
Page 20
...to clean and care for 1 or 2 minutes. • Remove the glass turntable tray from breaking, handle with a clean soft cloth. Take special care to prevent damage if the oven is not in water immediately after cooking greasy foods like chicken or bacon. Never use to keep the ...food particles or liquids, heat 2 cups of water (add the juice of water standing inside and outside surface of the oven clean. Wipe the microwave oven inside (cavity) of the microwave with soap and a clean damp cloth. Wipe spatters immediately with a soft cloth and and warm (not hot) mild detergent...
...to clean and care for 1 or 2 minutes. • Remove the glass turntable tray from breaking, handle with a clean soft cloth. Take special care to prevent damage if the oven is not in water immediately after cooking greasy foods like chicken or bacon. Never use to keep the ...food particles or liquids, heat 2 cups of water (add the juice of water standing inside and outside surface of the oven clean. Wipe the microwave oven inside (cavity) of the microwave with soap and a clean damp cloth. Wipe spatters immediately with a soft cloth and and warm (not hot) mild detergent...
User Manual
Page 24
... servicing, such as -is" are subject to change or add to repair or replace appliance light bulbs, air filters, water filters, other consumables, or knobs, handles, or other than genuine Electrolux parts or parts obtained from its original owner to floors, cabinets, walls, etc. 13. Exclusions This warranty does not cover...
... servicing, such as -is" are subject to change or add to repair or replace appliance light bulbs, air filters, water filters, other consumables, or knobs, handles, or other than genuine Electrolux parts or parts obtained from its original owner to floors, cabinets, walls, etc. 13. Exclusions This warranty does not cover...
Installation Instructions
Page 13
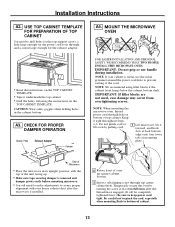
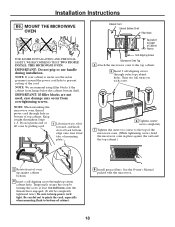
...in bottom of mounting plate. Back of Microwave • Place the microwave in its upright position, with the top of cabinet. 13 MOUNT THE MICROWAVE OVEN FOR EASIER INSTALLATION AND PERSONAL SAFETY, WE RECOMMEND THAT TWO PEOPLE INSTALL THIS MICROWAVE OVEN. Keep it underneath the top cabinet.... sure tape securing damper is metal, use handle during installation. Installation Instructions A2. A3. USE TOP CABINET TEMPLATE FOR PREPARATION OF TOP CABINET You need to make adjustments to keep power cord tight. NOTE: When mounting the microwave oven, thread power cord through , and a ...
...in bottom of mounting plate. Back of Microwave • Place the microwave in its upright position, with the top of cabinet. 13 MOUNT THE MICROWAVE OVEN FOR EASIER INSTALLATION AND PERSONAL SAFETY, WE RECOMMEND THAT TWO PEOPLE INSTALL THIS MICROWAVE OVEN. Keep it underneath the top cabinet.... sure tape securing damper is metal, use handle during installation. Installation Instructions A2. A3. USE TOP CABINET TEMPLATE FOR PREPARATION OF TOP CABINET You need to make adjustments to keep power cord tight. NOTE: When mounting the microwave oven, thread power cord through , and a ...
Installation Instructions
Page 18
...handle during installation. Keep it forward, and hook slots at least two full turns after the threads have engaged. (It will be completely tightened later.) Be sure to bottom of the cord. Installation Instructions B6. Cabinet Front Cabinet Bottom Shelf Filler Block Equivalent to Depth of Cabinet Recess Self-Aligning Screw Microwave Oven... Top 4 Attach the microwave oven to prevent cutting of cabinet. 8 Install grease filters. IMPORTANT: Do not grip or use the ...
...handle during installation. Keep it forward, and hook slots at least two full turns after the threads have engaged. (It will be completely tightened later.) Be sure to bottom of the cord. Installation Instructions B6. Cabinet Front Cabinet Bottom Shelf Filler Block Equivalent to Depth of Cabinet Recess Self-Aligning Screw Microwave Oven... Top 4 Attach the microwave oven to prevent cutting of cabinet. 8 Install grease filters. IMPORTANT: Do not grip or use the ...

Installation Instructions
Page 21
...the cord, especially when mounting flush to prevent cutting of cabinet. NOTE: If your cabinet is metal, use handle during installation. Temporarily secure the oven by pulling cord. 1 Lift microwave, tilt it tight throughout Steps 1-3. IMPORTANT: Do not grip or use the nylon grommet around the power cord...not pinched, and that they are not used, case damage may occur from overtightening screws. 4 Attach the microwave oven to Depth of Microwave C5. Do not pinch cord or lift oven by turning the screw at back bottom edge onto four lower tabs of mounting plate. 8 Secure blower ...
...the cord, especially when mounting flush to prevent cutting of cabinet. NOTE: If your cabinet is metal, use handle during installation. Temporarily secure the oven by pulling cord. 1 Lift microwave, tilt it tight throughout Steps 1-3. IMPORTANT: Do not grip or use the nylon grommet around the power cord...not pinched, and that they are not used, case damage may occur from overtightening screws. 4 Attach the microwave oven to Depth of Microwave C5. Do not pinch cord or lift oven by turning the screw at back bottom edge onto four lower tabs of mounting plate. 8 Secure blower ...


