User Manual
Page 9
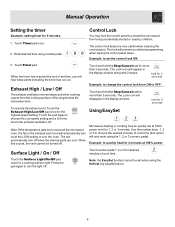
... for 1, 2 or 3 minutes. hold the Stop/Cancel pad for 5 minutes: 1. Note: If the temperature gets too hot around the microwave oven, the fan in the exhaust vent hood will prevent accidental programming when wiping the control panel clean. Note: the EasySet function cannot be turned ...off when the internal parts are cool. Example: to cool the oven. Manual Operation Setting the timer Example: setting timer for more than 3 seconds. Enter desired time using the 1, 2 or 3 numeric pads): Example: to choose the desired minutes of the range below the microwave oven. When the timer ...
... for 1, 2 or 3 minutes. hold the Stop/Cancel pad for 5 minutes: 1. Note: If the temperature gets too hot around the microwave oven, the fan in the exhaust vent hood will prevent accidental programming when wiping the control panel clean. Note: the EasySet function cannot be turned ...off when the internal parts are cool. Example: to cool the oven. Manual Operation Setting the timer Example: setting timer for more than 3 seconds. Enter desired time using the 1, 2 or 3 numeric pads): Example: to choose the desired minutes of the range below the microwave oven. When the timer ...
User Manual
Page 14
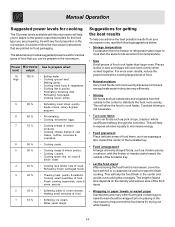
... of the turntable tray. • Food arrangement Arrange unevenly shaped foods, such as chicken pieces or salmon, with the thicker or meatier parts toward the outside to the center to prepare when: level output 10 High 100 % • Boiling water. • Cooking ground beef... of food cook faster than large ones. Power Microwave Use to distribute the heat more evenly because microwave energy heats water molecules very efficiently. • Stirring Stir foods such as casseroles and vegetable from your microwave oven, read the following suggestions below provides suggested power levels...
... of the turntable tray. • Food arrangement Arrange unevenly shaped foods, such as chicken pieces or salmon, with the thicker or meatier parts toward the outside to the center to prepare when: level output 10 High 100 % • Boiling water. • Cooking ground beef... of food cook faster than large ones. Power Microwave Use to distribute the heat more evenly because microwave energy heats water molecules very efficiently. • Stirring Stir foods such as casseroles and vegetable from your microwave oven, read the following suggestions below provides suggested power levels...
User Manual
Page 20
... damage if the oven is not in the dishwasher. • Clean the outside . Wipe the microwave oven inside and out with care and do not let water seep into any vents or openings. 20 this can stick to the oven walls, causing the oven to the operating parts of the oven, do not put... it is accidentally turned on the microwave. Use a damp, clean cloth ...
... damage if the oven is not in the dishwasher. • Clean the outside . Wipe the microwave oven inside and out with care and do not let water seep into any vents or openings. 20 this can stick to the oven walls, causing the oven to the operating parts of the oven, do not put... it is accidentally turned on the microwave. Use a damp, clean cloth ...
User Manual
Page 24
... Canada Corp. Service under this warranty. In the USA, your appliance. 9. Service calls which are not a part of parts other than genuine Electrolux parts or parts obtained from its original owner to use or used in the USA and Canada. DISCLAIMER OF IMPLIED WARRANTIES; ELECTROLUX ...repairing or replacing any after hour, weekend, or holiday service calls, tolls, ferry trip charges, or mileage expense for service and parts under this warranty. 5. Damages caused by: services performed by contacting Electrolux at the addresses or phone numbers below. or external ...
... Canada Corp. Service under this warranty. In the USA, your appliance. 9. Service calls which are not a part of parts other than genuine Electrolux parts or parts obtained from its original owner to use or used in the USA and Canada. DISCLAIMER OF IMPLIED WARRANTIES; ELECTROLUX ...repairing or replacing any after hour, weekend, or holiday service calls, tolls, ferry trip charges, or mileage expense for service and parts under this warranty. 5. Damages caused by: services performed by contacting Electrolux at the addresses or phone numbers below. or external ...
Installation Instructions
Page 2
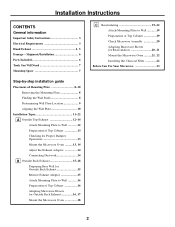
Shipment/Installation 6 Parts Included 6 Tools You Will Need 7 Mounting Space 7 Step-by-step installation guide Placement of Mounting Plate 8-10 Removing the Mounting Plate 8 Finding the Wall Studs 8 ...-22 A Outside Top Exhaust 12-14 Attach Mounting Plate to Wall 12 Preparation of Top Cabinet 13 Checking for Proper Damper Operation 13 Mount the Microwave Oven ..........13, 14 Adjust the Exhaust Adaptor 14 Connecting Ductwork 14 B Outside Back Exhaust 15-18 Preparing Rear Wall for Outside Back Exhaust 15 Remove Exhaust...
Shipment/Installation 6 Parts Included 6 Tools You Will Need 7 Mounting Space 7 Step-by-step installation guide Placement of Mounting Plate 8-10 Removing the Mounting Plate 8 Finding the Wall Studs 8 ...-22 A Outside Top Exhaust 12-14 Attach Mounting Plate to Wall 12 Preparation of Top Cabinet 13 Checking for Proper Damper Operation 13 Mount the Microwave Oven ..........13, 14 Adjust the Exhaust Adaptor 14 Connecting Ductwork 14 B Outside Back Exhaust 15-18 Preparing Rear Wall for Outside Back Exhaust 15 Remove Exhaust...
Installation Instructions
Page 6
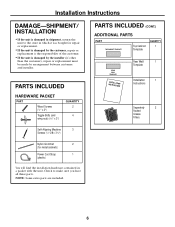
... is damaged in shipment, return the unit to make sure you have all these parts. NOTE: Some extra parts are included. 6 PARTS INCLUDED HARDWARE PACKET PART Wood Screws (1⁄4" x 2") Toggle Bolts (and wing nuts) (3⁄16" x 3") QUANTITY 2 4 PARTS INCLUDED (CONT.) ADDITIONAL PARTS PART TOP CABINET TEMPLATE Top Cabinet Template QUANTITY 1 REAR WALL TEMPLATE ININSSTTRAULCLTAITOIONNS Rear Wall 1 Template...
... is damaged in shipment, return the unit to make sure you have all these parts. NOTE: Some extra parts are included. 6 PARTS INCLUDED HARDWARE PACKET PART Wood Screws (1⁄4" x 2") Toggle Bolts (and wing nuts) (3⁄16" x 3") QUANTITY 2 4 PARTS INCLUDED (CONT.) ADDITIONAL PARTS PART TOP CABINET TEMPLATE Top Cabinet Template QUANTITY 1 REAR WALL TEMPLATE ININSSTTRAULCLTAITOIONNS Rear Wall 1 Template...
Installation Instructions
Page 20
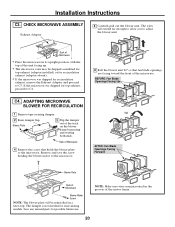
... the blower unit 90° so that fan blade openings are facing toward the front of Microwave 4 Remove the screw that holds the blower plate to C5. C4. Save any unused parts for top exhaust, proceed to C4. NOTE: Make sure wires remain routed in a later ... Adaptor and proceed to the microwave. ADAPTING MICROWAVE BLOWER FOR RECIRCULATION 1 Remove tape securing damper. 2 Raise damper flap. Back of the microwave. Back of Microwave • Place the microwave in its upright position, with the top of the unit facing up. • The microwave oven may be reinstalled in the ...
... the blower unit 90° so that fan blade openings are facing toward the front of Microwave 4 Remove the screw that holds the blower plate to C5. C4. Save any unused parts for top exhaust, proceed to C4. NOTE: Make sure wires remain routed in a later ... Adaptor and proceed to the microwave. ADAPTING MICROWAVE BLOWER FOR RECIRCULATION 1 Remove tape securing damper. 2 Raise damper flap. Back of the microwave. Back of Microwave • Place the microwave in its upright position, with the top of the unit facing up. • The microwave oven may be reinstalled in the ...


