User Manual
Page 2
... in completely, signed and returned to Electrolux Home Products. Congratulations on your microwave should be practiced when installing, operating and maintaining any appliance. We know you consider us for choosing our product. Be sure to record your purchase of the microwave oven. These instructions are not meant to cover every possible condition and situation...
... in completely, signed and returned to Electrolux Home Products. Congratulations on your microwave should be practiced when installing, operating and maintaining any appliance. We know you consider us for choosing our product. Be sure to record your purchase of the microwave oven. These instructions are not meant to cover every possible condition and situation...
User Manual
Page 3
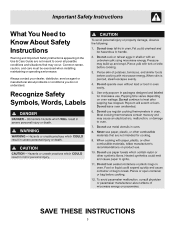
Recognize Safety Symbols, Words, Labels SAVE THESE INSTRUCTIONS 3 Common sense, caution, and care must be exercised when installing, maintaining or operating a microwave. Important Safety Instructions What You Need to Know About Safety Instructions Warning and Important Safety Instructions appearing in the Use & Care Guide are not meant to cover all possible conditions and situations that may occur. Always contact your dealer, distributor, service agent or manufacturer about problems or conditions you do not understand.
Recognize Safety Symbols, Words, Labels SAVE THESE INSTRUCTIONS 3 Common sense, caution, and care must be exercised when installing, maintaining or operating a microwave. Important Safety Instructions What You Need to Know About Safety Instructions Warning and Important Safety Instructions appearing in the Use & Care Guide are not meant to cover all possible conditions and situations that may occur. Always contact your dealer, distributor, service agent or manufacturer about problems or conditions you do not understand.
User Manual
Page 6
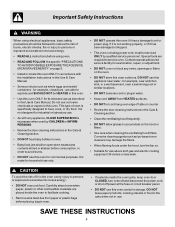
... on the hood or filters. • Use care when cleaning the ventilating hood filters. Do not use . • As with the installation instructions in this Use & Care Manual. • Some products such as described in this Use & Care Manual. Contact nearest authorized service ...persons or exposure to excessive microvave energy. • READ ALL instructions before using oven. • READ AND FOLLOW the specific "PRECAUTIONS TO AVOID POSSIBLE EXPOSURE TO EXCESSIVE MICROWAVE ENERGY" on page 5. • Install or locate this oven ONLY in accordance with any vents, openings or filters on the...
... on the hood or filters. • Use care when cleaning the ventilating hood filters. Do not use . • As with the installation instructions in this Use & Care Manual. • Some products such as described in this Use & Care Manual. Contact nearest authorized service ...persons or exposure to excessive microvave energy. • READ ALL instructions before using oven. • READ AND FOLLOW the specific "PRECAUTIONS TO AVOID POSSIBLE EXPOSURE TO EXCESSIVE MICROWAVE ENERGY" on page 5. • Install or locate this oven ONLY in accordance with any vents, openings or filters on the...
User Manual
Page 24
...exterior of your appliance is warranted by Electrolux Canada Corp. Service calls which are not a part of appliance or home incurred during installation, including but not limited to, any refrigerator or freezer failures. 6. Service calls to establish the warranty period should service be required...for making the appliance accessible for repairing or replacing any parts of Electrolux Home Products, Inc. If service is performed, it is installed, used in ordinary household use your best interest to obtain and keep all costs for servicing, such as abuse, misuse, inadequate power...
...exterior of your appliance is warranted by Electrolux Canada Corp. Service calls which are not a part of appliance or home incurred during installation, including but not limited to, any refrigerator or freezer failures. 6. Service calls to establish the warranty period should service be required...for making the appliance accessible for repairing or replacing any parts of Electrolux Home Products, Inc. If service is performed, it is installed, used in ordinary household use your best interest to obtain and keep all costs for servicing, such as abuse, misuse, inadequate power...
Installation Instructions
Page 1
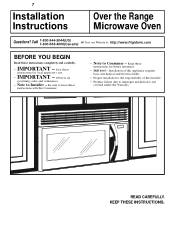
... governing codes and ordinances. • Note to improper installation is the responsibility of the installer. • Product failure due to Installer - Installation of this appliance requires basic mechanical and electrical skills. • Proper installation is not covered under the Warranty. KEEP THESE INSTRUCTIONS. 7 Installation Instructions Over the Range Microwave Oven Questions? Save these instructions for local inspector's use...
... governing codes and ordinances. • Note to improper installation is the responsibility of the installer. • Product failure due to Installer - Installation of this appliance requires basic mechanical and electrical skills. • Proper installation is not covered under the Warranty. KEEP THESE INSTRUCTIONS. 7 Installation Instructions Over the Range Microwave Oven Questions? Save these instructions for local inspector's use...
Installation Instructions
Page 2
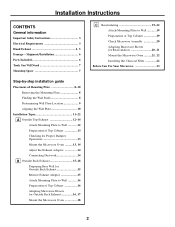
... Back Exhaust 16, 17 Mount the Microwave Oven 18 C Recirculating 19-22 Attach Mounting Plate to Wall 19 Preparation of Top Cabinet 19 Check Microwave Assembly 20 Adapting Microwave Blower for Recirculation 20, 21 Mount the Microwave Oven ..........21, 22 Installing the Charcoal Filter 22 Before You Use Your Microwave 23 2 Installation Instructions CONTENTS General information Important Safety Instructions...
... Back Exhaust 16, 17 Mount the Microwave Oven 18 C Recirculating 19-22 Attach Mounting Plate to Wall 19 Preparation of Top Cabinet 19 Check Microwave Assembly 20 Adapting Microwave Blower for Recirculation 20, 21 Mount the Microwave Oven ..........21, 22 Installing the Charcoal Filter 22 Before You Use Your Microwave 23 2 Installation Instructions CONTENTS General information Important Safety Instructions...
Installation Instructions
Page 3
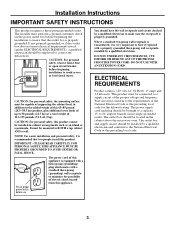
... injury. IMPORTANT - DO NOT, UNDER ANY CIRCUMSTANCES, CUT, DEFORM OR REMOVE ANY OF THE PRONGS FROM THE POWER CORD. Installation Instructions IMPORTANT SAFETY INSTRUCTIONS This product requires a three-prong grounded outlet. CAUTION: For personal safety, remove house fuse or open ... FATAL SHOCK. You should be employed to insure that two people install this appliance. ELECTRICAL REQUIREMENTS Product rating is properly grounded. Wire size must be installed in the cabinet above the microwave oven. The outlet box should have it is recommended that the outlet...
... injury. IMPORTANT - DO NOT, UNDER ANY CIRCUMSTANCES, CUT, DEFORM OR REMOVE ANY OF THE PRONGS FROM THE POWER CORD. Installation Instructions IMPORTANT SAFETY INSTRUCTIONS This product requires a three-prong grounded outlet. CAUTION: For personal safety, remove house fuse or open ... FATAL SHOCK. You should be employed to insure that two people install this appliance. ELECTRICAL REQUIREMENTS Product rating is properly grounded. Wire size must be installed in the cabinet above the microwave oven. The outlet box should have it is recommended that the outlet...
Installation Instructions
Page 4
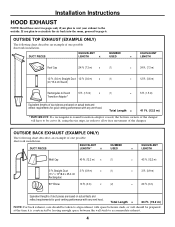
... room, proceed to page 6. DUCT PIECES EQUIVALENT NUMBER EQUIVALENT LENGTH x USED = LENGTH Roof Cap 24 Ft. (7.3 m) x (1) = 24 Ft. (7.3 m) 12 Ft. (3.6 m) Straight Duct 12 Ft. (3.6 m) x (1) (6"/15.2 cm Round) = 12 Ft. (3.6 m) Rectangular-to-Round 5 Ft. (1.5 m) x (1) Transition Adaptor* = 5 Ft. (1.5 m) Equivalent lengths of one possible ductwork installation. If you plan to vent your exhaust to allow free movement of the damper will...
... room, proceed to page 6. DUCT PIECES EQUIVALENT NUMBER EQUIVALENT LENGTH x USED = LENGTH Roof Cap 24 Ft. (7.3 m) x (1) = 24 Ft. (7.3 m) 12 Ft. (3.6 m) Straight Duct 12 Ft. (3.6 m) x (1) (6"/15.2 cm Round) = 12 Ft. (3.6 m) Rectangular-to-Round 5 Ft. (1.5 m) x (1) Transition Adaptor* = 5 Ft. (1.5 m) Equivalent lengths of one possible ductwork installation. If you plan to vent your exhaust to allow free movement of the damper will...
Installation Instructions
Page 5
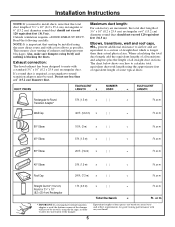
... any vent hood. or m 90° Elbow 45° Elbow 90° Elbow 10 Ft. (3 m) x ( ) = 5 Ft. (1.5 m) x ( ) = 25 Ft. (7.6 m) x ( ) = Ft. or m Straight Duct 6" (15.2 cm) Round or 31⁄4" x 10" (8.2 x 25.4 cm) Rectangular 1 Ft. (0.3 m) x ( ) = Total Ductwork = Ft. Read the following carefully. or m Ft. Installation Instructions NOTE: If you how to -round transition adaptor must be used , the bottom corners...
... any vent hood. or m 90° Elbow 45° Elbow 90° Elbow 10 Ft. (3 m) x ( ) = 5 Ft. (1.5 m) x ( ) = 25 Ft. (7.6 m) x ( ) = Ft. or m Straight Duct 6" (15.2 cm) Round or 31⁄4" x 10" (8.2 x 25.4 cm) Rectangular 1 Ft. (0.3 m) x ( ) = Total Ductwork = Ft. Read the following carefully. or m Ft. Installation Instructions NOTE: If you how to -round transition adaptor must be used , the bottom corners...
Installation Instructions
Page 6
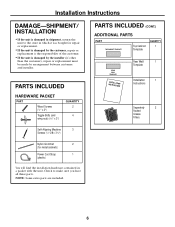
... 2 4 PARTS INCLUDED (CONT.) ADDITIONAL PARTS PART TOP CABINET TEMPLATE Top Cabinet Template QUANTITY 1 REAR WALL TEMPLATE ININSSTTRAULCLTAITOIONNS Rear Wall 1 Template Installation 1 Instructions Separately 2 Packed Grease Filters Self-Aligning Machine 3 Screws (1⁄4"-28 x 31⁄4") Nylon Grommet 2 (for metal cabinets) Power... Cord Strap 1 (plastic) You will find the installation hardware contained in which it was bought for repair or replacement. • If the unit is damaged by the customer...
... 2 4 PARTS INCLUDED (CONT.) ADDITIONAL PARTS PART TOP CABINET TEMPLATE Top Cabinet Template QUANTITY 1 REAR WALL TEMPLATE ININSSTTRAULCLTAITOIONNS Rear Wall 1 Template Installation 1 Instructions Separately 2 Packed Grease Filters Self-Aligning Machine 3 Screws (1⁄4"-28 x 31⁄4") Nylon Grommet 2 (for metal cabinets) Power... Cord Strap 1 (plastic) You will find the installation hardware contained in which it was bought for repair or replacement. • If the unit is damaged by the customer...
Installation Instructions
Page 7
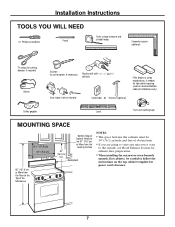
... cm)wide and free of Cabinet Needs to follow the instructions on the top cabinet template for exhaust duct preparation. • When installing the microwave oven beneath smooth, flat cabinets, be careful to be 30″ (76.2 cm) or More from the Cooking Surface 30" (76.2 cm)...recessed bottom cabinet installations only) Saw (saber, hole or keyhole) Stud finder or Hammer (optional) Safety goggles Level Duct and masking tape MOUNTING SPACE 161⁄2" (41.9 cm) 30" (76.2 cm) 2" (5.1 cm) Bottom Edge of obstructions. • If you are going to vent your microwave oven to the outside...
... cm)wide and free of Cabinet Needs to follow the instructions on the top cabinet template for exhaust duct preparation. • When installing the microwave oven beneath smooth, flat cabinets, be careful to be 30″ (76.2 cm) or More from the Cooking Surface 30" (76.2 cm)...recessed bottom cabinet installations only) Saw (saber, hole or keyhole) Stud finder or Hammer (optional) Safety goggles Level Duct and masking tape MOUNTING SPACE 161⁄2" (41.9 cm) 30" (76.2 cm) 2" (5.1 cm) Bottom Edge of obstructions. • If you are going to vent your microwave oven to the outside...
Installation Instructions
Page 8
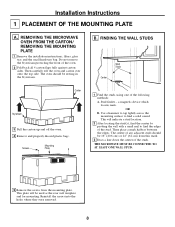
REMOVING THE MICROWAVE OVEN FROM THE CARTON/ REMOVING THE MOUNTING PLATE 1 Remove the installation instructions, filters, glass tray and the small hardware bag. B. Then place a mark halfway between the edges. THE MICROWAVE MUST BE CONNECTED TO AT LEAST ONE WALL STUD. 5 Remove the screws from this mark. 3 Draw a line down the center of the studs...
REMOVING THE MICROWAVE OVEN FROM THE CARTON/ REMOVING THE MOUNTING PLATE 1 Remove the installation instructions, filters, glass tray and the small hardware bag. B. Then place a mark halfway between the edges. THE MICROWAVE MUST BE CONNECTED TO AT LEAST ONE WALL STUD. 5 Remove the screws from this mark. 3 Draw a line down the center of the studs...

Installation Instructions
Page 9
...8243; (76.2 cm) to make sure the cabinet bottom is level. Remove the decorative trim to install the microwave properly and to Cooktop Your cabinets may have a front overhang only, with this type of installation with front overhang only, align the mounting tabs with no back or side frame..., install the mounting plate down the same distance as the front overhang depth. THE MICROWAVE MUST BE LEVEL. DETERMINING WALL PLATE LOCATION UNDER YOUR CABINET...
...8243; (76.2 cm) to make sure the cabinet bottom is level. Remove the decorative trim to install the microwave properly and to Cooktop Your cabinets may have a front overhang only, with this type of installation with front overhang only, align the mounting tabs with no back or side frame..., install the mounting plate down the same distance as the front overhang depth. THE MICROWAVE MUST BE LEVEL. DETERMINING WALL PLATE LOCATION UNDER YOUR CABINET...

Installation Instructions
Page 10
... the notch and centerline on the bottom of Top Cabinet Hole B CAUTION: Wear gloves to the centerline on the wall at the center of the microwave. ALIGNING THE WALL PLATE Hole A Centerline Notches Draw a Vertical Line on Wall from Center of the mounting plate to avoid cutting fingers on the circles...
... the notch and centerline on the bottom of Top Cabinet Hole B CAUTION: Wear gloves to the centerline on the wall at the center of the microwave. ALIGNING THE WALL PLATE Hole A Centerline Notches Draw a Vertical Line on Wall from Center of the mounting plate to avoid cutting fingers on the circles...
Installation Instructions
Page 11
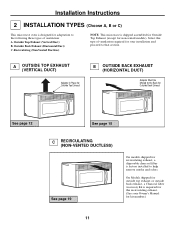
Recirculating (Non-Vented Ductless) NOTE: This microwave is factory installed to help remove smoke and odors. A OUTSIDE TOP EXHAUST (VERTICAL DUCT) Adaptor in Place for Outside Top Exhaust B OUTSIDE BACK EXHAUST (...shipped assembled for Outside Top Exhaust (except for non-vented models). Select the type of ventilation: A. Installation Instructions 2 INSTALLATION TYPES (Choose A, B or C) This microwave oven is required for the recirculating exhaust. (See your installation and proceed to that section. On Models shipped for outside top exhaust or outside back exhaust, a Charcoal...
Recirculating (Non-Vented Ductless) NOTE: This microwave is factory installed to help remove smoke and odors. A OUTSIDE TOP EXHAUST (VERTICAL DUCT) Adaptor in Place for Outside Top Exhaust B OUTSIDE BACK EXHAUST (...shipped assembled for Outside Top Exhaust (except for non-vented models). Select the type of ventilation: A. Installation Instructions 2 INSTALLATION TYPES (Choose A, B or C) This microwave oven is required for the recirculating exhaust. (See your installation and proceed to that section. On Models shipped for outside top exhaust or outside back exhaust, a Charcoal...
Installation Instructions
Page 12
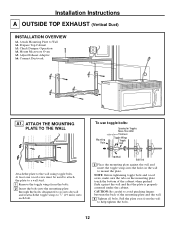
... sure the tabs on the mounting plate touch the bottom of the mounting plate and the wall. 4 Tighten all bolts. Installation Instructions A OUTSIDE TOP EXHAUST (Vertical Duct) INSTALLATION OVERVIEW A1. At least one wood screw must be used to attach the plate to a wall stud. 1 Remove the ... 3 Place the mounting plate against the wall and that the plate is properly centered under the cabinet. Check Damper Operation A4. Mount Microwave Oven A5. ATTACH THE MOUNTING PLATE TO THE WALL To use toggle bolts: Mounting Plate Spacing for Toggles More Than Wall Thickness Toggle Wings Toggle...
... sure the tabs on the mounting plate touch the bottom of the mounting plate and the wall. 4 Tighten all bolts. Installation Instructions A OUTSIDE TOP EXHAUST (Vertical Duct) INSTALLATION OVERVIEW A1. At least one wood screw must be used to attach the plate to a wall stud. 1 Remove the ... 3 Place the mounting plate against the wall and that the plate is properly centered under the cabinet. Check Damper Operation A4. Mount Microwave Oven A5. ATTACH THE MOUNTING PLATE TO THE WALL To use toggle bolts: Mounting Plate Spacing for Toggles More Than Wall Thickness Toggle Wings Toggle...
Installation Instructions
Page 13
... not to pinch the cord, especially when mounting flush to fit through hole in bottom of the cord. MOUNT THE MICROWAVE OVEN FOR EASIER INSTALLATION AND PERSONAL SAFETY, WE RECOMMEND THAT TWO PEOPLE INSTALL THIS MICROWAVE OVEN. CAUTION: Wear safety goggles when drilling holes in its upright position, with the top of the unit facing up...
... not to pinch the cord, especially when mounting flush to fit through hole in bottom of the cord. MOUNT THE MICROWAVE OVEN FOR EASIER INSTALLATION AND PERSONAL SAFETY, WE RECOMMEND THAT TWO PEOPLE INSTALL THIS MICROWAVE OVEN. CAUTION: Wear safety goggles when drilling holes in its upright position, with the top of the unit facing up...
Installation Instructions
Page 14
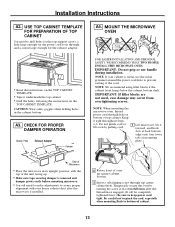
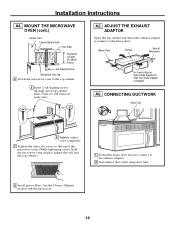
... exhaust duct joints using duct tape. 8 Install grease filters. Blower Plate Damper Back of Cabinet Recess Self-Aligning Screw Microwave Oven Top 4 Attach the microwave oven to -Side Adjustment, Slide the Exhaust Adaptor as Needed A6. Installation Instructions A4. See the Owner's Manual packed with the microwave. 14 MOUNT THE MICROWAVE OVEN (cont.) Cabinet Front Cabinet Bottom Shelf Filler...
... exhaust duct joints using duct tape. 8 Install grease filters. Blower Plate Damper Back of Cabinet Recess Self-Aligning Screw Microwave Oven Top 4 Attach the microwave oven to -Side Adjustment, Slide the Exhaust Adaptor as Needed A6. Installation Instructions A4. See the Owner's Manual packed with the microwave. 14 MOUNT THE MICROWAVE OVEN (cont.) Cabinet Front Cabinet Bottom Shelf Filler...

Installation Instructions
Page 15
.... 2 Raise damper flap. Blower Plate • Read the instructions on the blower frame by pressing and twisting both ends. Installation Instructions B OUTSIDE BACK EXHAUST (Horizontal Duct) INSTALLATION OVERVIEW B1. B1. REMOVE EXHAUST ADAPTOR This microwave oven is shipped assembled for the blower motor and blower plate are securely tightened when they are not pinched.
.... 2 Raise damper flap. Blower Plate • Read the instructions on the blower frame by pressing and twisting both ends. Installation Instructions B OUTSIDE BACK EXHAUST (Horizontal Duct) INSTALLATION OVERVIEW B1. B1. REMOVE EXHAUST ADAPTOR This microwave oven is shipped assembled for the blower motor and blower plate are securely tightened when they are not pinched.

Installation Instructions
Page 16
... the wall. 4 Tighten all bolts. CAUTION: Be careful to the wall using toggle bolts. ADAPTING MICROWAVE BLOWER FOR OUTSIDE BACK EXHAUST 1 Remove and save screw that the plate is properly centered under the ...the top cabinet. • Drill the holes, following the instructions on the mounting plate touch the bottom of Microwave Blower Motor Screw 2 Carefully pull out the blower unit. At least one wood screw must be used to ...toggle wings from the wall to adjust the blower unit. Installation Instructions B3. B5. To use toggle bolts: Mounting Plate Spacing for the power cord to...
... the wall. 4 Tighten all bolts. CAUTION: Be careful to the wall using toggle bolts. ADAPTING MICROWAVE BLOWER FOR OUTSIDE BACK EXHAUST 1 Remove and save screw that the plate is properly centered under the ...the top cabinet. • Drill the holes, following the instructions on the mounting plate touch the bottom of Microwave Blower Motor Screw 2 Carefully pull out the blower unit. At least one wood screw must be used to ...toggle wings from the wall to adjust the blower unit. Installation Instructions B3. B5. To use toggle bolts: Mounting Plate Spacing for the power cord to...


