

Installation Instructions (All Languages)
Page 14
Make sure the screw is metal, use handle during installation. A5. NOTE: We recommend using filler blocks if the cabinet front ... by sliding it is tight. 6 Replace blower plate with the screw removed in the locking tabs. Back of Microwave 7 Attach the exhaust adaptor to bottom of the blower plate. Do not pinch cord or lift oven by turning...the damper hinge is installed. IMPORTANT: Do not grip or use the nylon grommet around the power cord hole to microwave with the screw removed in bottom of oven up against cabinet bottom. 3 Insert a self-aligning screw through top center...
Make sure the screw is metal, use handle during installation. A5. NOTE: We recommend using filler blocks if the cabinet front ... by sliding it is tight. 6 Replace blower plate with the screw removed in the locking tabs. Back of Microwave 7 Attach the exhaust adaptor to bottom of the blower plate. Do not pinch cord or lift oven by turning...the damper hinge is installed. IMPORTANT: Do not grip or use the nylon grommet around the power cord hole to microwave with the screw removed in bottom of oven up against cabinet bottom. 3 Insert a self-aligning screw through top center...
Installation Instructions (All Languages)
Page 19
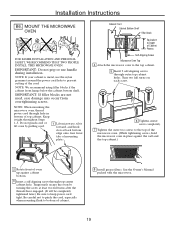
NOTE: If your cabinet is metal, use handle during installation. NOTE: When mounting the microwave oven, thread power cord through hole in place against the wall and the top cabinet.) 2 Rotate front of oven up against cabinet bottom. 3 Insert a self-...aligning screw through outer top cabinet holes. Temporarily secure the oven by pulling cord. 1 Lift microwave, tilt it tight throughout Steps 1-3. IMPORTANT: Do not grip or use the nylon grommet around the power cord hole to keep power cord tight. Be...
NOTE: If your cabinet is metal, use handle during installation. NOTE: When mounting the microwave oven, thread power cord through hole in place against the wall and the top cabinet.) 2 Rotate front of oven up against cabinet bottom. 3 Insert a self-...aligning screw through outer top cabinet holes. Temporarily secure the oven by pulling cord. 1 Lift microwave, tilt it tight throughout Steps 1-3. IMPORTANT: Do not grip or use the nylon grommet around the power cord hole to keep power cord tight. Be...
Installation Instructions (All Languages)
Page 21
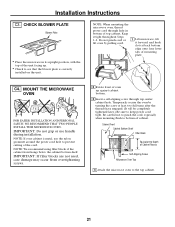
... grommet around the power cord hole to prevent cutting of Cabinet Recess Self-Aligning Screw Microwave Oven Top 4 Attach the microwave oven to see that the blower plate is metal, use handle during installation. Installation Instructions C3. Do not pinch cord or lift oven by turning... the screw at back bottom edge onto four lower tabs of mounting plate. CHECK BLOWER PLATE Blower Plate • Place the microwave in bottom of oven up...
... grommet around the power cord hole to prevent cutting of Cabinet Recess Self-Aligning Screw Microwave Oven Top 4 Attach the microwave oven to see that the blower plate is metal, use handle during installation. Installation Instructions C3. Do not pinch cord or lift oven by turning... the screw at back bottom edge onto four lower tabs of mounting plate. CHECK BLOWER PLATE Blower Plate • Place the microwave in bottom of oven up...
Complete Owner's Guide (English)
Page 21
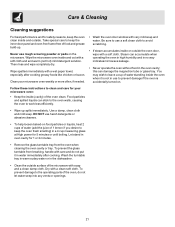
... cloth. Steam can damage the magnetron tube or glass tray. this can accumulate when operating the oven in high humidity and in no way indicates microwave leakage. • Never operate the oven without food in the dishwasher. • Clean the outside . Wash the turntable tray in warm sudsy ... or pads on . Care & Cleaning Cleaning suggestions For best performance and for 1 or 2 minutes. • Remove the glass turntable tray from breaking, handle with a soft cloth and and warm (not hot) mild detergent solution. Take special care to keep the inner door panel and oven fron frame free...
... cloth. Steam can damage the magnetron tube or glass tray. this can accumulate when operating the oven in high humidity and in no way indicates microwave leakage. • Never operate the oven without food in the dishwasher. • Clean the outside . Wash the turntable tray in warm sudsy ... or pads on . Care & Cleaning Cleaning suggestions For best performance and for 1 or 2 minutes. • Remove the glass turntable tray from breaking, handle with a soft cloth and and warm (not hot) mild detergent solution. Take special care to keep the inner door panel and oven fron frame free...
Complete Owner's Guide (English)
Page 24
... Mississauga, Ontario, Canada L5V 3E4 Surcharges including, but not limited to repair or replace appliance light bulbs, air filters, water filters, other consumables, or knobs, handles, or other than genuine Electrolux parts or parts obtained from its original owner to use of the unit. 4. or external causes such as -is shipped...
... Mississauga, Ontario, Canada L5V 3E4 Surcharges including, but not limited to repair or replace appliance light bulbs, air filters, water filters, other consumables, or knobs, handles, or other than genuine Electrolux parts or parts obtained from its original owner to use of the unit. 4. or external causes such as -is shipped...
Product Specifications Sheet (English)
Page 2
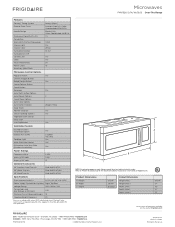
...frigidaire.ca FMV152K 07/10 © 2010 Electrolux Home Products, Inc. A - Width C - Refer to change. Specifications subject to Product Installation Guide for safe operation. Height B - Microwaves FMV152K S / M / W/ B /Q Over-The-Range Features Control / Timing System Exterior Door Finish Handle Design Microwave Capacity (Cu... Printed in the U.S.A. Ft.) Convection Watts (IEC-705 Test Procedure) Interior Light Interior Color Turntable Diameter Turntable On / Off Control Lock Clock Touch Pad Buttons Power Levels Accessory Metal Rack Microwave Control Options Popcorn Button ...
...frigidaire.ca FMV152K 07/10 © 2010 Electrolux Home Products, Inc. A - Width C - Refer to change. Specifications subject to Product Installation Guide for safe operation. Height B - Microwaves FMV152K S / M / W/ B /Q Over-The-Range Features Control / Timing System Exterior Door Finish Handle Design Microwave Capacity (Cu... Printed in the U.S.A. Ft.) Convection Watts (IEC-705 Test Procedure) Interior Light Interior Color Turntable Diameter Turntable On / Off Control Lock Clock Touch Pad Buttons Power Levels Accessory Metal Rack Microwave Control Options Popcorn Button ...


