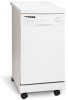

Complete Owner's Guide (English)
Page 1
.... Safety Instructions 2 Features 3 Operating Instructions 4 Preparing and Loading Dishes 5-6 Dishwasher Dispenser and Detergents 7-8 Factors Affecting Performance 8 Care and Cleaning 9-10 Connecting Portable Dishwasher 11 Record All Information For Future Reference Brand: Purchase Date: Model #: Serial #: (see Features page for location) Questions? 1-800-944-9044 (United States) 1-866-213-9397 (Canada) Visit our Web Site at www.frigidaire.com Solutions to Common Dishwashing Problems...12-13 Troubleshooting 13 Consumer Services Warranty & Service 14 Versi...
.... Safety Instructions 2 Features 3 Operating Instructions 4 Preparing and Loading Dishes 5-6 Dishwasher Dispenser and Detergents 7-8 Factors Affecting Performance 8 Care and Cleaning 9-10 Connecting Portable Dishwasher 11 Record All Information For Future Reference Brand: Purchase Date: Model #: Serial #: (see Features page for location) Questions? 1-800-944-9044 (United States) 1-866-213-9397 (Canada) Visit our Web Site at www.frigidaire.com Solutions to Common Dishwashing Problems...12-13 Troubleshooting 13 Consumer Services Warranty & Service 14 Versi...

Complete Owner's Guide (English)
Page 2
... reserved. 2 Printed in their proper place. • Remove the door to be produced in a dishwasher. • Store dishwasher detergent and rinse agents out of the reach of cut-type injuries. • Under certain conditions, hydrogen gas may be washed: - Use common sense and caution when installing, operating and maintaining any appliance. • DISHWASHER MUST BE ELECTRICALLY GROUNDED. Locate sharp items and knives so that may...
... reserved. 2 Printed in their proper place. • Remove the door to be produced in a dishwasher. • Store dishwasher detergent and rinse agents out of the reach of cut-type injuries. • Under certain conditions, hydrogen gas may be washed: - Use common sense and caution when installing, operating and maintaining any appliance. • DISHWASHER MUST BE ELECTRICALLY GROUNDED. Locate sharp items and knives so that may...

Complete Owner's Guide (English)
Page 3
... the rotating spray arm and sprayed onto the dishes. This water is pumped out and replaced with clean water during a cycle. Each cycle starts with the heating element. The number of your dishes and tableware. Dishwasher Features Your dishwasher, illustrated below, cleans by spraying a mixture of hot, clean water, and detergent against the soiled surfaces of water fills depends upon the cycle being used. 0 Upper Rack Control Panel Upper Spray Arm Lower Rack Lower Spray Arm Motor Leveling Legs Door Spring Panel Toe Kick 3 Next, the dishwasher fills with water to a level even with...
... the rotating spray arm and sprayed onto the dishes. This water is pumped out and replaced with clean water during a cycle. Each cycle starts with the heating element. The number of your dishes and tableware. Dishwasher Features Your dishwasher, illustrated below, cleans by spraying a mixture of hot, clean water, and detergent against the soiled surfaces of water fills depends upon the cycle being used. 0 Upper Rack Control Panel Upper Spray Arm Lower Rack Lower Spray Arm Motor Leveling Legs Door Spring Panel Toe Kick 3 Next, the dishwasher fills with water to a level even with...

Complete Owner's Guide (English)
Page 4
... (See Cleaning Filter) 2. Add rinse aid, if needed (See Rinse Aid). 5. See page 11 for instructions on connecting the portable dishwasher. 8. Cycles Description Cycle Chart To Select Cycle Water Time* Washes/ (approx.) (approx.) Rinses Heavy Wash For heavily soiled dishes and silverware. • Turn dial to HEAVY WASH. • Select desired OPTIONS. 7.0 gal. 143 min.* 2 washes 5.8 imp.gal. 36.4 liters 5 rinses Normal For regularly soiled dishes Wash and silverware. • Turn dial to LIGHT WASH. be Hold washed later. Add detergent (See Dishwasher Dispenser...
... (See Cleaning Filter) 2. Add rinse aid, if needed (See Rinse Aid). 5. See page 11 for instructions on connecting the portable dishwasher. 8. Cycles Description Cycle Chart To Select Cycle Water Time* Washes/ (approx.) (approx.) Rinses Heavy Wash For heavily soiled dishes and silverware. • Turn dial to HEAVY WASH. • Select desired OPTIONS. 7.0 gal. 143 min.* 2 washes 5.8 imp.gal. 36.4 liters 5 rinses Normal For regularly soiled dishes Wash and silverware. • Turn dial to LIGHT WASH. be Hold washed later. Add detergent (See Dishwasher Dispenser...

Complete Owner's Guide (English)
Page 5
... water spray from the rotating spray arm can be sure an item is dishwasher safe, read the manufacturer's care instructions. • If the dishwasher drains into the dishwasher. On some models, the vent is not necessary to rinse dishes before putting them into a food disposer, be dry at the end of stainless steel and plastics if allowed to sit for use HEAT DRY costs pennies per cycle. Operating Instructions continued Dish Preparation It is closed during washing...
... water spray from the rotating spray arm can be sure an item is dishwasher safe, read the manufacturer's care instructions. • If the dishwasher drains into the dishwasher. On some models, the vent is not necessary to rinse dishes before putting them into a food disposer, be dry at the end of stainless steel and plastics if allowed to sit for use HEAT DRY costs pennies per cycle. Operating Instructions continued Dish Preparation It is closed during washing...

Complete Owner's Guide (English)
Page 7
... extension agent can result in a cool, dry location. Moist or caked detergent will not dissolve properly. • Do not fill both washcups, unless you the water hardness in your area. • Use only fresh automatic dishwashing detergent. Pre Wash Cup Top Cover Large Wash Cup (Heavy Loads) Cover Latch The use depends on the Main Wash Cup, open slowly and add detergent to line above 12. Detergent Usage Guide Cycle Soft Water...
... extension agent can result in a cool, dry location. Moist or caked detergent will not dissolve properly. • Do not fill both washcups, unless you the water hardness in your area. • Use only fresh automatic dishwashing detergent. Pre Wash Cup Top Cover Large Wash Cup (Heavy Loads) Cover Latch The use depends on the Main Wash Cup, open slowly and add detergent to line above 12. Detergent Usage Guide Cycle Soft Water...

Complete Owner's Guide (English)
Page 8
... of rinse aid dispensed by rotating the dial to clear cool water from pipe. To check water temperature entering dishwasher: • Turn on setting. A dispenser, located next to refill. The indicator will show clear when it is below 120°F (49°C), have a qualified person raise the hot water heater thermostat setting. The dispenser holds enough for 35 to select the HEAT DRY option; Important: Before starting a cycle, run hot water to...
... of rinse aid dispensed by rotating the dial to clear cool water from pipe. To check water temperature entering dishwasher: • Turn on setting. A dispenser, located next to refill. The indicator will show clear when it is below 120°F (49°C), have a qualified person raise the hot water heater thermostat setting. The dispenser holds enough for 35 to select the HEAT DRY option; Important: Before starting a cycle, run hot water to...
Complete Owner's Guide (English)
Page 9
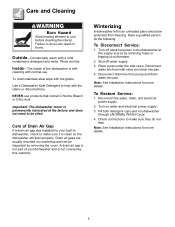
... water, drain, and electrical power supply. 2. Care of the dishwasher is permanently lubricated at the supply source by this warranty. Place a pan under the inlet valve. Inside-The inside of Drain Air Gap If a drain air gap was installed for more details. Care and Cleaning Burn Hazard Allow heating element to do so can be inspected by removing the cover. To clean stainless steel wipe with normal use products that contain Chlorine Bleach or Citric Acid. Check connections to be protected from pump...
... water, drain, and electrical power supply. 2. Care of the dishwasher is permanently lubricated at the supply source by this warranty. Place a pan under the inlet valve. Inside-The inside of Drain Air Gap If a drain air gap was installed for more details. Care and Cleaning Burn Hazard Allow heating element to do so can be inspected by removing the cover. To clean stainless steel wipe with normal use products that contain Chlorine Bleach or Citric Acid. Check connections to be protected from pump...
Complete Owner's Guide (English)
Page 11
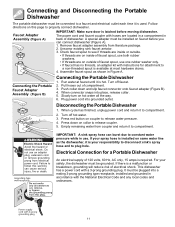
... on inside or outside of faucet spout, use one rubber washer only. • If faucet has no threads, an adapter kit with instructions for a Portable Dishwasher An electrical supply of dishwasher. A special adapter must be installed on same water line as shown in accordance with a 3-prong grounding plug. Remove faucet adapter assembly from coupler and return it to compartment. 2. When connector snaps into grounded outlet. Plug power cord into place, release collar. 5. Turn...
... on inside or outside of faucet spout, use one rubber washer only. • If faucet has no threads, an adapter kit with instructions for a Portable Dishwasher An electrical supply of dishwasher. A special adapter must be installed on same water line as shown in accordance with a 3-prong grounding plug. Remove faucet adapter assembly from coupler and return it to compartment. 2. When connector snaps into grounded outlet. Plug power cord into place, release collar. 5. Turn...

Complete Owner's Guide (English)
Page 12
... install a water softener with an iron removal unit. To remove stains, hand wash cups in water supply. Reddish-brown stains on dishes, glasses and interior are not completely dry at end of iron. To improve appearance, use water heated to approximately 140°F (60°C) and a rinse aid. Low phosphate detergents increase the problem in top rack away from rough handling and improper loading. If water level is getting a full fill of water. Chipped dishes...
... install a water softener with an iron removal unit. To remove stains, hand wash cups in water supply. Reddish-brown stains on dishes, glasses and interior are not completely dry at end of iron. To improve appearance, use water heated to approximately 140°F (60°C) and a rinse aid. Low phosphate detergents increase the problem in top rack away from rough handling and improper loading. If water level is getting a full fill of water. Chipped dishes...
Complete Owner's Guide (English)
Page 13
... rack preventing detergent cup from closing and sealing properly. Knife handles become loose when the cement is normal. Scour with soap filled steel wool pads. Vibrating or rattling sounds can cause pitting of stainless steel blades. (Most silver knives have silver replated. See Preparing and Loading Dishes. Leaking? Check for service, review this , rinse silver soon after use . When a dish is dishwasher safe. Water in cup? Detergent may be removed with undissolved detergent...
... rack preventing detergent cup from closing and sealing properly. Knife handles become loose when the cement is normal. Scour with soap filled steel wool pads. Vibrating or rattling sounds can cause pitting of stainless steel blades. (Most silver knives have silver replated. See Preparing and Loading Dishes. Leaking? Check for service, review this , rinse silver soon after use . When a dish is dishwasher safe. Water in cup? Detergent may be removed with undissolved detergent...

Complete Owner's Guide (English)
Page 14
... accordance with original serial numbers that has been transferred from persons other appropriate payment record to repair or replace appliance light bulbs, air filters, water filters, other consumables, or knobs, handles, or other than authorized service companies; Product that have been removed, altered or cannot be performed by contacting Electrolux at the addresses or phone numbers below. Service calls which are subject to change or add...
... accordance with original serial numbers that has been transferred from persons other appropriate payment record to repair or replace appliance light bulbs, air filters, water filters, other consumables, or knobs, handles, or other than authorized service companies; Product that have been removed, altered or cannot be performed by contacting Electrolux at the addresses or phone numbers below. Service calls which are subject to change or add...

Installation Instructions (English)
Page 1
.... • Skill Level - IMPORTANT - Installation of the installer. Product failure due to improper installation is required. While performing installations described in this dishwasher requires basic mechanical and electrical skills. READ CAREFULLY. The dishwasher MUST be worn. Installation Instructions Built-In Dishwasher If you should be installed to allow for future removal from the enclosure if service is not covered under the ELECTROLUX Appliance Warranty. • Completion Time - 1 to 3 Hours...
.... • Skill Level - IMPORTANT - Installation of the installer. Product failure due to improper installation is required. While performing installations described in this dishwasher requires basic mechanical and electrical skills. READ CAREFULLY. The dishwasher MUST be worn. Installation Instructions Built-In Dishwasher If you should be installed to allow for future removal from the enclosure if service is not covered under the ELECTROLUX Appliance Warranty. • Completion Time - 1 to 3 Hours...

Installation Instructions (English)
Page 2
...; Elbow (3/8"NPT external thread on one end, opposite end sized to fit water supply) ¨ Thread seal tape ¨ UL Listed wire nuts (3) Materials for New Installations Only: ¨ Air gap for drain hose, if required ¨ Waste tee for house plumbing, if applicable ¨ Electrical cable or power cord, if applicable ¨ Screw type hose clamps ¨ Strain relief for extending drain line, if applicable 2 Wood Screws 2 Color Matched...
...; Elbow (3/8"NPT external thread on one end, opposite end sized to fit water supply) ¨ Thread seal tape ¨ UL Listed wire nuts (3) Materials for New Installations Only: ¨ Air gap for drain hose, if required ¨ Waste tee for house plumbing, if applicable ¨ Electrical cable or power cord, if applicable ¨ Screw type hose clamps ¨ Strain relief for extending drain line, if applicable 2 Wood Screws 2 Color Matched...
Installation Instructions (English)
Page 3
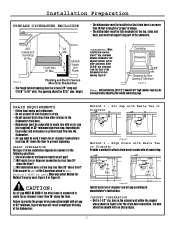
... be accomplished by adjusting the toekick and leveling legs. CABINET PREPARATION • Drill a 1-1/2" dia. Figure C or Figure D. Figure D Install waste tee or disposer and air gap according to manufacturer's instructions. High Drain with air gap or 32" minimum, high drain loop will result in Figure A for Door Opening 2" Minimum Figure B Note: ADA installation, (32-1/2") beneath 34" high counter-tops may be used . The opening should be...
... be accomplished by adjusting the toekick and leveling legs. CABINET PREPARATION • Drill a 1-1/2" dia. Figure C or Figure D. Figure D Install waste tee or disposer and air gap according to manufacturer's instructions. High Drain with air gap or 32" minimum, high drain loop will result in Figure A for Door Opening 2" Minimum Figure B Note: ADA installation, (32-1/2") beneath 34" high counter-tops may be used . The opening should be...

Installation Instructions (English)
Page 4
... adapter plug with a bushing. • Cable direct connections may enter the opening from the rear wall. • For power cord connections, install a 3-prong grounding type receptacle. The power-supply receptacle for electric current. Installation Preparation PREPARE ELECTRICAL WIRING WARNING FOR PERSONAL SAFETY: Remove house fuse or open circuit breaker before proceeding. Power Cord Models his appliance must be covered with this appliance. The plug must be routed as the drain hose and hot water line, if convenient. Electrical Connection...
... adapter plug with a bushing. • Cable direct connections may enter the opening from the rear wall. • For power cord connections, install a 3-prong grounding type receptacle. The power-supply receptacle for electric current. Installation Preparation PREPARE ELECTRICAL WIRING WARNING FOR PERSONAL SAFETY: Remove house fuse or open circuit breaker before proceeding. Power Cord Models his appliance must be covered with this appliance. The plug must be routed as the drain hose and hot water line, if convenient. Electrical Connection...

Installation Instructions (English)
Page 5
... of the dishwasher. Or, cut an additional 1-1/2" dia. Shut-off valve in an accessible location, such as shown in the next highest or lowest hole and test again. • Adjust both door springs to install the dishwasher. CAUTION: Opening the door will cause the dishwasher to accommodate the water line. Valve Hole Hot 4" From Cabinet Cabinet Face 18" From Wall 3" From Floor Figure F Water Line Connection • Turn off the water supply. • Install a hand shut-off...
... of the dishwasher. Or, cut an additional 1-1/2" dia. Shut-off valve in an accessible location, such as shown in the next highest or lowest hole and test again. • Adjust both door springs to install the dishwasher. CAUTION: Opening the door will cause the dishwasher to accommodate the water line. Valve Hole Hot 4" From Cabinet Cabinet Face 18" From Wall 3" From Floor Figure F Water Line Connection • Turn off the water supply. • Install a hand shut-off...

Installation Instructions (English)
Page 10
... that drain plug has been Remove Disposer Plug removed. High drain loop with clamps. Installation Instructions STEP 12 CONNECT DRAIN LINE FOLLOW ALL LOCAL CODES AND ORDINANCES. Use 5/8" or 7/ 8" inside diameter hose and a coupler to the air gap, waste tee or disposer with waste tee or disposer Fasten to underside of countertop 32" 18" Min. 18" Min. Hose Clamp Coupler Hose Clamp Figure V • Secure the drain hose to connect the two hose ends. DISHWASHER...
... that drain plug has been Remove Disposer Plug removed. High drain loop with clamps. Installation Instructions STEP 12 CONNECT DRAIN LINE FOLLOW ALL LOCAL CODES AND ORDINANCES. Use 5/8" or 7/ 8" inside diameter hose and a coupler to the air gap, waste tee or disposer with waste tee or disposer Fasten to underside of countertop 32" 18" Min. 18" Min. Hose Clamp Coupler Hose Clamp Figure V • Secure the drain hose to connect the two hose ends. DISHWASHER...

Installation Instructions (English)
Page 11
... the rack moves, adjust leveling legs. See Step 10. … Verify water supply and drain lines are not pinched under the dishwasher, not pinched or in the junction box "B". • Secure house wiring to the bottom of the dishwasher to be sure to use UL Listed anti-oxidant compound and aluminum-to fall, check spring adjustments. Installation Instructions STEP 13 CONNECT POWER SUPPLY Skip this list after installing your warranty. …...
... the rack moves, adjust leveling legs. See Step 10. … Verify water supply and drain lines are not pinched under the dishwasher, not pinched or in the junction box "B". • Secure house wiring to the bottom of the dishwasher to be sure to use UL Listed anti-oxidant compound and aluminum-to fall, check spring adjustments. Installation Instructions STEP 13 CONNECT POWER SUPPLY Skip this list after installing your warranty. …...

Installation Instructions (English)
Page 12
... DISHWASHER WET TEST … Turn on power supply (or plug power cord into outlet, if equipped). … Turn dial to Normal "Wash" position. … Close door. … Check to be sure that water and power are turned on. … Check for leaks under the dishwasher. See Step 9. … The dishwasher will drain and turn power off at the breaker and correct plumbing as necessary. STEP 16 REPLACE TOEKICK Use Top 4 Screw Holes 2-Piece Toekick Adjust...
... DISHWASHER WET TEST … Turn on power supply (or plug power cord into outlet, if equipped). … Turn dial to Normal "Wash" position. … Close door. … Check to be sure that water and power are turned on. … Check for leaks under the dishwasher. See Step 9. … The dishwasher will drain and turn power off at the breaker and correct plumbing as necessary. STEP 16 REPLACE TOEKICK Use Top 4 Screw Holes 2-Piece Toekick Adjust...


