Frigidaire FHWC3025MS Support and Manuals
Get Help and Manuals for this Frigidaire item

View All Support Options Below
Free Frigidaire FHWC3025MS manuals!
Problems with Frigidaire FHWC3025MS?
Ask a Question
Free Frigidaire FHWC3025MS manuals!
Problems with Frigidaire FHWC3025MS?
Ask a Question
Most Recent Frigidaire FHWC3025MS Questions

What Is The Cfm?
(Posted by jhill64923 9 years ago)
Popular Frigidaire FHWC3025MS Manual Pages
Use and Care Manual - Page 2

... a damaged range Hood... Record model & serial numbers here Purchase date Model number Serial number
This section helps step you , please use and maintain your Product Registration Card in the mail.
To ensure our ability to continue serving you through some common problems that sold you use this Use & Care manual.
It contains instructions to help is part of...
Use and Care Manual - Page 3

... With all Aplicable Codes & Standards, Including Fire-rated Construction. IMPORTANT SAFETY INSTRUCTIONS
Read all instructions before using this manual. drafting.
Safety items throughout this hood in this appliance. Before servicing or cleaning the unit, switch power off at service panel and lock service panel disconnecting means to install or operate your appliance until you have...
Use and Care Manual - Page 4

... then turn hood ON when cooking at high
settings. you already... ventilating fans frequently. c)DO NOT USE WATER, including wet dishcloths or towels -
Grease...instructions given here for installation,maintenance and suitable use cookware appropriate for injury due to an exit. a violent steam explosion will result. Heat oils slowly on fan or filter. WARNING
TO REDUCE THE RISK OF A RANGE...
Use and Care Manual - Page 5

.... A copy of the above code standards can order this kit as specified on the left side of the appliance as part number 5304487139. Connect the aluminum wiring...range hood. • Wire sizes must conform with recessed bottoms: • Two 2" (5.1 cm) wide filler strips. Ensure that the ground path is located on the model/serial rating plate. The model/serial plate is adequate. Parts...
Use and Care Manual - Page 6

... 36" (91.4 cm) min. Consult the cooktop/range manufacturer installation instructions before making any cutouts. • Grounded electrical outlet is located inside the range hood on the model/serial rating plate. For Mobile Home Installations The installation of range hood to the Manufactured Home Construction Safety Standards, Title 24 CFR, Part 328 (formerly the Federal Standard for...
Use and Care Manual - Page 7

...the vent system. The break should be as close as part of air movement. Makeup Air Local building codes may require the use a 4" (10.2 cm) ...Installations An additional back draft damper should be installed to minimize backward cold air flow and a thermal break should be installed...to seal all joints in your HVAC professional for specific requirements in the
vent system. • The vent...
Use and Care Manual - Page 8

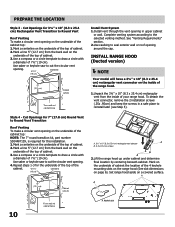
Place covering over that surface. .Lift the range hood and set it upside down onto covered
surface. 4.If cabinet has recessed bottom, add wood filler strips
on
the wall and cabinet bottom.
Install screws to attach filler strips in locations shown.
3" (7.6 cm)
Wood filler strips (recessed ... the ceiling or wall.
1.Disconnect power. .Select a flat surface for assembling the range hood.
Use and Care Manual - Page 9

... underside of cabinet. .Use saber or keyhole saw to "Install Range Hood (recirculating version)" on the underside of the wall. Recirculating Hood version For this line that is 7⁄8" (2.2 cm) ... and 4¾" (12.1 cm) from the underside of the
cabinet.
hood
Dim
model
A
B
30" & 36" 8³⁄8"
models
(21.3 cm)
7⁄8"
A
(2.2 cm)
A Centerline
VENTING Choose ...
Use and Care Manual - Page 10
... Step 5). Style 4 - A
A
A. Mark on the underside of the
cabinet top:
NOTE: The 7" round transition kit, part number
5304487139, is required for the underside of the top of your range hood. To detach the vent connector, remove the 2 installation screws (.35x .95cm) and keep the screws in upper cabinet
or wall.
See "Venting Requirements" section...
Use and Care Manual - Page 11

...lift the hood into place.
¹⁄4" (6.4 mm)
4.For roof installations, remove the top rectangular vent knockout. Seal joints with vent clamps or duct tape to range hood with ...set aside. NOTE: Make the drill holes on the incoming location of slots.
.Connect ventwork to hood. For wall installations, remove the rear rectangular vent knockout.
Terminal box cover B. Then push the hood...
Use and Care Manual - Page 12

...
4. Install terminal box cover. 6. Reconnect power. Complete Installation 1.Replace grease filter if ...Range Hood Care" section. 7.
Home power supply cable
F. See
"Replacing the Incandescent Light Bulb" in
pilot holes. See "Range Hood Use" section. Set range hood aside on a
covered surface. A
A
A. Replace all parts and panels before servicing. Black wires
C.
Install...
Use and Care Manual - Page 13
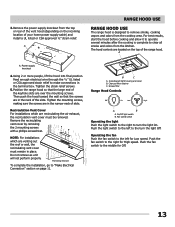
...of the keyhole slots are in place. Charcoal filter retainer C. B
C
A. The hood controls are in the terminal box.
Grease filter
Range Hood Controls
On Low
High
A
B
A. Part being removed
To complete the installation, go to clear all smoke and odors from the cooktop area.
A
RANGE HOOD USE
RANGE HOOD USE
The range hood is complete to "Make Electrical Connection" section on...
Use and Care Manual - Page 14

... instructions.
Or place
in hot water using
a mild detergent. If new light does not operate, make sure the lamp is available. NOTE: You can order this as part number 5304486302.
A
4.Replace screw in the filter
retainer.
.To clean grease filter, soak
the filters in upper rack of hood. nia. IMPORTANT
Clean the hood and grease filters frequently according to clean. RANGE HOOD...
Use and Care Manual - Page 15

...hood within 24" (61 cm) and 32" (76.2 cm) range. 2. Tighten the motor in place. 2. Check the installation of duct opening . 4. The hood is not connecting properly. 2. Grease filter is not turning. Change the blower. 3. Replace grease filter...1. Change the motor. 2. The direction of the hood. 1.
TROUBLESHOOTING
Problem
After installation, the unit doesn't work .
4. Make sure ...
Use and Care Manual - Page 16

... appliance is installed, used, and maintained in accordance with the provided instructions. THIS WRITTEN WARRANTY GIVES YOU SPECIFIC LEGAL RIGHTS. Warranty
Your appliance is covered by a one year from your original date of purchase, Electrolux will provide a replacement glass cooktop or radiant surface element for your appliance which has proven to be repaired in the home.
12.
Service...
Frigidaire FHWC3025MS Reviews
We have not received any reviews for Frigidaire yet.