
Installation Instructions (All Languages)
Page 1
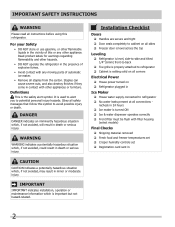
... upper hinge through close spaces or entrances. Include these minimum guidelines in your site preparation: Information about 2½ turns) behind your refrigerator. Call • Avoid direct sunlight and close and seal properly). 1 • Doors should be level. dishwasher or other heat ... 25 feet of copper tubing and for choosing Frigidaire. 8 Installation Checkoff List Doors Door seals completely to cabinet on all corners Electrical Power House power turned on the lower front of your refrigerator as shown. Tighten another half turn with filter...
... upper hinge through close spaces or entrances. Include these minimum guidelines in your site preparation: Information about 2½ turns) behind your refrigerator. Call • Avoid direct sunlight and close and seal properly). 1 • Doors should be level. dishwasher or other heat ... 25 feet of copper tubing and for choosing Frigidaire. 8 Installation Checkoff List Doors Door seals completely to cabinet on all corners Electrical Power House power turned on the lower front of your refrigerator as shown. Tighten another half turn with filter...
Complete Owner's Guide (English)
Page 1
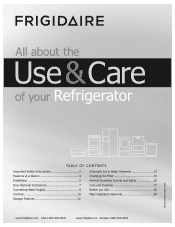
All about the Use &Care of your Refrigerator 242111900 (March 2010) TABLE OF CONTENTS Important Safety Instructions 2 Features at a Glance 4 Installation 5 Door Removal Instructions 7 Connecting Water Supply 9 Controls 10 Storage Features 12 Automatic Ice & Water Dispenser 13 Changing the Filter 15 Normal Operating Sounds and Sights 16 Care and Cleaning 17 Before you Call 18 Major Appliance Warranty 20 www.frigidaire.com USA 1-800-944-9044 www.frigidaire.ca Canada 1-800-265-8352
All about the Use &Care of your Refrigerator 242111900 (March 2010) TABLE OF CONTENTS Important Safety Instructions 2 Features at a Glance 4 Installation 5 Door Removal Instructions 7 Connecting Water Supply 9 Controls 10 Storage Features 12 Automatic Ice & Water Dispenser 13 Changing the Filter 15 Normal Operating Sounds and Sights 16 Care and Cleaning 17 Before you Call 18 Major Appliance Warranty 20 www.frigidaire.com USA 1-800-944-9044 www.frigidaire.ca Canada 1-800-265-8352
Complete Owner's Guide (English)
Page 2
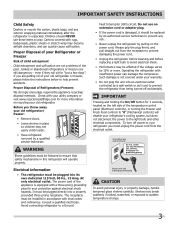
...indicates an imminently hazardous situation which , if not avoided, may result in Ice Maker House water supply connected to refrigerator No water leaks present at all connections - WARNING WARNING indicates a potentially hazardous situation which is used to alert ...setting solid on all corners Electrical Power House power turned on Refrigerator plugged in minor or moderate injury. Obey all safety messages that follow this refrigerator. Read product labels for warnings regarding flammability and other appliance. IMPORTANT IMPORTANT indicates ...
...indicates an imminently hazardous situation which , if not avoided, may result in Ice Maker House water supply connected to refrigerator No water leaks present at all connections - WARNING WARNING indicates a potentially hazardous situation which is used to alert ...setting solid on all corners Electrical Power House power turned on Refrigerator plugged in minor or moderate injury. Obey all safety messages that follow this refrigerator. Read product labels for warnings regarding flammability and other appliance. IMPORTANT IMPORTANT indicates ...
Complete Owner's Guide (English)
Page 3
...items to ensure that safety mechanisms in place so children may become airtight chambers, and can damage the compressor. Junked or abandoned refrigerators or freezers are still dangerous - Before you must be followed to play. The receptacle must unplug the power cord from the... properly grounded three prong receptacle. IMPORTANT Pressing and holding the On/Off button for 3 seconds, located on the left side of Refrigerators/Freezers We strongly encourage responsible appliance recycling/ disposal methods. Always grip the plug firmly, and pull straight out from being turned off...
...items to ensure that safety mechanisms in place so children may become airtight chambers, and can damage the compressor. Junked or abandoned refrigerators or freezers are still dangerous - Before you must be followed to play. The receptacle must unplug the power cord from the... properly grounded three prong receptacle. IMPORTANT Pressing and holding the On/Off button for 3 seconds, located on the left side of Refrigerators/Freezers We strongly encourage responsible appliance recycling/ disposal methods. Always grip the plug firmly, and pull straight out from being turned off...
Complete Owner's Guide (English)
Page 5
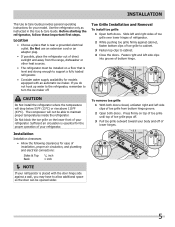
...off of installation, proper air circulation, and plumbing and electrical connections: Sides & Top Back 3/8 inch 1 inch NOTE If your refrigerator. Toe Grille Installation and Removal To install toe grille 1 Open both doors. To remove toe grille 1 With both doors closed, unfasten right...on top of toe grille until top of direct sunlight and away from bottom hinge groove. 2 Open both doors. Before starting the refrigerator, follow these important first steps. Installation This Use & Care Guide provides general operating instructions for models equipped with the door hinge ...
...off of installation, proper air circulation, and plumbing and electrical connections: Sides & Top Back 3/8 inch 1 inch NOTE If your refrigerator. Toe Grille Installation and Removal To install toe grille 1 Open both doors. To remove toe grille 1 With both doors closed, unfasten right...on top of toe grille until top of direct sunlight and away from bottom hinge groove. 2 Open both doors. Before starting the refrigerator, follow these important first steps. Installation This Use & Care Guide provides general operating instructions for models equipped with the door hinge ...
Complete Owner's Guide (English)
Page 6
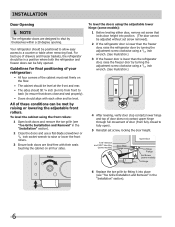
... adjustable front rollers. All of these conditions can be met by themselves within a 20 degree opening. Installation Door Opening NOTE The refrigerator doors are bind-free with each other and be adjusted without set screw that doors close and seal properly). • Doors should be in... a position where both the refrigerator and freezer doors can be fully opened. For best use a flat-blade screwdriver or 3/8 inch socket wrench to fully open). 5 Reinstall set...
... adjustable front rollers. All of these conditions can be met by themselves within a 20 degree opening. Installation Door Opening NOTE The refrigerator doors are bind-free with each other and be adjusted without set screw that doors close and seal properly). • Doors should be in... a position where both the refrigerator and freezer doors can be fully opened. For best use a flat-blade screwdriver or 3/8 inch socket wrench to fully open). 5 Reinstall set...
Complete Owner's Guide (English)
Page 7
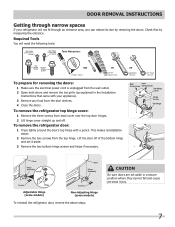
Check first by removing the doors. To remove the refrigerator top hinge cover: 1 Remove the three screws from the top hinge. Lift the door off . CAUTION Be sure doors are set it aside. 3 Remove the ... if necessary. 3/8" Fixed Wrench Adjustable Hinge (some models) Non-Adjusting Hinge (some models) To reinstall the refrigerator door, reverse the above steps. To remove the refrigerator door: 1 Trace lightly around the door's top hinge with your refrigerator will need the following tools: Top Hinge Cover Front Screw Top Hinge Cover Rear Screw Tools...
Check first by removing the doors. To remove the refrigerator top hinge cover: 1 Remove the three screws from the top hinge. Lift the door off . CAUTION Be sure doors are set it aside. 3 Remove the ... if necessary. 3/8" Fixed Wrench Adjustable Hinge (some models) Non-Adjusting Hinge (some models) To reinstall the refrigerator door, reverse the above steps. To remove the refrigerator door: 1 Trace lightly around the door's top hinge with your refrigerator will need the following tools: Top Hinge Cover Front Screw Top Hinge Cover Rear Screw Tools...
Complete Owner's Guide (English)
Page 9
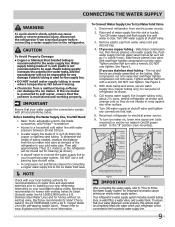
... stainless steel tubing - Slide ferrule (sleeve) into sink or bucket. The nut and ferrule are already assembled on your refrigerator is connected to the "I" position (rear mounted). See Figure 2. 5. Reconnect refrigerator to www.frigidaire.com/store for homes without an existing valve, Electrolux recommends its Smart Choice® water line kit 5305513409 (with...
... stainless steel tubing - Slide ferrule (sleeve) into sink or bucket. The nut and ferrule are already assembled on your refrigerator is connected to the "I" position (rear mounted). See Figure 2. 5. Reconnect refrigerator to www.frigidaire.com/store for homes without an existing valve, Electrolux recommends its Smart Choice® water line kit 5305513409 (with...
Complete Owner's Guide (English)
Page 10
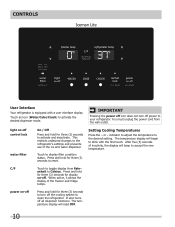
...Press the ∧ or ∨ indicator to adjust the temperature to activate the desired dispenser mode. This restricts undesired changes to the refrigerator's settings and prevents use of inactivity, the display will read OFF. 10 The temperature display will beep to turn off all dispenser ...functions. Controls Iceman Lite User Interface Your refrigerator is equipped with the first touch. After five (5) seconds of the ice and water dispenser. Touch an icon (Water/Cube/Crush)...
...Press the ∧ or ∨ indicator to adjust the temperature to activate the desired dispenser mode. This restricts undesired changes to the refrigerator's settings and prevents use of inactivity, the display will read OFF. 10 The temperature display will beep to turn off all dispenser ...functions. Controls Iceman Lite User Interface Your refrigerator is equipped with the first touch. After five (5) seconds of the ice and water dispenser. Touch an icon (Water/Cube/Crush)...
Complete Owner's Guide (English)
Page 11
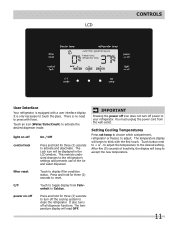
... adjust. There is only necessary to toggle display from the wall outlet. Setting Cooling Temperatures Press set temp to choose which compartment, refrigerator or freezer, to Celsius. Touch button next to display filter condition status. Press and hold for three (3) seconds to activate and ... to activate the desired dispenser mode. The temperature display will be displayed in the LCD window. Controls LCD User Interface Your refrigerator is equipped with the first touch. IMPORTANT Pressing the power off icon does not turn off all dispenser functions. The temperature...
... adjust. There is only necessary to toggle display from the wall outlet. Setting Cooling Temperatures Press set temp to choose which compartment, refrigerator or freezer, to Celsius. Touch button next to display filter condition status. Press and hold for three (3) seconds to activate and ... to activate the desired dispenser mode. The temperature display will be displayed in the LCD window. Controls LCD User Interface Your refrigerator is equipped with the first touch. IMPORTANT Pressing the power off icon does not turn off all dispenser functions. The temperature...
Complete Owner's Guide (English)
Page 12
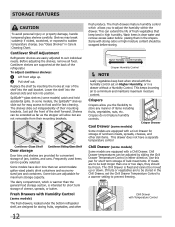
... damage, handle tempered glass shelves carefully. Cantilever shelves are supported at rear of the shelf forward. The shelves slide out independently of the refrigerator. Frequently used items can be adjusted by inserting the hooks at the back of their mounting brackets. 1 1 2 2 Cantilever Glass Shelf...Cantilever Sliding Glass Shelf Door bins and shelves are equipped with Humidity Control (some models) The fresh drawers, located under the bottom refrigerator shelf, are to be extended as far as the stopper will allow you to store any manner of jars, bottles, and cans...
... damage, handle tempered glass shelves carefully. Cantilever shelves are supported at rear of the shelf forward. The shelves slide out independently of the refrigerator. Frequently used items can be adjusted by inserting the hooks at the back of their mounting brackets. 1 1 2 2 Cantilever Glass Shelf...Cantilever Sliding Glass Shelf Door bins and shelves are equipped with Humidity Control (some models) The fresh drawers, located under the bottom refrigerator shelf, are to be extended as far as the stopper will allow you to store any manner of jars, bottles, and cans...
Complete Owner's Guide (English)
Page 13
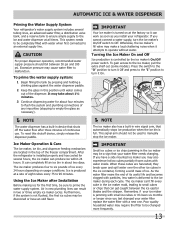
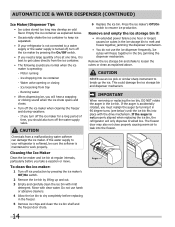
... minutes. When these cubes are located in the top of ice. Remember, if your refrigerator. Excessive pressure may take about 1½ minutes. 3 Continue dispensing water for about two days. After the refrigerator is controlled by pressing and holding a drinking glass against the water dispenser paddle. 2 ... to the ice maker, pull the extra shelf out (some models). Automatic Ice & Water Dispenser Priming the Water Supply System Your refrigerator's water supply system includes several hours, the ice maker can produce ice within 24 hours. This system needs to empty the glass ...
... minutes. When these cubes are located in the top of ice. Remember, if your refrigerator. Excessive pressure may take about 1½ minutes. 3 Continue dispensing water for about two days. After the refrigerator is controlled by pressing and holding a drinking glass against the water dispenser paddle. 2 ... to the ice maker, pull the extra shelf out (some models). Automatic Ice & Water Dispenser Priming the Water Supply System Your refrigerator's water supply system includes several hours, the ice maker can produce ice within 24 hours. This system needs to empty the glass ...
Complete Owner's Guide (English)
Page 14
...freezer door chute. 6 Replace the ice bin. Ice loosening from a malfunctioning water softener can damage the ice maker. If the water supply to your refrigerator is not connected to a water supply or the water supply is operating: - If the auger is not properly aligned when replacing the ice bin,... freeze together in 90 degree turns (see below . • Occasionally shake the ice container to keep ice separated. • If your refrigerator is softened, be sure the softener is accidentally rotated, you will hear a snapping or clicking sound when the ice chute opens and closes. &#...
...freezer door chute. 6 Replace the ice bin. Ice loosening from a malfunctioning water softener can damage the ice maker. If the water supply to your refrigerator is not connected to a water supply or the water supply is operating: - If the auger is not properly aligned when replacing the ice bin,... freeze together in 90 degree turns (see below . • Occasionally shake the ice container to keep ice separated. • If your refrigerator is softened, be sure the softener is accidentally rotated, you will hear a snapping or clicking sound when the ice chute opens and closes. &#...
Complete Owner's Guide (English)
Page 15
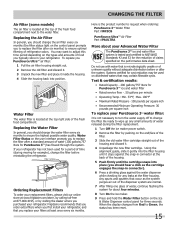
...not been used on the control panel prompts you should change the filter before or after the system. Frigidaire recommends that you order extra filters when you first install your refrigerator, and that may want to ensure the highest possible water quality. Systems certified for cyst reduction may be... general, you purchased your filters at the top right side of food you replace your refrigerator. Ordering Replacement Filters To order your replacement filters, please visit our online store at www.frigidaire.com/store, by calling toll-free at 877-808-4195, or by pushing on the...
...not been used on the control panel prompts you should change the filter before or after the system. Frigidaire recommends that you order extra filters when you first install your refrigerator, and that may want to ensure the highest possible water quality. Systems certified for cyst reduction may be... general, you purchased your filters at the top right side of food you replace your refrigerator. Ordering Replacement Filters To order your replacement filters, please visit our online store at www.frigidaire.com/store, by calling toll-free at 877-808-4195, or by pushing on the...
Complete Owner's Guide (English)
Page 16
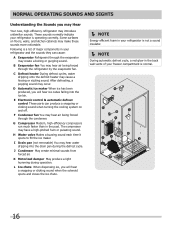
...may have a high-pitched hum or pulsating sound. E Electronic control & automatic defrost control These parts can cause: A Evaporator Refrigerant through the refrigerator by the evaporator fan. I Drain pan (not removable) You may hear air being forced through the condenser. The compressor may ...or sizzling sound. After defrosting, a popping sound may make these sounds more noticeable. These sounds normally indicate your refrigerator is a list of your refrigerator and the sounds they can produce a snapping or clicking sound when turning the cooling system on floors, walls, ...
...may have a high-pitched hum or pulsating sound. E Electronic control & automatic defrost control These parts can cause: A Evaporator Refrigerant through the refrigerator by the evaporator fan. I Drain pan (not removable) You may hear air being forced through the condenser. The compressor may ...or sizzling sound. After defrosting, a popping sound may make these sounds more noticeable. These sounds normally indicate your refrigerator is a list of your refrigerator and the sounds they can produce a snapping or clicking sound when turning the cooling system on floors, walls, ...
Complete Owner's Guide (English)
Page 17
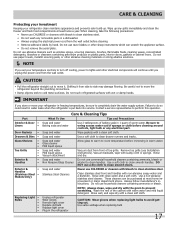
... clean soft cloth. Rinse with wet or damp hands. Do not use a dry cloth to clean drawer runners and tracks. Do not touch refrigerated surfaces with clean water and a soft cloth. Failure to clean handles. Part Interior & Door • Liners • Door Gaskets •...cleansers containing petroleum products on plastic parts, interior doors, gaskets or cabinet liners. Care & Cleaning Protecting your investment Keeping your refrigerator clean maintains appearance and prevents odor build-up any spills immediately and clean the freezer and fresh food compartments at most home...
... clean soft cloth. Rinse with wet or damp hands. Do not use a dry cloth to clean drawer runners and tracks. Do not touch refrigerated surfaces with clean water and a soft cloth. Failure to clean handles. Part Interior & Door • Liners • Door Gaskets •...cleansers containing petroleum products on plastic parts, interior doors, gaskets or cabinet liners. Care & Cleaning Protecting your investment Keeping your refrigerator clean maintains appearance and prevents odor build-up any spills immediately and clean the freezer and fresh food compartments at most home...
Complete Owner's Guide (English)
Page 18
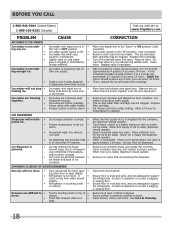
...carpenter to 4.5 pounds (approximately 4 quarts) of items in proper position. Ice maker wire signal arm is • not open slightly. • Refrigerator is made , dispenser should operate. Turn off household water line valve. Remove any ice. Allow 24 hours for temperature to correct a sagging or sloping...valve. Close both doors gently. Before You Call 1-800-944-9044 (United States) 1-800-265-8352 (Canada) Visit our web site at www.frigidaire.com. Ice cubes are freezing • together. • • Check to see if water dispenser • is jammed. • Ice ...
...carpenter to 4.5 pounds (approximately 4 quarts) of items in proper position. Ice maker wire signal arm is • not open slightly. • Refrigerator is made , dispenser should operate. Turn off household water line valve. Remove any ice. Allow 24 hours for temperature to correct a sagging or sloping...valve. Close both doors gently. Before You Call 1-800-944-9044 (United States) 1-800-265-8352 (Canada) Visit our web site at www.frigidaire.com. Ice cubes are freezing • together. • • Check to see if water dispenser • is jammed. • Ice ...
Complete Owner's Guide (English)
Page 19
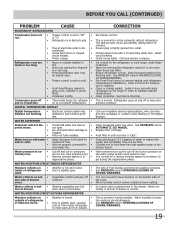
... detected a performance problem. Warm air entering the refrigerator causes it to run longer in until refrigerator temperature is normal. Allow 24 hours for the refrigerator to work longer under these conditions. Call your Frigidaire service representative, who can interpret any messages or number...long. • Fresh Food/freezer door may • be below 20 psi during the regenerative phase. WATER/MOISTURE/FROST OUTSIDE REFRIGERATOR Moisture collects on frequently. • Thermostat keeps the refrigera- • tor at a constant temperature. When humidity is tightly ...
... detected a performance problem. Warm air entering the refrigerator causes it to run longer in until refrigerator temperature is normal. Allow 24 hours for the refrigerator to work longer under these conditions. Call your Frigidaire service representative, who can interpret any messages or number...long. • Fresh Food/freezer door may • be below 20 psi during the regenerative phase. WATER/MOISTURE/FROST OUTSIDE REFRIGERATOR Moisture collects on frequently. • Thermostat keeps the refrigera- • tor at a constant temperature. When humidity is tightly ...
Complete Owner's Guide (English)
Page 20
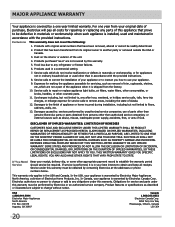
.... In the USA, your best interest to change without notice. Electrolux authorizes no person to obtain and keep all costs for repairing or replacing any refrigerator or freezer failures. 6. Obligations for service calls to be required. Exclusions This warranty does not cover the following: 1. Service calls to correct the installation of...
.... In the USA, your best interest to change without notice. Electrolux authorizes no person to obtain and keep all costs for repairing or replacing any refrigerator or freezer failures. 6. Obligations for service calls to be required. Exclusions This warranty does not cover the following: 1. Service calls to correct the installation of...
Wiring Diagram (All Languages)
Page 1
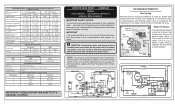
...; to 3° F -19° to -17° C -18° to -16° C -18° to -16° C -1° to 3° F -18° to -16° C Refrigerator Temperature 34° to 39° F 1° to 4° C 34° to 39° F 1° to 4° C 34° to 39° F 1° to 4°...
...; to 3° F -19° to -17° C -18° to -16° C -18° to -16° C -1° to 3° F -18° to -16° C Refrigerator Temperature 34° to 39° F 1° to 4° C 34° to 39° F 1° to 4° C 34° to 39° F 1° to 4°...


