Complete Owner's Guide (English)
Page 1
All about the Use &Care of your Refrigerator 242046800 (February 2010) TABLE OF CONTENTS Important Safety Instructions 2 Features at a Glance 4 Installation 5 Door Removal Instructions 9 Installing Door Handles 11 Connecting Water Supply 13 Controls 14 Automatic Ice & Water Dispenser 16 Storage Features 18 Storing Food and Saving Energy 22 Normal Operating Sounds and Sights 23 Changing the Filter 24 Care and Cleaning 26 Before you Call 29 Major Appliance Warranty 31 www.frigidaire.com USA 1-800-944-9044 www.frigidaire.ca Canada 1-800-265-8352
All about the Use &Care of your Refrigerator 242046800 (February 2010) TABLE OF CONTENTS Important Safety Instructions 2 Features at a Glance 4 Installation 5 Door Removal Instructions 9 Installing Door Handles 11 Connecting Water Supply 13 Controls 14 Automatic Ice & Water Dispenser 16 Storage Features 18 Storing Food and Saving Energy 22 Normal Operating Sounds and Sights 23 Changing the Filter 24 Care and Cleaning 26 Before you Call 29 Major Appliance Warranty 31 www.frigidaire.com USA 1-800-944-9044 www.frigidaire.ca Canada 1-800-265-8352
Complete Owner's Guide (English)
Page 2
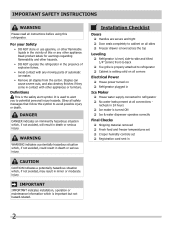
... • Avoid contact with other appliances or furniture. Obey all corners Electrical Power House power turned on Refrigerator plugged in death or serious injury. CAUTION CAUTION indicates a potentially hazardous situation which , if not avoided, will result in minor... Doors Handles are secure and tight Door seals completely to cabinet on all safety messages that follow this refrigerator. Important Safety Instructions WARNING Please read all connections - Read product labels for warnings regarding flammability and other appliance. It is turned...
... • Avoid contact with other appliances or furniture. Obey all corners Electrical Power House power turned on Refrigerator plugged in death or serious injury. CAUTION CAUTION indicates a potentially hazardous situation which , if not avoided, will result in minor... Doors Handles are secure and tight Door seals completely to cabinet on all safety messages that follow this refrigerator. Important Safety Instructions WARNING Please read all connections - Read product labels for warnings regarding flammability and other appliance. It is turned...
Complete Owner's Guide (English)
Page 3
...the power cord is equipped with rugs, bedspreads, plastic sheets or stretch wrap may not easily climb inside. • Have refrigerant removed by a wall switch or pull cord to ensure that safety mechanisms in accordance with your utility company or visit www....authorized service technician to help prevent accidents. Shelves may be replaced by 10% or more information on the left side of Refrigerators/Freezers We strongly encourage responsible appliance recycling/ disposal methods. Important Safety Instructions Child Safety Destroy or recycle the carton, plastic ...
...the power cord is equipped with rugs, bedspreads, plastic sheets or stretch wrap may not easily climb inside. • Have refrigerant removed by a wall switch or pull cord to ensure that safety mechanisms in accordance with your utility company or visit www....authorized service technician to help prevent accidents. Shelves may be replaced by 10% or more information on the left side of Refrigerators/Freezers We strongly encourage responsible appliance recycling/ disposal methods. Important Safety Instructions Child Safety Destroy or recycle the carton, plastic ...
Complete Owner's Guide (English)
Page 5
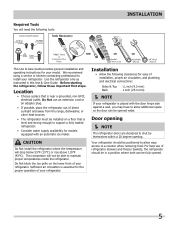
...door can be opened . 5 Do Not block the toe grille on a floor that is level and strong enough to support a fully loaded refrigerator. • Consider water supply availability for models equipped with the door hinge side against a wall, you may have to allow easy access to...removing food. Location • Choose a place that is near a grounded, non-GFCI, electrical outlet. Do Not use of your model. Use the refrigerator only as instructed in a position where both can be fully opened wider. Sufficient air circulation is placed with an automatic ice maker. Installation •...
...door can be opened . 5 Do Not block the toe grille on a floor that is level and strong enough to support a fully loaded refrigerator. • Consider water supply availability for models equipped with the door hinge side against a wall, you may have to allow easy access to...removing food. Location • Choose a place that is near a grounded, non-GFCI, electrical outlet. Do Not use of your model. Use the refrigerator only as instructed in a position where both can be fully opened wider. Sufficient air circulation is placed with an automatic ice maker. Installation •...
Complete Owner's Guide (English)
Page 6
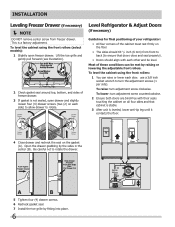
... adjustment screw counterclockwise. 2 Ensure both doors are bind-free with each side) to allow drawer to rotate the drawer. Level Refrigerator & Adjust Doors (if necessary) Guidelines for final positioning of your refrigerator: • All four corners of freezer drawer. 3 If gasket is a factory adjustment. Push Against Freezer Drawer Grab Drawer At Center...
... adjustment screw counterclockwise. 2 Ensure both doors are bind-free with each side) to allow drawer to rotate the drawer. Level Refrigerator & Adjust Doors (if necessary) Guidelines for final positioning of your refrigerator: • All four corners of freezer drawer. 3 If gasket is a factory adjustment. Push Against Freezer Drawer Grab Drawer At Center...

Complete Owner's Guide (English)
Page 7
.... 2 Open doors to desired location. Re-tighten Screw 6 Ensure door stops in desired location before resuming normal use. A Open Door 90 degrees Bottom of the refrigerator door. Adjustable Door Stop 1 Open door to provide access to screw. 2 Loosen screw. 3 Adjust door to 90 degrees. 3 Loosen or remove screw. Installation 5 Re-tighten...
.... 2 Open doors to desired location. Re-tighten Screw 6 Ensure door stops in desired location before resuming normal use. A Open Door 90 degrees Bottom of the refrigerator door. Adjustable Door Stop 1 Open door to provide access to screw. 2 Loosen screw. 3 Adjust door to 90 degrees. 3 Loosen or remove screw. Installation 5 Re-tighten...

Complete Owner's Guide (English)
Page 9
...door shelves and close the doors. The connector releases when you can remove the doors. Door Removal Instructions Getting through narrow spaces If your refrigerator will not fit through an entrance area, you press inward on the outer sleeve while pushing the tube toward the connector then while continuing to... the front of the unit. To remove the top hinge covers: 1 Remove the two (2) screws from the connector located behind the refrigerator and pull the tube back out to hold in the sleeve, pull the tube away. NOTE DO NOT remove the ground screw from ...
...door shelves and close the doors. The connector releases when you can remove the doors. Door Removal Instructions Getting through narrow spaces If your refrigerator will not fit through an entrance area, you press inward on the outer sleeve while pushing the tube toward the connector then while continuing to... the front of the unit. To remove the top hinge covers: 1 Remove the two (2) screws from the connector located behind the refrigerator and pull the tube back out to hold in the sleeve, pull the tube away. NOTE DO NOT remove the ground screw from ...
Complete Owner's Guide (English)
Page 10
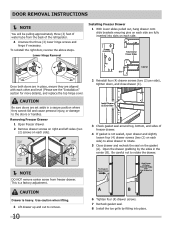
... each side. To reinstall the right door, reverse the above steps. Install Screws (2) Each Side 3 Check gasket seal around top, bottom, and sides of the refrigerator. 4 Unscrew the three (3) lower hinge screws and hinge if necessary. Be careful not to remove. 10 Push Against Freezer Drawer Grab Drawer At Center From...
... each side. To reinstall the right door, reverse the above steps. Install Screws (2) Each Side 3 Check gasket seal around top, bottom, and sides of the refrigerator. 4 Unscrew the three (3) lower hinge screws and hinge if necessary. Be careful not to remove. 10 Push Against Freezer Drawer Grab Drawer At Center From...
Complete Owner's Guide (English)
Page 11
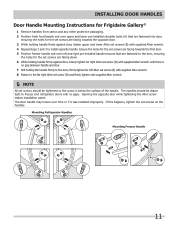
... supplied Allen wrench until there is no gaps. The door handle may loosen over time or if it was installed improperly. Mounting Refrigerator Handles Mounting Freezer Handle 11 Ensure the holes for the set screws are facing towards the first door. 5 Position freezer handle end...on the handles. Opening the opposite door while tightening the Allen screw makes installation easier. Installing Door Handles Door Handle Mounting Instructions for Frigidaire Gallery® 1 Remove handles from carton and any other protective packaging. 2 Position fresh food handle end over upper and lower pre...
... supplied Allen wrench until there is no gaps. The door handle may loosen over time or if it was installed improperly. Mounting Refrigerator Handles Mounting Freezer Handle 11 Ensure the holes for the set screws are facing towards the first door. 5 Position freezer handle end...on the handles. Opening the opposite door while tightening the Allen screw makes installation easier. Installing Door Handles Door Handle Mounting Instructions for Frigidaire Gallery® 1 Remove handles from carton and any other protective packaging. 2 Position fresh food handle end over upper and lower pre...

Complete Owner's Guide (English)
Page 12
Opening the opposite door while tightening the Allen screw makes installation easier. Mounting Refrigerator Handles Mounting Freezer Handle 12 The door handle may loosen over time or if it was installed improperly. Ensure the holes for the ... and 3 to install opposite handle. The handles should be drawn tight to freezer and refrigerator doors with no gaps. If this happens, tighten the set screws on the handles. Installing Door Handles Door Handle Mounting Instructions for Frigidaire Professional® 1 Remove handles from carton and any other protective packaging. 2 Position fresh ...
Opening the opposite door while tightening the Allen screw makes installation easier. Mounting Refrigerator Handles Mounting Freezer Handle 12 The door handle may loosen over time or if it was installed improperly. Ensure the holes for the ... and 3 to install opposite handle. The handles should be drawn tight to freezer and refrigerator doors with no gaps. If this happens, tighten the set screws on the handles. Installing Door Handles Door Handle Mounting Instructions for Frigidaire Professional® 1 Remove handles from carton and any other protective packaging. 2 Position fresh ...
Complete Owner's Guide (English)
Page 13
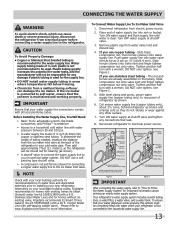
...line with your local building authority for homes without an existing valve, Frigidaire recommends its Smart Choice® water line kit 5305513409 (with a 6 ft. Reconnect refrigerator to rear panel of refrigerator as shown and arrange coils so they do not vibrate or wear ...a 20 ft. Stainless Steel Water Line) and for recommendations on water lines and associated materials prior to installing your new refrigerator. Disconnect refrigerator from household water supply (Include enough tubing in areas where temperatures fall below freezing. • Chemicals from water valve inlet...
...line with your local building authority for homes without an existing valve, Frigidaire recommends its Smart Choice® water line kit 5305513409 (with a 6 ft. Reconnect refrigerator to rear panel of refrigerator as shown and arrange coils so they do not vibrate or wear ...a 20 ft. Stainless Steel Water Line) and for recommendations on water lines and associated materials prior to installing your new refrigerator. Disconnect refrigerator from household water supply (Include enough tubing in areas where temperatures fall below freezing. • Chemicals from water valve inlet...
Complete Owner's Guide (English)
Page 14
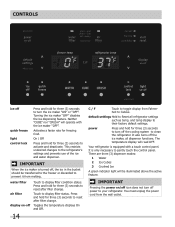
...to gently touch the control panel. default settings Hold to Reset all dispenser functions. IMPORTANT Pressing the power on -off Touch to the refrigerator's settings and prevents use of the ice and water dispenser. Controls ice off quick freeze light control lock Press and hold for three ...(3) seconds to activate and deactivate. Your refrigerator is equipped with the ice maker "OFF". IMPORTANT When the ice maker is only necessary to display filter status. Turning the ice maker...
...to gently touch the control panel. default settings Hold to Reset all dispenser functions. IMPORTANT Pressing the power on -off Touch to the refrigerator's settings and prevents use of the ice and water dispenser. Controls ice off quick freeze light control lock Press and hold for three ...(3) seconds to activate and deactivate. Your refrigerator is equipped with the ice maker "OFF". IMPORTANT When the ice maker is only necessary to display filter status. Turning the ice maker...
Complete Owner's Guide (English)
Page 15
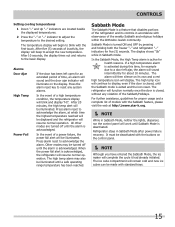
...Temp Power Fail If the door has been left ajar, the alarm will sound intermittently for about 10 minutes. In the event of the refrigerator and its own and a red high temperature icon will display. Sabbath Mode The Sabbath Mode is activated during this time, for example due...Sabbath Mode, the ice maker will complete the cycle it had already initiated. The high temp icon will continue to the desired setting. The refrigerator will function normally once the door is exited and the icon reset. For further assistance, guidelines for an extended period of a high temperature condition...
...Temp Power Fail If the door has been left ajar, the alarm will sound intermittently for about 10 minutes. In the event of the refrigerator and its own and a red high temperature icon will display. Sabbath Mode The Sabbath Mode is activated during this time, for example due...Sabbath Mode, the ice maker will complete the cycle it had already initiated. The high temp icon will continue to the desired setting. The refrigerator will function normally once the door is exited and the icon reset. For further assistance, guidelines for an extended period of a high temperature condition...
Complete Owner's Guide (English)
Page 16
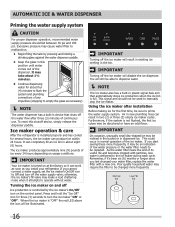
... out of low water pressure or the water filter needs to be discolored or have an odd flavor. Ice maker operation & care After the refrigerator is "OFF" the red LED above the icon will disable the ice dispenser. Air in new plumbing lines can completely fill an ice bin ...has a built-in about four (4) minutes to flush the system and plumbing connections of continuous use. Poor quality household water may be changed your refrigerator. You will result in existing ice melting in normal operation of its useful life and becomes clogged with a new one. It can result in dispensed...
... out of low water pressure or the water filter needs to be discolored or have an odd flavor. Ice maker operation & care After the refrigerator is "OFF" the red LED above the icon will disable the ice dispenser. Air in new plumbing lines can completely fill an ice bin ...has a built-in about four (4) minutes to flush the system and plumbing connections of continuous use. Poor quality household water may be changed your refrigerator. You will result in existing ice melting in normal operation of its useful life and becomes clogged with a new one. It can result in dispensed...

Complete Owner's Guide (English)
Page 17
... NEVER use the ice dispenser frequently. Adjusting Ice Bin Auger 17 Automatic Ice & Water Dispenser (Continued) Ice maker/dispenser tips • If your refrigerator is softened, be sure the softener is properly maintained. Motor running - Chemicals from the ice bin. • Ice cubes stored too long may not... the water shut-off the ice maker. 2 Remove the ice bin by turning it is not properly aligned when replacing the ice bin, the refrigerator will freeze together in the freezer. 5 Replace the ice bin. Remove and empty the ice bin if: • An extended power failure (one...
... NEVER use the ice dispenser frequently. Adjusting Ice Bin Auger 17 Automatic Ice & Water Dispenser (Continued) Ice maker/dispenser tips • If your refrigerator is softened, be sure the softener is properly maintained. Motor running - Chemicals from the ice bin. • Ice cubes stored too long may not... the water shut-off the ice maker. 2 Remove the ice bin by turning it is not properly aligned when replacing the ice bin, the refrigerator will freeze together in the freezer. 5 Replace the ice bin. Remove and empty the ice bin if: • An extended power failure (one...
Complete Owner's Guide (English)
Page 18
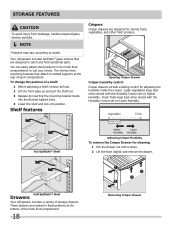
Your refrigerator includes SpillSafeTM glass shelves that attach to catch and hold accidental spills. Opening Crisper Drawer Crisper humidity control Crisper drawers include a sliding control for cleaning: 1 ... mounting brackets that are designed for storing fruits, vegetables, and other fresh produce. To change the position of storage drawers. Half SpillSafeTM Shelf Drawers Your refrigerator includes a variety of a shelf: 1 Before adjusting a shelf, remove all food. 2 Lift the front edge up and pull the shelf out. 3 Replace by inserting the mounting...
Your refrigerator includes SpillSafeTM glass shelves that attach to catch and hold accidental spills. Opening Crisper Drawer Crisper humidity control Crisper drawers include a sliding control for cleaning: 1 ... mounting brackets that are designed for storing fruits, vegetables, and other fresh produce. To change the position of storage drawers. Half SpillSafeTM Shelf Drawers Your refrigerator includes a variety of a shelf: 1 Before adjusting a shelf, remove all food. 2 Lift the front edge up and pull the shelf out. 3 Replace by inserting the mounting...
Complete Owner's Guide (English)
Page 19
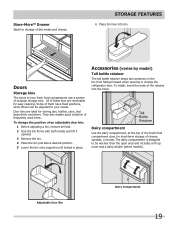
.... 4 Place the bin just above desired position. 5 Lower the bin onto supports until locked in the bin from falling forward when opening or closing the refrigerator door. Adjustable Door Bin Dairy Compartment 19 Storage Features 6 Place bin liner into the holes. They also enable quick selection of frequently used items. To...
.... 4 Place the bin just above desired position. 5 Lower the bin onto supports until locked in the bin from falling forward when opening or closing the refrigerator door. Adjustable Door Bin Dairy Compartment 19 Storage Features 6 Place bin liner into the holes. They also enable quick selection of frequently used items. To...
Complete Owner's Guide (English)
Page 22
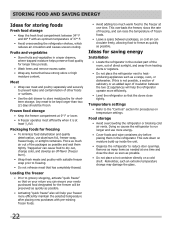
...purchases with suitable freezer wrap prior to store meat/poultry for saving energy Installation • Locate the refrigerator in the refrigerator. Food storage • Avoid overcrowding the refrigerator or blocking cold air vents. This cuts down on a cold shelf. Remember, such an extreme ... helps preserve food quality for freezing • To minimize food dehydration and quality deterioration, use more efficiently. • Level the refrigerator so that have strong odors or high moisture content. Packaging foods for longer time periods. • Wash items and remove excess ...
...purchases with suitable freezer wrap prior to store meat/poultry for saving energy Installation • Locate the refrigerator in the refrigerator. Food storage • Avoid overcrowding the refrigerator or blocking cold air vents. This cuts down on a cold shelf. Remember, such an extreme ... helps preserve food quality for freezing • To minimize food dehydration and quality deterioration, use more efficiently. • Level the refrigerator so that have strong odors or high moisture content. Packaging foods for longer time periods. • Wash items and remove excess ...
Complete Owner's Guide (English)
Page 23
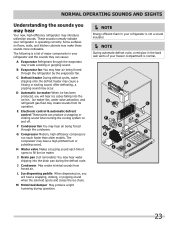
...water dripping onto the defrost heater may have a high-pitched hum or pulsating sound. Ice maker fan, water valve activation, and refrigerant gas fluid may make these sounds more noticeable. The following is operating correctly. The compressor may cause a hissing or sizzling sound.... D Automatic ice maker When ice has been produced, you may hear Your new, high-efficiency refrigerator may occur. Some surfaces on and off. After defrosting, a popping sound may introduce unfamiliar sounds. Normal Operating Sounds and sights Understanding...
...water dripping onto the defrost heater may have a high-pitched hum or pulsating sound. Ice maker fan, water valve activation, and refrigerant gas fluid may make these sounds more noticeable. The following is operating correctly. The compressor may cause a hissing or sizzling sound.... D Automatic ice maker When ice has been produced, you may hear Your new, high-efficiency refrigerator may occur. Some surfaces on and off. After defrosting, a popping sound may introduce unfamiliar sounds. Normal Operating Sounds and sights Understanding...
Complete Owner's Guide (English)
Page 24
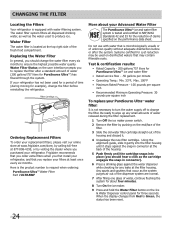
...filter. 3 Slide the old water filter cartridge straight out of the housing and discard it. 4 Unpackage the new filter cartridge. Frigidaire recommends that you order extra filters when you first install your Advanced Water Filter The PureSource UltraTM ice and water filter system is ...• Maximum Rated Pressure - 100 pounds per square inch • Recommended Minimum Operating Pressure: 30 pounds per square inch To replace your refrigerator. Be ready to ensure the highest possible water quality. Replacing the Water Filter In general, you should hear a click as the cartridge engages ...
...filter. 3 Slide the old water filter cartridge straight out of the housing and discard it. 4 Unpackage the new filter cartridge. Frigidaire recommends that you order extra filters when you first install your Advanced Water Filter The PureSource UltraTM ice and water filter system is ...• Maximum Rated Pressure - 100 pounds per square inch • Recommended Minimum Operating Pressure: 30 pounds per square inch To replace your refrigerator. Be ready to ensure the highest possible water quality. Replacing the Water Filter In general, you should hear a click as the cartridge engages ...


