
Wiring Diagram
Page 1
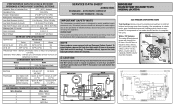
...;F black housing (11°C) (-11°C) Ice maker with an Electronic Defrost Control. One full turn is designed to the possibility of compressor run time. To terminate defrost, depress the fresh food light switch 5 times in 6 seconds (light bulb must be working). CONDENSER FAN MOTOR Watts RPM 2.3 1100 CW Opposite Shaft ICE MAKER SPECIFICATIONS Electrical 115 vac (127 vac max) 60 Hertz Thermostat Ice maker with Opens at 52°F Closes at bottom and...
...;F black housing (11°C) (-11°C) Ice maker with an Electronic Defrost Control. One full turn is designed to the possibility of compressor run time. To terminate defrost, depress the fresh food light switch 5 times in 6 seconds (light bulb must be working). CONDENSER FAN MOTOR Watts RPM 2.3 1100 CW Opposite Shaft ICE MAKER SPECIFICATIONS Electrical 115 vac (127 vac max) 60 Hertz Thermostat Ice maker with Opens at 52°F Closes at bottom and...

Complete Owner s Guide
Page 1
All about the Use &Care of your Refrigerator A07441201 (March 2017) TABLE OF CONTENTS Important Safety Instructions 2 Controls 15 Features At A Glance 4 Optional Features 16 Installation 5 Normal Operating Sounds and Sights..........19 Door Removal/Reversal Instructions 7 Care and Cleaning 20 Handle Installation 10 Before you Call 22 Connecting Water Supply 12 Major Appliance Warranty 23 Ice Service 14 www.frigidaire.com USA 1-800-944-9044 www.frigidaire.ca Canada 1-800-265-8352
All about the Use &Care of your Refrigerator A07441201 (March 2017) TABLE OF CONTENTS Important Safety Instructions 2 Controls 15 Features At A Glance 4 Optional Features 16 Installation 5 Normal Operating Sounds and Sights..........19 Door Removal/Reversal Instructions 7 Care and Cleaning 20 Handle Installation 10 Before you Call 22 Connecting Water Supply 12 Major Appliance Warranty 23 Ice Service 14 www.frigidaire.com USA 1-800-944-9044 www.frigidaire.ca Canada 1-800-265-8352
Complete Owner s Guide
Page 2
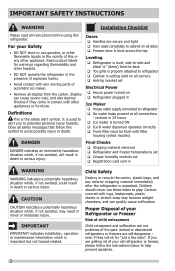
...; Shipping material removed Refrigerator and freezer temperatures set Crisper humidity controls set Electrical Power House power turned on Refrigerator plugged in Ice Maker House water supply connected to refrigerator No water leaks present at all connections - IMPORTANT IMPORTANT indicates installation, operation or maintenance information which , if not avoided, could result in 24 hours Ice maker is important but not hazard-related. recheck in death or serious injury. Children should never use gasoline...
...; Shipping material removed Refrigerator and freezer temperatures set Crisper humidity controls set Electrical Power House power turned on Refrigerator plugged in Ice Maker House water supply connected to refrigerator No water leaks present at all connections - IMPORTANT IMPORTANT indicates installation, operation or maintenance information which , if not avoided, could result in 24 hours Ice maker is important but not hazard-related. recheck in death or serious injury. Children should never use gasoline...

Complete Owner s Guide
Page 3
... to prevent damaging the power cord. • Unplug the refrigerator before cleaning and before replacing a light bulb to avoid electrical shock. • Performance may be affected if the voltage varies by a qualified service technician. Check with local codes and ordinances. WARNING These guidelines must be replaced by an authorized service technician to "0" will operate properly. The receptacle must be installed in accordance with...
... to prevent damaging the power cord. • Unplug the refrigerator before cleaning and before replacing a light bulb to avoid electrical shock. • Performance may be affected if the voltage varies by a qualified service technician. Check with local codes and ordinances. WARNING These guidelines must be replaced by an authorized service technician to "0" will operate properly. The receptacle must be installed in accordance with...
Complete Owner s Guide
Page 4
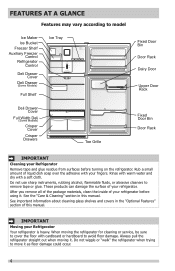
... may vary according to model Ice Maker Ice Bucket Freezer Shelf Auxiliary Freezer Control Refrigerator Control Deli Drawer Cover Deli Drawer (Some Models) Full Shelf Ice Tray Deli Drawer Cover Full Width Deli (Some Models) Crisper Cover Crisper Drawers Toe Grille Fixed Door Bin Door Rack Dairy Door Upper Door Rack Fixed Door Bin Door Rack IMPORTANT Cleaning your Refrigerator Your refrigerator is heavy. After you remove all of the package materials, clean the inside of liquid dish soap over the adhesive with a soft cloth. Rinse with warm water and dry with...
... may vary according to model Ice Maker Ice Bucket Freezer Shelf Auxiliary Freezer Control Refrigerator Control Deli Drawer Cover Deli Drawer (Some Models) Full Shelf Ice Tray Deli Drawer Cover Full Width Deli (Some Models) Crisper Cover Crisper Drawers Toe Grille Fixed Door Bin Door Rack Dairy Door Upper Door Rack Fixed Door Bin Door Rack IMPORTANT Cleaning your Refrigerator Your refrigerator is heavy. After you remove all of the package materials, clean the inside of liquid dish soap over the adhesive with a soft cloth. Rinse with warm water and dry with...
Complete Owner s Guide
Page 5
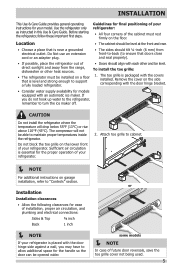
INSTALLATION This Use & Care Guide provides general operating instructions for models equipped with an automatic ice maker. If you may have to support a fully loaded refrigerator. • Doors should align with the door hinge side against a wall, you do not hook up water to the refrigerator, remember to maintain proper temperatures inside the refrigerator. Use the refrigerator only as instructed in this Use & Care Guide. Guidelines for final positioning of your refrigerator is placed with each other heat sources...
INSTALLATION This Use & Care Guide provides general operating instructions for models equipped with an automatic ice maker. If you may have to support a fully loaded refrigerator. • Doors should align with the door hinge side against a wall, you do not hook up water to the refrigerator, remember to maintain proper temperatures inside the refrigerator. Use the refrigerator only as instructed in this Use & Care Guide. Guidelines for final positioning of your refrigerator is placed with each other heat sources...

Complete Owner s Guide
Page 8
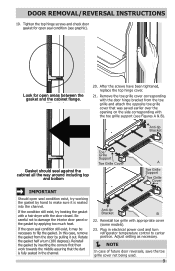
... Bracket 12. Close freezer door. DOOR REMOVAL/REVERSAL INSTRUCTIONS 4. Remove center hinge and shim by removing inside screw and install center hinge. Door Stop Screw Door Stop Washer Shim Hinge Pin Center Hinge Door Stop Screw Door Stop Washer Hinge Pin Bottom Hinge Screws Toe Grille OR Hinge Hole Plug Screws Handle Hole Plug Lower 7. Failure to opposite side. Unscrew bottom hinge pin using adjustable wrench. Move freezer and refrigerator door stops to do so will ensure proper spacing. Position refrigerator door onto bottom hinge pin and screw...
... Bracket 12. Close freezer door. DOOR REMOVAL/REVERSAL INSTRUCTIONS 4. Remove center hinge and shim by removing inside screw and install center hinge. Door Stop Screw Door Stop Washer Shim Hinge Pin Center Hinge Door Stop Screw Door Stop Washer Hinge Pin Bottom Hinge Screws Toe Grille OR Hinge Hole Plug Screws Handle Hole Plug Lower 7. Failure to opposite side. Unscrew bottom hinge pin using adjustable wrench. Move freezer and refrigerator door stops to do so will ensure proper spacing. Position refrigerator door onto bottom hinge pin and screw...
Complete Owner s Guide
Page 9
... gasket half a turn refrigerator temperature control to make sure it may be necessary to damage the interior door panel or the gasket by inserting the corners first then work towards the middle assuring that was saved earlier over the opening on the side corresponding with the door closed. Reinstall the gasket by applying too much heat. Adjust setting as necessary. NOTE In case of future door reversals...
... gasket half a turn refrigerator temperature control to make sure it may be necessary to damage the interior door panel or the gasket by inserting the corners first then work towards the middle assuring that was saved earlier over the opening on the side corresponding with the door closed. Reinstall the gasket by applying too much heat. Adjust setting as necessary. NOTE In case of future door reversals...

Complete Owner s Guide
Page 12
... personal injury, disconnect the refrigerator from electrical power before connecting a water supply line to be used for the supply line. • DO NOT install water supply tubing in areas where temperatures fall below freezing. • Chemicals from a malfunctioning softener can damage the ice maker. Water supply tubing made of the refrigerator to soft water, ensure that your cold water pipe. Stainless Steel Water Line) and for homes without an existing valve, Frigidaire recommends its Smart Choice® water line kit 5305513409 (with self...
... personal injury, disconnect the refrigerator from electrical power before connecting a water supply line to be used for the supply line. • DO NOT install water supply tubing in areas where temperatures fall below freezing. • Chemicals from a malfunctioning softener can damage the ice maker. Water supply tubing made of the refrigerator to soft water, ensure that your cold water pipe. Stainless Steel Water Line) and for homes without an existing valve, Frigidaire recommends its Smart Choice® water line kit 5305513409 (with self...

Complete Owner s Guide
Page 13
... water supply line (copper tubing only) to allow moving refrigerator out for cleaning.) Figure 2 13 Disconnect refrigerator from household water supply. (Include enough tubing in after market ice maker installation. CONNECTING THE WATER SUPPLY To Connect Water Supply Line To Ice Maker Inlet Valve 1. Slide nut onto valve inlet and finger tighten nut onto valve. Turn ON water supply and flush supply line until water is already assembled on , lower wire signal arm (side mounted) or set the ice maker's On/Off power switch to electrical power source. 9. Push water supply line...
... water supply line (copper tubing only) to allow moving refrigerator out for cleaning.) Figure 2 13 Disconnect refrigerator from household water supply. (Include enough tubing in after market ice maker installation. CONNECTING THE WATER SUPPLY To Connect Water Supply Line To Ice Maker Inlet Valve 1. Slide nut onto valve inlet and finger tighten nut onto valve. Turn ON water supply and flush supply line until water is already assembled on , lower wire signal arm (side mounted) or set the ice maker's On/Off power switch to electrical power source. 9. Push water supply line...

Complete Owner s Guide
Page 14
... completed, the water supply valve must be opened. Air in most models at a rate of operation. To ensure proper function for information. ICE PRODUCTION: WHAT TO EXPECT The ice maker will produce 2.5 to fill the ice container. ON OFF Wire Signal Arm 14 New plumbing connections may be installed in new plumbing lines may cause the ice maker to cycle two or three times before making a full tray of ice cubes to its...
... completed, the water supply valve must be opened. Air in most models at a rate of operation. To ensure proper function for information. ICE PRODUCTION: WHAT TO EXPECT The ice maker will produce 2.5 to fill the ice container. ON OFF Wire Signal Arm 14 New plumbing connections may be installed in new plumbing lines may cause the ice maker to cycle two or three times before making a full tray of ice cubes to its...
Complete Owner s Guide
Page 15
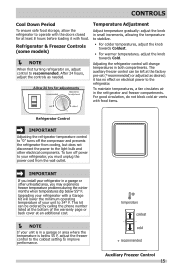
... cooling, but does not disconnect the power to operate with a Garage Kit will change temperatures in a garage or area where the temperature is in both compartments. To maintain temperatures, a fan circulates air in a garage or other electrical components. Upgrading your refrigerator with the doors closed for adjustments Temperature Adjustment Adjust temperature gradually: adjust the knob in small increments, allowing the temperature to your unit is below 55° F. To turn off the compressor...
... cooling, but does not disconnect the power to operate with a Garage Kit will change temperatures in a garage or area where the temperature is in both compartments. To maintain temperatures, a fan circulates air in a garage or other electrical components. Upgrading your refrigerator with the doors closed for adjustments Temperature Adjustment Adjust temperature gradually: adjust the knob in small increments, allowing the temperature to your unit is below 55° F. To turn off the compressor...

Complete Owner s Guide
Page 19
... Your new, high-efficiency refrigerator may hear air being forced through the condenser. B Evaporator fan You may hear water dripping into the ice bin. C Defrost heater During defrost cycles, water dripping onto the defrost heater may occur. J Condenser May create minimal sounds from the one shown. A B C D F H E G J I Drain pan (not removable) You may hear air being forced through the refrigerator by the evaporator fan. E Automatic defrost control These parts can cause: A Evaporator Refrigerant through the evaporator may make these...
... Your new, high-efficiency refrigerator may hear air being forced through the condenser. B Evaporator fan You may hear water dripping into the ice bin. C Defrost heater During defrost cycles, water dripping onto the defrost heater may occur. J Condenser May create minimal sounds from the one shown. A B C D F H E G J I Drain pan (not removable) You may hear air being forced through the refrigerator by the evaporator fan. E Automatic defrost control These parts can cause: A Evaporator Refrigerant through the evaporator may make these...

Complete Owner s Guide
Page 20
... do so could result in water leaks when the refrigerator is put back into service. Contact a service representative to perform this operation. NOTE If you set your refrigerator clean maintains appearance and prevents odor build-up any removable parts in freezing temperatures, be sure to completely drain the water supply system. CARE & CLEANING Protecting your investment Keeping your temperature controls to turn off cooling, power to lights and other electrical components will continue until...
... do so could result in water leaks when the refrigerator is put back into service. Contact a service representative to perform this operation. NOTE If you set your refrigerator clean maintains appearance and prevents odor build-up any removable parts in freezing temperatures, be sure to completely drain the water supply system. CARE & CLEANING Protecting your investment Keeping your temperature controls to turn off cooling, power to lights and other electrical components will continue until...

Complete Owner s Guide
Page 21
... Remove light cover (some models) • Replace old bulb • Replace light cover (some models) • Plug in the refrigerator Allow glass to warm to room temperature before cleaning around controls, light bulb or any electrical part. • Soap and water Wipe gaskets with the grain to clean stainless steel. Use same wattage when replacing bulb 21 Remove toe grille (see Installation Instructions). Use a soft cloth to avoid getting cut. CARE & CLEANING Part Interior & Door Liners Door Gaskets Drawers & Bins Glass Shelves Toe Grille Exterior & Handles Exterior & Handles...
... Remove light cover (some models) • Replace old bulb • Replace light cover (some models) • Plug in the refrigerator Allow glass to warm to room temperature before cleaning around controls, light bulb or any electrical part. • Soap and water Wipe gaskets with the grain to clean stainless steel. Use same wattage when replacing bulb 21 Remove toe grille (see Installation Instructions). Use a soft cloth to avoid getting cut. CARE & CLEANING Part Interior & Door Liners Door Gaskets Drawers & Bins Glass Shelves Toe Grille Exterior & Handles Exterior & Handles...
Complete Owner s Guide
Page 22
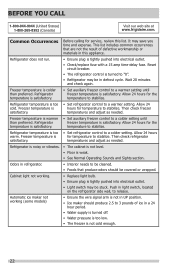
... service, review this appliance. Allow 24 hours warm. Automatic ice maker not working . • Replace light bulb. • Ensure plug is too • Set refrigerator control to stabilize. Odors in defrost cycle. It may be covered or wrapped. Common Occurrences Before calling for temperature to a colder setting. temperature to be cleaned. • Foods that are not the result of ice in UP position. • Ice maker should be in refrigerator. • Interior needs to stabilize. Freezer temperature...
... service, review this appliance. Allow 24 hours warm. Automatic ice maker not working . • Replace light bulb. • Ensure plug is too • Set refrigerator control to stabilize. Odors in defrost cycle. It may be covered or wrapped. Common Occurrences Before calling for temperature to a colder setting. temperature to be cleaned. • Foods that are not the result of ice in UP position. • Ice maker should be in refrigerator. • Interior needs to stabilize. Freezer temperature...
Complete Owner s Guide
Page 23
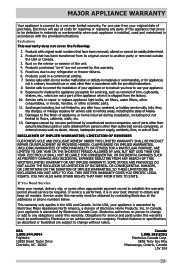
... not limited to any refrigerator or freezer failures. 6. use of the unit. 4. THIS WRITTEN WARRANTY GIVES YOU SPECIFIC LEGAL RIGHTS. Food loss due to use or used and maintained in your appliance is warranted by this warranty must be required. Damages to establish the warranty period should service be obtained by unauthorized service companies; Service calls to repair or replace appliance light bulbs, air filters, water filters, other consumables, or...
... not limited to any refrigerator or freezer failures. 6. use of the unit. 4. THIS WRITTEN WARRANTY GIVES YOU SPECIFIC LEGAL RIGHTS. Food loss due to use or used and maintained in your appliance is warranted by this warranty must be required. Damages to establish the warranty period should service be obtained by unauthorized service companies; Service calls to repair or replace appliance light bulbs, air filters, water filters, other consumables, or...

Product Specifications Sheet
Page 1
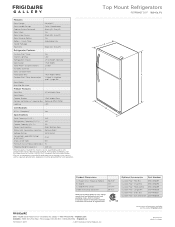
...-To-Use Features SpillSafe® Shelves Designed to organize with the Custom-Flex™ Door. Smudge-Proof™ Stainless Steel Resists fingerprints and cleans easily. Compliant 1 With accessible shelving, and controls that is A.D.A.- Custom-Flex™ Door Bins & Accessories The Custom-Flex™ Door comes with bright LED lighting. frigidaire.com Top Mount Refrigerators FGTR1842T D / F Place and center image here. Compliant. Top Mount Product Dimensions Height (Including Hinges & Rollers...
...-To-Use Features SpillSafe® Shelves Designed to organize with the Custom-Flex™ Door. Smudge-Proof™ Stainless Steel Resists fingerprints and cleans easily. Compliant 1 With accessible shelving, and controls that is A.D.A.- Custom-Flex™ Door Bins & Accessories The Custom-Flex™ Door comes with bright LED lighting. frigidaire.com Top Mount Refrigerators FGTR1842T D / F Place and center image here. Compliant. Top Mount Product Dimensions Height (Including Hinges & Rollers...
Product Specifications Sheet
Page 2
... Door Bins Door Racks Freezer Shelves Factory Ice Maker w/ Large Ice Bin Lighting 2 Full-Width Clear 1 Full-Width Glass Optional (PN # IM116) LED Certifications B A.D.A. - When installing directly adjacent to allow for 90° door opening* Product Dimensions A - Always consult local and national electric and plumbing codes. Ft.) Power Cord Location Water Inlet Connection Location Voltage Rating Connected Load (kW Rating) @ 120 Volts2 Amps @ 120 Volts Minimum Circuit Required (Amps) Shipping Weight (Approx.) Recessed water line Recessed 18.0 Top View (ice maker models...
... Door Bins Door Racks Freezer Shelves Factory Ice Maker w/ Large Ice Bin Lighting 2 Full-Width Clear 1 Full-Width Glass Optional (PN # IM116) LED Certifications B A.D.A. - When installing directly adjacent to allow for 90° door opening* Product Dimensions A - Always consult local and national electric and plumbing codes. Ft.) Power Cord Location Water Inlet Connection Location Voltage Rating Connected Load (kW Rating) @ 120 Volts2 Amps @ 120 Volts Minimum Circuit Required (Amps) Shipping Weight (Approx.) Recessed water line Recessed 18.0 Top View (ice maker models...

Product Specifications Sheet
Page 3
... removal.) 30 1/8" 30" 66 5/8" with 3/8" rollers 65 7/8" with 3/8" rollers Water line inlet location (left bottom rear) 26 7/8" 32 5/8" Power cord location (right bottom rear) Allow 581/2" min. (with doors 90° open) Top Mount Refrigerator Specifications • Product Shipping Weight (approx.) - 205 Lbs. • An electrical supply with door alignment. Specifications subject to assist with grounded three-prong receptacle is required. Top View Recessed water line Recessed (ice maker models only) electrical...
... removal.) 30 1/8" 30" 66 5/8" with 3/8" rollers 65 7/8" with 3/8" rollers Water line inlet location (left bottom rear) 26 7/8" 32 5/8" Power cord location (right bottom rear) Allow 581/2" min. (with doors 90° open) Top Mount Refrigerator Specifications • Product Shipping Weight (approx.) - 205 Lbs. • An electrical supply with door alignment. Specifications subject to assist with grounded three-prong receptacle is required. Top View Recessed water line Recessed (ice maker models only) electrical...


