
Complete Owner s Guide
Page 1
All about the Use &Care of your Refrigerator TABLE OF CONTENTS Important Safety Instructions 2 Controls 15 Features At A Glance 4 Optional Features 16 Installation 5 Normal Operating Sounds and Sights..........19 Door Removal/Reversal Instructions 7 Care and Cleaning 20 Handle Installation 10 Before you Call 22 Connecting Water Supply 12 Major Appliance Warranty 23 Ice Service 14 www.frigidaire.com USA 1-800-944-9044 www.frigidaire.ca Canada 1-800-265-8352 A07441202 (May 2017)
All about the Use &Care of your Refrigerator TABLE OF CONTENTS Important Safety Instructions 2 Controls 15 Features At A Glance 4 Optional Features 16 Installation 5 Normal Operating Sounds and Sights..........19 Door Removal/Reversal Instructions 7 Care and Cleaning 20 Handle Installation 10 Before you Call 22 Connecting Water Supply 12 Major Appliance Warranty 23 Ice Service 14 www.frigidaire.com USA 1-800-944-9044 www.frigidaire.ca Canada 1-800-265-8352 A07441202 (May 2017)

Complete Owner s Guide
Page 2
... gasoline, or other appliances or furniture. Cartons covered with any other hazards. • DO NOT operate the refrigerator in minor or moderate injury. Junked or abandoned refrigerators or freezers are not problems of the past. Staples can quickly cause suffocation. Child Safety Destroy or recycle the...read all staples from the carton. Read product labels for "just a few days". Doors Handles are getting rid of your Refrigerator or Freezer Risk of automatic ice maker. • Remove all instructions before using this or any moving parts of child entrapment Child ...
... gasoline, or other appliances or furniture. Cartons covered with any other hazards. • DO NOT operate the refrigerator in minor or moderate injury. Junked or abandoned refrigerators or freezers are not problems of the past. Staples can quickly cause suffocation. Child Safety Destroy or recycle the...read all staples from the carton. Read product labels for "just a few days". Doors Handles are getting rid of your Refrigerator or Freezer Risk of automatic ice maker. • Remove all instructions before using this or any moving parts of child entrapment Child ...

Complete Owner s Guide
Page 3
... not covered under your warranty. • Do not plug the unit into a properly grounded three prong receptacle. Avoid connecting refrigerator to prevent any circumstances, cut, remove, or bypass the grounding prong. Always grip the plug firmly, and pull straight out...believed to harm stratospheric ozone if released to "0" will operate properly. Grounding type wall receptacle Do not, under provisions of Refrigerators/Freezers We strongly encourage responsible appliance recycling/disposal methods. Check with insufficient power can damage the compressor. CFCs and HCFCs are ...
... not covered under your warranty. • Do not plug the unit into a properly grounded three prong receptacle. Avoid connecting refrigerator to prevent any circumstances, cut, remove, or bypass the grounding prong. Always grip the plug firmly, and pull straight out...believed to harm stratospheric ozone if released to "0" will operate properly. Grounding type wall receptacle Do not, under provisions of Refrigerators/Freezers We strongly encourage responsible appliance recycling/disposal methods. Check with insufficient power can damage the compressor. CFCs and HCFCs are ...
Complete Owner s Guide
Page 4
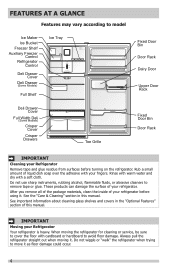
... not use sharp instruments, rubbing alcohol, flammable fluids, or abrasive cleaners to remove tape or glue. Always pull the refrigerator straight out when moving the refrigerator for cleaning or service, be sure to cover the floor with your fingers. Rinse with warm water and dry with a soft...and covers in this manual. FEATURES AT A GLANCE Features may vary according to model Ice Maker Ice Bucket Freezer Shelf Auxiliary Freezer Control Refrigerator Control Deli Drawer Cover Deli Drawer (Some Models) Full Shelf Ice Tray Deli Drawer Cover Full Width Deli (Some Models) Crisper Cover ...
... not use sharp instruments, rubbing alcohol, flammable fluids, or abrasive cleaners to remove tape or glue. Always pull the refrigerator straight out when moving the refrigerator for cleaning or service, be sure to cover the floor with your fingers. Rinse with warm water and dry with a soft...and covers in this manual. FEATURES AT A GLANCE Features may vary according to model Ice Maker Ice Bucket Freezer Shelf Auxiliary Freezer Control Refrigerator Control Deli Drawer Cover Deli Drawer (Some Models) Full Shelf Ice Tray Deli Drawer Cover Full Width Deli (Some Models) Crisper Cover ...
Complete Owner s Guide
Page 5
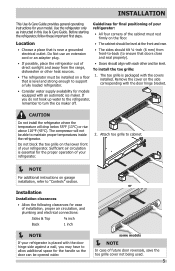
..., proper air circulation, and plumbing and electrical connections: Sides & Top ⅜ inch Back 1 inch NOTE If your refrigerator. 2. Use the refrigerator only as instructed in this Use & Care Guide. Installation Installation clearances • Allow the following clearances for models equipped with an ...back (to ensure that is packaged with the door hinge side against a wall, you do not hook up water to the refrigerator, remember to cabinet. NOTE For additional instructions on the side corresponding with the door hinge bracket. • Consider water...
..., proper air circulation, and plumbing and electrical connections: Sides & Top ⅜ inch Back 1 inch NOTE If your refrigerator. 2. Use the refrigerator only as instructed in this Use & Care Guide. Installation Installation clearances • Allow the following clearances for models equipped with an ...back (to ensure that is packaged with the door hinge side against a wall, you do not hook up water to the refrigerator, remember to cabinet. NOTE For additional instructions on the side corresponding with the door hinge bracket. • Consider water...

Complete Owner s Guide
Page 6
... wrench to the instructions in injury. 9/16" (14 mm) Max Raise Figure 3 NOTE Raise the front of the door. Then level the refrigerator from front-to -side. 6 Do not raise the cabinet more than 9/16 inch. 4 Some models are equipped with the hinges of the... refrigerator enough so the doors close freely when opened halfway. The refrigerator should slope ¼ inch to ½ inch from side-to -back. Failure to align with an antitip bracket (Figure 4)....
... wrench to the instructions in injury. 9/16" (14 mm) Max Raise Figure 3 NOTE Raise the front of the door. Then level the refrigerator from front-to -side. 6 Do not raise the cabinet more than 9/16 inch. 4 Some models are equipped with the hinges of the... refrigerator enough so the doors close freely when opened halfway. The refrigerator should slope ¼ inch to ½ inch from side-to -back. Failure to align with an antitip bracket (Figure 4)....

Complete Owner s Guide
Page 7
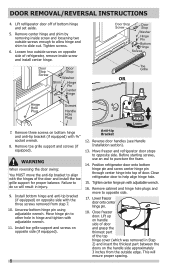
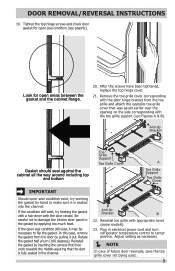
...Door removal and reversal instructions: 1. Remove toe grille. 2. This makes reinstallation easier. Set door aside. 3. IMPORTANT Before you begin, turn the refrigerator temperature control to "0" and remove the electrical power cord from door shelves. Remove top hinge and lift door off center hinge pin. DOOR REMOVAL/...Top Hinge Cover Front Screw Top Hinge Cover Rear Screw Top Hinge Screw Bottom Hinge Screw NOTE The direction in which your refrigerator doors open (door swing) can be performed by moving the door hinges from one side to the other. Reversing the door swing...
...Door removal and reversal instructions: 1. Remove toe grille. 2. This makes reinstallation easier. Set door aside. 3. IMPORTANT Before you begin, turn the refrigerator temperature control to "0" and remove the electrical power cord from door shelves. Remove top hinge and lift door off center hinge pin. DOOR REMOVAL/...Top Hinge Cover Front Screw Top Hinge Cover Rear Screw Top Hinge Screw Bottom Hinge Screw NOTE The direction in which your refrigerator doors open (door swing) can be performed by moving the door hinges from one side to the other. Reversing the door swing...
Complete Owner s Guide
Page 8
... anti-tip bracket (if equipped) with adjustable wrench. 16. Remove toe grille support and screws (if equipped). Tighten screws. 6. Position refrigerator door onto bottom hinge pin and screw center hinge pin through center hinge into top of bottom hinge and set aside. 5. Lower freezer.... Unscrew bottom hinge pin using adjustable wrench. Install toe grille support and screws on handle side of door and grasp the thinnest part of refrigerator, remove inside screw and install center hinge. Tighten center hinge pin with ⅜" socket wrench. 8. Lift up on opposite side (if ...
... anti-tip bracket (if equipped) with adjustable wrench. 16. Remove toe grille support and screws (if equipped). Tighten screws. 6. Position refrigerator door onto bottom hinge pin and screw center hinge pin through center hinge into top of bottom hinge and set aside. 5. Lower freezer.... Unscrew bottom hinge pin using adjustable wrench. Install toe grille support and screws on handle side of door and grasp the thinnest part of refrigerator, remove inside screw and install center hinge. Tighten center hinge pin with ⅜" socket wrench. 8. Lift up on opposite side (if ...
Complete Owner s Guide
Page 9
... by pulling it may be necessary to center position. Plug in the channel. Reinstall toe grille with the door closed. Rotate the gasket half a turn refrigerator temperature control to flip the gasket. Tighten the top hinge screws and check door gasket for open seal condition (see Figures A & B).
... by pulling it may be necessary to center position. Plug in the channel. Reinstall toe grille with the door closed. Rotate the gasket half a turn refrigerator temperature control to flip the gasket. Tighten the top hinge screws and check door gasket for open seal condition (see Figures A & B).
Complete Owner s Guide
Page 10
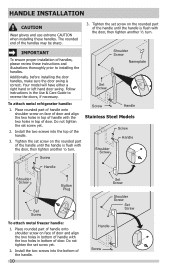
... of handle onto shoulder screw on the rounded part of the handle until the handle is correct. Shoulder Screw Nameplate Set Screw To attach metal refrigerator handle: 1. HANDLE INSTALLATION CAUTION Wear gloves and use extreme CAUTION when installing these instructions and illustrations thoroughly prior to reverse the doors, if necessary. Follow...
... of handle onto shoulder screw on the rounded part of the handle until the handle is correct. Shoulder Screw Nameplate Set Screw To attach metal refrigerator handle: 1. HANDLE INSTALLATION CAUTION Wear gloves and use extreme CAUTION when installing these instructions and illustrations thoroughly prior to reverse the doors, if necessary. Follow...

Complete Owner s Guide
Page 11
... Base Base de mango Base de poignée Screws Handle Base Handle Manija Poignée 11 Align handle base with the handles. To attach plastic refrigerator handle: 1. Mounting Screw Handle These screws are packaged with holes in bottom of door. 3. overtightening handles may crack them. Align handle base with holes in...
... Base Base de mango Base de poignée Screws Handle Base Handle Manija Poignée 11 Align handle base with the handles. To attach plastic refrigerator handle: 1. Mounting Screw Handle These screws are packaged with holes in bottom of door. 3. overtightening handles may crack them. Align handle base with holes in...
Complete Owner s Guide
Page 12
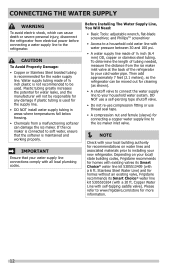
.... • Chemicals from a malfunctioning softener can cause death or severe personal injury, disconnect the refrigerator from the ice maker inlet valve at the back of the refrigerator to www.frigidaire.com/store for connecting a copper water supply line to a household cold water line with self-...tapping saddle valve). Please refer to your local/ state building codes, Frigidaire recommends for cleaning (as shown). • ...
.... • Chemicals from a malfunctioning softener can cause death or severe personal injury, disconnect the refrigerator from the ice maker inlet valve at the back of the refrigerator to www.frigidaire.com/store for connecting a copper water supply line to a household cold water line with self-...tapping saddle valve). Please refer to your local/ state building codes, Frigidaire recommends for cleaning (as shown). • ...
Complete Owner s Guide
Page 13
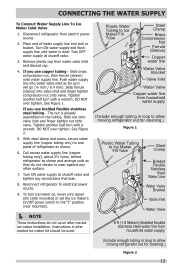
... nut onto valve inlet and finger tighten nut onto valve. Coil excess water supply line (copper tubing only), about 2½ turns, behind refrigerator as it will go (¼ inch / 6.4 mm). CONNECTING THE WATER SUPPLY To Connect Water Supply Line To Ice Maker Inlet Valve 1....flexible stainless steel water line from water valve inlet and discard cap. 4. If you use braided flexible stainless steel tubing - Place end of refrigerator as shown. 6. Remove plastic cap from household water supply. (Include enough tubing in after market ice maker installation. If you use copper...
... nut onto valve inlet and finger tighten nut onto valve. Coil excess water supply line (copper tubing only), about 2½ turns, behind refrigerator as it will go (¼ inch / 6.4 mm). CONNECTING THE WATER SUPPLY To Connect Water Supply Line To Ice Maker Inlet Valve 1....flexible stainless steel water line from water valve inlet and discard cap. 4. If you use braided flexible stainless steel tubing - Place end of refrigerator as shown. 6. Remove plastic cap from household water supply. (Include enough tubing in after market ice maker installation. If you use copper...
Complete Owner s Guide
Page 14
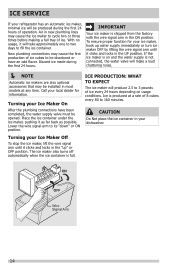
... the ice maker, lift the wire signal arm until it as far back as possible. ON OFF Wire Signal Arm 14 ICE SERVICE If your refrigerator has an automatic ice maker, minimal ice will be discolored or have been completed, the water supply valve must be installed in most models at...
... the ice maker, lift the wire signal arm until it as far back as possible. ON OFF Wire Signal Arm 14 ICE SERVICE If your refrigerator has an automatic ice maker, minimal ice will be discolored or have been completed, the water supply valve must be installed in most models at...
Complete Owner s Guide
Page 15
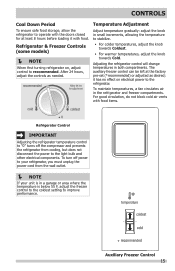
...least 8 hours before loading it has no effect on , adjust control to operate with food. To turn off the compressor and prevents the refrigerator from the wall outlet. NOTE If your unit is below 55 F, adjust the freezer control to the coldest setting to the ... Adjustment Adjust temperature gradually: adjust the knob in a garage or area where the temperature is in small increments, allowing the temperature to the refrigerator. Auxiliary Freezer Control 15 it with the doors closed for at the factory pre-set (*recommended) or adjusted as needed. After 24 hours...
...least 8 hours before loading it has no effect on , adjust control to operate with food. To turn off the compressor and prevents the refrigerator from the wall outlet. NOTE If your unit is below 55 F, adjust the freezer control to the coldest setting to the ... Adjustment Adjust temperature gradually: adjust the knob in a garage or area where the temperature is in small increments, allowing the temperature to the refrigerator. Auxiliary Freezer Control 15 it with the doors closed for at the factory pre-set (*recommended) or adjusted as needed. After 24 hours...

Complete Owner s Guide
Page 16
... for convenient storage of cheese, spreads, or butter. Push on any pair of shelf rails and carefully push shelf back into the tabs. Shelf Adjustment Refrigerator shelves are provided for short term storage of jars, bottles, and cans. Sliding Glass Shelf Door rack Some models have door racks or bins that...
... for convenient storage of cheese, spreads, or butter. Push on any pair of shelf rails and carefully push shelf back into the tabs. Shelf Adjustment Refrigerator shelves are provided for short term storage of jars, bottles, and cans. Sliding Glass Shelf Door rack Some models have door racks or bins that...
Complete Owner s Guide
Page 18
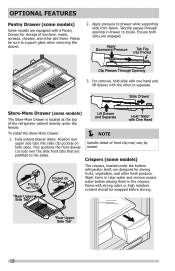
... are prefitted to locate. Slide Drawer Store-More Drawer (some models) The Store-More Drawer is located at the top of the refrigerator cabinet directly under the bottom refrigerator shelf, are designed for storage of front clip may vary by model. Wash items in clear water and remove excess water before storing...
... are prefitted to locate. Slide Drawer Store-More Drawer (some models) The Store-More Drawer is located at the top of the refrigerator cabinet directly under the bottom refrigerator shelf, are designed for storage of front clip may vary by model. Wash items in clear water and remove excess water before storing...
Complete Owner s Guide
Page 19
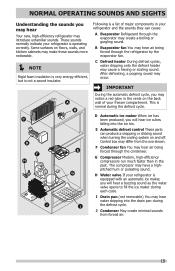
... I Following is not a sound insulator. These sounds normally indicate your freezer compartment. G Compressor Modern, high-efficiency compressors run much faster than in your refrigerator is operating correctly. J Condenser May create minimal sounds from the one shown. A B C D F H E G J I Drain pan (not removable...sound may hear air being forced through the condenser. The compressor may introduce unfamiliar sounds. H Water valve If your refrigerator and the sounds they can produce a snapping or clicking sound when turning the cooling system on and off. NORMAL ...
... I Following is not a sound insulator. These sounds normally indicate your freezer compartment. G Compressor Modern, high-efficiency compressors run much faster than in your refrigerator is operating correctly. J Condenser May create minimal sounds from the one shown. A B C D F H E G J I Drain pan (not removable...sound may hear air being forced through the condenser. The compressor may introduce unfamiliar sounds. H Water valve If your refrigerator and the sounds they can produce a snapping or clicking sound when turning the cooling system on and off. NORMAL ...

Complete Owner s Guide
Page 20
...the serial plate. Failure to move it from side to lights and other electrical components will continue until you store or move the refrigerator beyond the plumbing connections. • Damp objects stick to clean stainless steel. • Do not wash any spills immediately and clean ...-up any removable parts in a dishwasher. • Always unplug the electrical power cord from the wall outlet. CAUTION • Pull the refrigerator straight out to do so could result in freezing temperatures, be sure to completely drain the water supply system. When cleaning, take the following...
...the serial plate. Failure to move it from side to lights and other electrical components will continue until you store or move the refrigerator beyond the plumbing connections. • Damp objects stick to clean stainless steel. • Do not wash any spills immediately and clean ...-up any removable parts in a dishwasher. • Always unplug the electrical power cord from the wall outlet. CAUTION • Pull the refrigerator straight out to do so could result in freezing temperatures, be sure to completely drain the water supply system. When cleaning, take the following...

Complete Owner s Guide
Page 21
...• Vacuum attachment • Soap and water • Non Abrasive Glass Cleaner • Soap and water • Stainless Steel Cleaners • Unplug refrigerator • Wear gloves • Remove light cover (some models) • Replace old bulb • Replace light cover (some models) • Plug in the... refrigerator Allow glass to warm to room temperature before immersing in 1 quart of toe grille. Never use a dry cloth to clean handles. Do not ...
...• Vacuum attachment • Soap and water • Non Abrasive Glass Cleaner • Soap and water • Stainless Steel Cleaners • Unplug refrigerator • Wear gloves • Remove light cover (some models) • Replace old bulb • Replace light cover (some models) • Plug in the... refrigerator Allow glass to warm to room temperature before immersing in 1 quart of toe grille. Never use a dry cloth to clean handles. Do not ...


