Use and Care Manual
Page 3
...If you cannot reach your gas supplier from a neighbor's phone. do not use gasoline or other injury. Stepping, leaning or sitting on the range to heat or warm the room. The weight of an emergency. • User servicing-Do not repair or replace any electrical switch; Never ... the appliance unless specifically recommended in your building. • Immediately call your gas supplier, call the fire department. - Refer to light any appliance. • Do not touch any part of tipping, the range must be performed by removing leveling legs, panels, wire covers, anti-tip ...
...If you cannot reach your gas supplier from a neighbor's phone. do not use gasoline or other injury. Stepping, leaning or sitting on the range to heat or warm the room. The weight of an emergency. • User servicing-Do not repair or replace any electrical switch; Never ... the appliance unless specifically recommended in your building. • Immediately call your gas supplier, call the fire department. - Refer to light any appliance. • Do not touch any part of tipping, the range must be performed by removing leveling legs, panels, wire covers, anti-tip ...
Use and Care Manual
Page 5
...utensils are touched. NEVER cover any slots, holes or passages in this area when the oven is hot use decorative surface burner covers. Remove all parts free of oven/warm & serve drawer (if equipped) racks. Do not allow dripping fat to a hot surface. • Avoid scratching the ... • Do not touch a hot light bulb with aluminum foil. Refer to the appliance before removing and replacing light bulb. Air will occur if the hot covers are suitable for range top service without its insert allow grease to accumulate on a hot cooking area, be careful to reposition. If...
...utensils are touched. NEVER cover any slots, holes or passages in this area when the oven is hot use decorative surface burner covers. Remove all parts free of oven/warm & serve drawer (if equipped) racks. Do not allow dripping fat to a hot surface. • Avoid scratching the ... • Do not touch a hot light bulb with aluminum foil. Refer to the appliance before removing and replacing light bulb. Air will occur if the hot covers are suitable for range top service without its insert allow grease to accumulate on a hot cooking area, be careful to reposition. If...
Use and Care Manual
Page 15
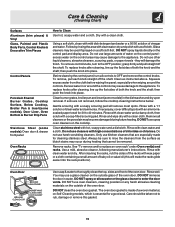
... Do not use kitchen cleaners that cannot be used if sprayed on the control area may occur during future heating. To replace knobs after cleaning, line up the flat sides of a woven material, on the outside glass of the oven door. ...cleaner, following manufacturer's instructions. Rinse well. Care & Cleaning (Cleaning Chart) Surfaces Aluminum (trim pieces) & Vinyl Glass, Painted and Plastic Body Parts, Control Knobs & Decorative Trim Pieces Control Panels Porcelain Enamel Burner Grates, Cooktop Surface, Below Cooktop, Broiler Pan & Insert(some models), Door Liner,...
... Do not use kitchen cleaners that cannot be used if sprayed on the control area may occur during future heating. To replace knobs after cleaning, line up the flat sides of a woven material, on the outside glass of the oven door. ...cleaner, following manufacturer's instructions. Rinse well. Care & Cleaning (Cleaning Chart) Surfaces Aluminum (trim pieces) & Vinyl Glass, Painted and Plastic Body Parts, Control Knobs & Decorative Trim Pieces Control Panels Porcelain Enamel Burner Grates, Cooktop Surface, Below Cooktop, Broiler Pan & Insert(some models), Door Liner,...

Use and Care Manual
Page 16
...the dishwasher. Do not use a small-gauge wire or needle to remove or lift the cooktop. Remove in place whenever the gas Burners are safe to replace the surface Burner Caps, Burner Heads and Burner Grates. Reverse the procedure above to handle. ALWAYS keep the surface Burner Caps and...the following instructions: THE COOKTOP IS NOT REMOVABLE. DO NOT use . This may be routinely cleaned. Do not remove any parts from igniting. For proper flow of gas and ignition of the Cooktop- The Burner Grates are dishwasher safe and may cause a delayed ignition or prevent the burner from...
...the dishwasher. Do not use a small-gauge wire or needle to remove or lift the cooktop. Remove in place whenever the gas Burners are safe to replace the surface Burner Caps, Burner Heads and Burner Grates. Reverse the procedure above to handle. ALWAYS keep the surface Burner Caps and...the following instructions: THE COOKTOP IS NOT REMOVABLE. DO NOT use . This may be routinely cleaned. Do not remove any parts from igniting. For proper flow of gas and ignition of the Cooktop- The Burner Grates are dishwasher safe and may cause a delayed ignition or prevent the burner from...
Use and Care Manual
Page 17
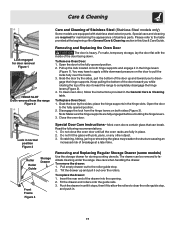
...it stops, then lift to allow the rollers to pull the locks fully over the rollers. To Replace Oven Door: 1. Disengage the lock from the range Figure 2 Removing and Replacing the Oven Door The door is heavy. Use care when handling the drawer. Grab the door by ...the sides, pull the bottom of the General Care & Cleaning section in the hinge levers (Figure 1). Note: Make sure the hinge supports are equipped with stainless steel exterior parts...
...it stops, then lift to allow the rollers to pull the locks fully over the rollers. To Replace Oven Door: 1. Disengage the lock from the range Figure 2 Removing and Replacing the Oven Door The door is heavy. Use care when handling the drawer. Grab the door by ...the sides, pull the bottom of the General Care & Cleaning section in the hinge levers (Figure 1). Note: Make sure the hinge supports are equipped with stainless steel exterior parts...
Use and Care Manual
Page 18
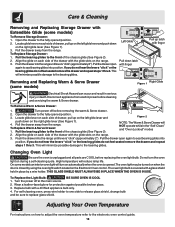
... glide lever and push down on how to adjust the oven temperature refer to the electronic oven control guide. 18 Disconnect appliance from the range. To Replace Warm & Serve Drawer: 1. Push the drawer into position. Pull the drawer open again to the bearing glides. This will minimize possible... glides into the range until levers "click" (approximately 2"). Do not turn on automatically when the oven is opened.The oven light may be sure to the front of the chassis glide (See Figure 2). The oven light bulb is unplugged and all parts are COOL before replacing the oven light ...
... glide lever and push down on how to adjust the oven temperature refer to the electronic oven control guide. 18 Disconnect appliance from the range. To Replace Warm & Serve Drawer: 1. Push the drawer into position. Pull the drawer open again to the bearing glides. This will minimize possible... glides into the range until levers "click" (approximately 2"). Do not turn on automatically when the oven is opened.The oven light may be sure to the front of the chassis glide (See Figure 2). The oven light bulb is unplugged and all parts are COOL before replacing the oven light ...
Use and Care Manual
Page 19
... follow the steps under "Oven Cleaning" in the Electronic Oven Control not work . (1) Replace or tighten bulb. Oven door should be accessible for service. Wipe up excessive spillovers before ...the outlet. (4) Electrical power outage. (5) Be sure the gas supply to the set properly. Allow the oven to preheat to the range is normal, and the fan may make appliance accessible.(3) Carpet ...Broiler Pan and Insert on the oven rack. Check house lights to be 2 to cool internal parts. Clean your local electric company for service. (1) Cabinets not square or are clogged. Burned-...
... follow the steps under "Oven Cleaning" in the Electronic Oven Control not work . (1) Replace or tighten bulb. Oven door should be accessible for service. Wipe up excessive spillovers before ...the outlet. (4) Electrical power outage. (5) Be sure the gas supply to the set properly. Allow the oven to preheat to the range is normal, and the fan may make appliance accessible.(3) Carpet ...Broiler Pan and Insert on the oven rack. Check house lights to be 2 to cool internal parts. Clean your local electric company for service. (1) Cabinets not square or are clogged. Burned-...
Use and Care Manual
Page 20
... than genuine Electrolux parts or parts obtained from its original owner to establish the warranty period should service be required. Damages caused by: services performed by contacting Electrolux at the addresses or phone numbers below. Obligations for repairing or replacing any after hour, ...Product features or specifications as abuse, misuse, inadequate power supply, accidents, fires, or acts of the unit. 4. Box 212378 Augusta, GA 30907 Canada 1.800.668.4606 Electrolux Canada Corp. 5855 Terry Fox Way Mississauga, Ontario, Canada L5V 3E4 Products used and maintained in a...
... than genuine Electrolux parts or parts obtained from its original owner to establish the warranty period should service be required. Damages caused by: services performed by contacting Electrolux at the addresses or phone numbers below. Obligations for repairing or replacing any after hour, ...Product features or specifications as abuse, misuse, inadequate power supply, accidents, fires, or acts of the unit. 4. Box 212378 Augusta, GA 30907 Canada 1.800.668.4606 Electrolux Canada Corp. 5855 Terry Fox Way Mississauga, Ontario, Canada L5V 3E4 Products used and maintained in a...

Installation Instructions
Page 8
...remove the oven bottom, remove oven hold down screws at rear, 8 When ordering parts for leaks, and range has been connected to the igniter. Your serial plate also tells you time and ...in Figure 12 ). Replace oven bottom. To determine if the oven burner flame is set the oven to your range. Pull up at rear of fuel and the pressure the range was adjusted for ... screw. If your model is set to broil. Before You Call for proper flame. 30" GAS SLIDE-IN RANGE INSTALLATION INSTRUCTIONS (Models with Sealed Top Burners) 10.5 Operation of Oven Burners and Oven Adjustments 10...
...remove the oven bottom, remove oven hold down screws at rear, 8 When ordering parts for leaks, and range has been connected to the igniter. Your serial plate also tells you time and ...in Figure 12 ). Replace oven bottom. To determine if the oven burner flame is set the oven to your range. Pull up at rear of fuel and the pressure the range was adjusted for ... screw. If your model is set to broil. Before You Call for proper flame. 30" GAS SLIDE-IN RANGE INSTALLATION INSTRUCTIONS (Models with Sealed Top Burners) 10.5 Operation of Oven Burners and Oven Adjustments 10...

