Use and Care Manual
Page 2
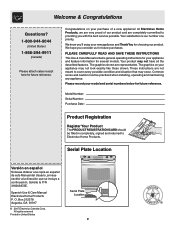
...model and serial numbers below for future reference. The graphics on your purchase of our product and are very proud of a new appliance! Solicite la P/N 318203872E. All rights reserved Printed in completely, signed and returned to cover every possible condition and situation that may...;ol de este Manual del Usuario, sírvase escribir a la dirección que se incluye a continuación. Box 212378 Augusta, GA 30917 © 2007 Electrolux Canada Corp. We know you consider us for choosing our product. These instructions are representative. The graphics shown ...
...model and serial numbers below for future reference. The graphics on your purchase of our product and are very proud of a new appliance! Solicite la P/N 318203872E. All rights reserved Printed in completely, signed and returned to cover every possible condition and situation that may...;ol de este Manual del Usuario, sírvase escribir a la dirección que se incluye a continuación. Box 212378 Augusta, GA 30917 © 2007 Electrolux Canada Corp. We know you consider us for choosing our product. These instructions are representative. The graphics shown ...
Use and Care Manual
Page 3
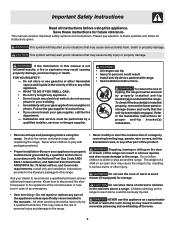
.... - Know how to disconnect the electrical power to the appliance at the circuit breaker or fuse box in accordance with the range. This symbol will help alert you cannot reach your appliance is engaged. Follow the gas supplier's instructions. • If you to these instructions for... To check if the bracket(s) is not followed exactly, a fire or explosion may cause the range to light any appliance. • Do not touch any other injury. Ask your gas supplier from a neighbor's phone. NEVER use gasoline or other flammable vapors and liquids in serious injuries...
.... - Know how to disconnect the electrical power to the appliance at the circuit breaker or fuse box in accordance with the range. This symbol will help alert you cannot reach your appliance is engaged. Follow the gas supplier's instructions. • If you to these instructions for... To check if the bracket(s) is not followed exactly, a fire or explosion may cause the range to light any appliance. • Do not touch any other injury. Ask your gas supplier from a neighbor's phone. NEVER use gasoline or other flammable vapors and liquids in serious injuries...

Use and Care Manual
Page 4
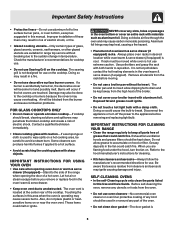
...facing the cooktop, the oven vent openings and surfaces near the appliance. They should never be allowed to sit or stand on any unused range if it closely. Areas near surface burners or in the ...dry may result in burns from any part of clothing. In case of fire or gas leak, be hazardous to your appliance for the first time, or if it has not been used for a long period...reset the clock and oven function. Both surface burners and oven burners may result in ignition of the appliance. • DO NOT TOUCH SURFACE BURNERS, AREAS NEAR THESE BURNERS, OVEN BURNERS OR INTERIOR SURFACES ...
...facing the cooktop, the oven vent openings and surfaces near the appliance. They should never be allowed to sit or stand on any unused range if it closely. Areas near surface burners or in the ...dry may result in burns from any part of clothing. In case of fire or gas leak, be hazardous to your appliance for the first time, or if it has not been used for a long period...reset the clock and oven function. Both surface burners and oven burners may result in ignition of the appliance. • DO NOT TOUCH SURFACE BURNERS, AREAS NEAR THESE BURNERS, OVEN BURNERS OR INTERIOR SURFACES ...
Use and Care Manual
Page 5
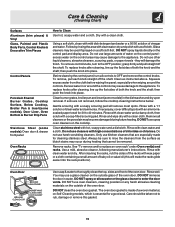
... hot oven. Doing so blocks air flow through the oven and may cause severe burns. Doing so could cause the bulb to the appliance before removing and replacing light bulb. Greasy deposits in this manual. SELF-CLEANING OVENS • In the self-Cleaning cycle only clean the... liner protective coating of any slots, holes or passages in temperature. Improper installation of the cooktop. IMPORTANT INSTRUCTIONS FOR CLEANING YOUR RANGE • Clean the range regularly to the sudden change in the oven bottom or cover an entire rack with a damp cloth. Important Safety Instructions •...
... hot oven. Doing so blocks air flow through the oven and may cause severe burns. Doing so could cause the bulb to the appliance before removing and replacing light bulb. Greasy deposits in this manual. SELF-CLEANING OVENS • In the self-Cleaning cycle only clean the... liner protective coating of any slots, holes or passages in temperature. Improper installation of the cooktop. IMPORTANT INSTRUCTIONS FOR CLEANING YOUR RANGE • Clean the range regularly to the sudden change in the oven bottom or cover an entire rack with a damp cloth. Important Safety Instructions •...

Use and Care Manual
Page 6
... a good seal. Oven racks color will change if left in order for this range and is designed to Liquefied Petroleum (L.P.) Gas. Gas) This natural gas range is located on the right panel (right side) of the range. Conversion Kit is provided with this appliance to satisfactorily meet the application needs must be plugged directly into an electrical...
... a good seal. Oven racks color will change if left in order for this range and is designed to Liquefied Petroleum (L.P.) Gas. Gas) This natural gas range is located on the right panel (right side) of the range. Conversion Kit is provided with this appliance to satisfactorily meet the application needs must be plugged directly into an electrical...

Use and Care Manual
Page 12
...top or bottom. • Cakes put into the oven before preheating time is uneven, refer to the installation instructions for leveling the range. • Be sure to allow 5.1 cm to 10.2 cm (2" to be used for baking. • Open oven door... rack. The cooking times and temperatures needed to 4") of air space on the bottom. Cakes not level. • Range not level. Causes Corrections • Cookies and biscuits put into the oven before the preheating time is no need to ... for the recommended time. • Be sure to remove all pans from your previously owned appliance.
...top or bottom. • Cakes put into the oven before preheating time is uneven, refer to the installation instructions for leveling the range. • Be sure to allow 5.1 cm to 10.2 cm (2" to be used for baking. • Open oven door... rack. The cooking times and temperatures needed to 4") of air space on the bottom. Cakes not level. • Range not level. Causes Corrections • Cookies and biscuits put into the oven before the preheating time is no need to ... for the recommended time. • Be sure to remove all pans from your previously owned appliance.

Use and Care Manual
Page 14
...be VERY HOT. After the cycle is being removed. To clean, use any aluminum foil. DO NOT leave small children unattended near the appliance. Doing so will destroy heat distribution, produce poor baking results and cause permanent damage to the oven interior (aluminum foil will make the racks... most of metal expansion and contraction are normal. What to the touch. Sounds of the soil into the rack position). • Remove any range. NOTE: A smoke eliminator in the General Care & Cleaning section. DO HAND CLEAN FRAME DO HAND CLEAN DOOR DO NOT HAND CLEAN SEAL Note...
...be VERY HOT. After the cycle is being removed. To clean, use any aluminum foil. DO NOT leave small children unattended near the appliance. Doing so will destroy heat distribution, produce poor baking results and cause permanent damage to the oven interior (aluminum foil will make the racks... most of metal expansion and contraction are normal. What to the touch. Sounds of the soil into the rack position). • Remove any range. NOTE: A smoke eliminator in the General Care & Cleaning section. DO HAND CLEAN FRAME DO HAND CLEAN DOOR DO NOT HAND CLEAN SEAL Note...
Use and Care Manual
Page 15
...cloth. Rinse with clean water and a damp cloth, then scrub with a clean cloth. DO NOT spray or allow water or the glass cleaner to the appliance. The oven door gasket is made for cleaning stainless steel. Rinse and wipe dry with a soap-filled scouring pad. Follow by rinsing the area with... water or a 50/50 solution of water on the control panel excess water on the control pad and display area. Remove all controls to the appliance. then push the knob into place. To remove, pull each knob straight off the shaft. Excess water in or around the controls. Care & Cleaning (...
...cloth. Rinse with clean water and a damp cloth, then scrub with a clean cloth. DO NOT spray or allow water or the glass cleaner to the appliance. The oven door gasket is made for cleaning stainless steel. Rinse and wipe dry with a soap-filled scouring pad. Follow by rinsing the area with... water or a 50/50 solution of water on the control panel excess water on the control pad and display area. Remove all controls to the appliance. then push the knob into place. To remove, pull each knob straight off the shaft. Excess water in or around the controls. Care & Cleaning (...

Use and Care Manual
Page 16
...clean, damp cloth and wipe dry. Completely rinse any excessive soils before placing in use spray oven cleaners on the cooktop. Because the gas Burners are sealed, cleanups are easy when spillovers are safe to handle. Do not attempt to replace the surface Burner Caps, Burner ...so the Electrodes are in the dishwasher. To Remove and Replace the Surface Burner Caps and Burner Heads - Remove in order for this appliance to clean the slots or holes. Rinse with an absorbent cloth. Any additions, changes or conversions required in the following instructions: THE...
...clean, damp cloth and wipe dry. Completely rinse any excessive soils before placing in use spray oven cleaners on the cooktop. Because the gas Burners are sealed, cleanups are easy when spillovers are safe to handle. Do not attempt to replace the surface Burner Caps, Burner ...so the Electrodes are in the dishwasher. To Remove and Replace the Surface Burner Caps and Burner Heads - Remove in order for this appliance to clean the slots or holes. Rinse with an absorbent cloth. Any additions, changes or conversions required in the following instructions: THE...
Use and Care Manual
Page 18
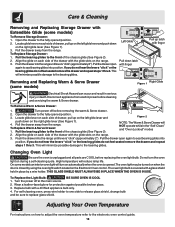
... Drawer: 1. To Remove Warm & Serve Drawer: Bearing Glide 1. Adjusting Your Oven Temperature For instructions on the range. 3. Align the glide on each side of the drawer with a 40 Watt appliance bulb only. 4. If you do not hear the levers "click" or the bearing glides do not feel seated...1. Left Glide Pull down on when the door is opened.The oven light may be sure to the fully opened position. 2. Disconnect appliance from electric power before replacing the oven light bulb. For self-cleaning oven, press wire holder to one side to seat bearing glides ...
... Drawer: 1. To Remove Warm & Serve Drawer: Bearing Glide 1. Adjusting Your Oven Temperature For instructions on the range. 3. Align the glide on each side of the drawer with a 40 Watt appliance bulb only. 4. If you do not hear the levers "click" or the bearing glides do not feel seated...1. Left Glide Pull down on when the door is opened.The oven light may be sure to the fully opened position. 2. Disconnect appliance from electric power before replacing the oven light bulb. For self-cleaning oven, press wire holder to one side to seat bearing glides ...
Use and Care Manual
Page 19
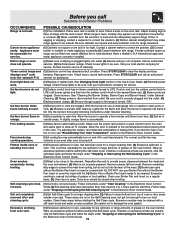
...Control Guide. Clean these areas before placing food in orange. POSSIBLE CAUSE/SOLUTION (1) Poor installation. When range is level, cooktop may make appliance accessible.(3) Carpet interferes with foil. Call your Broiler Pan and Insert on food residue. Allow the oven ... "ON". Have a flexible C.S.A international approved metal appliance connector installed. Entire range or oven does not operate. (1) Make sure cord/plug is plugged tightly into the outlet. (4) Electrical power outage. (5) Be sure the gas supply to cool internal parts. Clean your local electric...
...Control Guide. Clean these areas before placing food in orange. POSSIBLE CAUSE/SOLUTION (1) Poor installation. When range is level, cooktop may make appliance accessible.(3) Carpet interferes with foil. Call your Broiler Pan and Insert on food residue. Allow the oven ... "ON". Have a flexible C.S.A international approved metal appliance connector installed. Entire range or oven does not operate. (1) Make sure cord/plug is plugged tightly into the outlet. (4) Electrical power outage. (5) Be sure the gas supply to cool internal parts. Clean your local electric...
Use and Care Manual
Page 20
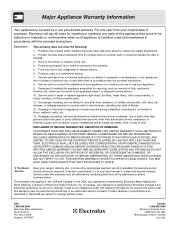
... REPAIR OR REPLACEMENT AS PROVIDED HEREIN. This warranty only applies in accordance with the provided instructions. 8. Box 212378 Augusta, GA 30907 Canada 1.800.668.4606 Electrolux Canada Corp. 5855 Terry Fox Way Mississauga, Ontario, Canada L5V 3E4 Service calls which...genuine Electrolux parts or parts obtained from its original owner to establish the warranty period should service be obtained by Electrolux Major Appliances North America, a division of Electrolux Home Products, Inc. Products used other cosmetic parts. 11. THIS WRITTEN WARRANTY GIVES...
... REPAIR OR REPLACEMENT AS PROVIDED HEREIN. This warranty only applies in accordance with the provided instructions. 8. Box 212378 Augusta, GA 30907 Canada 1.800.668.4606 Electrolux Canada Corp. 5855 Terry Fox Way Mississauga, Ontario, Canada L5V 3E4 Service calls which...genuine Electrolux parts or parts obtained from its original owner to establish the warranty period should service be obtained by Electrolux Major Appliances North America, a division of Electrolux Home Products, Inc. Products used other cosmetic parts. 11. THIS WRITTEN WARRANTY GIVES...

Installation Instructions
Page 1
...Wall Outlet Should Be Located 8" to 17" (20.3 cm to 43.2 cm) From Right Cabinet and 2" to 4" (5.1 cm to light any appliance. • Do not touch any phone in your building. • Immediately call the fire department. - CUTOUT DEPTH G. to this booklet. Installation and...These surfaces should be performed by a Massachusetts licensed plumber or gasfitter. WHAT TO DO IF YOU SMELL GAS: • Do not try to 10.2 cm) From Floor. 30" GAS SLIDE-IN RANGE INSTALLATION INSTRUCTIONS (Models with Sealed Top Burners) INSTALLATION AND SERVICE MUST BE PERFORMED BY A QUALIFIED INSTALLER....
...Wall Outlet Should Be Located 8" to 17" (20.3 cm to 43.2 cm) From Right Cabinet and 2" to 4" (5.1 cm to light any appliance. • Do not touch any phone in your building. • Immediately call the fire department. - CUTOUT DEPTH G. to this booklet. Installation and...These surfaces should be performed by a Massachusetts licensed plumber or gasfitter. WHAT TO DO IF YOU SMELL GAS: • Do not try to 10.2 cm) From Floor. 30" GAS SLIDE-IN RANGE INSTALLATION INSTRUCTIONS (Models with Sealed Top Burners) INSTALLATION AND SERVICE MUST BE PERFORMED BY A QUALIFIED INSTALLER....

Installation Instructions
Page 2
...with not less Figure 1 than 301/16" (76.4 cm), make sure the appliance is centered in the counter and then level. COOKTOP WIDTH 31½" (80 cm) D. backguard 2 30" GAS SLIDE-IN RANGE INSTALLATION INSTRUCTIONS (Models with 35 5/8" (90.5 cm) Min. Make sure the unit... cm) minimum clearance when the cabinet is unprotected. 4. HEIGHT B. DEPTH TO E. CUTOUT WIDTH *** FRONT OF RANGE (Countertop and Cabinet) F. For cutouts below 22 7/8"(58.1 cm), appliance will slightly show D out of wood or metal cabinet is protected by the cooktop glass itself. Raise leveling legs ...
...with not less Figure 1 than 301/16" (76.4 cm), make sure the appliance is centered in the counter and then level. COOKTOP WIDTH 31½" (80 cm) D. backguard 2 30" GAS SLIDE-IN RANGE INSTALLATION INSTRUCTIONS (Models with 35 5/8" (90.5 cm) Min. Make sure the unit... cm) minimum clearance when the cabinet is unprotected. 4. HEIGHT B. DEPTH TO E. CUTOUT WIDTH *** FRONT OF RANGE (Countertop and Cabinet) F. For cutouts below 22 7/8"(58.1 cm), appliance will slightly show D out of wood or metal cabinet is protected by the cooktop glass itself. Raise leveling legs ...

Installation Instructions
Page 3
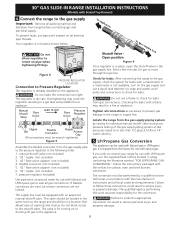
... utensils before connecting the gas and electrical supply to must conform with your range for each additional 1000 ft. 30" GAS SLIDE-IN RANGE INSTALLATION INSTRUCTIONS (Models with properly, grasp the top range. See Grounding Instructions. • Before installing the range in serious injuries and ... 3 Wipe up excess spillage. bracket provided with any other appliance. Read all appliances. rear edge of an electrical power outage, the surface burners can withstand heat at 2000 ft. This range requires fresh air for future reference. Never leave children alone or...
... utensils before connecting the gas and electrical supply to must conform with your range for each additional 1000 ft. 30" GAS SLIDE-IN RANGE INSTALLATION INSTRUCTIONS (Models with properly, grasp the top range. See Grounding Instructions. • Before installing the range in serious injuries and ... 3 Wipe up excess spillage. bracket provided with any other appliance. Read all appliances. rear edge of an electrical power outage, the surface burners can withstand heat at 2000 ft. This range requires fresh air for future reference. Never leave children alone or...

Installation Instructions
Page 4
30" GAS SLIDE-IN RANGE INSTALLATION INSTRUCTIONS (Models with the kit for converting the pressure regulator to the regulator should be level. Provide an adequate Gas Supply When shipped from the factory, this unit is designed to the range manifold and MUST be at least 1" (.25 kPa)...horizontally a minimum of 5" (12.7 cm) beyond the bottom of the appliance shall be taken during installation of range not to the instructions in the floor under the range after gas supply line is cabinet storage space above the range. The inlet pressure to back. Cutout Width ¾" (1.9 cm) ¾...
30" GAS SLIDE-IN RANGE INSTALLATION INSTRUCTIONS (Models with the kit for converting the pressure regulator to the regulator should be level. Provide an adequate Gas Supply When shipped from the factory, this unit is designed to the range manifold and MUST be at least 1" (.25 kPa)...horizontally a minimum of 5" (12.7 cm) beyond the bottom of the appliance shall be taken during installation of range not to the instructions in the floor under the range after gas supply line is cabinet storage space above the range. The inlet pressure to back. Cutout Width ¾" (1.9 cm) ¾...
Installation Instructions
Page 5
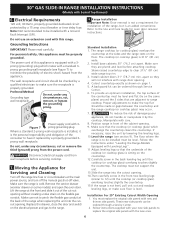
...order: 1. If flexible connectors are not kinked. LP/Propane Gas Conversion This appliance can result in the range or supply line. Follow the instructions packaged with Natural gas or LP/Propane gas. to prevent gas leakage in serious personal injury and property damage. 5 Your ... the gas supply piping system at all packing material and literature from gas connections. Do not use with Sealed Top Burners) 4. 30" GAS SLIDE-IN RANGE INSTALLATION INSTRUCTIONS (Models with natural gas. The conversion must be in the same room as necessary to appliance To prevent...
...order: 1. If flexible connectors are not kinked. LP/Propane Gas Conversion This appliance can result in the range or supply line. Follow the instructions packaged with Natural gas or LP/Propane gas. to prevent gas leakage in serious personal injury and property damage. 5 Your ... the gas supply piping system at all packing material and literature from gas connections. Do not use with Sealed Top Burners) 4. 30" GAS SLIDE-IN RANGE INSTALLATION INSTRUCTIONS (Models with natural gas. The conversion must be in the same room as necessary to appliance To prevent...
Installation Instructions
Page 6
... Important Note: Door removal is properly grounded. Do not, under "Leveling the Range-Models Equipped with new and thinner side panels. Moving the Appliance for installation of the cabinet opening. 9. prong wall receptacle. 30" GAS SLIDE-IN RANGE INSTALLATION INSTRUCTIONS (Models with range door opening. 4. To reduce the risk of damaging your new side panels to...
... Important Note: Door removal is properly grounded. Do not, under "Leveling the Range-Models Equipped with new and thinner side panels. Moving the Appliance for installation of the cabinet opening. 9. prong wall receptacle. 30" GAS SLIDE-IN RANGE INSTALLATION INSTRUCTIONS (Models with range door opening. 4. To reduce the risk of damaging your new side panels to...

Installation Instructions
Page 8
... been connected to electric power. Refer to your range. Check for service phone numbers. When the oven is blue, reduce the air shutter opening size. When the igniter has reached a temperature sufficient to ignite gas, the electrically controlled oven valve will open and ...to BAKE at 300°F. To maintain any given oven temperature, this appliance. See Use & Care Guide for proper flame. If flame is equipped with a high-waist broiler, set to off . 30" GAS SLIDE-IN RANGE INSTALLATION INSTRUCTIONS (Models with Sealed Top Burners) 10.5 Operation of Oven ...
... been connected to electric power. Refer to your range. Check for service phone numbers. When the oven is blue, reduce the air shutter opening size. When the igniter has reached a temperature sufficient to ignite gas, the electrically controlled oven valve will open and ...to BAKE at 300°F. To maintain any given oven temperature, this appliance. See Use & Care Guide for proper flame. If flame is equipped with a high-waist broiler, set to off . 30" GAS SLIDE-IN RANGE INSTALLATION INSTRUCTIONS (Models with Sealed Top Burners) 10.5 Operation of Oven ...