
Complete Owner's Guide (English)
Page 2
...open since open-door operation can relax knowing help you received a damaged Microwave Oven... Use your microwave oven properly. These instructions are a few things you can do need service, you with the best service possible. Visit the Frigidaire Web Site at 1-800-944-9044, 24 hours a day, 7... installing, operating and maintaining any object between the oven front face and the door or allow soil or cleaner residue to microwave energy. We know you consider us serve you the Microwave Oven. Model Number Serial Number Purchase Date NEED HELP? Or call Frigidaire ...
...open since open-door operation can relax knowing help you received a damaged Microwave Oven... Use your microwave oven properly. These instructions are a few things you can do need service, you with the best service possible. Visit the Frigidaire Web Site at 1-800-944-9044, 24 hours a day, 7... installing, operating and maintaining any object between the oven front face and the door or allow soil or cleaner residue to microwave energy. We know you consider us serve you the Microwave Oven. Model Number Serial Number Purchase Date NEED HELP? Or call Frigidaire ...
Complete Owner's Guide (English)
Page 3
... page 26. • To reduce the risk of fire in accordance with the provided installation instructions. • Some products such as water, coffee or tea are placed inside the microwave oven ignite, keep microwave oven door closed glass jars-are able to stand in this symbol to avoid possible injury or death. Do...
... page 26. • To reduce the risk of fire in accordance with the provided installation instructions. • Some products such as water, coffee or tea are placed inside the microwave oven ignite, keep microwave oven door closed glass jars-are able to stand in this symbol to avoid possible injury or death. Do...

Complete Owner's Guide (English)
Page 4
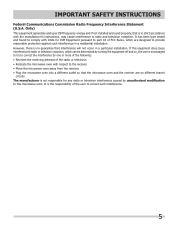
... electric shock. 4 Figure 1 Ground Receptacle Opening for Power Cord Lift carton off microwave oven and remove all packing materials, Installation Instructions, Wall Template, Top Template, Charcoal Filter, Turntable and Turntable Support. Check the microwave oven for any damage, do not operate the microwave oven and contact your dealer or ELECTROLUX SERVICER. DO NOT UNDER ANY...
... electric shock. 4 Figure 1 Ground Receptacle Opening for Power Cord Lift carton off microwave oven and remove all packing materials, Installation Instructions, Wall Template, Top Template, Charcoal Filter, Turntable and Turntable Support. Check the microwave oven for any damage, do not operate the microwave oven and contact your dealer or ELECTROLUX SERVICER. DO NOT UNDER ANY...
Complete Owner's Guide (English)
Page 5
..., which can be determined by turning the equipment off and on different branch circuits. If this microwave oven. IMPORTANT SAFETY INSTRUCTIONS Federal Communications Commission Radio Frequency Interference Statement (U.S.A. The manufacturer is encouraged to try to correct the...television. • Relocate the microwave oven with the manufacturer's instructions, may cause interference to provide reasonable protection against such interference in a particular installation. Only) This equipment generates and uses ISM frequency energy and if not installed and used properly, that ...
..., which can be determined by turning the equipment off and on different branch circuits. If this microwave oven. IMPORTANT SAFETY INSTRUCTIONS Federal Communications Commission Radio Frequency Interference Statement (U.S.A. The manufacturer is encouraged to try to correct the...television. • Relocate the microwave oven with the manufacturer's instructions, may cause interference to provide reasonable protection against such interference in a particular installation. Only) This equipment generates and uses ISM frequency energy and if not installed and used properly, that ...
Complete Owner's Guide (English)
Page 27
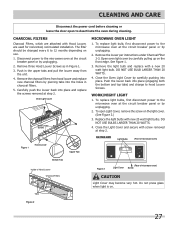
...Tab BOTTOM VIEW Light Bulbs (Front of microwave oven) Bottom Tab Inside of Hood Louver Charcoal Filters Tabs Figure 3 (Rear of microwave oven) Light Cover Screw CAUTION Light Cover may become very hot. Remove the louver per instructions under Charcoal Filter 2-3. Close the Oven Light... To replace light bulb, first disconnect power to the microwave oven at the circuit breaker panel or by piercing tabs into place. See figure 1. 3. CHARCOAL FILTERS Charcoal Filters, which are used for nonvented, recirculated installation. Figure 2 27 Remove the light bulb and replace ...
...Tab BOTTOM VIEW Light Bulbs (Front of microwave oven) Bottom Tab Inside of Hood Louver Charcoal Filters Tabs Figure 3 (Rear of microwave oven) Light Cover Screw CAUTION Light Cover may become very hot. Remove the louver per instructions under Charcoal Filter 2-3. Close the Oven Light... To replace light bulb, first disconnect power to the microwave oven at the circuit breaker panel or by piercing tabs into place. See figure 1. 3. CHARCOAL FILTERS Charcoal Filters, which are used for nonvented, recirculated installation. Figure 2 27 Remove the light bulb and replace ...
Complete Owner's Guide (English)
Page 29
...trip charges, or mileage expense for service calls to change without notice. Products with the provided instructions. 8. Service calls to correct the installation of your appliance or to instruct you how to establish the warranty period should service be defective in materials or workmanship when such... appliance is installed, used and maintained in accordance with the provided instructions. DISCLAIMER OF IMPLIED WARRANTIES; YOU MAY ALSO HAVE OTHER RIGHTS THAT VARY FROM STATE TO STATE....
...trip charges, or mileage expense for service calls to change without notice. Products with the provided instructions. 8. Service calls to correct the installation of your appliance or to instruct you how to establish the warranty period should service be defective in materials or workmanship when such... appliance is installed, used and maintained in accordance with the provided instructions. DISCLAIMER OF IMPLIED WARRANTIES; YOU MAY ALSO HAVE OTHER RIGHTS THAT VARY FROM STATE TO STATE....
Installation Instructions (All Languages)
Page 1
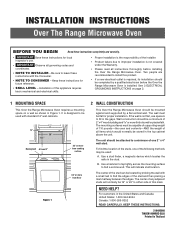
..." to either side of the stud and then placing a mark halfway between the edges. For customers in the stud. INSTALLATION INSTRUCTIONS Over The Range Microwave Oven BEFORE YOU BEGIN Read these instructions completely and carefully. • IMPORTANT Save these instructions for local inspector's use spacers to fill in Thailand NEED HELP? See 3 ELECTRICAL GROUNDING...
..." to either side of the stud and then placing a mark halfway between the edges. For customers in the stud. INSTALLATION INSTRUCTIONS Over The Range Microwave Oven BEFORE YOU BEGIN Read these instructions completely and carefully. • IMPORTANT Save these instructions for local inspector's use spacers to fill in Thailand NEED HELP? See 3 ELECTRICAL GROUNDING...
Installation Instructions (All Languages)
Page 2
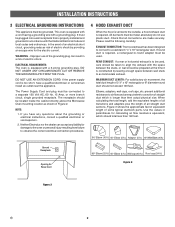
...qualified electrician or serviceman install an outlet near the appliance. The receptacle should not exceed 140 feet. Check that is longer than 140 feet. 90° Elbow (10 ft.) 45° Elbow (5 ft.) Adaptor (5 ft.) 10" Wide Elbow (10 ft.) Ground Receptacle Opening for damage...is equipped with a cord having a grounding wire with a grounding plug. This oven is equipped with a 3-prong grounding plug. INSTALLATION INSTRUCTIONS 3 ELECTRICAL GROUNDING INSTRUCTIONS This appliance must be used , care should be taken to align the exhaust with the space between the studs, or wall ...
...qualified electrician or serviceman install an outlet near the appliance. The receptacle should not exceed 140 feet. Check that is longer than 140 feet. 90° Elbow (10 ft.) 45° Elbow (5 ft.) Adaptor (5 ft.) 10" Wide Elbow (10 ft.) Ground Receptacle Opening for damage...is equipped with a cord having a grounding wire with a grounding plug. This oven is equipped with a 3-prong grounding plug. INSTALLATION INSTRUCTIONS 3 ELECTRICAL GROUNDING INSTRUCTIONS This appliance must be used , care should be taken to align the exhaust with the space between the studs, or wall ...
Installation Instructions (All Languages)
Page 3
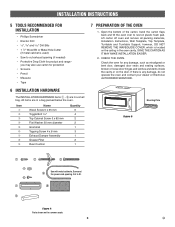
...not operate the oven and contact your dealer or Electrolux AUTHORIZED SERVICER. Lift carton off oven and remove all packing materials, Installation Instructions, Wall Template, Top Template, Turntable and Turntable Support; Cut to fit. 9 Figure 4 Parts shown not to ...bend the carton flaps back and tilt the oven over to common scale. 3 E Mounting Plate Figure 5 Use with metal cabinets. INSTALLATION INSTRUCTIONS 5 TOOLS RECOMMENDED FOR INSTALLATION • Phillips Screwdriver • Electric Drill • 1/2", 5/8" and 3/32" Drill Bits • 1 1/2" Wood Bit or...
...not operate the oven and contact your dealer or Electrolux AUTHORIZED SERVICER. Lift carton off oven and remove all packing materials, Installation Instructions, Wall Template, Top Template, Turntable and Turntable Support; Cut to fit. 9 Figure 4 Parts shown not to ...bend the carton flaps back and tilt the oven over to common scale. 3 E Mounting Plate Figure 5 Use with metal cabinets. INSTALLATION INSTRUCTIONS 5 TOOLS RECOMMENDED FOR INSTALLATION • Phillips Screwdriver • Electric Drill • 1/2", 5/8" and 3/32" Drill Bits • 1 1/2" Wood Bit or...
Installation Instructions (All Languages)
Page 4
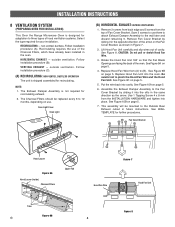
... will be replaced every 6 to 12 months, depending on page 5. The Exhaust Damper Assembly is not required for your installation. Put the wire back into the slits in the same direction as shown in the oven. The Charcoal Filters should be... Upper Tab Figure 7 Hood Fan Wire Hood Fan Unit Tabs Figure 6B E 4 Figure 8 Follow installation procedure (B). INSTALLATION INSTRUCTIONS 8 VENTILATION SYSTEM (PREPARING OVEN FOR INSTALLATION) This Over the Range Microwave Oven is designed for adaptation to three types of hood ventilation systems. Select the type required for recirculating...
... will be replaced every 6 to 12 months, depending on page 5. The Exhaust Damper Assembly is not required for your installation. Put the wire back into the slits in the same direction as shown in the oven. The Charcoal Filters should be... Upper Tab Figure 7 Hood Fan Wire Hood Fan Unit Tabs Figure 6B E 4 Figure 8 Follow installation procedure (B). INSTALLATION INSTRUCTIONS 8 VENTILATION SYSTEM (PREPARING OVEN FOR INSTALLATION) This Over the Range Microwave Oven is designed for adaptation to three types of hood ventilation systems. Select the type required for recirculating...
Installation Instructions (All Languages)
Page 5
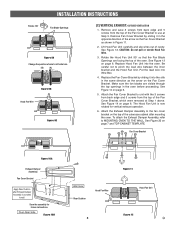
...to wall. Make sure the fan blades are facing the top of the outercase cabinet after Exhaust Damper Assembly is now rotated for future instructions. Save the assembly for vertical exhaust operation. 6. Be careful not to use at Step 1 above. Remove Fan Cover Bracket by sliding... Bracket Figure 10A Exhaust Damper Assembly Fan Cover Bracket Apply Rear Cushion after mounting the oven. Put the lead wire into the oven. INSTALLATION INSTRUCTIONS Rotate 180̊ Fan Blade Openings Figure 9A Change the position of cavity. Remove and save 3 screws from back edge and 5 screws...
...to wall. Make sure the fan blades are facing the top of the outercase cabinet after Exhaust Damper Assembly is now rotated for future instructions. Save the assembly for vertical exhaust operation. 6. Be careful not to use at Step 1 above. Remove Fan Cover Bracket by sliding... Bracket Figure 10A Exhaust Damper Assembly Fan Cover Bracket Apply Rear Cushion after mounting the oven. Put the lead wire into the oven. INSTALLATION INSTRUCTIONS Rotate 180̊ Fan Blade Openings Figure 9A Change the position of cavity. Remove and save 3 screws from back edge and 5 screws...
Installation Instructions (All Languages)
Page 6
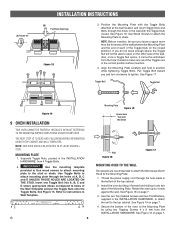
... the holes at the wall location and insert Toggle Nuts and Bolts through the holes in the bottom of the top cabinet. 2. (A) Rotate 90° INSTALLATION INSTRUCTIONS (B) Fan Blade Openings Figure 13 3. See Figure 17. Separate Toggle Nuts, packed in Wall Template. Insert one Toggle Bolt into A, B, C and D ... space more than the thickness of the wall between the Mounting Plate and the end of each of the Toggles are recommended to attach the Microwave Oven/ Hood to the top cabinet. Use the two Top Cabinet Screws and two Flat Washers, supplied in the closed . See Figure 16...
... the holes at the wall location and insert Toggle Nuts and Bolts through the holes in the bottom of the top cabinet. 2. (A) Rotate 90° INSTALLATION INSTRUCTIONS (B) Fan Blade Openings Figure 13 3. See Figure 17. Separate Toggle Nuts, packed in Wall Template. Insert one Toggle Bolt into A, B, C and D ... space more than the thickness of the wall between the Mounting Plate and the end of each of the Toggles are recommended to attach the Microwave Oven/ Hood to the top cabinet. Use the two Top Cabinet Screws and two Flat Washers, supplied in the closed . See Figure 16...
Installation Instructions (All Languages)
Page 7
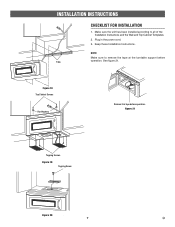
Plug in the power cord. 3. INSTALLATION INSTRUCTIONS CHECKLIST FOR INSTALLATION 1. See figure 21. NOTE: Make sure to all of the Installation Instructions and the Wall and Top Cabinet Templates. 2. Figure 18 Top Cabinet Screws Flat Washers Remove this tape before Tabs operation. Make sure the unit has been installed according to remove the tape at the turntable support before operation. Keep these Installation Instructions. Figure 21 Tapping Screws Figure 19 Tapping Screw Figure 20 7 E
Plug in the power cord. 3. INSTALLATION INSTRUCTIONS CHECKLIST FOR INSTALLATION 1. See figure 21. NOTE: Make sure to all of the Installation Instructions and the Wall and Top Cabinet Templates. 2. Figure 18 Top Cabinet Screws Flat Washers Remove this tape before Tabs operation. Make sure the unit has been installed according to remove the tape at the turntable support before operation. Keep these Installation Instructions. Figure 21 Tapping Screws Figure 19 Tapping Screw Figure 20 7 E

