Installation Instructions (All Languages)
Page 2
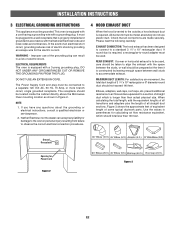
... duct which should be connected to a standard 3 1/4" x 10" rectangular duct. The Power Supply Cord and plug must be located inside the cabinet directly above the Microwave Oven mounting location as shown in a risk of all transitions and adapters plus the length of electric shock. Neither Electrolux nor the dealer can result... be metal; present additional resistance to -round adapter must be plugged into a wall receptacle that all connections are equivalent to a section of some typical ductwork parts.
... duct which should be connected to a standard 3 1/4" x 10" rectangular duct. The Power Supply Cord and plug must be located inside the cabinet directly above the Microwave Oven mounting location as shown in a risk of all transitions and adapters plus the length of electric shock. Neither Electrolux nor the dealer can result... be metal; present additional resistance to -round adapter must be plugged into a wall receptacle that all connections are equivalent to a section of some typical ductwork parts.
Installation Instructions (All Languages)
Page 3
... seals and sealing surfaces, broken or loose door hinges and latches and dents inside the cavity or on the door. E3 Figure 5 Mounting Plate Figure 4 Parts shown not to rest on the ceiling in the oven cavity. Lift carton off oven and remove all packing materials, Installation Instructions, Wall Template, Top...
... seals and sealing surfaces, broken or loose door hinges and latches and dents inside the cavity or on the door. E3 Figure 5 Mounting Plate Figure 4 Parts shown not to rest on the ceiling in the oven cavity. Lift carton off oven and remove all packing materials, Installation Instructions, Wall Template, Top...

Complete Owner's Guide (English)
Page 1
All about the Use &Care of your Microwave Oven 316902449 Rev A (October 2010) TABLE OF CONTENTS WELCOME & CONGRATULATION 2 IMPORTANT SAFETY INSTRUCTIONS 2 PART NAMES 8 BEFORE OPERATING 10 MANUAL COOKING 10 SENSOR COOKING 12 AUTO COOKING 16 CONVENIENT FEATURES 20 CLEANING AND CARE 23 SERVICE CALL CHECK 25 SPECIFICATIONS 25 WARRANTY 26 www.frigidaire.com USA 1-800-944-9044 www.frigidaire.ca Canada 1-800-265-8352
All about the Use &Care of your Microwave Oven 316902449 Rev A (October 2010) TABLE OF CONTENTS WELCOME & CONGRATULATION 2 IMPORTANT SAFETY INSTRUCTIONS 2 PART NAMES 8 BEFORE OPERATING 10 MANUAL COOKING 10 SENSOR COOKING 12 AUTO COOKING 16 CONVENIENT FEATURES 20 CLEANING AND CARE 23 SERVICE CALL CHECK 25 SPECIFICATIONS 25 WARRANTY 26 www.frigidaire.com USA 1-800-944-9044 www.frigidaire.ca Canada 1-800-265-8352

Complete Owner's Guide (English)
Page 5
... with the manufacturer's instructions, may cause interference to the receiver. • Move the microwave oven away from the receiver. • Plug the microwave oven into a different outlet so that the microwave oven and the receiver are designed to correct such interference. 5 Only) This equipment generates and ... if not installed and used properly, that interference will not occur in a residential installation. If this microwave oven. It is not responsible for ISM Equipment pursuant to part 18 of FCC Rules, which can be determined by turning the equipment off and on, the user ...
... with the manufacturer's instructions, may cause interference to the receiver. • Move the microwave oven away from the receiver. • Plug the microwave oven into a different outlet so that the microwave oven and the receiver are designed to correct such interference. 5 Only) This equipment generates and ... if not installed and used properly, that interference will not occur in a residential installation. If this microwave oven. It is not responsible for ISM Equipment pursuant to part 18 of FCC Rules, which can be determined by turning the equipment off and on, the user ...
Complete Owner's Guide (English)
Page 6
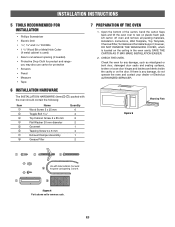
... add time accordingly. Condensation is very hot to 1 or 2 seconds or use the microwave oven without overcooking. • Check for food preparation only. Center bottom of dish is a normal part of potatoes, apples, squash, hot dogs and sausages so that cooking temperatures have food ...in original jars. IMPORTANT SAFETY INSTRUCTIONS ABOUT YOUR MICROWAVE OVEN This Use and Care Manual is a valuable asset. Meat and...
... add time accordingly. Condensation is very hot to 1 or 2 seconds or use the microwave oven without overcooking. • Check for food preparation only. Center bottom of dish is a normal part of potatoes, apples, squash, hot dogs and sausages so that cooking temperatures have food ...in original jars. IMPORTANT SAFETY INSTRUCTIONS ABOUT YOUR MICROWAVE OVEN This Use and Care Manual is a valuable asset. Meat and...

Complete Owner's Guide (English)
Page 8
...turntable support in the motor shaft in the center of microwave oven) 1 Microwave oven door with see-through window 2 Door hinges 3 Waveguide cover: DO NOT REMOVE. 4 Turntable motor shaft 5 Microwave oven light It will light when microwave oven is operating or door is open. 6 Rack ...holders 7 Safety door latches The microwave oven will rotate clockwise or counterclockwise. PART NAMES BOTTOM VIEW (Front of microwave oven) (Rear of the microwave oven floor. Then, place the...
...turntable support in the motor shaft in the center of microwave oven) 1 Microwave oven door with see-through window 2 Door hinges 3 Waveguide cover: DO NOT REMOVE. 4 Turntable motor shaft 5 Microwave oven light It will light when microwave oven is operating or door is open. 6 Rack ...holders 7 Safety door latches The microwave oven will rotate clockwise or counterclockwise. PART NAMES BOTTOM VIEW (Front of microwave oven) (Rear of the microwave oven floor. Then, place the...
Complete Owner's Guide (English)
Page 12
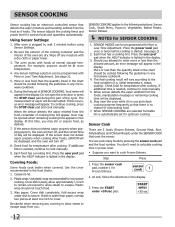
... are dry. Step Press 1. Any Sensor Settings selection can be programmed with a dry cloth or paper towel. 3. During the first part of vapor will be at least one inch to the following the guidelines in the display. Check food for optimum cooking. Each food has...wrap should be cooked following selections: Sensor Cook, Snack Menu, Popcorn, Vegetables, Baked Potato, Sensor Reheat. Be careful when removing any microwave cookbook. 6. NOTES for various foods and quantities automatically. SENSOR MODES can be programmed with foods at normal storage temperature. Press the power...
... are dry. Step Press 1. Any Sensor Settings selection can be programmed with a dry cloth or paper towel. 3. During the first part of vapor will be at least one inch to the following the guidelines in the display. Check food for optimum cooking. Each food has...wrap should be cooked following selections: Sensor Cook, Snack Menu, Popcorn, Vegetables, Baked Potato, Sensor Reheat. Be careful when removing any microwave cookbook. 6. NOTES for various foods and quantities automatically. SENSOR MODES can be programmed with foods at normal storage temperature. Press the power...
Complete Owner's Guide (English)
Page 16
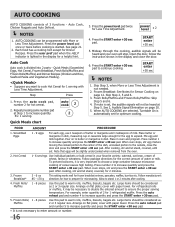
...as Muffins 2 or 3 regular size. Repeat pressing same number pad at Step 5. Skip Step 2, 5 and 6. 3. If mute is divided into 2 parts - Scrambled Eggs 1 - 9 eggs For each egg, use 1 teaspoon of butter or margarine and 1 tablespoon of wheat, farina or wheatena. Place butter or ...moving the cooked portion to the center of cereal causes high boiling. Follow package directions for the egg to choose a large container because microwave cooking of the dish, uncooked portion to the outside, close the door. Allow to increase quantity. cover with paper towel. For example,...
...as Muffins 2 or 3 regular size. Repeat pressing same number pad at Step 5. Skip Step 2, 5 and 6. 3. If mute is divided into 2 parts - Scrambled Eggs 1 - 9 eggs For each egg, use 1 teaspoon of butter or margarine and 1 tablespoon of wheat, farina or wheatena. Place butter or ...moving the cooked portion to the center of cereal causes high boiling. Follow package directions for the egg to choose a large container because microwave cooking of the dish, uncooked portion to the outside, close the door. Allow to increase quantity. cover with paper towel. For example,...
Complete Owner's Guide (English)
Page 23
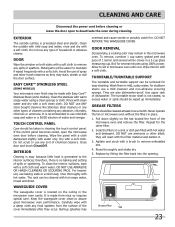
... once a month. for several whole cloves in place. 1. They are also dishwasher-proof. GREASE FILTERS Filters should be taken in the microwave oven cavity. Repeat for easy cleaning. Rinse thoroughly and shake dry. 5. rinse and dry with hot water. DOOR Wipe the window on... both sides with a soft cloth to assure good microwave oven performance. Metal parts will react with mild soap and water; EASY CARE™ STAINLESS STEEL (SOME MODELS) Your microwave oven finish may remain in microwave oven until cool. therefore, there is precoated steel and plastic. ...
... once a month. for several whole cloves in place. 1. They are also dishwasher-proof. GREASE FILTERS Filters should be taken in the microwave oven cavity. Repeat for easy cleaning. Rinse thoroughly and shake dry. 5. rinse and dry with hot water. DOOR Wipe the window on... both sides with a soft cloth to assure good microwave oven performance. Metal parts will react with mild soap and water; EASY CARE™ STAINLESS STEEL (SOME MODELS) Your microwave oven finish may remain in microwave oven until cool. therefore, there is precoated steel and plastic. ...

Complete Owner's Guide (English)
Page 24
...Screw Light bulbs Carefully push the louver back into the tabs. 6. Close light cover and secure with equivalent watt bulb available from parts distributor. Remove old light bulb and replace only with screw removed in step 2. To replace light bulbs, first disconnect power to ...Remove three Hood Louver screws. 3. To release cover, remove the screw on use. 1. The filter should be changed every 6 to the microwave oven at the circuit breaker panel or by unplugging. 2. Bulbs are also available at most hardware stores or lighting centers. Tilt the Hood louver...
...Screw Light bulbs Carefully push the louver back into the tabs. 6. Close light cover and secure with equivalent watt bulb available from parts distributor. Remove old light bulb and replace only with screw removed in step 2. To replace light bulbs, first disconnect power to ...Remove three Hood Louver screws. 3. To release cover, remove the screw on use. 1. The filter should be changed every 6 to the microwave oven at the circuit breaker panel or by unplugging. 2. Bulbs are also available at most hardware stores or lighting centers. Tilt the Hood louver...
Complete Owner's Guide (English)
Page 26
... REPAIR OR REPLACEMENT AS PROVIDED HEREIN. If You Need Service Keep your receipt, delivery slip, or some other than genuine Electrolux parts or parts obtained from its original owner to another party or removed outside the USA or Canada. 3. MAJOR APPLIANCE WARRANTY INFORMATION Your appliance ... or replacing any obligations under this warranty must be required. In the USA, your best interest to the finish of parts other cosmetic parts. 11. Service under this warranty. 5. In Canada, your appliance or to instruct you how to correct the installation of the...
... REPAIR OR REPLACEMENT AS PROVIDED HEREIN. If You Need Service Keep your receipt, delivery slip, or some other than genuine Electrolux parts or parts obtained from its original owner to another party or removed outside the USA or Canada. 3. MAJOR APPLIANCE WARRANTY INFORMATION Your appliance ... or replacing any obligations under this warranty must be required. In the USA, your best interest to the finish of parts other cosmetic parts. 11. Service under this warranty. 5. In Canada, your appliance or to instruct you how to correct the installation of the...


