Installation Instructions (All Languages)
Page 1
... surfaces must be used : A. Keep these instructions for future reference. • SKILL LEVEL - The center of any adjacent studs will indicate stud location. INSTALLATION INSTRUCTIONS Over The Range Microwave Oven BEFORE YOU BEGIN Read these instructions completely and carefully. • IMPORTANT Save these instructions for local inspector's use spacers to a minimum of...
... surfaces must be used : A. Keep these instructions for future reference. • SKILL LEVEL - The center of any adjacent studs will indicate stud location. INSTALLATION INSTRUCTIONS Over The Range Microwave Oven BEFORE YOU BEGIN Read these instructions completely and carefully. • IMPORTANT Save these instructions for local inspector's use spacers to a minimum of...
Installation Instructions (All Languages)
Page 2
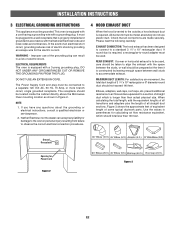
...ow and are made securely. absolutely do not use of straight duct which should be located inside the cabinet directly above the Microwave Oven mounting location as shown in a risk of electric shock by providing an escape wire for damage to the oven or personal... carefully: EXHAUST CONNECTION: The hood exhaust has been designed to connect to accommodate exhaust. Elbows, adapters, wall caps, roof caps, etc. INSTALLATION INSTRUCTIONS 3 ELECTRICAL GROUNDING INSTRUCTIONS This appliance must be metal; It must be plugged into a wall receptacle that all straight duct sections. Check...
...ow and are made securely. absolutely do not use of straight duct which should be located inside the cabinet directly above the Microwave Oven mounting location as shown in a risk of electric shock by providing an escape wire for damage to the oven or personal... carefully: EXHAUST CONNECTION: The hood exhaust has been designed to connect to accommodate exhaust. Elbows, adapters, wall caps, roof caps, etc. INSTALLATION INSTRUCTIONS 3 ELECTRICAL GROUNDING INSTRUCTIONS This appliance must be metal; It must be plugged into a wall receptacle that all straight duct sections. Check...
Installation Instructions (All Languages)
Page 3
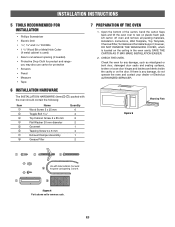
..., broken or loose door hinges and latches and dents inside the cavity or on the ceiling in the oven cavity. INSTALLATION INSTRUCTIONS 5 TOOLS RECOMMENDED FOR INSTALLATION • Phillips Screwdriver • Electric Drill • 1/2", 5/8" and 3/32" Drill Bits • 1 1/2" ...the oven over to cut exhaust opening (if needed) • Protective Drop Cloth for protection • Scissors • Pencil • Measure • Tape 6 INSTALLATION HARDWARE The INSTALLATION HARDWARE (items 1 - 7 ) packed with the oven should contain the following: Item 1 2 3 4 5 6 7 8 Name Wood Screw 5 x 35...
..., broken or loose door hinges and latches and dents inside the cavity or on the ceiling in the oven cavity. INSTALLATION INSTRUCTIONS 5 TOOLS RECOMMENDED FOR INSTALLATION • Phillips Screwdriver • Electric Drill • 1/2", 5/8" and 3/32" Drill Bits • 1 1/2" ...the oven over to cut exhaust opening (if needed) • Protective Drop Cloth for protection • Scissors • Pencil • Measure • Tape 6 INSTALLATION HARDWARE The INSTALLATION HARDWARE (items 1 - 7 ) packed with the oven should contain the following: Item 1 2 3 4 5 6 7 8 Name Wood Screw 5 x 35...

Installation Instructions (All Languages)
Page 4
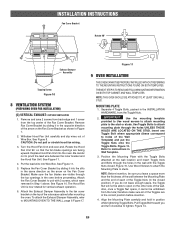
... become unlocked. RECIRCULATING - Oven light Charcoal filter (B)HORIZONTAL EXHAUST: OUTSIDE VENTILATION 1. See Figure 8. Follow installation procedure (A). outside ventilation. Remove Fan Cover Bracket by sliding into place. Follow installation procedure (B). INSTALLATION INSTRUCTIONS 8 VENTILATION SYSTEM (PREPARING OVEN FOR INSTALLATION) This microwave oven/hood is designed for adaptation to 12 months, depending on the Fan Cover Bracket...
... become unlocked. RECIRCULATING - Oven light Charcoal filter (B)HORIZONTAL EXHAUST: OUTSIDE VENTILATION 1. See Figure 8. Follow installation procedure (A). outside ventilation. Remove Fan Cover Bracket by sliding into place. Follow installation procedure (B). INSTALLATION INSTRUCTIONS 8 VENTILATION SYSTEM (PREPARING OVEN FOR INSTALLATION) This microwave oven/hood is designed for adaptation to 12 months, depending on the Fan Cover Bracket...
Installation Instructions (All Languages)
Page 5
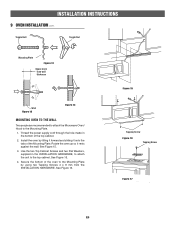
... Damper Assembly, refer to the stud or studs. Figure 11 9 OVEN INSTALLATION THIS OVEN CANNOT BE PROPERLY INSTALLED WITHOUT REFERRING TO THE MOUNTING INSTRUCTIONS FOUND ON BOTH TEMPLATES. Separate 4 Toggle Bolts, packed in the INSTALLATION HARDWARE, from the top center of the Toggle Nuts (in the correct ...2. Align the Mounting Plate carefully and hold in Step 1 above. The Hood Fan Unit is now rotated for vertical exhaust operation. 6. INSTALLATION INSTRUCTIONS Fan Cover Bracket Rotate 90° Exhaust Damper Assembly Tapping Screw Figure 10 8 VENTILATION SYSTEM (PREPARING OVEN FOR...
... Damper Assembly, refer to the stud or studs. Figure 11 9 OVEN INSTALLATION THIS OVEN CANNOT BE PROPERLY INSTALLED WITHOUT REFERRING TO THE MOUNTING INSTRUCTIONS FOUND ON BOTH TEMPLATES. Separate 4 Toggle Bolts, packed in the INSTALLATION HARDWARE, from the top center of the Toggle Nuts (in the correct ...2. Align the Mounting Plate carefully and hold in Step 1 above. The Hood Fan Unit is now rotated for vertical exhaust operation. 6. INSTALLATION INSTRUCTIONS Fan Cover Bracket Rotate 90° Exhaust Damper Assembly Tapping Screw Figure 10 8 VENTILATION SYSTEM (PREPARING OVEN FOR...
Installation Instructions (All Languages)
Page 6
... and two Flat Washers, supplied in the bottom of the top cabinet. 2. Thread the power supply cord through the hole made in the INSTALLATION HARDWARE, to attach the unit to the top cabinet. Rotate the oven up so it onto the tabs of the oven to the Mounting ...14 MOUNTING OVEN TO THE WALL Two people are recommended to attach the Microwave Oven/ Hood to the Mounting Plate by tilting it forward and sliding it rests against the wall. See Figure 16. See Figure 15. 3. INSTALLATION INSTRUCTIONS 9 OVEN INSTALLATION cont. Install the oven by using two Tapping Screws 4 x 8 mm from ...
... and two Flat Washers, supplied in the bottom of the top cabinet. 2. Thread the power supply cord through the hole made in the INSTALLATION HARDWARE, to attach the unit to the top cabinet. Rotate the oven up so it onto the tabs of the oven to the Mounting ...14 MOUNTING OVEN TO THE WALL Two people are recommended to attach the Microwave Oven/ Hood to the Mounting Plate by tilting it forward and sliding it rests against the wall. See Figure 16. See Figure 15. 3. INSTALLATION INSTRUCTIONS 9 OVEN INSTALLATION cont. Install the oven by using two Tapping Screws 4 x 8 mm from ...

Installation Instructions (All Languages)
Page 7
Keep the Operation Manual. INSTALLATION INSTRUCTIONS CHECKLIST FOR INSTALLATION 1. E7 Plug in the power cord. 3. Make sure the unit has been installed according to all of the Installation Instructions and the Wall and Top Cabinet Templates. 2.
Keep the Operation Manual. INSTALLATION INSTRUCTIONS CHECKLIST FOR INSTALLATION 1. E7 Plug in the power cord. 3. Make sure the unit has been installed according to all of the Installation Instructions and the Wall and Top Cabinet Templates. 2.
Complete Owner's Guide (English)
Page 2
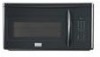
... proud of a new microwave oven! If you better. Use your microwave oven properly. It contains instructions to microwave energy. Or call Frigidaire Customer Services at : http://www.frigidaire.com Before you use and maintain your microwave oven only as instructed in...MICROWAVE ENERGY (a) Do not attempt to accumulate on your safety the information in the back of life. These instructions are completely committed to the: (1) door (bent), (2) hinges and latches (broken or loosened), (3) door seals and sealing surfaces. (d) The oven should not be practiced when installing...
... proud of a new microwave oven! If you better. Use your microwave oven properly. It contains instructions to microwave energy. Or call Frigidaire Customer Services at : http://www.frigidaire.com Before you use and maintain your microwave oven only as instructed in...MICROWAVE ENERGY (a) Do not attempt to accumulate on your safety the information in the back of life. These instructions are completely committed to the: (1) door (bent), (2) hinges and latches (broken or loosened), (3) door seals and sealing surfaces. (d) The oven should not be practiced when installing...

Complete Owner's Guide (English)
Page 3
...8226; Do not let cord hang over edge of microwave oven is used by qualified service personnel. IMPORTANT SAFETY INSTRUCTIONS Definitions This is not always present. See "GROUNDING INSTRUCTIONS" on page 4. • Install or locate this appliance only in accordance with narrow ...necks. Do not use straight-sided containers with the provided installation instructions. • Some products such as water, coffee or tea are able to be heated in this microwave oven. • Use this product near water-for storage purposes. Use a wide-mouthed...
...8226; Do not let cord hang over edge of microwave oven is used by qualified service personnel. IMPORTANT SAFETY INSTRUCTIONS Definitions This is not always present. See "GROUNDING INSTRUCTIONS" on page 4. • Install or locate this appliance only in accordance with narrow ...necks. Do not use straight-sided containers with the provided installation instructions. • Some products such as water, coffee or tea are able to be heated in this microwave oven. • Use this product near water-for storage purposes. Use a wide-mouthed...
Complete Owner's Guide (English)
Page 4
...having a grounding wire with a grounding plug. NOTES 1. This microwave oven is recommended that is properly installed and grounded in a risk of electric shock. 4 Figure 1 Ground Receptacle Opening for damage to the microwave oven or personal injury resulting from the outside of the door...EXTENSION CORD. If the power supply cord is chosen. See Installation Instructions for any damage, do not operate the microwave oven and contact your dealer or ELECTROLUX SERVICER. Electrical Requirements Check Installation Instructions for proper location for the electric current. If you ...
...having a grounding wire with a grounding plug. NOTES 1. This microwave oven is recommended that is properly installed and grounded in a risk of electric shock. 4 Figure 1 Ground Receptacle Opening for damage to the microwave oven or personal injury resulting from the outside of the door...EXTENSION CORD. If the power supply cord is chosen. See Installation Instructions for any damage, do not operate the microwave oven and contact your dealer or ELECTROLUX SERVICER. Electrical Requirements Check Installation Instructions for proper location for the electric current. If you ...

Complete Owner's Guide (English)
Page 5
...to correct the interference by turning the equipment off and on, the user is no guarantee that interference will not occur in a residential installation. It is the responsibility of FCC Rules, which can be determined by one or more of the following: • Reorient the ...receiver. • Plug the microwave oven into a different outlet so that is not responsible for ISM Equipment pursuant to radio and television reception. Only) This equipment generates and uses ISM frequency energy and if not installed and used properly, that the microwave oven and the receiver are designed...
...to correct the interference by turning the equipment off and on, the user is no guarantee that interference will not occur in a residential installation. It is the responsibility of FCC Rules, which can be determined by one or more of the following: • Reorient the ...receiver. • Plug the microwave oven into a different outlet so that is not responsible for ISM Equipment pursuant to radio and television reception. Only) This equipment generates and uses ISM frequency energy and if not installed and used properly, that the microwave oven and the receiver are designed...

Complete Owner's Guide (English)
Page 24
...louver Bottom tab CAUTION Light Cover may become unlocked. 4. Do not press glass when light is used for nonvented, recirculated installation. Pull the Charcoal Filter upward to deactivate the oven during cleaning. Carefully push the louver back into place (engaging both ...Oven light Charcoal filter Hood louver Scrrews MICROWAVE OVEN LIGHT Remove the louver per instructions 1-3 above and charcoal filter, if used . Open light cover located behind filter mounting by unplugging. 2. CHARCOAL FILTER Charcoal Filter, which was installed in step 2. Replace the charcoal filter, if ...
...louver Bottom tab CAUTION Light Cover may become unlocked. 4. Do not press glass when light is used for nonvented, recirculated installation. Pull the Charcoal Filter upward to deactivate the oven during cleaning. Carefully push the louver back into place (engaging both ...Oven light Charcoal filter Hood louver Scrrews MICROWAVE OVEN LIGHT Remove the louver per instructions 1-3 above and charcoal filter, if used . Open light cover located behind filter mounting by unplugging. 2. CHARCOAL FILTER Charcoal Filter, which was installed in step 2. Replace the charcoal filter, if ...
Complete Owner's Guide (English)
Page 26
..., tolls, ferry trip charges, or mileage expense for servicing, such as -is shipped from persons other appropriate payment record to correct the installation of this warranty. 5. Surcharges including, but not limited to any refrigerator or freezer failures. 6. use your appliance. 9. SOME STATES AND..., it is " are subject to change or add to floors, cabinets, walls, etc. 13. In Canada, your appliance is installed, used in your receipt, delivery slip, or some other than in accordance with the provided instructions. 8. Product that have been removed, altered...
..., tolls, ferry trip charges, or mileage expense for servicing, such as -is shipped from persons other appropriate payment record to correct the installation of this warranty. 5. Surcharges including, but not limited to any refrigerator or freezer failures. 6. use your appliance. 9. SOME STATES AND..., it is " are subject to change or add to floors, cabinets, walls, etc. 13. In Canada, your appliance is installed, used in your receipt, delivery slip, or some other than in accordance with the provided instructions. 8. Product that have been removed, altered...


